
The Tree Box Christmas Pattern is a charming holiday crochet project that combines the beauty of a miniature Christmas tree with the practicality of a handmade storage box. Featuring a textured brown base, a removable green Christmas tree lid, delicate white edging, and a golden star, this adorable creation is perfect for decorating your home during the festive season.
One of the most delightful features of this Crochet Christmas Tree Box is its clever two-piece construction. The lower section resembles a cozy wooden cottage with decorative windows, while the upper section forms a beautiful Christmas tree that can be lifted to reveal a small storage compartment. The combination creates a magical woodland-inspired decoration that is both functional and attractive.
The Christmas tree lid features overlapping green branches arranged in several tiers, with white crochet edging that resembles freshly fallen snow. A small golden star completes the top, adding a traditional festive touch. The brown container underneath has raised vertical stitches that give it a rustic, wood-like appearance, making the entire piece look like a tiny Christmas cottage hidden beneath a tree.
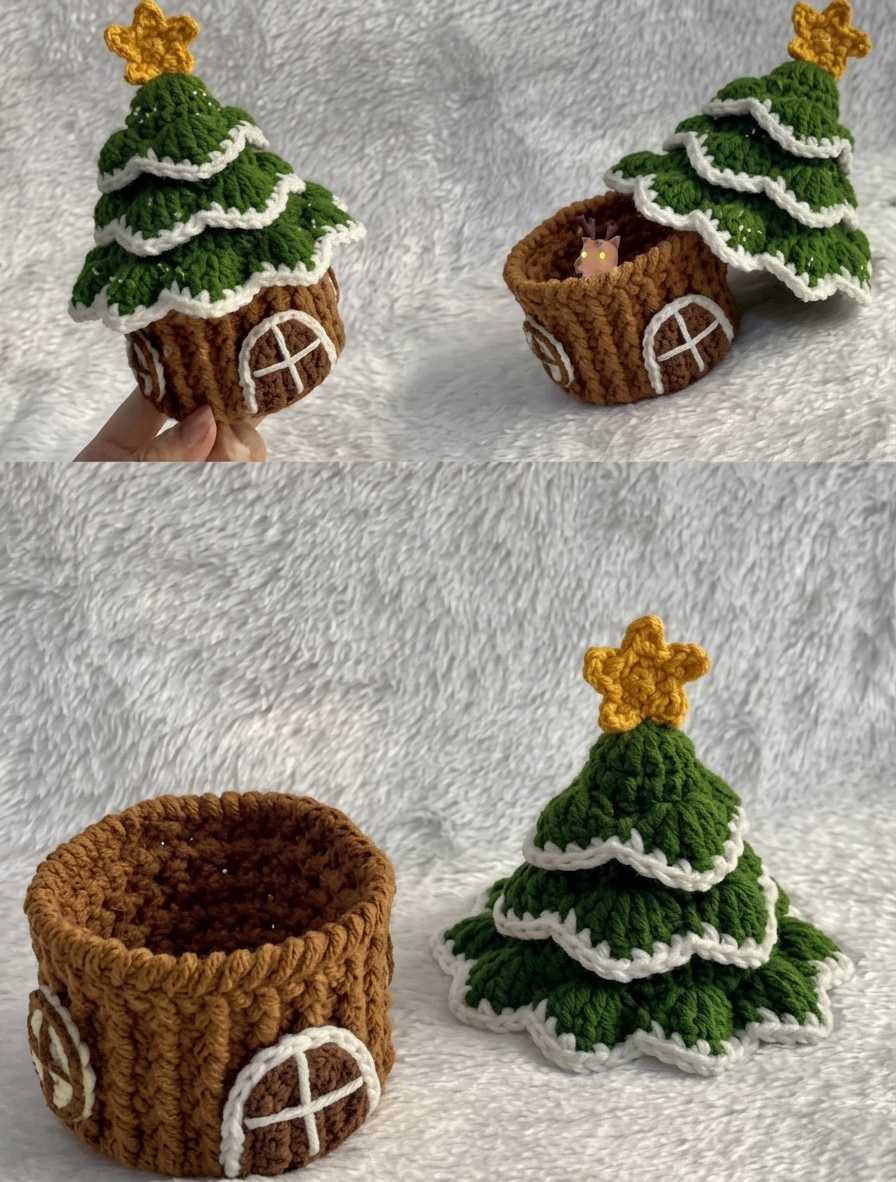
In this complete Tree Box Christmas Crochet Tutorial, you will learn how to create the cylindrical storage base, crochet the layered Christmas tree lid, add decorative snowy borders, make the golden star, and assemble the finished project. The instructions provide an original, simplified interpretation inspired by the reference image, with clear measurements, stitch counts, and helpful tips for creating a beautiful handmade Christmas decoration.
DISCOVER MORE FREE PATTERNS HERE!
Materials, Crochet Stitches, and Measurements for the Tree Box Christmas Pattern
Before beginning your Crochet Christmas Tree Storage Box, choose yarn that provides both softness and structure. Since the lower section functions as a container, it should be firm enough to maintain its cylindrical shape.
Worsted-weight cotton yarn is an excellent choice because it produces defined stitches and creates a sturdy fabric. Cotton-blend yarn also works well, especially when combined with a slightly smaller crochet hook.
For the Christmas tree, choose a rich forest green or pine green. These colors create a traditional holiday appearance and contrast beautifully with the white snowy edging. Warm caramel brown is ideal for the storage base, while golden yellow adds brightness to the star.
Materials needed
- Approximately 100–130 yards (90–120 meters) of brown worsted-weight cotton yarn.
- Approximately 120–160 yards (110–145 meters) of forest green worsted-weight cotton yarn.
- Approximately 25 yards (23 meters) of white cotton yarn.
- Approximately 15 yards (14 meters) of golden yellow yarn.
- A 3.5 mm crochet hook.
- A 4.0 mm crochet hook, optional for the tree branches.
- Yarn needle.
- Scissors.
- Stitch markers.
- Measuring tape.
- Optional lightweight plastic canvas for reinforcing the box.
- Optional small amount of polyester fiberfill for the star.
- Optional removable battery-operated LED decoration.
Use only cool-running battery-operated decorations if adding lighting. Never place candles, open flames, or hot lights inside or near the crocheted box.
Suggested finished measurements
| Component | Approximate Measurement |
|---|---|
| Brown storage box diameter | 4 in (10 cm) |
| Brown storage box height | 3 in (7.5 cm) |
| Christmas tree lid diameter | 6–7 in (15–18 cm) |
| Christmas tree lid height | 4–5 in (10–12.5 cm) |
| Golden star | 1.5 in (4 cm) |
| Complete decoration height | 7–8 in (18–20 cm) |
These dimensions are approximate and depend on your yarn, hook size, and crochet tension.
Crochet abbreviations – US terminology
| Abbreviation | Meaning |
|---|---|
| MR | Magic ring |
| ch | Chain |
| sc | Single crochet |
| hdc | Half double crochet |
| dc | Double crochet |
| tr | Treble crochet |
| sl st | Slip stitch |
| inc | Two single crochets in one stitch |
| dec | Single crochet decrease |
| BLO | Back loop only |
| FLO | Front loop only |
| st | Stitch |
| sp | Space |
| FO | Fasten off |
Special stitches used
Front Post Double Crochet (FPdc): Yarn over, insert the hook from front to back and back to front around the post of the indicated stitch, yarn over and pull up a loop, then complete a double crochet.
Back Post Double Crochet (BPdc): Yarn over, insert the hook from back to front and front to back around the post of the indicated stitch, then complete a double crochet.
Shell Stitch: Work five double crochet stitches into the same stitch or space.
Picot Stitch: Chain 3, then slip stitch into the first chain to create a small decorative point.
Crab Stitch: Work single crochet stitches in the reverse direction for a firm, twisted-looking edge.
Understanding the construction
The Tree Box Christmas Pattern consists of five decorative elements.
The first is the circular bottom of the storage box.
The second is the textured cylindrical wall.
The third is the conical Christmas tree lid.
The fourth is the layered green branches with white snowy borders.
The fifth is the golden star and decorative cottage windows.
Each section is crocheted separately before being assembled into the finished decoration.
Step-by-Step Tree Box Christmas Pattern: Crocheting the Brown Storage Box
The brown storage box forms the foundation of the project. It should be sturdy, evenly shaped, and large enough to hold small lightweight items.
The sample design uses a circular base with a textured cylindrical wall.
Step 1: Create the circular base
Using brown yarn and a 3.5 mm crochet hook, make a magic ring.
Round 1: Work 6 sc into the magic ring. (6)
Round 2: Inc in every stitch. (12)
Round 3: 1 sc, inc repeat 6 times. (18)
Round 4: 2 sc, inc repeat 6 times. (24)
Round 5: 3 sc, inc repeat 6 times. (30)
Round 6: 4 sc, inc repeat 6 times. (36)
Round 7: 5 sc, inc repeat 6 times. (42)
Round 8: 6 sc, inc repeat 6 times. (48)
Round 9: 7 sc, inc repeat 6 times. (54)
Round 10: 8 sc, inc repeat 6 times. (60)
The circular base should measure approximately 4 inches across.
If your circle is smaller, continue increasing by six stitches per round until you reach the desired diameter.
Step 2: Create the box walls
Round 11: Work one sc in BLO of each stitch around. (60)
This creates a defined turning edge between the base and the walls.
Rounds 12–13: Work one sc into each stitch around. (60)
Keep the tension firm and consistent.
The walls should begin rising vertically from the circular base.
Step 3: Create the textured wood-like surface
For the textured walls, alternate front post and back post stitches.
Round 14: Chain 2, then work one dc in each stitch around. Join with a sl st. (60)
Round 15: Chain 2, FPdc around the next stitch, BPdc around the following stitch repeat around. Join with a sl st. (60)
Rounds 16–20: Repeat Round 15, working FPdc around the existing raised posts and BPdc around the recessed posts.
This creates a beautiful ribbed texture that resembles vertical wooden panels.
If the walls begin to flare outward, use a smaller hook or tighter tension.
Step 4: Finish the upper rim
Change back to single crochet.
Round 21: Work one sc into each stitch around. (60)
Round 22: Work one reverse single crochet, or crab stitch, into each stitch around.
Fasten off and weave in the yarn tail.
The reverse single crochet creates a firm decorative rim.
Step 5: Reinforce the box
If the box feels too soft, add a removable circular plastic canvas insert to the bottom.
You can also create a thin cylindrical liner from flexible plastic canvas.
Make sure all edges are smooth and covered.
Do not use sharp or exposed materials.
The reinforcement helps the box maintain its shape when the lid is removed.
Step 6: Add decorative cottage windows
Using white yarn, create two small window outlines.
For each window, chain 16 and join with a slip stitch to form a ring.
Fasten off, leaving a long tail.
Shape the ring into a rounded square or oval.
Sew it onto the outer wall of the brown box.
Use white yarn to embroider one vertical and one horizontal line inside each window.
Repeat on the opposite side.
The finished windows give the storage box the charming appearance of a miniature Christmas cottage.
How to Crochet the Christmas Tree Lid with Layered Green Branches
The removable Christmas tree lid is the most decorative part of the Crochet Christmas Tree Box Pattern.
It features a conical base covered with overlapping branch layers.
For this version, the tree cone is worked from the top downward.
Step 1: Crochet the tree cone
Using forest green yarn and a 3.5 mm hook, make a magic ring.
Round 1: Work 6 sc into the ring. (6)
Round 2: Work one sc in each stitch around. (6)
Round 3: Inc in every stitch. (12)
Round 4: Work one sc in each stitch around. (12)
Round 5: 1 sc, inc repeat 6 times. (18)
Round 6: Work one sc in each stitch around. (18)
Round 7: 2 sc, inc repeat 6 times. (24)
Round 8: Work one sc in each stitch around. (24)
Round 9: 3 sc, inc repeat 6 times. (30)
Round 10: Work one sc in each stitch around. (30)
Round 11: 4 sc, inc repeat 6 times. (36)
Round 12: Work one sc in each stitch around. (36)
Round 13: 5 sc, inc repeat 6 times. (42)
Round 14: Work one sc in each stitch around. (42)
Round 15: 6 sc, inc repeat 6 times. (48)
Round 16: Work one sc in each stitch around. (48)
Round 17: 7 sc, inc repeat 6 times. (54)
Round 18: Work one sc in each stitch around. (54)
Round 19: 8 sc, inc repeat 6 times. (60)
Round 20: Work one sc in each stitch around. (60)
The cone should now have a gently tapered Christmas tree shape.
Step 2: Create the first branch layer
Using green yarn, join the yarn around the cone near Round 7.
Work a decorative shell pattern around the circumference.
For a simple branch layer, repeat:
Skip two stitches, work five dc into the next stitch, skip two stitches, work one sc into the next stitch.
Continue around the selected round.
If the stitch count does not divide evenly into the shell repeat, adjust the spacing slightly near the end.
Fasten off.
The shells should extend outward from the cone.
Step 3: Create the second branch layer
Join green yarn near Round 12.
Work the same shell pattern around the cone.
This layer should be wider than the first because the cone has a larger circumference.
Keep the shell stitches loose enough to create soft overlapping branches.
Fasten off and weave in the yarn tail.
Step 4: Create the third branch layer
Join green yarn near Round 17.
Repeat the shell pattern.
This lower layer should form the widest section of the tree.
For a fuller appearance, use seven double crochet stitches instead of five in each shell.
The branches should extend outward beyond the cone.
This creates the beautiful layered Christmas tree silhouette.
Step 5: Add the snowy white edging
Using white yarn, attach the yarn to the edge of the upper branch layer.
Work one sc into each stitch along the shell edges.
At the center of each shell, you may work a small picot to create a snowy point.
Continue around the layer.
Fasten off.
Repeat for the middle and lower branch layers.
The white edging creates the appearance of snow resting on the green branches.
Step 6: Create the lid’s inner support
The tree lid needs a stable lower edge so it can rest on the brown storage box.
Using green yarn, crochet a circular support disk with the same stitch progression as the brown box base until it reaches approximately the same diameter as the box opening.
Place the disk inside the lower portion of the tree cone.
Sew it around the inner circumference, leaving the decorative branches free.
The support disk should rest over the box opening without being forced inside.
Test the fit before completing the stitching.
The finished tree should lift off easily while remaining stable when placed on top of the box.
Golden Star, Decorative Finishing, Color Ideas, and Creative Christmas Variations
The golden star completes the Tree Box Christmas Pattern and gives the handmade decoration its festive appearance.
You can make the star flat or slightly padded.
For a miniature tree, a simple five-point crochet star works beautifully.
Step 1: Crochet the golden star
Using golden yellow yarn, make a magic ring.
Round 1: Work 10 sc into the ring. Join with a sl st. (10)
For each star point, work the following sequence:
Chain 4.
Starting in the second chain from the hook, work one sl st, one sc, and one hdc.
Skip one stitch on the center ring.
Slip stitch into the next stitch.
Repeat until you have five points.
Fasten off, leaving a long tail.
Gently shape the points with your fingers.
Step 2: Attach the star
Position the golden star at the top of the Christmas tree.
Use the long yarn tail to sew it securely to the cone.
Pass the needle through several stitches.
Make sure the star stands upright.
For additional stability, crochet two identical stars and sew them together around the edges.
You may add a tiny amount of fiberfill before closing them.
Step 3: Add decorative snow details
Use white yarn to embroider small snowflakes or scattered stitches along the green branches.
Keep the decorations subtle.
You can also add a few tiny gold stitches to resemble Christmas lights.
Avoid using loose beads if the decoration may be handled by young children.
Secure every decorative element carefully.
Step 4: Add a festive color variation
The traditional green, white, and gold combination is beautiful, but the project can be customized in many ways.
For a vintage Christmas appearance, use deep forest green, antique gold, and warm cream.
For a modern design, choose emerald green, bright white, and metallic gold-colored yarn.
For a delicate winter decoration, use icy blue, white, and silver.
For a playful holiday version, combine red, green, and white.
Step 5: Create a larger Christmas tree box
To make a larger version, use thicker yarn and a larger crochet hook.
You can also increase the number of rounds in the brown box and tree cone.
Maintain the same general shaping method.
Add more branch layers as the tree becomes taller.
Remember to increase the diameter of the inner support disk to match the larger box opening.
Step 6: Finish and display the decoration
Weave in all remaining yarn ends.
Inspect the brown box, tree lid, star, and decorative windows.
Check that the lid fits comfortably over the box.
Gently shape the branch layers.
Place the decoration on a shelf, mantel, or holiday table.
Use the storage compartment for lightweight items such as wrapped candies, small notes, or tiny gifts.
If storing food, keep it inside its original packaging or a suitable food-safe container.
Beautiful Color Combinations for the Tree Box Christmas Pattern
Forest Green, Snow White, and Gold: A timeless Christmas palette that highlights the layered tree branches and festive star.
Emerald Green and Metallic Gold: A luxurious combination that creates a bright and elegant holiday decoration.
Red, Green, and Cream: A traditional festive palette with a cheerful handmade appearance.
Sage Green, Ivory, and Champagne: A sophisticated vintage-inspired combination for rustic Christmas décor.
Icy Blue, White, and Silver: A delicate winter palette inspired by snowy landscapes.
Burgundy, Antique Gold, and Pine Green: A rich, elegant combination that creates a classic holiday atmosphere.
Helpful Tips for a Perfect Crochet Christmas Tree Box
Use firm stitches for the base. A sturdy container helps the finished decoration maintain its shape.
Keep the tree branches flexible. Slightly looser stitches allow the shell layers to drape naturally.
Measure the lid carefully. The tree should rest comfortably over the box without becoming too tight.
Use contrasting edging. White borders help emphasize the layered Christmas tree shape.
Reinforce the star attachment. Secure stitching keeps the topper upright.
Avoid heavy contents. The box is designed for small, lightweight items rather than heavy storage.
Frequently Asked Questions About the Tree Box Christmas Pattern
1. Is the Tree Box Christmas Pattern suitable for beginners?
This project is best suited for confident beginners or intermediate crocheters who understand basic stitches, increases, textured stitches, and simple assembly.
2. What yarn is best for this crochet Christmas box?
Worsted-weight cotton yarn is an excellent choice because it provides structure and clear stitch definition.
3. What crochet hook should I use?
A 3.5 mm hook is recommended for the box and cone. A 4.0 mm hook may be used for softer, fuller branches.
4. How large is the finished decoration?
The completed Christmas tree box measures approximately 7–8 inches tall, depending on yarn and tension.
5. Can I make the box larger?
Yes. Increase the circular base and tree cone proportionally, and add additional branch layers.
6. Can I use acrylic yarn?
Yes. Acrylic yarn can be used, although cotton generally provides better structure for the storage container.
7. How do I make the box stand upright?
Use firm crochet tension and add a removable plastic canvas insert if additional support is needed.
8. Can I make the Christmas tree removable?
Yes. The pattern is designed with a separate tree lid that lifts off the brown storage box.
9. Can I add Christmas lights?
You may use a suitable cool-running battery-operated LED decoration, but avoid heat-producing lights and keep electrical components safely separated from the yarn.
10. Can I use the box for candy?
Yes, provided the candy remains individually wrapped or is placed inside a food-safe container.
11. Can I make the star in another color?
Absolutely. White, silver, red, or champagne-colored yarn can create beautiful alternatives.
12. How do I prevent the tree branches from curling?
Maintain even tension and gently block the branch layers according to the yarn manufacturer’s instructions.
13. Can I add more snowy layers?
Yes. Add additional shell rounds and finish each one with white edging.
14. How should I clean the finished Christmas box?
Gently spot-clean or handwash according to the yarn manufacturer’s instructions. Remove any plastic inserts before washing and allow the crochet pieces to dry completely.
15. Can I sell handmade Christmas tree boxes?
Handmade decorations created from your own work can generally be sold, subject to applicable pattern rights, product safety requirements, and local regulations.
Conclusion
The Tree Box Christmas Pattern is a delightful crochet project that combines festive decoration with practical handmade storage. Its textured brown cottage base, removable green Christmas tree lid, delicate snowy borders, and golden star create a charming holiday accessory.
One of the most appealing aspects of this design is its versatility. You can customize the colors, size, branch layers, and decorative details to create a Christmas decoration that matches your personal style.
The project also provides an enjoyable opportunity to practice circular crochet, textured stitches, shell patterns, decorative edging, and simple assembly techniques.
For crocheters who enjoy making meaningful handmade gifts, this Crochet Christmas Tree Storage Box is a thoughtful choice. It can be filled with small wrapped treats, handwritten messages, or tiny surprises for family and friends.
Whether you choose traditional forest green and gold or experiment with elegant winter colors, the finished decoration can become a beautiful addition to your holiday collection.
With patience, careful measurements, and attention to the finishing details, your Handmade Christmas Tree Box can become a treasured festive accessory that brings warmth, creativity, and Christmas charm to your home year after year.