
Air Fryer Cover Pattern is a practical sewing and quilting project designed to protect a countertop air fryer while adding a handmade decorative touch to the kitchen. Inspired by the floral and sage-green cover shown in the reference image, this project combines quilting cotton, optional batting, decorative trim, bias binding, and carefully shaped panels to create a fitted cover that looks polished from every angle.
One of the biggest advantages of making your own quilted air fryer cover is customization. Air fryers come in many different shapes and sizes, so a handmade cover can be adjusted to fit your particular appliance. The reference design is intended for a medium-to-large air fryer and uses an approximate overall circumference of 92 cm (36.22 in) and side height of about 31 cm (12.20 in). These dimensions should always be checked against your appliance before cutting expensive fabric.
The combination of cream floral fabric, lavender details, sage-green polka dots, and delicate trim gives this Air Fryer Cover Pattern a cottage-inspired appearance. However, the same construction method works beautifully with modern geometric prints, farmhouse checks, patchwork scraps, solid quilting cotton, or seasonal fabrics. Most importantly, the cover should only be placed over an air fryer that is completely switched off, unplugged, and fully cool.
Materials, Measurements, and Preparing the Air Fryer Cover Pattern
For this Air Fryer Cover Pattern, choose a good-quality quilting cotton for the exterior. Approximately 1 to 1½ yards (0.9–1.4 m) of main fabric should be sufficient for many medium-sized appliances, depending on fabric width, print direction, and whether you plan to match patterns.
DISCOVER MORE FREE PATTERNS HERE!
You will also need approximately the same amount of lining fabric if you want the inside fully finished. Lightweight cotton batting or fusible fleece can be added between the exterior and lining to give the cover a softly structured, quilted appearance.
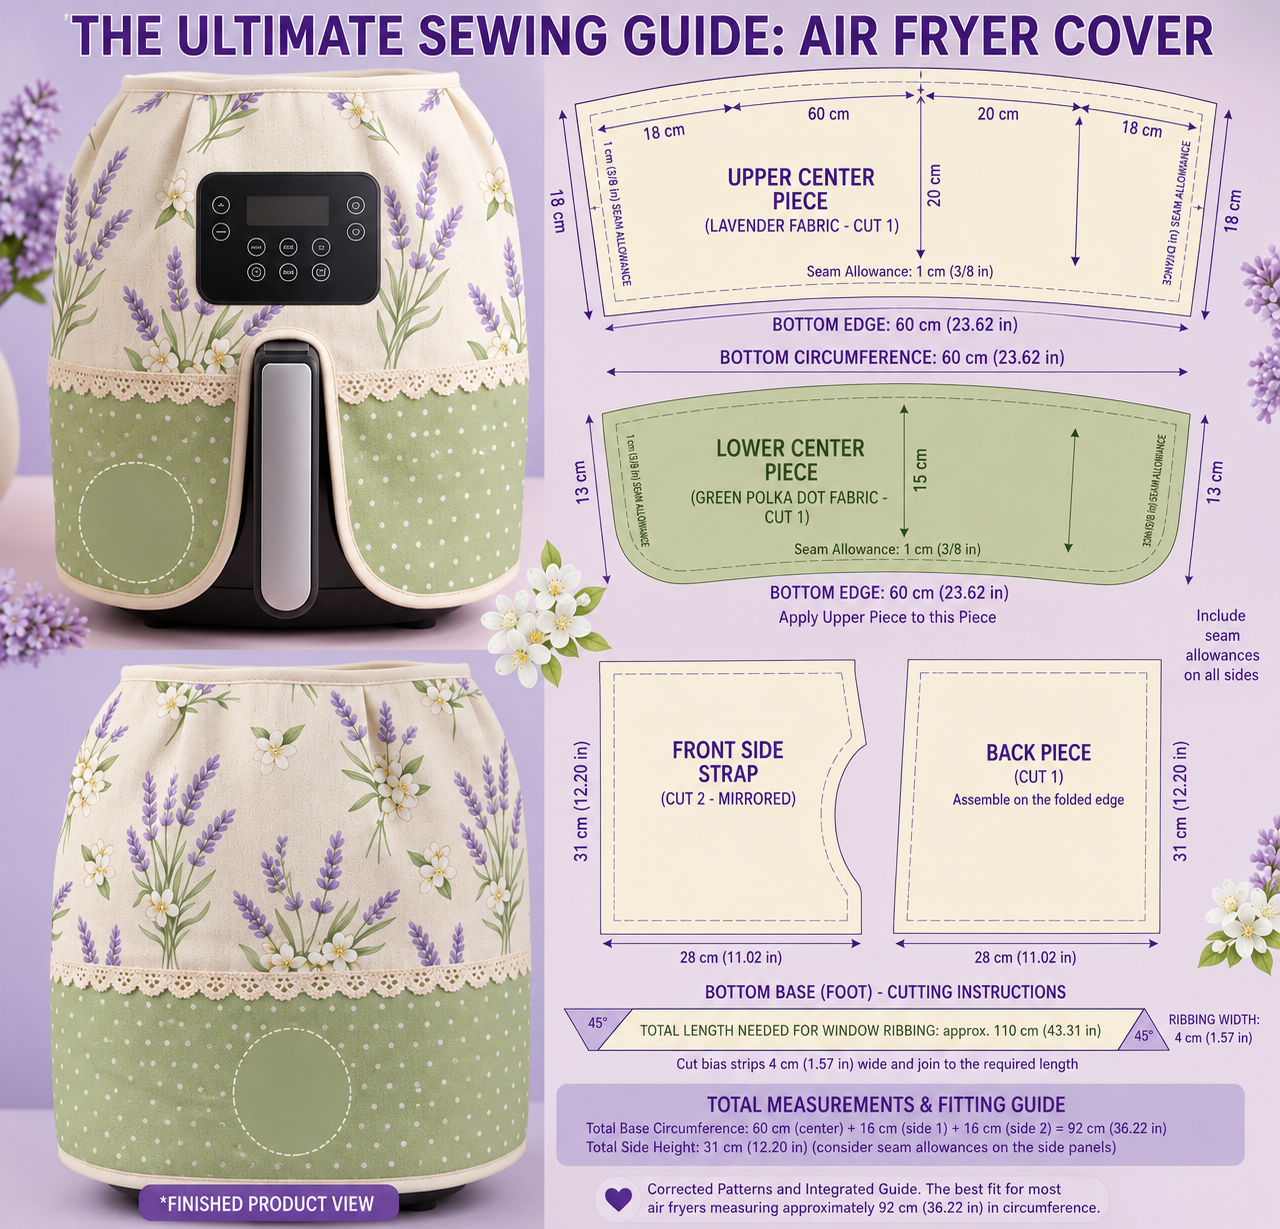
The reference project uses a finished side height of approximately 31 cm (12.20 in). The illustrated fitting guide suggests a total circumference of approximately 92 cm (36.22 in). Because appliance dimensions vary considerably, measure your own air fryer at its widest and tallest points before drafting the pattern.
The illustrated upper section is approximately 20 cm (7.87 in) high at the center, while the lower contrasting section is approximately 13–15 cm (5.12–5.91 in) high depending on shaping. A 1 cm (3/8 in) seam allowance is suitable for most construction seams.
Additional supplies include coordinating polyester thread, fabric scissors or rotary cutter, cutting mat, ruler, pins or sewing clips, washable fabric marker, iron, sewing machine, and approximately 110 cm (43.31 in) of prepared bias binding if you are creating a similarly shaped front opening.
Before cutting anything, make a quick paper or inexpensive muslin test pattern. Place it loosely around the unplugged, completely cold appliance. Allow enough ease for the cover to slide on and off without pulling against the control panel or handle.
Cutting, Quilting, and Assembling the Main Fabric Panels
Begin by measuring the height, width, depth, and circumference of your air fryer. Record the measurements carefully. Add approximately 1–2 cm (3/8–3/4 in) of wearing ease where appropriate, plus your chosen seam allowances.
The reference design divides the body visually into two sections. The upper section uses a cream floral fabric with lavender flowers, while the lower portion uses sage-green polka-dot fabric. This is an excellent way to combine two coordinating quilting fabrics.
Cut the upper and lower panels according to your customized measurements. Sew the contrasting sections together with right sides facing, using a 1 cm (3/8 in) seam allowance. Press the seam toward the darker fabric.
Decorative lace can be added over this horizontal seam. Position the lace evenly, pin or clip it into place, and stitch close to the upper and lower edges. Rickrack, piping, decorative ribbon, or narrow patchwork strips are attractive alternatives.
If you want a true quilted air fryer cover, layer each exterior panel with cotton batting and lining or backing fabric. Quilt the layers using straight lines, diamonds, crosshatching, or gentle free-motion quilting. Keep the quilting relatively light so the panels remain flexible enough to follow the appliance shape.
After quilting, trim each section back to its original pattern dimensions. Quilting can cause slight shrinkage or distortion, so trimming after stitching helps keep the final assembly accurate and symmetrical.
Sewing the Front Opening, Back, and Shaped Air Fryer Cover
The distinctive feature of the reference Air Fryer Cover Pattern is the front opening surrounding the appliance handle. Instead of forcing the cover over the protruding handle, the fabric curves around it.
Draft two mirrored front-side sections approximately 31 cm (12.20 in) high × 28 cm (11.02 in) wide as a starting reference. The inner edge should curve smoothly around the handle area. Your actual dimensions should be based on your own appliance.
Test the paper pieces against the air fryer before cutting fabric. Make certain that the opening does not press buttons, switches, vents, or the handle. Remember that the cover is intended strictly for storage between uses.
Finish the curved front opening with bias binding. The reference suggests cutting bias strips approximately 4 cm (1.57 in) wide and joining them diagonally until you have approximately 110 cm (43.31 in) of continuous binding.
For the back panel, draft a piece that follows the back profile of the appliance. The illustrated reference uses approximately 31 cm × 28 cm (12.20 × 11.02 in) as a starting proportion. Again, customize this measurement because air fryer dimensions differ substantially between manufacturers.
Join the front, side, and back sections gradually. Pin or clip generously, especially around curves. Sew using the established 1 cm (3/8 in) seam allowance, then inspect the cover on the completely cool appliance before completing the final finishing.
Finishing the Quilted Air Fryer Cover for a Professional Result
Once the major sections are assembled, trim bulky seam allowances where necessary. Curved seams can be carefully clipped or notched so they relax naturally when turned right side out.
If your cover is lined, keep the interior clean by enclosing raw seams wherever practical. Another option is to finish exposed seam allowances with bias tape or an overlock/serger stitch.
The bottom edge can be finished with coordinating bias binding. Begin somewhere inconspicuous near the back, stitch around the entire lower circumference, join the ends neatly, and press carefully.
Topstitching can dramatically improve the finished appearance. A line of stitching approximately 1/8 in (3 mm) from selected seams helps keep the layers flat and gives the project the polished appearance associated with professionally made appliance covers.
Try the finished cover over the unplugged and completely cold appliance. It should slide into position without significant stretching. The front opening should sit comfortably around the handle while the remaining panels cover the body.
Never put the fabric cover over an operating, plugged-in, or warm air fryer. Air fryers produce substantial heat and require ventilation. Allow the appliance to cool fully according to its manufacturer’s instructions before covering it.
FAQ About the Air Fryer Cover Pattern
What is an Air Fryer Cover Pattern?
An Air Fryer Cover Pattern is a sewing template used to create a removable fabric cover for an air fryer when the appliance is not being used.
What size is the cover in the reference design?
The illustrated project indicates an approximate overall circumference of 92 cm (36.22 in) and a side height of approximately 31 cm (12.20 in).
Will this pattern fit every air fryer?
No. Air fryers vary considerably in shape and size. The measurements should therefore be treated as a starting reference and customized to your appliance.
What is the best fabric for an air fryer cover?
100% quilting cotton is an excellent choice because it is stable, easy to cut, easy to quilt, and available in countless prints.
Should I use batting?
Batting is optional. Thin cotton batting gives the cover more structure and creates the traditional quilted appearance.
Can I use fusible fleece?
Yes. Lightweight fusible fleece can work well when you want structure without extensive quilting.
What seam allowance should I use?
The reference design uses approximately 1 cm (3/8 in).
How wide should the bias strips be?
Approximately 4 cm (1.57 in) is a useful width for creating binding similar to the reference design.
Why does the cover have an opening in front?
The opening accommodates the projecting air fryer handle and helps the fabric fall naturally around the appliance.
Can I make the project from fabric scraps?
Yes. A patchwork air fryer cover is an excellent scrap-friendly quilting project. Construct larger patchwork panels first and then cut the required pattern pieces.
Can I add pockets?
You can add lightweight decorative or storage pockets, although avoid making the cover excessively bulky.
Can I wash the finished cover?
Usually yes when made entirely from washable cotton materials. Prewashing fabric before construction can reduce unexpected shrinkage.
Should I prewash quilting cotton?
Prewashing is optional but useful for a washable kitchen project, particularly when combining fabrics with different shrinkage rates.
Can I use polyester batting?
It can be used for a storage cover, but remember that this project must never be treated as heat protection. The appliance should always be fully cool before being covered.
Can the cover remain on while the air fryer is running?
No. Remove the cover completely before plugging in or operating the air fryer. Do not allow fabric to obstruct the appliance’s vents.
How long should I wait before covering the air fryer?
Follow the cooling and safety instructions supplied by your air fryer’s manufacturer. The exterior and surrounding ventilation areas should be completely cool before the fabric cover is replaced.
How can I make the cover look more professional?
Accurate measurements, consistent seam allowances, careful pressing, neat bias binding, symmetrical quilting, and well-aligned decorative trim make the biggest difference.
Conclusion
The Air Fryer Cover Pattern is an attractive way to combine practical sewing with quilting and kitchen décor. The reference design uses approximately 31 cm (12.20 in) of side height, a fitting circumference around 92 cm (36.22 in), contrasting upper and lower fabrics, decorative lace, and a shaped opening that accommodates the front handle.
The most important part of making a successful quilted air fryer cover is measuring the actual appliance rather than relying entirely on standardized dimensions. Width, depth, handle position, top curvature, and overall height can differ significantly between models. Creating an inexpensive paper or muslin test version before cutting your final quilting fabric can prevent costly mistakes.
Once the basic pattern is fitted, the decorative possibilities are almost unlimited. Lavender florals and sage green create a soft cottage-inspired cover like the reference image, while patchwork blocks, farmhouse checks, modern prints, seasonal fabrics, or coordinated kitchen colors can completely transform the project.
With careful measuring, neat quilting, smooth curved seams, decorative binding, and professional pressing, this Air Fryer Cover Pattern can become a beautiful handmade addition to the kitchen. Just remember its purpose: it is a decorative dust cover for a switched-off, unplugged, completely cooled appliance, and it should always be removed before the air fryer is used.