
Baby Mary Jane Shoe Sewing Pattern is a charming fabric-sewing project for creating soft, decorative baby shoes with the classic rounded Mary Jane silhouette, an instep strap, a comfortable fabric lining, and an optional bow on the toe. Inspired by the red polka-dot shoes in the reference image, this project combines straightforward pattern pieces with careful curved sewing to produce a polished handmade result. The finished shoes can be made from quilting cotton, lightweight canvas, linen blends, or other soft woven fabrics, allowing you to create everything from traditional floral Mary Janes to colorful patchwork versions.
The beauty of a fabric baby shoe pattern is that a relatively small amount of material can become a beautifully detailed sewing project. The reference design uses bright red fabric with tiny white dots, matching red binding, decorative bows, and pearl-style strap details. However, the same construction can look completely different in gingham, florals, denim, pastel cotton, or coordinated fabric scraps. Because the pieces are small, this is also an excellent project for using high-quality remnants left from quilts, dresses, bags, and other sewing projects.
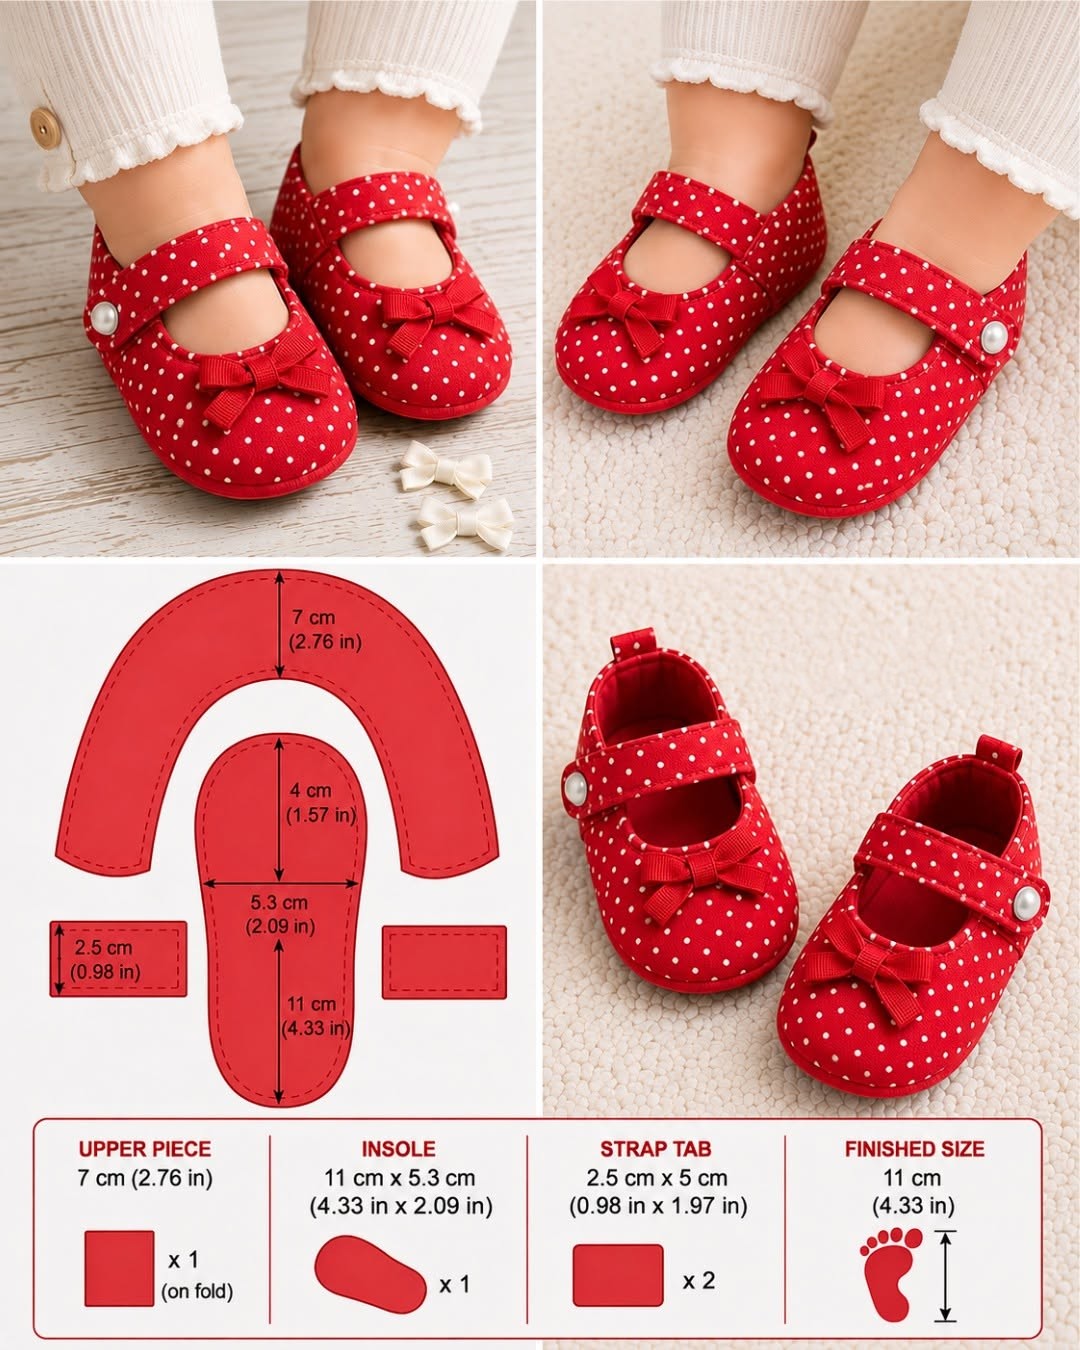
This tutorial follows the approximate dimensions displayed in the reference. The illustrated finished sole length is about 11 cm (4.33 in), with an insole approximately 11 × 5.3 cm (4.33 × 2.09 in). The upper section is shown at approximately 7 cm (2.76 in) deep, while the strap tabs measure about 5 × 2.5 cm (1.97 × 0.98 in). These measurements are best treated as a starting point: always compare the completed pattern with the baby’s actual foot measurements and allow comfortable room. Handmade soft shoes should never restrict circulation or be relied upon as protective walking footwear.
Materials, Measurements, and Preparing the Baby Mary Jane Pattern
Start your Baby Mary Jane Shoe Sewing Pattern with a soft but stable woven fabric. Quilting cotton is especially beginner-friendly because it cuts accurately and is available in countless prints. For the red polka-dot appearance in the photograph, choose a medium red cotton with a small white print and coordinate it with solid red lining or binding.
DISCOVER MORE FREE PATTERNS HERE!
You will need approximately 1/4 yard (23 cm) of exterior fabric and the same amount of lining fabric. Small projects like this rarely require much yardage, but having extra fabric makes pattern placement and recutting easier. Lightweight fusible interfacing can also be used to give the upper a little more structure.
For the sole, consider adding a layer of soft batting, felt, or flexible interfacing between the exterior and lining. Keep this layer relatively thin. The goal is to create a soft fabric shoe rather than a rigid sole.
The illustrated insole pattern measures approximately 11 cm long × 5.3 cm wide (4.33 × 2.09 in). The image also shows the front curved portion at approximately 4 cm (1.57 in) in the indicated area. Draw the sole carefully on paper and create separate left and right pieces by flipping the template.
The curved upper piece wraps around the front and sides of the shoe. The reference indicates approximately 7 cm (2.76 in) from the upper outer curve to the inner opening at its deepest point. Because this piece must match the sole perimeter, create a paper test version and check the lengths before cutting your final fabric.
Finally, prepare the strap components. The reference shows approximately 5 × 2.5 cm (1.97 × 0.98 in) for the small strap-tab pieces. For an actual functional strap crossing the foot, its finished length must be customized to the shoe and intended fit. Mark all centers, seam allowances, strap positions, and opening points before beginning construction.
Cutting and Sewing the Upper, Lining, Sole, and Strap
Press your fabric before cutting. Place the Baby Mary Jane pattern pieces on the fabric according to the grainline and trace them with a removable fabric marker. Cut mirrored pieces for the left and right shoes so you do not accidentally create two identical sides.
For each shoe, prepare an exterior upper and matching lining. If using interfacing, fuse it to the wrong side of the exterior fabric according to the manufacturer’s instructions. Keep interfacing away from unnecessarily bulky seam intersections.
Place the exterior upper and lining right sides together around the inner opening. Pin carefully, particularly around the front curve. Sew using approximately a 1/4-inch (6 mm) seam allowance, unless your drafted pattern already includes another allowance.
Clip the seam allowance around the curves without cutting through the stitching. Turn the upper right side out and gently roll the seam between your fingers. Press carefully, then topstitch close to the opening for a crisp, professional appearance.
Construct the Mary Jane strap by folding the fabric right sides together and sewing along the long edge. Turn it right side out, press, and topstitch. Alternatively, cut exterior and lining strap pieces, sew them together, turn, and press. The strap should be strong enough for repeated fastening without becoming bulky.
Before attaching the sole, baste the strap into its designated position. Temporarily fold the shoe into its finished shape and check that the strap crosses comfortably over the opening. This test is important because a strap that is too short can make the shoe restrictive, while an excessively long strap will not hold the shape correctly.
Assembling the Baby Shoe and Creating the Rounded Mary Jane Shape
Mark the center front and center back of both the sole and upper. These reference points make the curved assembly considerably easier. Align the upper with the sole right sides together, matching the center markings first.
Continue pinning or clipping from the center front toward both sides. Do not stretch the fabric aggressively to force the pieces together. Instead, distribute the upper evenly around the sole. Small clips can be particularly convenient when working with multiple fabric layers.
Sew slowly around the sole using your established seam allowance. Curved baby-shoe seams require patience. Stop occasionally with the needle down, lift the presser foot, reposition the fabric, and continue. This creates a smoother curve than trying to push the entire piece through continuously.
After sewing, inspect the seam before trimming anything. Check for accidental pleats and make sure all layers were caught by the stitching. If necessary, correct small areas now. Then trim excessive bulk and clip the curved seam allowance where appropriate.
Turn the fabric Mary Jane shoe right side out. Use your fingers or a blunt turning tool to shape the toe gently. Never push sharply against the fabric because this can damage the seam. The toe should gradually develop the soft rounded appearance visible in the reference.
Repeat exactly the same process for the second shoe, remembering that the strap orientation must be mirrored. Place the completed shoes side by side and compare their height, toe shape, opening size, and strap position. Small corrections can dramatically improve the appearance of the finished pair.
Adding the Bow, Fastener, Topstitching, and Professional Finishing
The small bow on the front gives the Baby Mary Jane Shoe Sewing Pattern its classic decorative appearance. Cut a small rectangle of fabric or grosgrain ribbon, form it into a bow, and secure the center firmly with thread. Keep the bow proportional to the toe rather than making it excessively large.
Sew the bow securely to the front upper by hand, catching several layers of fabric without stitching through areas where the seam would cause discomfort. For a clean look, use matching thread and hide the knots between the fabric layers whenever possible.
For the strap closure, a sewn-on snap or securely stitched hook-and-loop fastening is generally more practical than a decorative loose component. The pearl-like detail shown in the reference can be recreated aesthetically with embroidery or another flat decorative technique if desired.
Topstitching is one of the simplest ways to make handmade shoes appear more polished. Sew approximately 1/8 inch (3 mm) from selected finished edges, maintaining the same distance throughout. Coordinating thread produces a subtle appearance, while contrasting thread can emphasize the construction.
Inspect the inside carefully. Trim loose threads, check that seam allowances are smooth, and make sure there are no rough or bulky components where the foot would rest. The lining should feel comfortable and the opening should remain flexible.
Because babies grow quickly, check the fit frequently. The shoe should never squeeze the toes or leave pressure marks. These soft fabric baby shoes are primarily decorative and suitable for appropriate supervised use; they are not a substitute for structured footwear when protective shoes are required.
FAQ About the Baby Mary Jane Shoe Sewing Pattern
Is the Baby Mary Jane Shoe Sewing Pattern suitable for beginners?
Yes, although the curved sole requires careful sewing. A beginner who already understands basic straight stitching, curves, clipping seam allowances, and turning fabric should be able to complete the project.
What fabric is best for baby Mary Jane shoes?
Quilting cotton, lightweight canvas, linen blends, and other soft woven fabrics work well. Avoid extremely thick materials for your first pair.
What is the approximate finished length shown in the reference?
The illustrated finished size is approximately 11 cm (4.33 in) long.
What size is the illustrated insole?
Approximately 11 × 5.3 cm (4.33 × 2.09 in).
What is the upper measurement shown in the image?
The illustrated upper indicates approximately 7 cm (2.76 in) from the outer curved edge to the inner opening in the marked area.
What size are the strap tabs?
The reference shows pieces approximately 5 × 2.5 cm (1.97 × 0.98 in).
Does the pattern need seam allowance?
That depends on how you draft your templates. If you copy the finished dimensions, add your seam allowance separately. Approximately 1/4 inch (6 mm) is convenient for small fabric shoes.
Should I add interfacing?
Lightweight interfacing can help maintain the shoe shape, but avoid heavy interfacing that makes the upper rigid.
Can I add batting to the sole?
Yes. A thin layer of batting or felt can create additional softness and structure.
How do I make a left and right shoe?
Cut mirrored pattern pieces. Flip the sole and relevant upper components when cutting the second shoe.
Why is marking the center front important?
The center marks help distribute the curved upper evenly around the sole and reduce the chance of ending with a twisted or uneven shoe.
How do I prevent puckers around the sole?
Use plenty of clips or pins, distribute the fabric gradually, and sew slowly. Avoid stretching either piece excessively.
Can I make the shoes from fabric scraps?
Yes. The small pattern pieces make this an excellent fabric scrap sewing project.
Can I use patchwork fabric?
Certainly. Create the patchwork panel first, press the seams carefully, and then cut the shoe pieces from the completed panel.
Can I make a floral version?
Yes. Small floral prints are particularly suitable because the pattern remains visible on the tiny shoe pieces.
Can the bow be removed?
Absolutely. The bow is decorative. You can leave the toe plain or replace it with embroidery, a fabric flower, or another securely attached flat detail.
What closure can I use for the strap?
A securely sewn snap or hook-and-loop closure works well. Choose a closure appropriate for the intended use and make sure it cannot easily detach.
Can I enlarge the pattern?
Yes, but the baby’s actual foot should determine the dimensions rather than simply enlarging the template by an arbitrary percentage.
How much extra room should the shoe have?
The toes should have comfortable movement without the shoe slipping excessively. Since sizing varies greatly among babies, test your paper or fabric prototype against actual measurements before finishing the pair.
Are handmade fabric shoes suitable for walking outdoors?
Soft fabric shoes generally do not provide the traction, durability, or protection of purpose-made outdoor footwear. Treat this design primarily as a soft indoor or decorative shoe.
Conclusion
The Baby Mary Jane Shoe Sewing Pattern turns a few small pieces of fabric into an adorable pair of classic handmade shoes. The rounded toe, open instep, crossing strap, soft lining, and optional bow give the design the recognizable Mary Jane appearance while leaving plenty of opportunities for personalization.
The project begins with careful pattern preparation. Using the reference measurements, the illustrated sole is approximately 11 × 5.3 cm (4.33 × 2.09 in), while the upper has a depth of about 7 cm (2.76 in) in the marked section. Preparing accurate mirrored pieces is essential for producing a balanced left and right shoe.
Construction then focuses on joining the exterior and lining, forming the curved opening, preparing the strap, and carefully attaching the upper to the sole. Accurate center markings and slow sewing around the curves are two of the most important techniques for achieving a professional result.
Finishing details can completely transform the design. A small fabric bow creates a traditional look, while topstitching emphasizes the rounded silhouette. Floral cotton, gingham, polka dots, denim, patchwork, or pastel fabrics can all produce beautiful variations of the same fabric baby shoe pattern.
Most importantly, handmade baby footwear should remain soft, comfortable, securely constructed, and appropriately sized. Avoid loose decorative pieces and regularly check the fit as the baby’s feet grow.
After making your Baby Mary Jane Shoe Sewing Pattern, leave your sincere opinion about the project and share your suggestions. Tell us which fabric and color combination you would choose and what detail you would add to make your handmade Mary Jane shoes even more special.