
Beach Poncho Pattern is a practical and comfortable sewing project designed to create a loose hooded cover-up that is perfect for beach days, pool visits, summer vacations, and everyday outdoor adventures. Inspired by the striped child’s poncho shown in the reference image, this project combines a generously shaped body with a comfortable neckline and a separate two-piece hood. The wide silhouette allows plenty of movement while also making the garment relatively straightforward to sew.
A handmade Beach Poncho Pattern is especially useful because the fabric can be selected according to the purpose of the finished garment. Cotton terry is absorbent and works beautifully after swimming, while lightweight cotton, jersey knit, waffle fabric, or soft French terry can create a lighter hooded beach poncho. Striped fabrics give the project a classic nautical appearance, but colorful prints, patchwork combinations, and coordinated quilt fabrics can make every version unique.
This tutorial uses the approximate proportions visible in the reference project as a starting point for a child-size poncho. Because children vary considerably in height and build, the measurements should be treated as a customizable guide rather than standardized commercial sizing. The construction techniques are approachable for confident beginners and provide useful practice with seam allowances, curved hems, hood construction, neckline finishing, edge stitching, and fabric alignment.
Materials, Measurements, and Preparing the Beach Poncho Pattern
For this Beach Poncho Pattern, choose approximately 1.5–2 yards (1.4–1.8 m) of fabric, depending on fabric width, directional prints, stripe matching, and the size you intend to make. Cotton terry, lightweight French terry, cotton jersey, and soft woven cotton are excellent possibilities.
DISCOVER MORE FREE PATTERNS HERE!
You will also need coordinating polyester thread, fabric scissors or a rotary cutter, a cutting mat, quilting ruler, pins or sewing clips, fabric marker, measuring tape, sewing machine, iron, and ironing surface. A walking foot can be useful when working with several soft layers, although it is not essential.
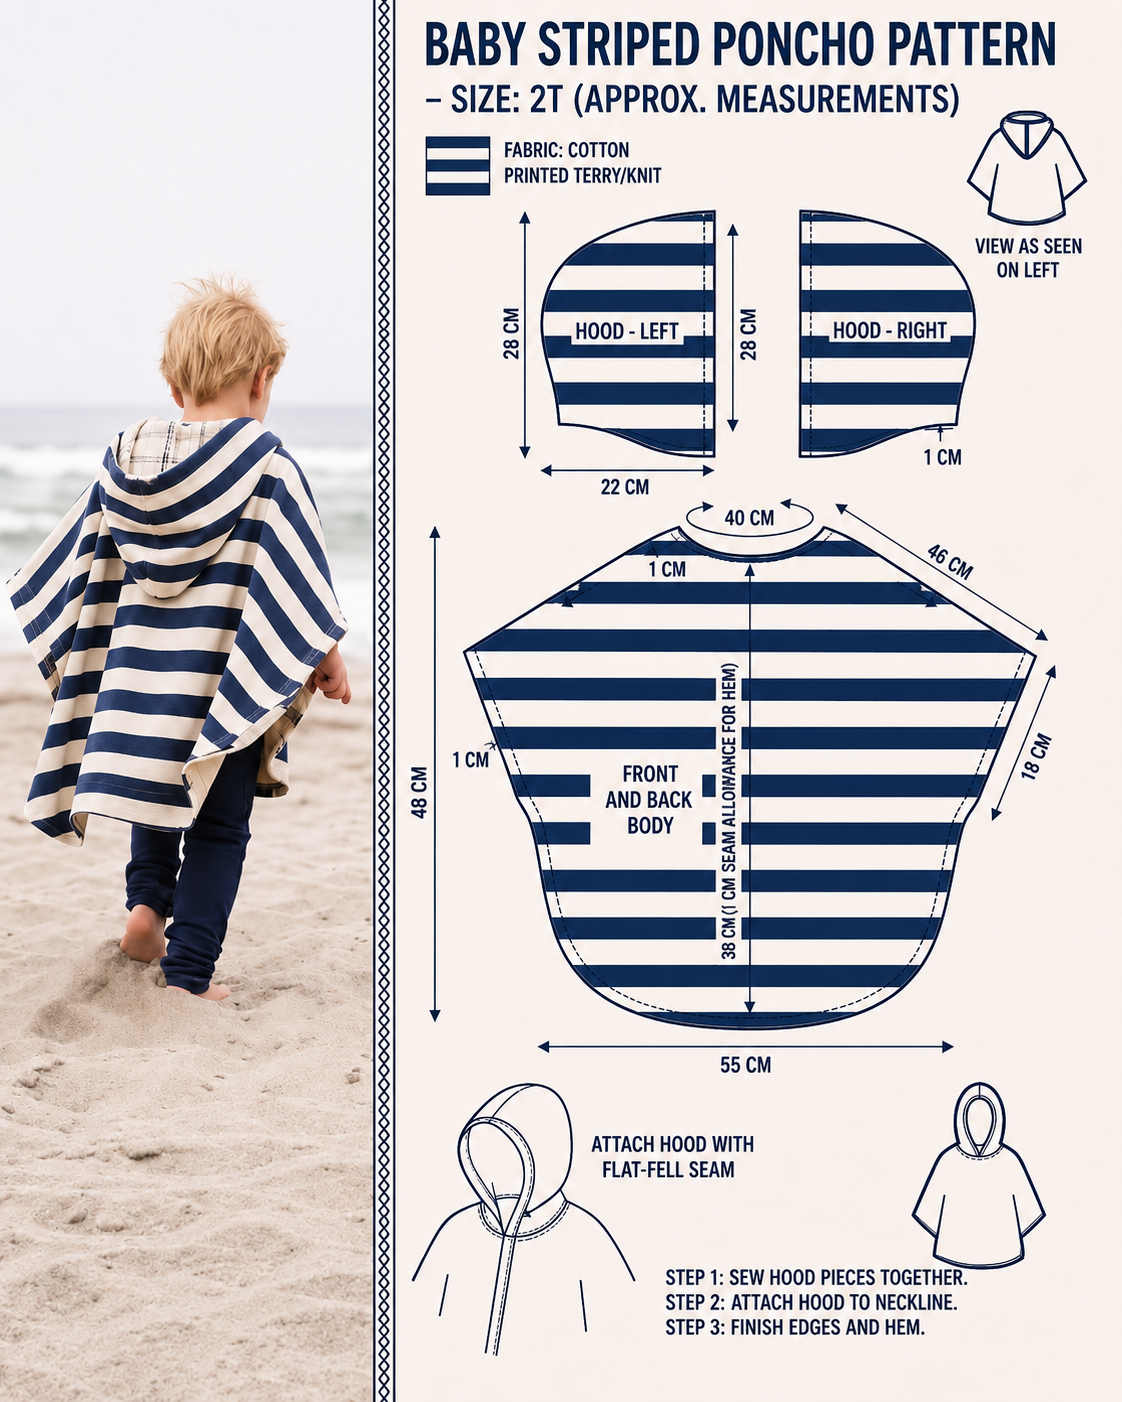
For a child-size version inspired by the image, the body can measure approximately 55 cm (21.7 in) across the lower section and around 48 cm (18.9 in) from the upper shoulder area to the bottom edge. The center length can be approximately 38 cm (15 in) depending on how deeply the neckline is shaped.
The upper shoulder/side section can extend approximately 46 cm (18.1 in) from the neckline area toward each outer corner. The short side opening or sleeve-like section may measure approximately 18 cm (7.1 in). These measurements create the characteristic wide poncho silhouette.
For the hood, prepare two mirrored pieces approximately 28 cm (11 in) high × 22 cm (8.7 in) wide at their maximum dimensions. Shape the upper and back edges into smooth curves rather than simply cutting rectangles.
Add approximately 1 cm (3/8 in) seam allowance around joined edges unless your drafted template already contains allowances. For a turned hem, leave approximately 2–2.5 cm (3/4–1 in) along the bottom and exposed side edges.
If you are using stripes, carefully align them before cutting. Fold the fabric with matching stripes positioned directly over each other, pin securely, and cut slowly. Good stripe alignment will make the finished striped beach poncho appear much more polished.
Cutting and Sewing the Main Poncho Body
Begin by drafting the main Beach Poncho Pattern body on pattern paper. A simple method is to create one half of the body first and then cut the fabric on the fold, ensuring perfect symmetry.
Mark the center neckline. For a child-size version, a finished neckline circumference near 40 cm (15.7 in) can serve as a starting reference, but always check the intended wearer before cutting. The opening must pass comfortably over the head.
From the neckline, extend the upper edges diagonally outward toward the wide sides. The image uses approximately 46 cm (18.1 in) as an upper diagonal reference. This creates the relaxed shoulder shape rather than a conventional fitted sleeve.
Continue shaping the side edges downward and slightly inward. Round the lower corners and connect them with a broad curved bottom edge. Avoid sharp transitions because gentle curves are much easier to hem neatly.
Cut one front and one back piece if constructing the garment from separate panels. Alternatively, depending on your fabric width and preferred construction, the body may be drafted as a larger continuous piece with strategically placed seams.
Place the front and back right sides together. Pin or clip the shoulder and upper side sections. Sew using your chosen seam allowance, generally around 3/8 in (1 cm). Finish raw edges with a serger, zigzag stitch, or overcasting stitch to prevent fraying.
Making and Attaching the Hood
The hood is an important feature of this Beach Poncho Pattern because it adds warmth after swimming and gives the garment its recognizable casual beachwear appearance. Cut two mirrored hood pieces from the main fabric.
Place the hood pieces right sides together. Match the curved back and upper edges carefully, then pin or clip from the lower back upward and around the crown.
Sew the curved hood seam with approximately a 3/8 in (1 cm) seam allowance. Clip or notch the seam allowance gently around pronounced curves without cutting through the stitching. Finish the raw edge with zigzag stitching or a serger.
Turn the hood right side out and press gently. If using terry or synthetic knit fabric, check the recommended iron temperature first. Excessive heat can flatten textured fibers or damage synthetic materials.
Finish the front opening of the hood before attaching it to the garment. Turn the raw edge inward approximately 3/8 in (1 cm) and then turn it again to conceal the raw edge. Topstitch evenly around the opening.
With the poncho right side out and the hood positioned appropriately, align the center back hood seam with the center back neckline. Match the hood ends near the front neckline. Pin carefully, distribute the fabric evenly, and sew around the entire neckline.
Finishing the Edges and Creating a Professional Beach Poncho
After attaching the hood, inspect the neckline from both sides. Finish the seam allowance with a serger or zigzag stitch. For an especially clean finish, the seam can be covered with cotton twill tape or bias binding.
Next, finish the side edges. Fold approximately 1 cm (3/8 in) toward the wrong side, press, and fold again. Stitch close to the inner folded edge. For terry fabric, a wider double-fold hem may be easier to control.
Repeat the same process around the curved lower edge. When sewing around curves, avoid stretching the fabric. Work slowly and reposition the garment frequently so the hem remains smooth.
For knit fabrics, consider using a ballpoint or stretch needle. A narrow zigzag or stretch stitch may perform better than a standard straight stitch because it allows the seams to move with the fabric.
Press the finished garment carefully and inspect all seams. Trim loose threads and reinforce any points that may experience additional stress, particularly around the neckline and hood attachment.
Finally, try the hooded beach poncho on the intended wearer. Confirm that the neckline is comfortable, the hood has sufficient depth, and the sides allow unrestricted arm movement. Any future versions can then be adjusted based on this first finished sample.
Customizing the Beach Poncho Pattern for Different Sizes and Styles
One advantage of this Beach Poncho Pattern is that the basic silhouette can easily be resized. Instead of depending only on age labels, measure the wearer from shoulder to desired hem and from the center neckline toward the desired outer width.
For a longer poncho, extend the bottom section while maintaining the same gradual side curves. For a wider version, extend the shoulder lines and lower width proportionally. Keep the neckline relatively stable unless the wearer’s head circumference requires adjustment.
To resize the hood, measure from the shoulder area over the crown of the head to the opposite side and check the distance from forehead to back of head. Add ease so the hood does not fit tightly.
A towel beach poncho can be created using absorbent terry cloth. This version is especially practical after swimming because the oversized body can help dry the wearer while providing comfortable coverage.
For a lightweight summer version, use cotton jersey or French terry. A classic navy-and-white striped fabric creates the nautical appearance seen in the reference image, while turquoise, coral, lavender, pink, sage green, or rainbow stripes can create brighter alternatives.
Quilters can also adapt the concept creatively. Lightweight coordinated cotton panels can be pieced before cutting the main pattern shapes. If using actual quilted layers, keep batting thin and consider whether the extra weight and warmth are appropriate for the intended use.
FAQ About the Beach Poncho Pattern
Is the Beach Poncho Pattern beginner-friendly?
Yes. The project uses relatively simple shapes and straightforward seams. The hood and curved hem require some patience, but they are manageable for beginners with basic sewing experience.
What fabric is best for a beach poncho?
Cotton terry cloth is one of the best options when absorbency is important. French terry, jersey knit, waffle fabric, and lightweight cotton can also work.
How much fabric do I need?
For many child sizes, approximately 1.5–2 yards (1.4–1.8 m) is a practical starting estimate. Larger sizes and directional prints may require more.
What seam allowance should I use?
A 3/8 in (1 cm) seam allowance works well for this project unless your template specifies another allowance.
What size is the example based on?
The reference image indicates an approximate toddler/young-child size. The tutorial therefore uses the displayed measurements only as a starting guide rather than claiming standardized sizing.
How wide should the finished poncho be?
The illustrated lower body measures approximately 55 cm (21.7 in) across. You can increase or decrease this measurement according to the wearer.
How tall should the hood be?
Approximately 28 cm (11 in) works as a useful starting measurement for the illustrated child-size version.
Can I make it from an old bath towel?
Yes, provided the towel is large enough for your pattern pieces. Upcycling towels can be an economical way to make an absorbent DIY beach poncho.
Can I use quilting cotton?
Yes, although quilting cotton will not absorb water like terry cloth and will produce a lighter, more structured garment.
Can I add a front pocket?
Yes. A large kangaroo-style pocket can be added before the front and back pieces are assembled.
Can I add binding around the edges?
Absolutely. Bias binding can provide an attractive professional finish, especially when using woven cotton.
How do I keep striped fabric aligned?
Match the stripe positions carefully before cutting, use plenty of pins or clips, and verify alignment again before stitching each major seam.
Can this pattern be enlarged for adults?
Yes. Measure the adult wearer and enlarge the body width, length, neckline, and hood proportionally rather than simply multiplying every measurement by the same amount.
What needle should I use for knit fabric?
A ballpoint or stretch sewing-machine needle is generally appropriate for jersey and other knit fabrics.
Should I prewash the fabric?
Yes, especially when using cotton or terry cloth. Prewashing helps account for shrinkage before the pieces are cut.
Conclusion
The Beach Poncho Pattern is a versatile sewing project that combines an oversized body, practical hood, comfortable neckline, and easy-to-finish edges into one useful handmade garment. Its loose construction makes it particularly suitable for beach trips, swimming lessons, pool days, vacations, and casual summer use.
Using the reference measurements, a child-size version can begin with a body approximately 55 cm (21.7 in) wide, a length around 48 cm (18.9 in), and hood pieces measuring roughly 28 × 22 cm (11 × 8.7 in). These figures should be adjusted according to the individual wearer and the characteristics of the chosen fabric.
Fabric selection can completely change the finished project. Cotton terry produces an absorbent swimming poncho, jersey creates a soft lightweight cover-up, and striped cotton or French terry gives the garment a classic nautical appearance. Patchwork panels can also transform the same basic design into a more traditional quilt-inspired sewing project.
With careful cutting, accurate seam allowances, smooth hood construction, and neatly finished edges, this Beach Poncho Pattern can become a polished handmade piece that is both attractive and genuinely practical. Once the basic pattern is mastered, it can be resized and customized with pockets, contrasting binding, appliqué, patchwork, or personalized fabric combinations for many different versions.