
Blossom Crossbody Bag Pattern is a charming sewing project that combines practical everyday storage with the handmade beauty of quilting. Featuring a softly rounded rectangular body, butterfly-print fabric, a secure top zipper, a convenient front zippered pocket, and an adjustable shoulder strap, this bag is compact enough for daily outings while still providing useful space for personal essentials.
The quilted construction gives the Blossom Crossbody Bag Pattern more structure than an ordinary fabric purse. By combining exterior cotton with batting or fusible fleece and lining fabric, you can create a soft but stable body that protects the contents and holds its shape. The gentle rounded corners are especially important because they give the finished bag the polished appearance shown in the inspiration.
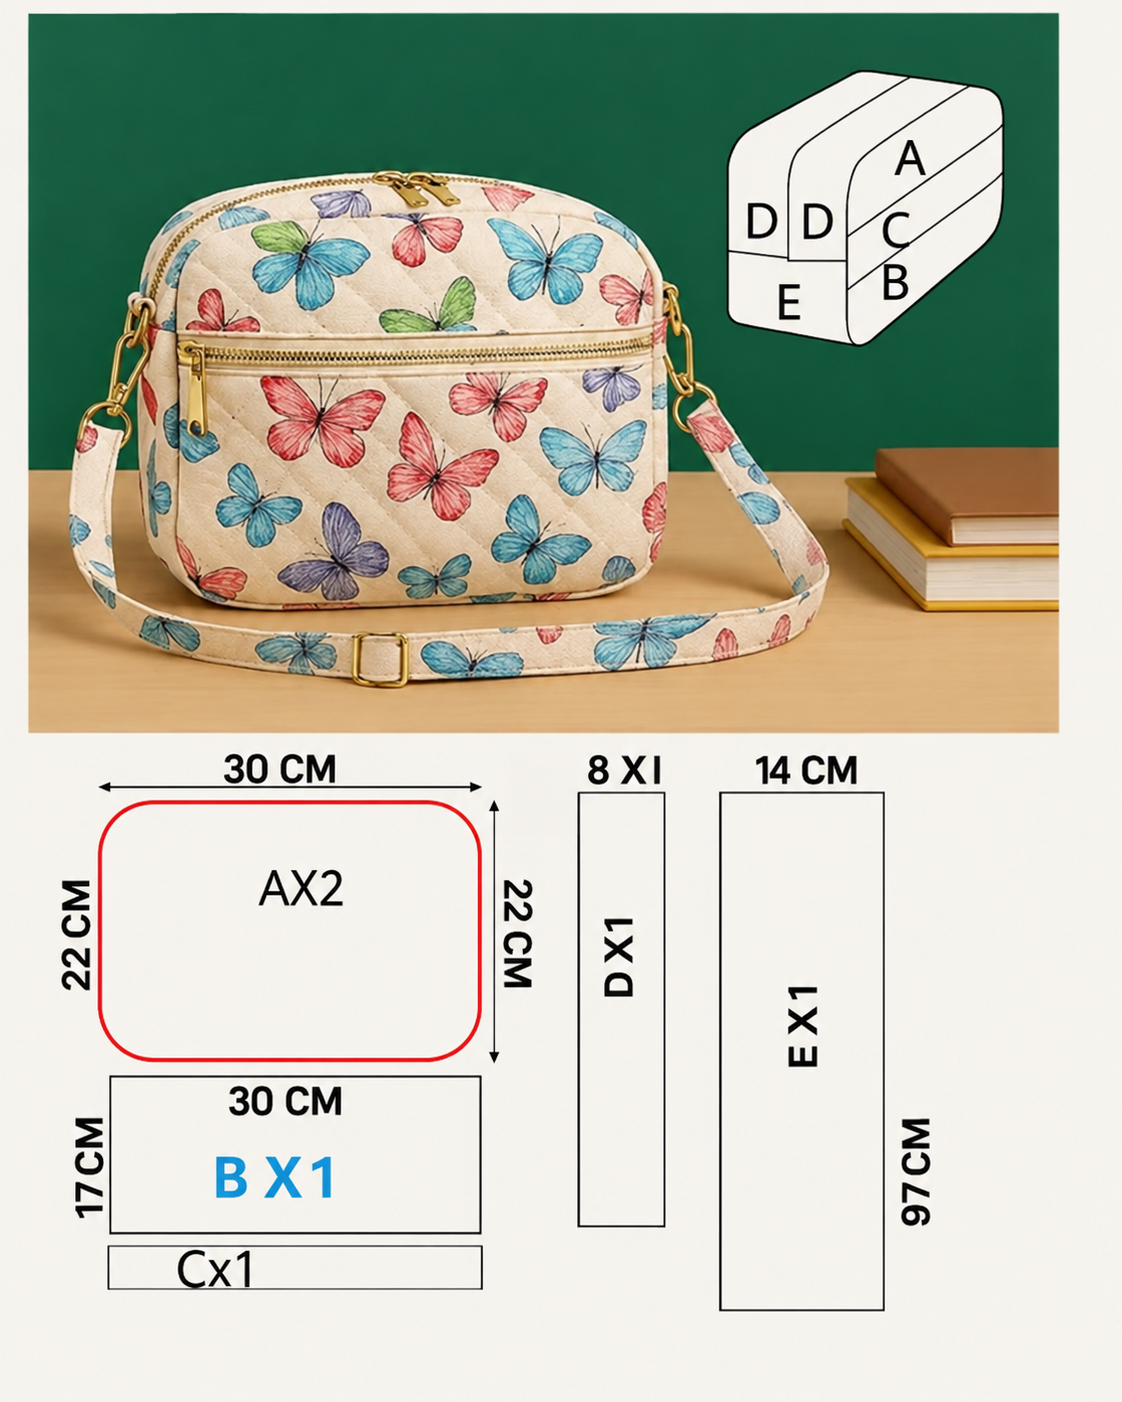
This tutorial uses the approximate proportions shown in the reference pattern. The main body is about 30 cm × 22 cm (11.8 × 8.7 inches), while the front pocket section is approximately 30 cm × 17 cm (11.8 × 6.7 inches). The adjustable strap can be approximately 97 cm (38 inches) long before adjustment, although it can easily be lengthened for a lower crossbody fit. Because fabric thickness, quilting, zipper installation, and seam allowances affect the final dimensions, treat these measurements as a practical starting point and test the bag against your preferred finished size.
Materials, Measurements and Preparing the Quilted Pieces
For the exterior of your Blossom Crossbody Bag Pattern, choose a medium-weight quilting cotton. A floral, butterfly, botanical, or small-scale print works beautifully because the simple bag shape allows the fabric design to remain visible.
DISCOVER MORE FREE PATTERNS HERE!
You will need approximately ½ yard (0.46 m) of exterior fabric, ½ yard (0.46 m) of lining fabric, and a similar amount of batting or fusible fleece. Small amounts may remain, but having extra fabric makes pattern placement and strap construction easier.
Prepare two main body pieces approximately 30 cm × 22 cm (11.8 × 8.7 inches). Round the four corners gradually rather than creating a sharp curve. A plate, bowl, or curved quilting ruler can help make both pieces identical.
For the front pocket, prepare a rectangle approximately 30 cm × 17 cm (11.8 × 6.7 inches). Depending on your preferred construction method, you may cut corresponding lining and stabilizer pieces for this pocket as well.
The side/gusset construction can be made from strips approximately 8 cm (3.1 inches) wide. Their exact finished length should be determined by measuring around the edges of your prepared main panels because rounding the corners changes the required length.
For the adjustable shoulder strap, the reference suggests approximately 14 cm × 97 cm (5.5 × 38 inches) before folding. For a true crossbody bag, however, many makers may prefer a finished adjustable strap capable of extending to approximately 110–140 cm (43–55 inches).
You will also need a top zipper appropriate for the bag opening and a second zipper for the front pocket. Two zipper pulls in a coordinating metallic finish can give the handmade bag a more professional appearance.
Hardware can include two D-rings or rectangular rings, two swivel hooks, and one adjustable slider. Select hardware that matches the finished strap width.
Before cutting, wash and press washable cotton fabrics if desired. Accurate pressing makes a considerable difference when sewing small bags because even minor distortions can affect zipper alignment.
Layer the exterior fabric over batting or fusible fleece. Quilt the layers with diagonal lines, diamonds, straight channels, or another simple quilting design. Keep the quilting relatively subtle if the exterior fabric already has a detailed print.
A standard ¼-inch (6 mm) to ⅜-inch (1 cm) seam allowance works well for bag construction. Choose one allowance and use it consistently throughout the project.
Sewing the Front Zipper Pocket and Main Bag Panels
Begin the quilted crossbody bag with the front pocket. This feature is useful for storing smaller objects that need to remain accessible without opening the main compartment.
Place the pocket zipper along the upper edge of the prepared pocket section. Position the zipper and pocket fabric right sides together and sew using a zipper foot.
Fold the fabric away from the zipper teeth and press carefully. Topstitch close to the folded edge. This creates a crisp finish and helps prevent fabric from catching in the zipper.
Attach the opposite side of the zipper to the main front panel. Check its position before stitching so the pocket remains straight across the bag.
Add the pocket lining if you are using one. A fully lined pocket conceals raw edges and gives the interior a cleaner finish.
Once the zipper is installed, align the sides and lower edge of the pocket with the front panel. Baste approximately ⅛ inch (3 mm) from the edge. The pocket will now behave as part of the main front panel during final assembly.
Check the quilting on the front and back pieces. If batting extends beyond the fabric edges, trim everything evenly.
Prepare the bag gusset next. Depending on your preferred method, the gusset can be constructed as one continuous strip or several sections joined together.
If the top zipper is incorporated into the gusset, make a zipper panel first. Cut two long exterior strips and corresponding lining pieces. Sandwich the zipper between them and stitch.
Turn the pieces away from the zipper and topstitch. Repeat for the opposite side so the zipper sits neatly between two fabric sections.
Join the zipper panel to the remaining gusset pieces. When completed, the gusset should form a long band that travels around the curved perimeter of the bag.
Before attaching it, mark the top center, bottom center, and side centers of both main panels and the gusset. These reference marks make it much easier to distribute the fabric evenly around curved corners.
Assembling the Blossom Crossbody Bag
Open the main zipper at least halfway before assembling the bag. This is important because you will eventually need the opening to turn the finished bag right side out.
Place the gusset against the front panel with right sides together. Match the center marks and secure the layers with sewing clips.
Work around the rounded corners slowly. Instead of stretching the fabric, gently manipulate the gusset around the curve. Additional clips can prevent shifting.
Sew around the entire perimeter using your chosen seam allowance. A shorter stitch length around the curves can provide better control.
Check the front from the right side before continuing. The corners should appear smooth, and the butterfly or floral fabric should not develop obvious puckers.
Attach the back panel to the opposite side of the gusset using the same method. Again, begin by matching the center points.
After stitching, trim excessive bulk from the seam allowances. Small notches can be made around curved areas, but never cut through the stitching.
If you are constructing a separate lining, repeat the basic bag assembly using the lining pieces. Leave an opening of approximately 4–5 inches (10–13 cm) along an inconspicuous lower seam.
Insert the exterior bag into the lining with right sides facing. Align the zipper area and upper edges carefully.
Sew the lining to the zipper seam or secure it using your chosen bag-lining method. Turn the entire project through the opening in the lining.
Push out the corners gently with a blunt turning tool. Never use the point of scissors because it can puncture the fabric.
Close the lining opening with a narrow machine stitch or invisible ladder stitch. Push the lining into the bag and press the finished structure carefully.
Topstitch around accessible edges when necessary. Good topstitching is one of the easiest ways to give a handmade quilted shoulder bag a professional appearance.
Making the Adjustable Strap and Finishing the Bag
Cut the strap fabric according to the desired finished length. For a longer crossbody strap, starting with approximately 120–140 cm (47–55 inches) provides greater adjustment flexibility than a short shoulder strap.
If the exterior cotton is lightweight, reinforce the strap with fusible interfacing. Avoid extremely thick batting because it can make the strap difficult to pass through the slider.
Fold the long strip in half lengthwise and press. Open it again, fold both raw edges toward the center crease, and press once more.
Fold the strip along the original center line. All raw edges should now be enclosed. Topstitch along both long sides.
Prepare two short fabric tabs using the same folding technique. Thread each through a D-ring and fold it in half.
Position one tab at each upper side of the bag. Stitch several times across the tabs because these areas receive considerable stress during use.
Thread one end of the long strap through the adjustable slider, then through a swivel hook. Bring the strap back through the slider and secure the end.
Attach another swivel hook to the opposite end. Clip both hooks onto the bag’s D-rings.
Test the adjustment. The strap should move through the slider smoothly but should not slip when weight is placed inside the bag.
Inspect the two zippers. Open and close them several times and check that no lining fabric catches in the teeth.
Give the bag a final pressing according to the requirements of the fabric and stabilizer. A pressing cloth can protect printed cotton and synthetic interfacing from excessive heat.
If the bag seems too soft, a removable base insert can be placed inside. Cut plastic canvas or another washable bag-base material slightly smaller than the bottom and cover it with matching fabric.
Decorative zipper pulls, a small fabric charm, or a matching butterfly appliqué can also be added, but keep embellishments balanced so they do not compete with the printed fabric.
The completed Blossom Crossbody Bag Pattern should have a structured but softly padded body, a convenient front compartment, smooth rounded corners, and a comfortable adjustable strap.
FAQ – Blossom Crossbody Bag Pattern
Is the Blossom Crossbody Bag Pattern suitable for beginners?
It is best for a confident beginner or intermediate sewer. Straight sewing is simple, but installing two zippers and sewing a gusset around rounded corners requires patience.
What is the approximate finished size?
Using the reference measurements, the main panels begin around 30 × 22 cm (11.8 × 8.7 inches). The finished dimensions will be slightly smaller after seam allowances and assembly.
What fabric works best?
Quilting cotton, lightweight canvas, linen blends, or similar woven fabrics work well. Lightweight quilting cotton benefits from batting or fusible fleece.
How much fabric do I need?
Approximately ½ yard (0.46 m) each of exterior and lining fabric should be sufficient for many versions, though additional fabric is useful for pattern matching or a longer strap.
Should the exterior be quilted?
Quilting is recommended because it adds structure and produces the softly padded appearance shown in the design.
What batting should I use?
Low-loft cotton batting, fusible fleece, or bag-making foam can work. Foam produces a firmer bag, while batting creates a softer quilted finish.
What seam allowance should I use?
A consistent ¼ inch (6 mm) or ⅜ inch (1 cm) seam allowance is practical. If using a printed template, follow the allowance specified by that template.
How long should a crossbody strap be?
Adjustable straps commonly benefit from a range around 110–140 cm (43–55 inches), although the ideal length depends on the wearer’s height and preferred bag position.
Can I make the strap non-adjustable?
Yes. Measure a comfortable strap length before sewing and attach both ends directly to the side tabs.
Can I omit the front pocket?
Absolutely. Simply use the complete front panel without installing the second zipper.
Can I add interior pockets?
Yes. A slip pocket or internal zipper pocket can be attached to the lining before assembling it.
How can I make the corners smooth?
Use gradual curves, plenty of clips, slow stitching, and careful trimming of the seam allowances after sewing.
Can I enlarge the pattern?
Yes, but increase the main panels, pocket, gusset, and zipper lengths proportionally. Remember that a larger bag may also need stronger interfacing.
What needle should I use?
A 90/14 universal or quilting needle is a useful starting point for layered cotton and batting. Heavier materials may require a stronger needle.
Can I wash the finished bag?
That depends on the fabric, batting, interfacing, zippers, and hardware used. Check the care recommendations for every component before washing.
How can I make the bag look more professional?
Accurate cutting, consistent seam allowances, neat zipper installation, careful pressing, matching hardware, and even topstitching make the biggest difference.
Conclusion
The Blossom Crossbody Bag Pattern combines several useful sewing techniques in one attractive project: quilting, zipper installation, pocket construction, curved gusset sewing, lining, and adjustable strap making. The result is a compact handmade bag that can be customized with countless fabric combinations.
The butterfly-print inspiration demonstrates how effectively a simple bag silhouette can showcase beautiful quilting cotton. A softly quilted cream background combined with colorful butterflies and gold-tone hardware gives the design an elegant handmade character without requiring complicated patchwork.
Take extra care when installing the front zipper and sewing the gusset around the rounded corners. Those two stages largely determine the final shape of the quilted crossbody bag. Accurate center marks, generous use of sewing clips, and slow stitching will make assembly considerably easier.
PATTERN VIDEO:
Once you have completed one Blossom Crossbody Bag Pattern, the same construction can become the foundation for many variations. Try floral prints, patchwork scraps, solids, denim, seasonal fabrics, contrasting pockets, decorative quilting, or a longer adjustable strap. With its practical pockets and classic shape, this is a versatile sewing pattern that offers plenty of room for creativity while producing a genuinely useful finished project.