
The Car Gear Shift Organizer Pattern is a charming sewing project that combines practical storage with the beauty of handmade patchwork. Designed with colorful fabrics, decorative stitching, and small storage pockets, this organizer brings a personalized touch to the interior of a vehicle.
A Quilted Car Organizer is an excellent way to transform leftover fabric into something attractive and functional. Floral cotton prints, vintage patterns, gingham fabrics, and delicate pastel colors can all be combined to create a beautiful accessory that reflects your personal style.
This tutorial features a compact organizer with three pockets, a softly quilted body, and reinforced fabric straps. It is designed for installation on a suitable fixed storage panel or approved attachment point near the center console—not on the moving gear shift lever itself.
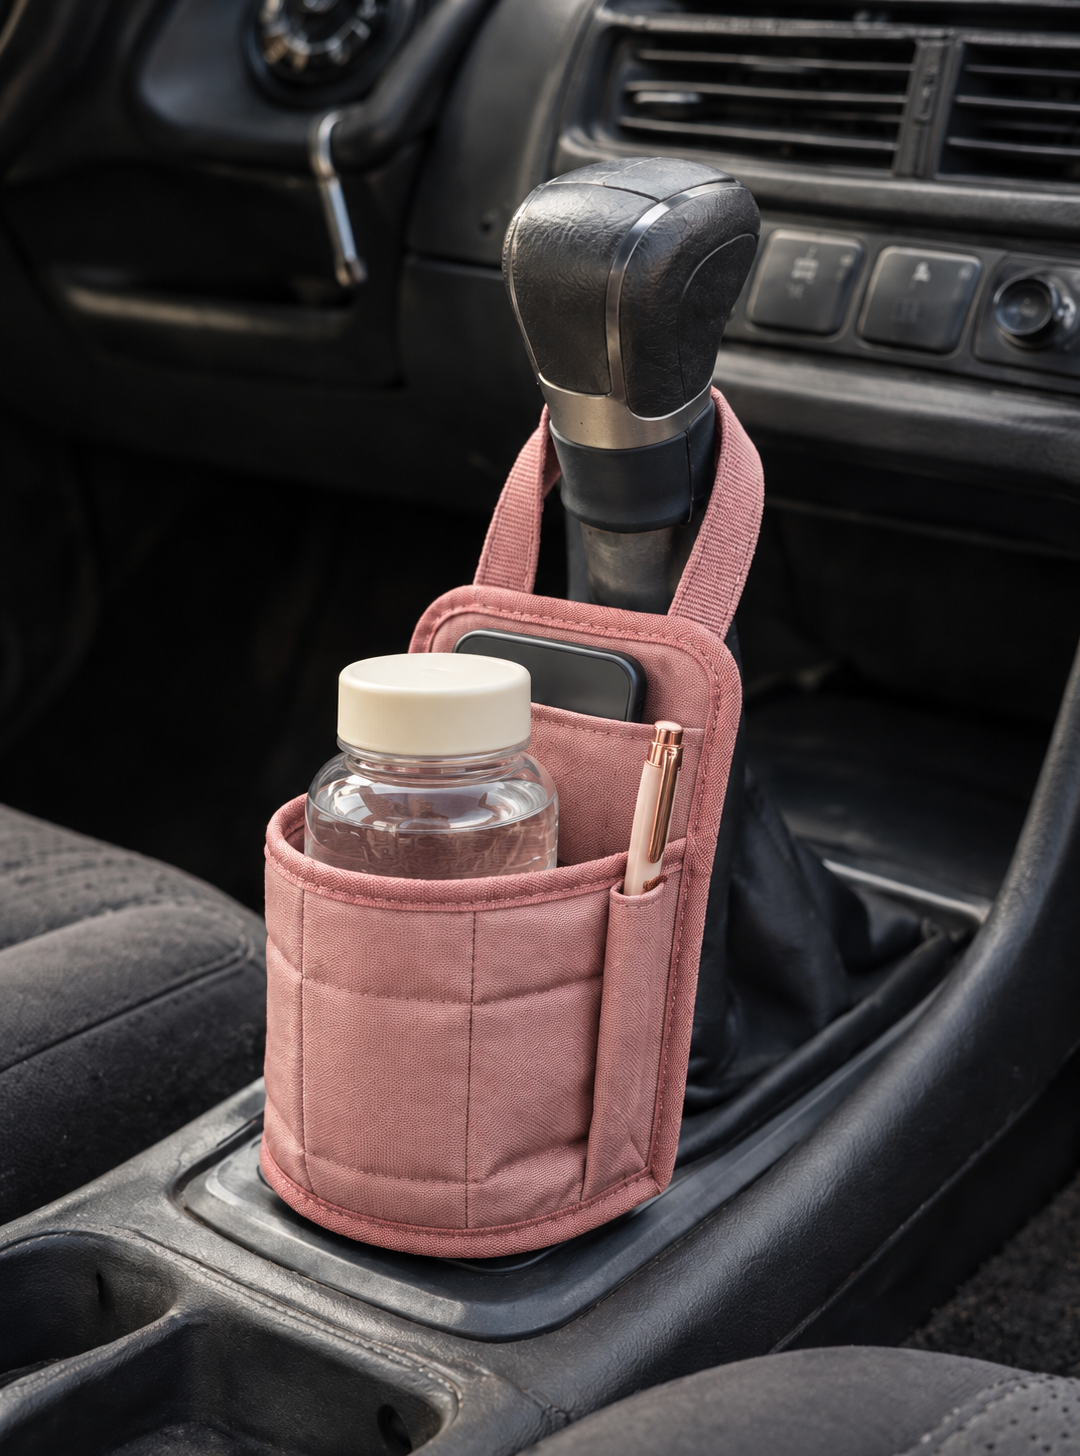
Whether you are an experienced quilter or learning to sew accessories, this Fabric Car Organizer Pattern offers an enjoyable opportunity to practice cutting, quilting, pocket construction, binding, and decorative finishing.
DISCOVER MORE FREE PATTERNS HERE!
Materials, Fabric Measurements, and Preparation for the Car Gear Shift Organizer Pattern
Before beginning, choose sturdy cotton fabrics that will withstand frequent handling. Quilting cotton works beautifully when reinforced with lightweight interfacing and batting.
The project uses a rectangular backing panel, a divided pocket, and a smaller front pocket. The measurements below create a finished organizer approximately 7 inches wide and 9 inches tall.
Materials needed
- ¼ yard of printed quilting cotton for the exterior.
- ¼ yard of coordinating cotton for the lining.
- Assorted fabric scraps for patchwork decoration.
- Lightweight fusible interfacing.
- Thin cotton batting.
- Coordinating polyester sewing thread.
- Sewing machine.
- Universal sewing needle, size 80/12.
- Rotary cutter and cutting mat.
- Quilting ruler.
- Fabric scissors.
- Sewing clips or pins.
- Iron and ironing board.
- Fabric marking pencil.
- Two ¾-inch-wide sew-on hook-and-loop fastening strips, if suitable for the intended fixed mounting point.
- Optional decorative buttons or embroidery.
Cutting measurements
All dimensions include a ¼-inch seam allowance unless otherwise indicated.
| Fabric Piece | Cutting Size | Quantity |
|---|---|---|
| Exterior backing panel | 7½ × 9½ in | 1 |
| Lining backing panel | 7½ × 9½ in | 1 |
| Thin batting | 7½ × 9½ in | 1 |
| Large pocket exterior | 7½ × 11 in | 1 |
| Large pocket lining | 7½ × 11 in | 1 |
| Small front pocket exterior | 5 × 6 in | 1 |
| Small front pocket lining | 5 × 6 in | 1 |
| Mounting strap fabric | 2½ × 8 in | 2 |
| Binding fabric | 2½ in wide | Approximately 40 in total |
The large pocket is folded horizontally to create a double-layer panel approximately 5½ inches high.
The smaller pocket is also folded horizontally, creating a finished panel approximately 3 inches high.
After sewing and binding, the organizer will measure approximately 7 × 9 inches.
Recommended fabric combinations
Vintage Floral and Cream: A soft, romantic combination suitable for an elegant handmade accessory.
Sage Green and Beige: A natural palette that creates a calm and sophisticated appearance.
Dusty Rose and White: A delicate combination with a classic feminine touch.
Navy Blue and Floral Prints: A timeless option that complements many vehicle interiors.
Denim Blue and Mustard Yellow: A cheerful combination with a modern patchwork personality.
Lavender and Soft Gray: A subtle palette that looks beautiful with decorative quilting.
Important safety considerations
A vehicle’s gear selector must remain completely unobstructed. Never hang the organizer from the moving shift lever, its knob, or its boot, and never place it where it can interfere with pedals, the parking brake, buttons, displays, or driver movement.
The organizer should only be used if it can be securely attached to a fixed, suitable surface in accordance with the vehicle manufacturer’s guidance. If a safe mounting position cannot be identified, use the finished piece as a stationary organizer outside the vehicle.
Step-by-Step Car Gear Shift Organizer Pattern: Cutting and Sewing the Quilted Base
The first stage involves preparing the backing panel and creating a sturdy quilted foundation.
Step 1: Prepare the fabrics
Wash and dry the cotton fabrics before cutting.
Press each piece with a warm iron to remove wrinkles.
Place the exterior fabric on a cutting mat.
Use a quilting ruler and rotary cutter to cut the backing panel to 7½ × 9½ inches.
Cut the matching lining and batting pieces.
Accurate cutting helps the finished organizer maintain straight edges and an even shape.
Step 2: Create a patchwork exterior
If you prefer a decorative patchwork organizer, join several fabric scraps into a panel measuring at least 8 × 10 inches.
Use a ¼-inch seam allowance.
Press the seams open or toward the darker fabric.
Trim the completed patchwork panel to 7½ × 9½ inches.
For a simpler design, use one piece of floral or printed cotton.
Both options work beautifully.
Step 3: Assemble the quilt sandwich
Place the lining fabric wrong side up on your work surface.
Position the batting on top.
Place the exterior fabric right side up over the batting.
Align all four edges carefully.
Secure the layers with quilting clips or safety pins.
Smooth the fabric to remove wrinkles.
Step 4: Quilt the backing panel
Using a walking foot, sew straight quilting lines across the fabric.
Space the lines approximately 1 inch apart.
You may also create a diagonal diamond pattern.
For a vintage appearance, use coordinating thread that blends with the fabric.
For a more decorative result, choose contrasting thread.
Quilting helps stabilize the layers and adds texture to the organizer.
Step 5: Trim the quilted panel
After quilting, place the panel on the cutting mat.
Check that the corners are square.
Trim any uneven edges.
The panel should measure 7½ × 9½ inches before binding.
Avoid stretching the fabric while trimming.
A carefully squared backing makes pocket placement easier.
Step 6: Prepare the pocket fabrics
Place the large pocket exterior and lining right sides together.
Sew along one 7½-inch edge using a ¼-inch seam allowance.
Turn the fabrics right side out.
Press the seam flat.
Fold the panel so the sewn seam forms the upper edge, with the raw lower edges aligned.
The pocket panel should measure approximately 7½ × 5¼ inches after accounting for the top seam.
Topstitch ⅛ inch below the upper edge.
Repeat the process with the smaller pocket pieces, sewing along one 5-inch edge.
How to Make the Storage Pockets and Assemble the Fabric Car Organizer
The pocket construction gives this project its practical character.
The large pocket can be divided into two sections, while the smaller pocket provides an additional compartment for lightweight accessories.
Step 1: Position the large pocket
Place the quilted backing panel right side up.
Position the large pocket over the lower portion of the backing.
Align the bottom and side edges.
The finished upper edge should sit approximately 5¼ inches above the bottom.
Pin the pocket in place.
Sew a temporary basting stitch along the sides and bottom, approximately ⅛ inch from the edge.
This prevents the pocket from shifting during final assembly.
Step 2: Divide the large pocket
Use a fabric marking pencil to draw a vertical line down the center of the large pocket.
The line should run from the upper edge to the bottom.
Sew directly along the marked line.
Backstitch at the beginning and end.
This creates two separate storage compartments.
For a more decorative finish, sew a second line approximately ⅛ inch beside the first.
Step 3: Prepare the smaller front pocket
Take the smaller pocket panel.
Fold its side and bottom raw edges inward by ¼ inch.
Press carefully.
Position it over the center of the larger pocket.
Keep its upper edge below the top of the large pocket.
Pin it in place.
Sew along the two sides and bottom, leaving the upper edge open.
Backstitch at the top corners for reinforcement.
Step 4: Add decorative quilting
Use contrasting thread to topstitch around the smaller pocket.
You can also add a narrow strip of lace or decorative ribbon along its upper edge.
Keep embellishments flat and securely stitched.
Avoid bulky decorations that could snag nearby objects.
Small embroidered flowers are a lovely alternative to raised buttons.
Step 5: Prepare the mounting straps
Take one 2½ × 8-inch fabric strip.
Fold it lengthwise in half, wrong sides together, and press.
Open it and fold both long raw edges toward the center crease.
Fold it in half again.
The finished strap will measure approximately ⅝ inch wide.
Topstitch close to both long edges.
Repeat with the second strap.
These straps are intended only for a suitable fixed mounting point, never for wrapping around a moving gear selector.
Step 6: Attach the straps and binding
Position the straps on the upper back of the organizer, approximately 1 inch inward from each side.
Fold under one short end of each strap by ½ inch.
Sew the folded ends securely to the backing using reinforced rectangular stitching.
Keep the free ends available for the intended attachment method.
Apply double-fold binding around the organizer’s outer edges.
Use mitered corners for a neat finish.
Sew the binding securely, ensuring that the pocket edges are enclosed.
Creative Quilted Car Organizer Designs, Professional Finishing Tips, and Customization Ideas
One of the greatest advantages of the Car Gear Shift Organizer Pattern is its versatility.
You can change the fabrics, pocket arrangement, decorative stitching, and dimensions to create an accessory that suits different preferences.
Step 1: Make a vintage floral organizer
Choose small floral prints in dusty rose, cream, and sage green.
Combine them with coordinating gingham fabric.
Use cream-colored thread for quilting.
Add a narrow decorative trim along the pocket openings.
This creates a romantic vintage appearance.
Step 2: Create a denim patchwork version
Use clean denim scraps from old jeans.
Combine light and dark blue pieces.
Choose a strong needle suitable for denim.
Avoid excessive layers at the seams.
Topstitch with gold-colored thread for a classic denim finish.
Step 3: Add a zipper pocket
A zipper pocket can be added to a redesigned front panel for storing small lightweight items.
Choose a short nylon zipper.
Install it into the pocket panel before attaching the panel to the backing.
Reinforce both ends of the zipper opening.
Ensure the zipper pull cannot catch on nearby vehicle controls.
Step 4: Customize the organizer size
Measure the intended fixed mounting surface before cutting.
For a smaller organizer, reduce the dimensions of the backing and pockets proportionally.
For a larger organizer, increase the width and height while maintaining adequate pocket spacing.
Always check the available clearance.
The organizer must not interfere with the gear selector or any other vehicle function.
Step 5: Add decorative embroidery
Use embroidery thread to create small flowers, leaves, or geometric details.
Embroidery looks especially beautiful on plain cotton or denim.
Complete the embroidery before assembling the quilt sandwich.
This allows you to hide the thread ends inside the layers.
Step 6: Create a matching accessory set
Use the same fabrics to sew a small zipper pouch, tissue holder, or compact storage basket.
Coordinating handmade accessories can create a lovely decorative collection.
Choose washable materials and reinforced seams for pieces intended for regular handling.
Beautiful Color Combinations for a Quilted Car Organizer
Sage Green and Ivory: A sophisticated combination inspired by natural colors and vintage interiors.
Dusty Pink and Floral Cream: A soft, romantic palette with delicate country-style charm.
Navy Blue and White: A classic combination that works beautifully with geometric quilting.
Lavender and Beige: A gentle color pairing suitable for elegant handmade accessories.
Denim Blue and Mustard: A cheerful combination that adds personality to patchwork designs.
Burgundy and Antique Gold: A rich vintage palette with a refined decorative appearance.
Helpful Tips for Sewing a Professional Car Organizer
Use reinforced seams. Pockets and straps experience repeated handling, so backstitch at stress points.
Choose thin batting. Excessively thick batting can make the organizer bulky.
Press every seam. Careful pressing produces cleaner edges and more accurate pocket placement.
Avoid loose decorations. Raised embellishments can detach or snag nearby objects.
Test the attachment carefully. A handmade organizer should never interfere with vehicle controls or become loose during travel.
Use lightweight contents only. Store small accessories in a secure, approved location and avoid heavy, sharp, or fragile objects.
Frequently Asked Questions About the Car Gear Shift Organizer Pattern
1. Is this sewing project suitable for beginners?
Yes. The basic version uses straight seams, simple quilting, and rectangular pockets.
2. What is the finished size?
The organizer measures approximately 7 inches wide and 9 inches tall.
3. What fabric works best?
Quilting cotton, cotton canvas, and lightweight denim are suitable choices.
4. Can I use leftover fabric scraps?
Yes. This project is excellent for using small patchwork pieces.
5. Is batting necessary?
Thin batting adds structure and texture, although interfacing can be used for a flatter result.
6. Can I sew the organizer by hand?
Yes, but a sewing machine makes it easier to reinforce the pockets and straps.
7. Can I add more pockets?
Yes. Additional pockets can be incorporated if they do not create excessive bulk.
8. Can I attach the organizer directly to the gear shift lever?
No. The moving gear selector must remain unobstructed and should not support hanging storage accessories.
9. How should the organizer be attached?
Only to a suitable fixed mounting location using an attachment method permitted by the vehicle manufacturer.
10. Can I use this pattern in different vehicles?
The fabric pattern can be adapted, but mounting suitability must be assessed separately for each vehicle.
11. Can I wash the organizer?
If the fabrics and batting are washable, gently hand-wash and air-dry the organizer after removing any detachable hardware.
12. Can I use waterproof fabric?
Yes. A lightweight water-resistant fabric may be used, provided it can be sewn securely.
13. What is the best seam allowance?
A ¼-inch seam allowance works well for most of the construction.
14. Can I make matching organizers as gifts?
Yes. Handmade organizers can make thoughtful gifts, especially when personalized with favorite fabrics.
15. Can I sell finished organizers made from this pattern?
Generally, handmade items made from your own work may be sold, subject to applicable laws, product safety requirements, and any relevant pattern rights.
Conclusion
The Car Gear Shift Organizer Pattern is a creative sewing project that combines the beauty of quilting with the practicality of small storage compartments.
Its simple construction makes it suitable for quilters who enjoy turning fabric scraps into attractive handmade accessories.
By combining floral prints, vintage colors, decorative quilting, and reinforced pockets, you can create a personalized organizer with a beautiful professional finish.
The design can also be adapted for stationary craft-room storage, sewing tables, or other suitable fixed locations.
When considering vehicle use, remember that secure installation and unobstructed controls are essential. A decorative accessory should never compromise driving safety.
With careful measurements, quality materials, and attention to detail, this Quilted Fabric Organizer Tutorial provides an enjoyable way to practice sewing skills while creating something beautiful and functional.