
The Cat Bed Pattern is a wonderful sewing project for anyone who loves quilting, handmade home accessories, and creating comfortable spaces for pets. A soft, padded cat bed offers a cozy resting place while adding a beautiful decorative touch to your home. With carefully selected fabrics, attractive patchwork details, and a comfortable cushioned base, you can create a unique bed that your cat may enjoy using every day.
One of the most appealing features of this Quilted Cat Bed Pattern is its combination of practicality and creativity. Unlike ordinary store-bought pet beds, a handmade version allows you to choose the colors, textures, measurements, and decorative details. Whether you prefer delicate floral prints, classic patchwork squares, vintage cotton fabrics, or colorful scraps, the possibilities are nearly endless.
This DIY Fabric Cat Bed features a circular padded base surrounded by a soft, quilted outer wall. The raised sides create a sheltered resting area, while the removable cushion provides extra comfort and makes cleaning easier. The construction is suitable for confident beginners and intermediate sewists who want to practice quilting, curved seams, fabric assembly, and professional finishing techniques.
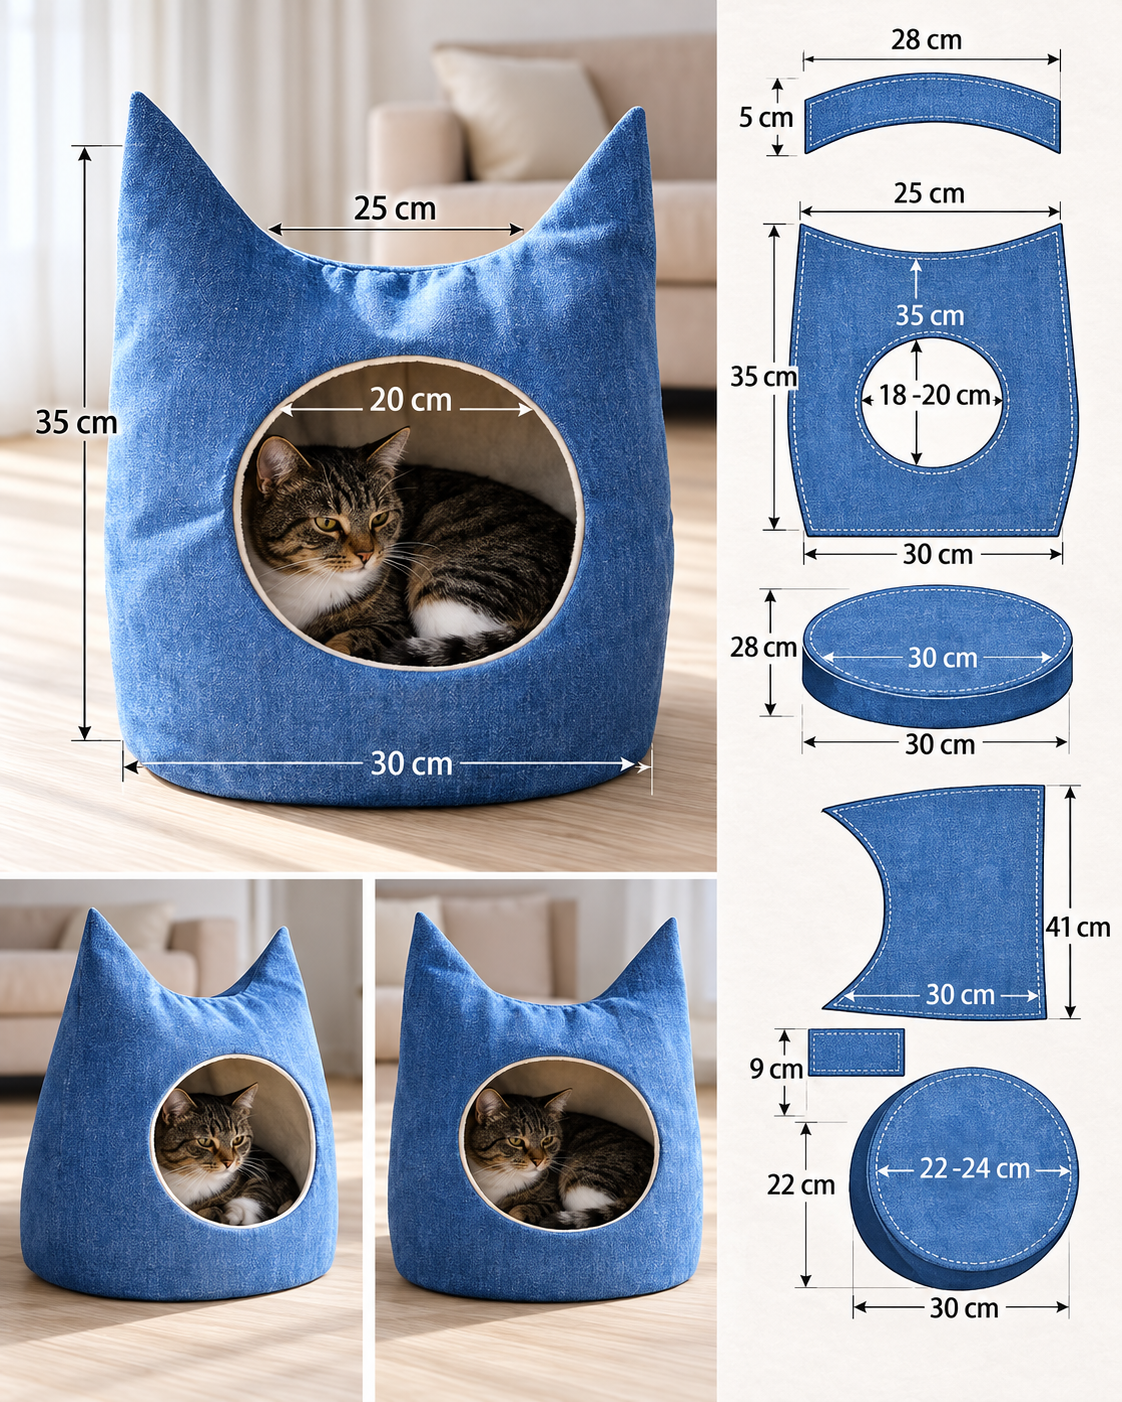
In this complete Cat Bed Pattern Tutorial, you will learn how to choose the materials, calculate the measurements, prepare the fabric pieces, sew the padded walls, construct the base, and finish the bed. The instructions include both inches and centimeters, making the project accessible to sewing enthusiasts in the United States, Canada, the United Kingdom, and beyond.
DISCOVER MORE FREE PATTERNS HERE!
Materials, Fabric Selection, and Measurements for the Cat Bed Pattern
Choosing the right materials is essential for creating a comfortable and durable Cat Bed Pattern. The fabric should be soft enough for everyday use while remaining strong enough to withstand regular washing and movement.
Quilting cotton is an excellent choice for the exterior because it is easy to sew, available in many beautiful prints, and works well with batting. For the interior, consider soft cotton, washable fleece, or another comfortable pet-friendly fabric.
The sample bed in this tutorial measures approximately 18 inches (46 cm) across the outside and is designed for many small and medium-sized cats. Larger cats may need a wider bed.
Materials needed
- 1 yard (0.9 m) of quilting cotton for the exterior.
- 1 yard (0.9 m) of cotton or washable fleece for the interior.
- Approximately 1 yard (0.9 m) of low-loft quilt batting.
- Polyester fiberfill for the padded walls.
- Polyester fiberfill or washable cushion stuffing for the removable pillow.
- Coordinating polyester sewing thread.
- Sewing machine with a universal needle.
- Fabric scissors or rotary cutter.
- Cutting mat and quilting ruler.
- Fabric clips or pins.
- Measuring tape.
- Fabric marking pencil.
- Hand-sewing needle.
- Iron and ironing board.
- Optional fabric scraps for decorative patchwork.
Choose washable materials whenever possible. Avoid loose beads, dangling cords, exposed foam, and small decorative pieces that a cat could chew or swallow.
Finished measurements
| Component | Finished Measurement |
|---|---|
| Outside Diameter | Approximately 18 in (46 cm) |
| Inside Sleeping Diameter | Approximately 14 in (35.5 cm) |
| Wall Height | Approximately 5 in (12.7 cm) |
| Padded Wall Thickness | Approximately 2 in (5 cm) |
| Removable Cushion Diameter | Approximately 13 in (33 cm) |
| Seam Allowance | ½ in (1.3 cm) |
| Skill Level | Confident Beginner |
| Estimated Sewing Time | 4–6 hours |
The dimensions are approximate because the final shape depends on how firmly the walls are stuffed.
Fabric cutting guide
The following pieces create a circular bed with a separate padded wall and removable cushion.
| Pattern Piece | Quantity | Cutting Measurement |
|---|---|---|
| Base Fabric Circle | 2 | 19 in (48.3 cm) diameter |
| Base Batting Circle | 1 | 18 in (45.7 cm) diameter |
| Outer Wall Fabric | 1 | 58½ × 7 in (148.6 × 17.8 cm) |
| Inner Wall Fabric | 1 | 45½ × 7 in (115.6 × 17.8 cm) |
| Outer Wall Batting | 1 | 57½ × 6 in (146.1 × 15.2 cm) |
| Inner Wall Batting | 1 | 44½ × 6 in (113 × 15.2 cm) |
| Cushion Fabric Circle | 2 | 14 in (35.6 cm) diameter |
Important construction note: The outer and inner wall strips have different lengths because they form two concentric circles. Their finished circumferences are approximately 57½ inches and 44½ inches, respectively, corresponding to diameters of approximately 18.3 inches and 14.2 inches.
The wall pieces will be assembled into separate rings, joined at their top edges, stuffed, and secured to the quilted base. The slight difference between the wall’s outer diameter and the base diameter can be eased during assembly.
The cutting measurements include ½-inch seam allowances.
Choosing beautiful fabric combinations
Vintage Floral: Sage green, ivory, and dusty rose create a delicate and sophisticated cat bed.
Classic Patchwork: Combine small floral prints, gingham, and neutral cotton fabrics for a traditional quilted appearance.
Modern Neutral: Beige, cream, warm gray, and soft brown work beautifully in contemporary homes.
Country Cottage: Blue floral cotton, white fabric, and tiny gingham checks create a charming farmhouse style.
Colorful Scraps: Combine coordinated fabric scraps for a cheerful handmade design.
Elegant Burgundy: Burgundy, antique pink, and cream create a rich vintage-inspired color palette.
Step-by-Step Cat Bed Pattern: Preparing and Quilting the Fabric
The first stage of the Cat Bed Pattern involves preparing the fabric and creating a padded circular base.
Accurate cutting is especially important because the bed includes curved pieces and padded walls.
Take your time during this stage to ensure that the fabric lies flat and the measurements remain consistent.
Step 1: Prepare the fabric
Wash and dry the cotton fabrics according to their care instructions.
Press them thoroughly before cutting.
Prewashing helps reduce the risk of shrinkage after the cat bed has been assembled.
Lay the fabrics on a clean cutting surface and remove any wrinkles.
Step 2: Cut the circular base
Create a paper circle measuring 19 inches (48.3 cm) in diameter.
Use this template to cut two fabric circles.
Cut one batting circle measuring 18 inches (45.7 cm) in diameter.
The batting is slightly smaller to reduce bulk in the seam allowance.
Step 3: Prepare the base layers
Place the first fabric circle right side down.
Center the batting circle on top.
Place the second fabric circle right side up.
Smooth the layers carefully.
Secure them with quilting pins or temporary fabric clips around the edges.
Step 4: Quilt the base
Mark a simple quilting design.
Straight lines, gentle curves, or a diamond grid are all suitable options.
Sew through the three layers, beginning near the center and working outward.
Maintain even stitching and avoid pulling the fabric.
A walking foot can help prevent shifting.
Step 5: Finish the base edge temporarily
After quilting, trim the fabric circles so their edges align neatly.
Baste around the outer edge using a ¼-inch (6 mm) seam allowance.
This holds the layers together during final assembly.
Do not attach binding yet because the padded walls will be sewn to the base.
Step 6: Prepare the wall pieces
Cut the outer and inner wall strips according to the cutting guide.
If your fabric is not long enough, join shorter strips using straight seams.
Press the joining seams open.
Trim the completed strips to their required lengths.
Prepare the batting strips and set them aside.
How to Sew and Assemble the Quilted Cat Bed Walls
The padded wall is what gives the Quilted Cat Bed Pattern its distinctive round shape.
This construction uses two separate fabric rings joined at the top, with stuffing between them.
The outer ring is longer than the inner ring because it follows a larger circumference.
Step 1: Sew the outer wall ring
Fold the outer wall strip in half with the short ends together and right sides facing.
Sew the short ends using a ½-inch (1.3 cm) seam allowance.
Press the seam open.
You now have a circular outer wall.
Repeat the same process with the inner wall strip.
Step 2: Add the batting
Position the batting against the wrong side of each wall ring.
The batting should stop short of the upper and lower seam allowances.
Secure it with temporary basting stitches or a few simple quilting lines.
This helps the wall fabric maintain its shape and provides a smoother appearance.
Step 3: Join the upper wall edges
Place the outer and inner rings right sides together.
Align their upper raw edges.
Because the outer ring is longer, distribute the extra length evenly around the seam.
Use small, evenly spaced gathers or gentle easing on the outer ring.
Sew around the upper edge with a ½-inch seam allowance.
Turn the joined rings right side out.
The seam now forms the upper rim of the bed.
Step 4: Shape the padded wall
Arrange the inner ring inside the outer ring.
The two lower edges should remain separate.
Distribute the fabric evenly so the top edge forms a smooth circular rim.
Check that the inner wall is not twisted.
The wall should resemble a soft circular channel.
Step 5: Stuff the wall
Insert polyester fiberfill between the inner and outer rings through the open lower edges.
Work gradually around the entire wall.
Use enough stuffing to create a supportive shape without making the fabric excessively tight.
A moderately firm wall will stand more easily than an underfilled one.
Keep the stuffing away from the lower seam allowances.
Step 6: Secure the lower wall edges
Turn the lower raw edges inward by approximately ½ inch (1.3 cm).
Pin the inner and outer edges in position.
Hand-baste them separately if needed to keep the stuffing contained.
The padded wall is now ready to be attached to the quilted base.
Finishing the Cat Bed Pattern, Adding a Cushion, and Creating Professional Details
The final stage of the Cat Bed Pattern combines the quilted base, padded wall, and removable cushion.
Careful finishing helps the bed maintain its shape and provides a comfortable resting surface.
A well-made cat bed should feel soft, stable, and easy to maintain.
Step 1: Position the padded wall
Place the quilted base on a flat surface.
Center the padded wall on top.
The outer wall should sit close to the perimeter of the base.
Adjust the stuffing until the bed appears evenly rounded.
Mark the position of the wall on the base with removable fabric chalk.
Step 2: Attach the wall to the base
Using strong polyester thread, hand-sew the folded lower edge of the outer wall to the base with small, secure stitches.
Work around the circumference, keeping the wall evenly positioned.
Next, hand-sew the folded lower edge of the inner wall to the base.
The inner seam should sit approximately 2 inches (5 cm) inward from the outer seam.
This creates a soft, padded ring around the sleeping area.
Use small stitches that are securely anchored into the quilted base layers.
Step 3: Check the structure
Place the bed on a flat surface.
Inspect the wall for uneven stuffing.
Gently redistribute the fiberfill where necessary.
Check that the base remains flat and that the wall is securely attached.
Reinforce any weak areas with additional stitching.
Step 4: Sew the removable cushion
Place the two 14-inch (35.6 cm) cushion circles right sides together.
Sew around the edge with a ½-inch seam allowance, leaving a 4-inch (10 cm) opening.
Clip small notches in the curved seam allowance without cutting the stitching.
Turn the cushion right side out.
Fill it lightly with washable polyester stuffing.
Close the opening with a ladder stitch.
The finished cushion will measure approximately 13 inches (33 cm) across before stuffing changes its shape.
Step 5: Add decorative quilting details
If desired, add simple decorative stitching to the outside of the padded wall.
A few vertical quilting lines can create a gently segmented appearance.
For a more traditional quilted style, use coordinated fabric panels or patchwork strips.
Avoid buttons, beads, or other small embellishments that could become detached.
Step 6: Complete the final inspection
Check every seam and remove all pins.
Trim loose threads.
Make sure no stuffing is exposed.
Place the removable cushion inside the bed.
The finished DIY Quilted Cat Bed should have a comfortable padded base, soft raised sides, and a neat circular shape.
Creative Cat Bed Design Ideas
Floral Cottage Cat Bed: Choose delicate flower prints in sage green, ivory, and pink for a soft vintage appearance.
Patchwork Cat Bed: Use coordinated cotton squares to create a colorful outer wall. Assemble the squares into strips before cutting the final wall pieces.
Luxury Neutral Cat Bed: Combine cream cotton with beige or warm gray fabric for an understated design.
Recycled Denim Cat Bed: Use soft, clean denim from old jeans for the exterior, paired with a gentler fabric inside.
Christmas Cat Bed: Red, forest green, and white fabrics create a festive resting space during the holiday season.
Pastel Cat Bed: Lavender, baby blue, blush pink, and cream create a cheerful, delicate design.
Helpful Tips for Sewing a Beautiful Cat Bed
Choose washable fabrics. A pet bed should be easy to clean because fur, dust, and everyday dirt can accumulate quickly.
Avoid overstuffing. Too much filling can make the walls rigid and uncomfortable.
Use strong seams. Reinforced stitching helps the bed withstand regular movement.
Keep the cushion removable. A separate cushion is easier to wash and replace.
Measure your cat. A larger cat may need a wider sleeping area than the sample dimensions.
Check the bed regularly. Repair loose seams or damaged fabric before your cat continues using it.
Frequently Asked Questions About the Cat Bed Pattern
1. What is a Cat Bed Pattern?
A Cat Bed Pattern is a sewing design used to create a comfortable fabric resting place for cats, often featuring padding, quilted sections, and raised sides.
2. Is this Cat Bed Pattern suitable for beginners?
Yes, confident beginners can complete the project, although some experience sewing curves and working with quilted layers is helpful.
3. What is the best fabric for a handmade cat bed?
Quilting cotton, washable fleece, and sturdy cotton blends are good options.
4. How large should a cat bed be?
The bed should allow your cat to curl up comfortably. The sample has an interior diameter of approximately 14 inches (35.5 cm).
5. Can I make the cat bed larger?
Yes. Increase the base diameter and recalculate the wall circumferences to match the new inner and outer diameters.
6. What stuffing should I use?
Washable polyester fiberfill is a practical choice for the padded walls and cushion.
7. Can I use leftover quilting fabric?
Absolutely. Coordinated fabric scraps can create a beautiful patchwork cat bed.
8. Does the bed need quilt batting?
Batting is recommended because it provides structure and helps the fabric maintain a quilted appearance.
9. Can I make a cat bed without a sewing machine?
Yes, but hand sewing the entire bed will take considerably longer. Use strong, secure stitches.
10. Is the cushion removable?
Yes. This pattern includes a separate removable cushion for easier maintenance.
11. Can I wash the finished cat bed?
Washability depends on the fabrics, batting, stuffing, and construction. Test the materials and follow their care instructions. Spot cleaning may be preferable for the assembled outer bed.
12. Can I use fleece for the interior?
Yes. Washable fleece provides a soft surface that many cats find comfortable.
13. How do I make the bed more supportive?
Use an appropriate amount of stuffing and reinforce the seams. Avoid making the bed excessively firm.
14. Can I decorate the cat bed with buttons?
It is better to avoid small detachable decorations because they may create a choking hazard if chewed or swallowed.
15. Is a handmade quilted cat bed a good gift?
Yes. A thoughtfully constructed cat bed can make a lovely handmade gift for a cat owner.
Conclusion
The Cat Bed Pattern is a rewarding quilting and sewing project that combines creativity, comfort, and practical craftsmanship. With carefully chosen fabrics, a padded circular base, and soft raised walls, you can create a beautiful resting place designed especially for your cat.
This step-by-step quilted cat bed tutorial provides a flexible foundation for experimenting with traditional patchwork, vintage floral fabrics, modern color combinations, and recycled materials.
One of the greatest advantages of making your own DIY Fabric Cat Bed is the ability to customize its size and appearance. You can adapt the dimensions to your cat, coordinate the fabrics with your home, and create a design that feels personal and unique.
The removable cushion adds comfort and makes everyday maintenance easier, while the quilted construction provides texture and a handmade appearance.
By taking time to measure accurately, distribute the stuffing evenly, and reinforce the seams, you can create a durable and attractive finished project.
Whether you are sewing for your own pet or preparing a thoughtful handmade gift, this Cat Bed Pattern offers a wonderful opportunity to turn beautiful fabric into something both decorative and useful.