
The Cat Pocket Pillow Pattern is a charming sewing and quilting project that combines adorable animal appliqués with practical storage. Featuring two colorful fabric cats and a spacious front pocket, this handmade cushion is perfect for organizing television remotes, reading glasses, and other small everyday essentials. Its cheerful design makes it a lovely addition to a living room, bedroom, reading chair, or cozy family corner.
One of the most delightful features of this Quilted Cat Pocket Pillow is the playful combination of colors and textures. The reference image shows a soft cream-colored pillow decorated with two tall cats, one in bright yellow and the other in dusty pink. Both have pointed ears, embroidered whiskers, little triangular noses, and contrasting fabric bellies. A coordinating yellow pocket runs across the lower front of the pillow, creating a practical place to keep small accessories within easy reach.
Unlike an ordinary decorative cushion, this Cat Remote Control Holder Pillow serves two purposes. It adds personality to your furniture while helping keep frequently used items organized. The cats themselves can also become functional pockets, with their upper openings designed to hold lightweight remote controls. This combination of decorative appliqué and useful storage makes the project especially appealing to anyone who enjoys handmade home accessories.
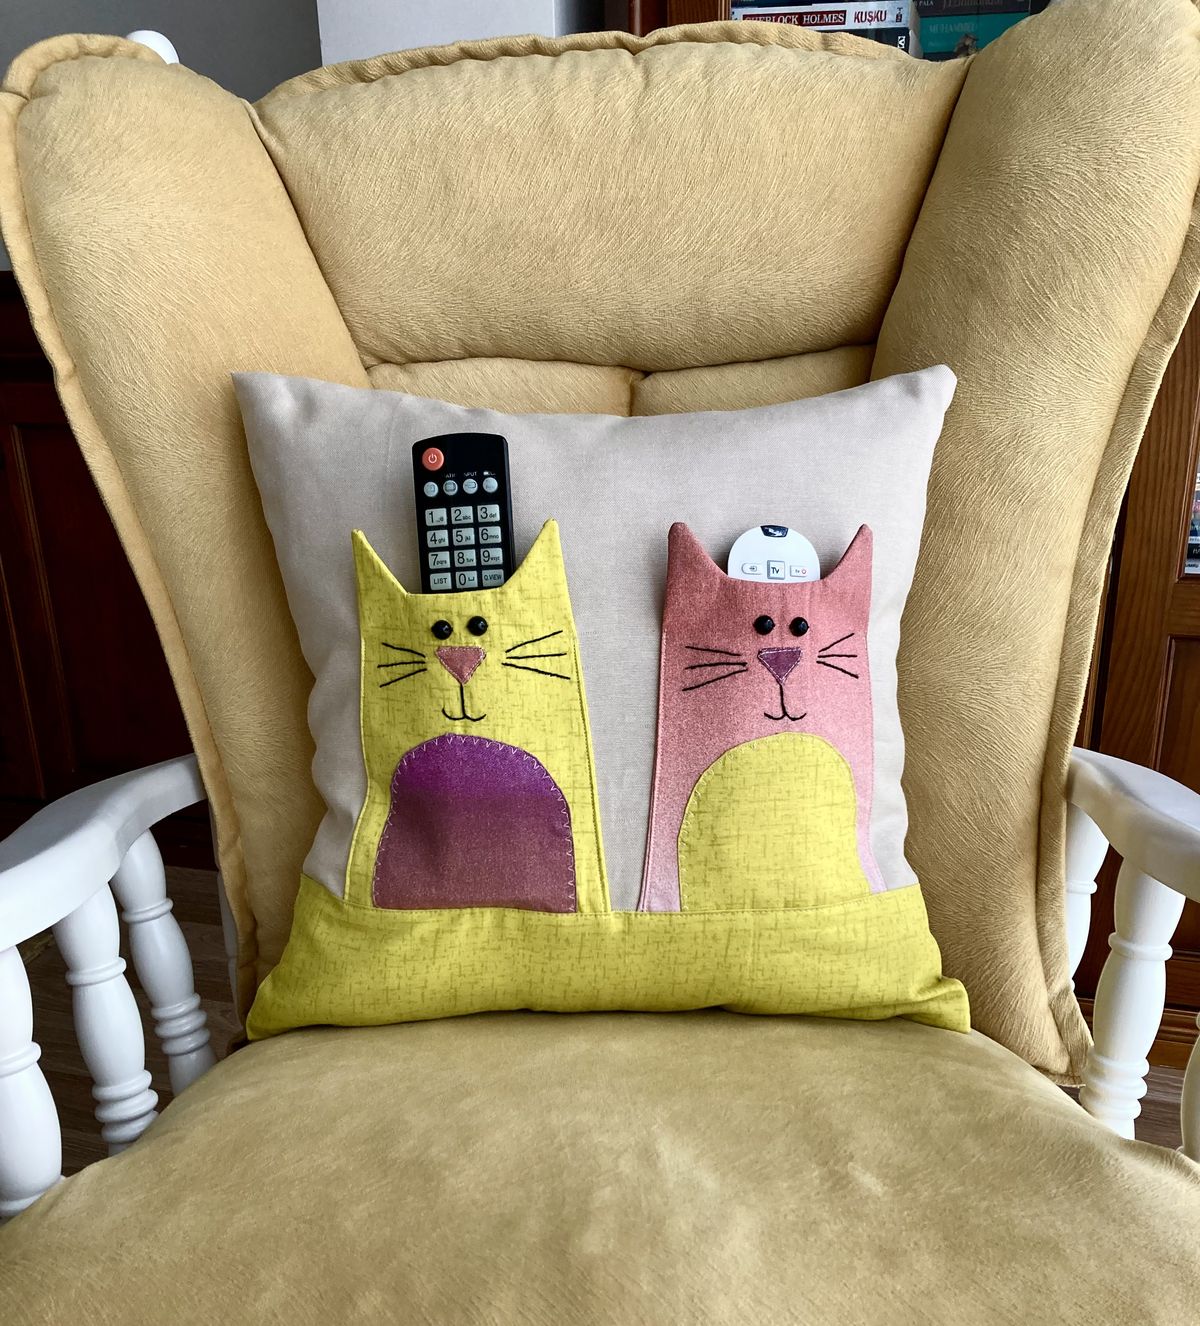
In this complete Cat Pocket Pillow Tutorial, you will learn how to choose coordinating fabrics, prepare the pillow pieces, create the cat-shaped pockets, sew the decorative faces, assemble the large front pocket, and finish the cushion with a removable envelope-style back. The instructions include measurements in inches and centimeters, practical sewing tips, and creative variations to help you make a beautiful pillow inspired by the reference image.
DISCOVER MORE FREE PATTERNS HERE!
Materials, Fabric Measurements, and Preparation for the Cat Pocket Pillow Pattern
Before beginning your Cat Pocket Pillow Pattern, choose fabrics that are comfortable, durable, and easy to sew. Quilting cotton is an excellent option because it comes in a wide variety of colors and prints. It also provides enough structure for appliqué details while remaining soft enough for decorative cushions.
For the main pillow background, choose ivory, cream, or light beige fabric. These neutral colors allow the colorful cats to stand out beautifully. Yellow and dusty pink are wonderful choices for the cats, while contrasting belly fabrics add extra visual interest.
The lower pocket should coordinate with at least one of the cats. In the reference image, the yellow pocket connects the entire design and creates a balanced appearance. You can reproduce this color combination or experiment with vintage florals, pastel shades, or bright patchwork fabrics.
Materials needed
- ½ yard of cream or ivory quilting cotton for the pillow front.
- ¾ yard of coordinating cotton fabric for the envelope back and lining.
- ¼ yard of yellow quilting cotton for the first cat and lower pocket.
- ¼ yard of dusty pink quilting cotton for the second cat.
- Small scraps of purple, mauve, or contrasting fabric for the cat bellies.
- Small scraps of pink or burgundy fabric for the noses.
- Lightweight fusible interfacing.
- Fusible web for appliqué, optional.
- Black embroidery floss.
- Two pairs of small black buttons or embroidered eyes.
- Coordinating sewing thread.
- Polyester batting or thin fusible fleece, optional.
- 18 × 18-inch (46 × 46 cm) pillow insert.
- Sewing machine.
- Fabric scissors or rotary cutter.
- Cutting mat and quilting ruler.
- Iron and ironing board.
- Pins or sewing clips.
- Hand-sewing needle.
- Fabric marking pencil.
- Paper for creating the cat templates.
For a pillow intended for young children, use embroidered eyes instead of buttons to avoid detachable small parts.
Finished pillow measurements
The finished cushion is designed to measure approximately 18 × 18 inches (46 × 46 cm).
| Component | Cutting Measurements |
|---|---|
| Pillow front | 18½ × 18½ in (47 × 47 cm) |
| Upper back panel | 18½ × 13 in (47 × 33 cm) |
| Lower back panel | 18½ × 13 in (47 × 33 cm) |
| Lower pocket exterior | 18½ × 5½ in (47 × 14 cm) |
| Lower pocket lining | 18½ × 5½ in (47 × 14 cm) |
| Each cat body | Approximately 5½ × 10½ in (14 × 27 cm) |
| Each cat belly | Approximately 3½ × 4½ in (9 × 11.5 cm) |
All measurements include seam allowances unless otherwise stated.
Use a ¼-inch seam allowance for appliqué and pocket construction, and a ¼-inch seam allowance for the final pillow assembly.
Understanding the pillow construction
The Cat Pocket Pillow Pattern consists of four main sections.
The first is the cream-colored pillow front, which provides the background for the decorative design.
The second consists of two fabric cat pockets, each with pointed ears and embroidered facial features.
The third is a long horizontal pocket positioned across the lower front of the cushion.
The fourth is the envelope-style pillow back, which allows the insert to be removed for washing.
The project combines basic patchwork techniques, appliqué, embroidery, and straight machine sewing.
Step-by-Step Cat Pocket Pillow Pattern: Making the Fabric Cats
The two cats are the most recognizable feature of this Quilted Cat Pillow Pattern.
Their tall bodies, pointed ears, and playful expressions create the charming appearance shown in the reference image.
For this tutorial, the cats will be constructed as separate lined fabric pockets and then attached to the pillow front.
Step 1: Create the cat templates
On a sheet of paper, draw a cat body approximately 5½ inches wide and 10½ inches tall.
The lower portion should be rectangular with slightly rounded sides.
At the top, draw two pointed triangular ears.
The center between the ears should form a shallow curved opening.
Keep the bottom edge straight.
Cut out the paper template.
Use the same template for both cats so their sizes match.
Step 2: Cut the cat fabric pieces
Place the template on the yellow fabric.
Cut one cat-shaped exterior piece.
Cut a matching piece from the lining fabric.
Repeat using dusty pink fabric for the second cat.
You should now have four cat-shaped pieces.
Cut two matching pieces of lightweight fusible interfacing.
Fuse the interfacing to the wrong side of the exterior cat pieces.
This helps the pockets maintain their shape.
Step 3: Prepare the cat bellies
Draw a rounded rectangle or soft oval approximately 3½ inches wide and 4½ inches tall.
Cut one belly from purple fabric.
Cut another from pale yellow or cream fabric.
Apply fusible web to the wrong side of each belly piece if desired.
Position the purple belly on the yellow cat.
Position the pale yellow belly on the pink cat.
Center each belly on the lower half of the cat body.
Step 4: Sew the belly appliqués
Fuse the belly pieces in place according to the fusible web instructions.
Set your sewing machine to a narrow zigzag or blanket stitch.
Sew carefully around the edge of each belly.
Use thread that coordinates with the fabric.
For a handmade appearance, choose a contrasting thread color.
The reference image features visible decorative stitching around the belly shapes.
This detail adds texture and reinforces the appliqué.
Step 5: Create the cat faces
Mark the eye positions approximately 2 inches below the top of the ears.
Place the eyes evenly on either side of the center line.
Use black embroidery floss to create small round eyes.
Alternatively, attach buttons securely if the pillow is intended for adult use.
Cut a small triangular nose from contrasting fabric.
Position the nose below the eyes.
Sew around the nose using a small blanket stitch.
Step 6: Embroider the whiskers and mouth
Thread a hand-sewing needle with black embroidery floss.
Begin at the center below the nose.
Create a short vertical line.
Add two small curved stitches to form the mouth.
Embroider three whiskers extending outward from each side of the face.
Keep the whiskers approximately 1–1½ inches long.
Repeat for the second cat.
The expressions should look cheerful and balanced.
Step 7: Sew the cat pocket lining
Place one decorated cat exterior right sides together with its matching lining piece.
Pin around the sides and ear shapes.
Sew around the upper ear contours and down both sides, leaving the straight bottom edge open.
Clip carefully into the valley between the ears without cutting the stitching.
Trim excess fabric at the ear tips.
Turn the cat right side out through the bottom opening.
Use a blunt turning tool to shape the ears.
Press gently.
Repeat for the second cat.
Step 8: Finish the cat pockets
Fold the raw bottom edges inward by ¼ inch.
Press.
Topstitch along the shaped upper edge, including the ears and center opening.
Do not sew the opening between the ears closed.
This opening will allow a small remote control to slide into the pocket.
Repeat for the second cat.
The cat pieces are now ready to attach to the pillow.
How to Assemble the Cat Pocket Pillow and Sew the Front Organizer Pocket
Once the cats are complete, you can begin assembling the pillow front.
This stage combines decorative placement with practical pocket construction.
Step 1: Prepare the pillow front
Cut one cream-colored fabric square measuring 18½ × 18½ inches.
Press the fabric.
If desired, fuse lightweight interfacing to the wrong side.
For a quilted appearance, place a thin layer of batting behind the fabric.
Secure the layers with temporary basting stitches.
You can quilt simple diagonal lines or a subtle grid pattern across the background.
Keep the quilting light so the fabric remains soft.
Step 2: Position the cats
Lay the pillow front on a flat surface.
Position the yellow cat on the left.
Place the dusty pink cat on the right.
Keep the cats approximately 1½ inches apart.
Position their lower edges approximately 3 inches above the bottom edge of the pillow front.
Check that both cats are centered.
Use pins to hold them in place.
Step 3: Attach the cat pockets
Sew along the left side, bottom edge, and right side of each cat.
Use a narrow ⅛-inch topstitching allowance.
Leave the shaped upper edge open.
This creates two separate cat-shaped pockets.
Reinforce the stitching near the upper corners.
These points receive additional stress when remote controls are inserted.
Check that both pockets open easily.
Step 4: Prepare the lower pocket
Cut two rectangles measuring 18½ × 5½ inches.
Use yellow fabric for the exterior.
Use coordinating cotton for the lining.
Place the pieces right sides together.
Sew along one long edge using a ¼-inch seam allowance.
Open the fabric and press the seam.
Fold the pieces wrong sides together.
Press the finished upper edge.
Topstitch approximately ⅛ inch from the fold.
The pocket should now measure approximately 5 inches tall.
Step 5: Position the lower pocket
Place the lower pocket across the bottom of the pillow front.
Align its raw bottom and side edges with the pillow front edges.
The finished upper edge should overlap the lower portions of the cat pockets.
This creates the layered appearance shown in the reference image.
Pin the pocket securely.
Baste along the side and bottom edges using a ⅛-inch seam allowance.
Step 6: Create optional pocket divisions
If desired, divide the lower pocket into smaller compartments.
Measure approximately 6 inches from the left edge.
Mark a vertical line from the upper pocket edge to the bottom.
Sew along the marked line.
Repeat on the opposite side.
This creates three compartments for small accessories.
For a design closer to the reference image, leave the lower pocket as one continuous compartment.
Step 7: Prepare the envelope back
Cut two backing rectangles measuring 18½ × 13 inches.
On one long edge of each rectangle, fold the fabric toward the wrong side by ¼ inch.
Press.
Fold again by ½ inch.
Press and stitch the hem.
These finished edges will overlap at the center back.
Step 8: Assemble the pillow cover
Place the completed pillow front right side up.
Position the two backing panels over it, right sides facing down.
Align the raw outer edges.
The hemmed edges should overlap in the center.
Pin or clip around all four sides.
Sew around the pillow using a ¼-inch seam allowance.
Reinforce the corners.
Trim the corners diagonally without cutting the stitching.
Turn the pillow cover right side out through the envelope opening.
Step 9: Insert the pillow form
Gently push out the corners.
Press the pillow cover.
Insert the 18 × 18-inch pillow form.
Adjust the filling so it reaches the corners.
Smooth the front.
Check that the cat pockets and lower organizer pocket remain accessible.
Your Cat Pocket Pillow is now complete.
Creative Cat Pocket Pillow Designs, Color Combinations, and Professional Finishing Tips
The Cat Pocket Pillow Pattern offers many opportunities for customization.
You can recreate the bright yellow and pink combination shown in the reference image or choose colors that coordinate with your home décor.
The design can also be adapted for children’s bedrooms, reading corners, craft rooms, and personalized gifts.
Step 1: Create a vintage cat pillow
Choose dusty rose, sage green, cream, and muted mustard fabrics.
Use small floral prints for the cat bellies.
Add decorative blanket stitching around the appliqués.
This creates a soft vintage-inspired appearance.
The finished pillow looks beautiful on neutral sofas and armchairs.
Step 2: Make a colorful patchwork cat pillow
Instead of using solid fabric for the cats, create small patchwork panels.
Join fabric scraps into rectangles.
Press the seams.
Use the cat template to cut the shapes from the patchwork fabric.
This creates a cheerful scrappy design.
Each cat can feature a different combination of colors.
Step 3: Create a black-and-white cat version
Use black fabric for one cat and white fabric for the other.
Choose gray or red fabric for the bellies.
Use contrasting embroidery thread for the faces.
This creates a classic cat-inspired appearance.
A red lower pocket can add a striking accent.
Step 4: Personalize the pillow with names
Embroider a name or short message on the lower pocket.
You can also add small fabric hearts or stars.
Use coordinating thread for a polished finish.
Personalized details make the pillow a thoughtful handmade gift.
Step 5: Add decorative quilting
Quilt small diagonal lines across the cream background.
Alternatively, use free-motion quilting to create simple floral shapes.
Avoid quilting through the pocket openings.
Decorative quilting adds texture and helps stabilize the pillow front.
Step 6: Finish the pillow professionally
Check all seams carefully.
Trim loose threads.
Reinforce the upper corners of the pockets.
Press the cover gently.
Inspect the envelope opening.
Make sure the pillow insert fits comfortably.
The finished cushion should look smooth and balanced.
Beautiful Color Combinations for the Cat Pocket Pillow Pattern
Yellow, Dusty Pink, and Cream: A cheerful combination inspired by the reference image.
Sage Green, Ivory, and Blush Pink: A delicate vintage palette with a soft, elegant appearance.
Lavender, White, and Pale Yellow: A playful pastel combination suitable for a cozy bedroom.
Terracotta, Mustard, and Beige: A warm rustic palette that complements farmhouse décor.
Navy Blue, White, and Red: A classic combination with strong contrast.
Emerald Green, Cream, and Gold: A sophisticated palette that creates a beautiful decorative accent.
Helpful Tips for a Perfect Cat Pocket Pillow
Use sturdy cotton fabrics. Durable fabrics help the pockets maintain their shape.
Reinforce the pocket openings. Additional stitching prevents stress points from tearing.
Choose washable materials. Removable pillow covers are easier to clean.
Use embroidered eyes for children’s pillows. Avoid detachable small decorations.
Measure remote controls before sewing. Adjust the cat pocket width to fit your accessories.
Press every seam. Careful pressing creates a more professional finished pillow.
Frequently Asked Questions About the Cat Pocket Pillow Pattern
1. Is the Cat Pocket Pillow Pattern suitable for beginners?
Yes. The project is suitable for confident beginners who understand basic sewing, appliqué, and simple embroidery techniques.
2. What fabric is best for this pillow?
Quilting cotton is an excellent choice because it is easy to sew and available in many colors.
3. What size is the finished pillow?
The finished cushion measures approximately 18 × 18 inches.
4. Can I make the pillow larger?
Yes. Increase the front and back measurements and adjust the cat templates proportionally.
5. Can I use fabric scraps?
Absolutely. Fabric scraps are perfect for the cat bellies, noses, and decorative details.
6. Are the cats functional pockets?
Yes. The cats are designed with open upper edges to hold lightweight remote controls and small accessories.
7. Can I make the pillow without the lower pocket?
Yes. The cat pockets can be used alone for a simpler design.
8. Can I use buttons for the eyes?
Yes, for adult-use pillows. For children’s pillows, embroidered eyes are a safer choice.
9. How do I prevent the pockets from tearing?
Reinforce the upper corners and use sturdy fabric with appropriate interfacing.
10. Can I add more cats?
Yes. You can create three smaller cats or adjust the layout to include additional appliqués.
11. Can I quilt the pillow front?
Yes. Light quilting adds texture and helps stabilize the fabric.
12. How do I wash the pillow cover?
Remove the insert and follow the fabric manufacturer’s care instructions. Gentle washing is recommended for appliqué details.
13. Can I use fleece fabric?
Yes, although fleece may stretch more than quilting cotton and may require additional stabilization.
14. Can I make matching accessories?
Yes. The same cat design can be adapted into wall organizers, tote bags, fabric baskets, and decorative cushions.
15. Can I sell handmade Cat Pocket Pillows?
Handmade pillows created from your own work can generally be sold, subject to applicable pattern rights, product safety requirements, and local regulations.
Conclusion
The Cat Pocket Pillow Pattern is a delightful sewing and quilting project that combines adorable animal designs with practical everyday organization. Its colorful fabric cats, embroidered facial details, and spacious front pocket create a charming handmade accessory that is both decorative and useful.
One of the greatest advantages of this design is its versatility. You can customize the colors, fabrics, pocket sizes, and decorative details to create a pillow that perfectly matches your home décor.
The project also provides an enjoyable opportunity to practice appliqué, embroidery, pocket construction, quilting, and envelope-style pillow assembly.
For anyone who loves cats and handmade home accessories, this Quilted Cat Remote Control Pillow is a wonderful choice. It keeps small essentials within easy reach while adding personality to a favorite chair or sofa.
Whether you choose the cheerful yellow-and-pink combination shown in the reference image or experiment with vintage florals, soft pastels, or bold contrasting fabrics, the finished cushion can become a unique handmade treasure.
With careful measurements, neat stitching, and attention to the finishing details, your Handmade Cat Pocket Pillow can bring comfort, creativity, and a little feline charm to your home for many years.