
Cat Quilt Block Pattern is a creative quilting project that transforms a collection of curved fabric pieces into an elegant sitting cat with a long curled tail. This design is especially attractive for quilters who enjoy scrap quilting, curved appliqué, animal quilt blocks, and fabric collage techniques. By dividing the cat silhouette into individual sections, different fabrics can be combined to create realistic markings or a colorful patchwork effect.
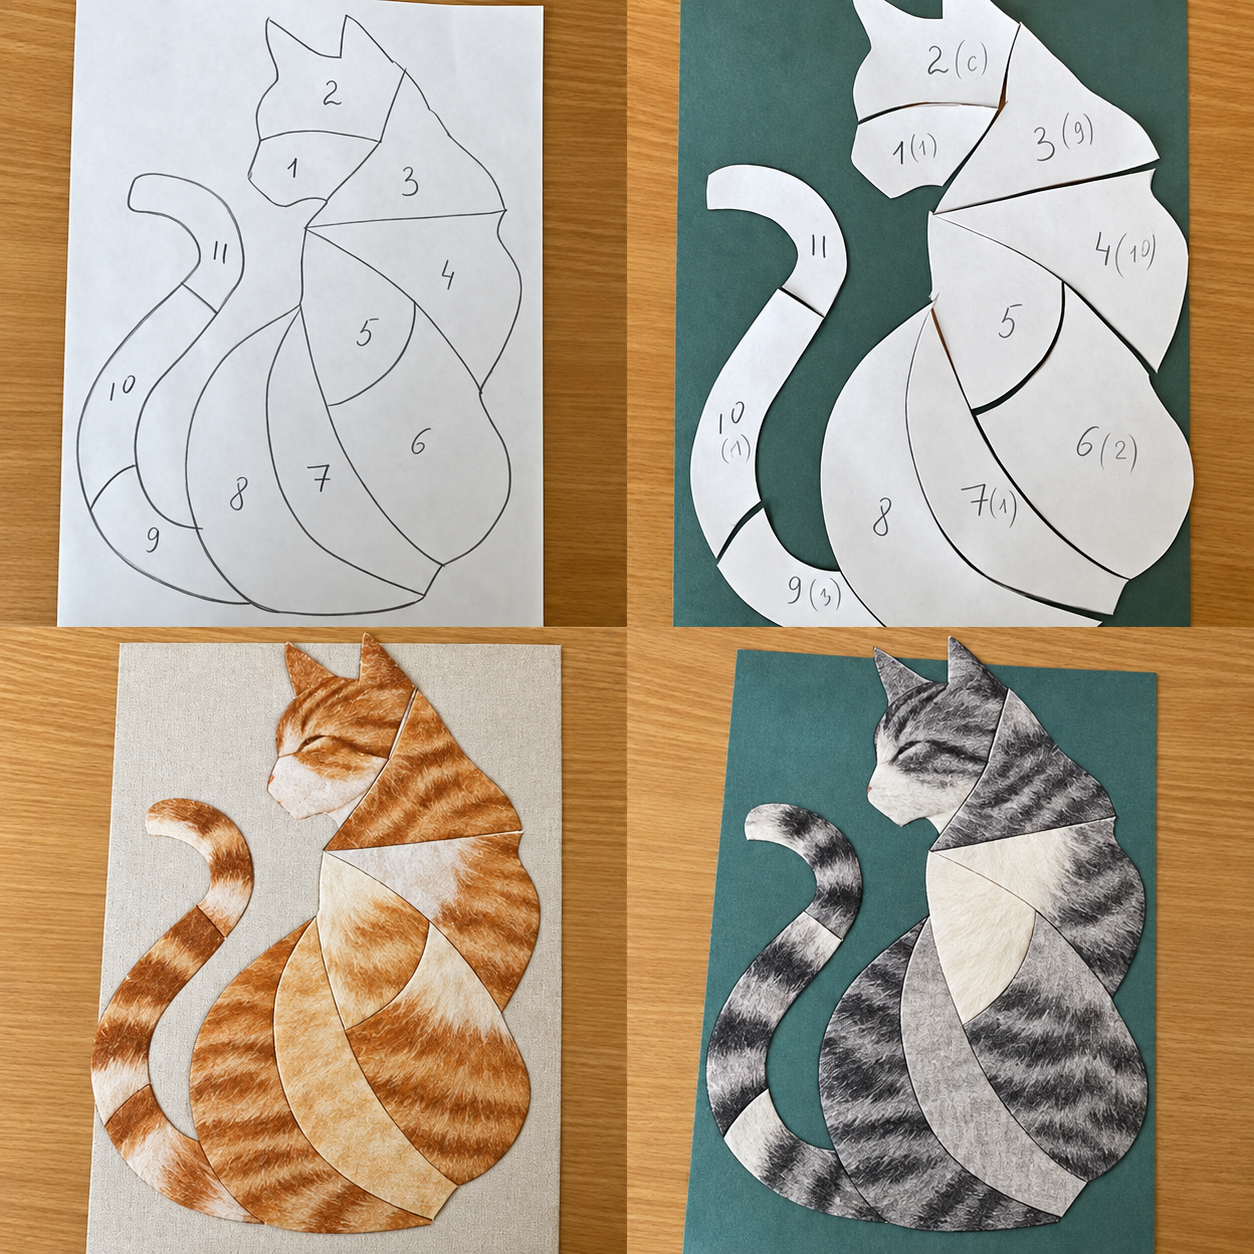
The design shown in the reference uses approximately eleven main sections to build the head, neck, chest, body, back, and curved tail. The pieces fit together like a fabric puzzle, which makes this Cat Quilt Block Pattern an excellent project for using coordinated scraps. Orange, cream, gray, black, brown, and white fabrics can create realistic cats, while floral prints, batiks, or bright scraps can produce a more artistic interpretation.
Unlike a traditional square made entirely from straight seams, this project relies heavily on smooth curves and careful positioning. Beginners can simplify construction by using raw-edge fusible appliqué, while experienced quilters can use turned-edge appliqué or carefully piece selected sections. The instructions below are designed around an appliqué-friendly approach because it makes the distinctive cat silhouette easier to reproduce accurately.
Materials, Measurements and Preparing the Cat Pattern
Choose a background fabric that provides strong contrast with the cat. For a block approximately 14 × 16 inches (35.5 × 40.5 cm), begin with a background rectangle around 16 × 18 inches (40.5 × 45.5 cm). The extra fabric allows the block to be squared after quilting.
DISCOVER MORE FREE PATTERNS HERE!
For the cat itself, collect approximately ¼–½ yard (0.23–0.46 m) total of assorted cotton fabrics. Small scraps are ideal because most individual sections require relatively little material.
Use 100% quilting cotton whenever possible. Stable woven fabric is easier to trace, cut, fuse, and stitch than stretchy materials.
You will also need lightweight paper-backed fusible web if using raw-edge appliqué. Choose a product intended for machine-sewn appliqué rather than an extremely heavy adhesive, which can make the finished block stiff.
Additional supplies include sharp fabric scissors, small detail scissors, an iron, pressing surface, fabric marker, tracing pencil, pins or appliqué glue, coordinating thread, sewing machine, and an optional light box for tracing.
The cat can be approximately 11–12 inches (28–30.5 cm) wide, including the tail, and approximately 13–14 inches (33–35.5 cm) tall. Resize the template proportionally if you want a smaller or larger block.
The reference design can be interpreted as approximately 11 individual pattern sections. Pieces 1–3 create much of the face, head, and upper neck; pieces 4–8 form the chest and rounded body; and pieces 9–11 construct the curled tail.
Before cutting fabric, make a complete paper version of the cat. Cut the individual template pieces and assemble them on a table.
This paper test is important. It lets you understand which edges touch before valuable fabric is cut.
Label the paper templates temporarily while working. Even if you eventually want an unlabeled printable template, construction numbers are useful during preparation.
Remember that fusible appliqué reverses shapes when they are traced onto the paper side of fusible web. If orientation matters, reverse your master template before tracing.
For a realistic orange tabby, combine rust, caramel, cream, and golden brown. For a gray tabby, use charcoal, silver, gray, cream, and black.
If you prefer a scrappy cat, ignore realistic coloring altogether. Every section can be made from a different fabric while maintaining the recognizable silhouette.
Cutting and Building the Cat Quilt Block
Begin by tracing each pattern section onto the paper side of your fusible web. Leave approximately ½ inch (1.3 cm) between neighboring shapes.
Cut roughly around each traced shape rather than cutting directly on the final line.
Fuse each section to the wrong side of its selected fabric according to the manufacturer’s temperature recommendations.
Allow the fabric to cool completely. Then cut each shape accurately along the traced outline.
Arrange all pieces on your work surface before removing the paper backing. This gives you another opportunity to correct fabric placement.
Start assembling the cat from the head. The muzzle or lower facial section should connect smoothly with the forehead and ear section.
Position the larger neck piece behind or immediately beside the head sections. Look carefully at the outer silhouette rather than concentrating only on internal seams.
Continue downward with the shoulder and chest pieces. The central chest section creates an important visual transition between the upper body and the rounded lower torso.
Arrange the larger curved body pieces next. Their edges should create the characteristic seated-cat shape, with a full rounded belly narrowing toward the base.
Add the long inner body section. This piece creates visual movement through the center of the cat and can be made from a lighter fabric for contrast.
Continue with the outer back and lower body pieces. Make sure the bottom edges collectively form a smooth resting line.
Now construct the tail. Begin with the lowest tail section near the body and work upward through the curved middle section.
The final tail section should curl upward beside the cat. Adjust it carefully so the negative space between the tail and body remains visible.
Once you are satisfied with the complete arrangement, photograph it with your phone before moving anything. This provides an easy reference if a piece shifts.
Remove the paper backing and position the sections again on the background.
Follow the fusible manufacturer’s instructions to secure the pieces permanently. Work gradually rather than pressing the entire design immediately.
Protect your iron and ironing board with parchment or an appliqué pressing sheet whenever exposed adhesive might be present.
Allow the block to cool flat before stitching.
Appliqué Stitching, Quilting and Adding Detail
After fusing, secure the edges with machine stitching. A blanket stitch, narrow zigzag, or straight raw-edge appliqué stitch can all work well.
For a traditional decorative appearance, blanket stitch around each section using dark thread. This creates visible outlines similar to those often seen in folk-art animal quilts.
If you prefer a cleaner contemporary style, use thread colors that closely match each fabric.
Begin with interior seams before stitching around the complete outside silhouette. This helps keep the individual sections visually defined.
Reduce your sewing speed around tight curves. Stop with the needle down, raise the presser foot, pivot slightly, and continue.
The ears contain sharper angles than the body. Take additional care at their points so they remain crisp.
When stitching the tail, follow the curves gradually. Avoid pulling the background fabric because this can cause distortion.
Once every appliqué piece has been secured, press the block from the back.
Now add optional facial details. The eye can be embroidered, appliquéd, or created with a small fabric shape.
A subtle nose and mouth can be added with dark embroidery thread. Keep these details small so they complement rather than dominate the patchwork.
Tabby stripes can also be suggested through quilting lines or embroidery.
To turn the block into a quilted panel, prepare a quilt sandwich consisting of the finished top, batting, and backing.
Baste the three layers using your preferred method.
Quilt the background more densely than the cat if you want the animal to stand slightly forward from the surface.
Simple free-motion stippling works beautifully around an appliqué cat. Straight-line quilting or gentle wavy lines are easier alternatives.
Within the cat, quilt selectively. Following the internal curved sections emphasizes the patchwork construction.
After quilting, square the block to its intended dimensions.
A finished 14 × 16-inch (35.5 × 40.5 cm) panel works nicely for wall décor, but the dimensions can be changed freely.
Finishing Ideas and Ways to Use the Cat Quilt Block
The completed Cat Quilt Block Pattern does not need to remain a single decorative panel. It can become the central motif in many larger sewing projects.
For a wall hanging, add a narrow inner border around the block followed by a wider contrasting border.
A finished wall quilt around 18 × 22 inches (45.5 × 56 cm) is large enough to display the cat clearly without becoming difficult to hang.
You can also use the block for a decorative pillow. Adjust the background so the completed appliqué fits a standard 16-inch or 18-inch cushion cover.
For a tote bag, reduce the cat pattern to approximately 8–10 inches (20–25.5 cm) tall and appliqué it onto the front panel before constructing the bag.
Another option is to create several cats in different fabric combinations. Arrange them as individual blocks in a larger cat-themed quilt.
For example, make an orange tabby, gray tabby, black-and-white tuxedo cat, calico, and multicolored scrap cat.
Keep the same template but change the fabric placement. The identical silhouette can look completely different depending on where light and dark fabrics are positioned.
The design is particularly useful for leftover fabrics. Because several pieces are relatively small, it is a practical scrap-busting quilt project.
Consider using fabrics from previous quilts. This can transform the cat block into a memory project containing recognizable scraps from earlier handmade pieces.
Batiks are another excellent choice because their subtle color changes resemble natural fur without requiring complicated piecing.
For a modern interpretation, use solid fabrics. Choose three or four values of the same color, such as light gray, medium gray, charcoal, and black.
You can even create a rainbow cat by progressing through colors from the head to the tail.
When making several blocks, keep the background consistent. This gives a multi-cat quilt visual unity even when every cat uses different fabrics.
Finish a standalone panel with traditional double-fold binding. A 2¼-inch (5.7 cm) binding strip is a common starting width.
Add a hanging sleeve to the back if the finished quilt will be displayed on a wall.
Finally, label the project with the completion date and any personal information you wish to preserve. Handmade animal quilts often become favorite decorative pieces or gifts.
FAQ – Cat Quilt Block Pattern
Is the Cat Quilt Block Pattern suitable for beginners?
Yes, particularly when made with fusible raw-edge appliqué. Traditional curved piecing would require more advanced sewing skills.
How large should the cat be?
A useful starting size is approximately 11–12 inches (28–30.5 cm) wide and 13–14 inches (33–35.5 cm) tall, including the tail.
How many pattern pieces are required?
The reference design can be constructed with approximately 11 main sections, although templates can be simplified or subdivided further.
What fabric is best?
100% quilting cotton is recommended because it remains stable during tracing, cutting, fusing, and stitching.
Can I use fabric scraps?
Absolutely. This is an excellent scrap quilt pattern because each section can be cut from a different leftover fabric.
Should I add seam allowance to the templates?
For raw-edge fusible appliqué, normally no seam allowance is necessary. For turned-edge appliqué or traditional piecing, additional fabric will be required.
Can I hand appliqué the cat?
Yes. Add the appropriate turning allowance around each template and use needle-turn or prepared-edge appliqué techniques.
How do I keep all the pieces organized?
Number the temporary paper templates and arrange the cut fabric pieces in order before assembly.
What stitch should I use around the appliqué?
Blanket stitch, zigzag, satin stitch, or a simple straight stitch can all be used depending on the desired finish.
Can I make a realistic tabby cat?
Yes. Choose directional prints or mottled fabrics that resemble fur and plan the stripe direction before cutting.
Can this block become a pillow?
Yes. Center the appliqué on a background large enough for your intended cushion dimensions.
Can I enlarge the template for a wall hanging?
Yes. Enlarge every pattern piece by the same percentage so the pieces continue to fit together correctly.
What batting should I use?
Low-loft cotton or cotton-blend batting works very well for an appliqué wall quilt.
How do I prevent the background from puckering?
Use lightweight fusible web, avoid excessive heat, stitch without stretching the fabric, and baste the quilt sandwich carefully.
Should I quilt over the cat?
You can. Light quilting following the curved sections helps emphasize the animal’s shape while keeping the appliqué secure.
How can I make several cats look different?
Change the placement of light, medium, and dark fabrics. Even when using exactly the same template, different color arrangements can create dramatically different cats.
Conclusion
The Cat Quilt Block Pattern is an appealing way to combine animal appliqué, scrap quilting, curved shapes, and creative fabric placement in one manageable project. Its seated silhouette, pointed ears, rounded body, and long curled tail make the cat instantly recognizable even when every section is made from a different fabric.
The key to a successful block is preparation. Make a complete paper mock-up first, organize the individual sections, and test the arrangement before permanently fusing anything. Pay particular attention to the head, central body curves, and tail because these areas define the character of the finished cat.
Fabric selection provides endless possibilities. Warm orange and cream pieces can create a convincing ginger tabby, while gray, charcoal, and white produce a beautiful silver cat. Floral fabrics, batiks, solids, and colorful scraps can transform the same Cat Quilt Block Pattern into a completely different artistic design.
Once completed, the block can become a wall hanging, pillow, tote bag panel, table decoration, memory quilt, or larger cat-themed quilt. It is also an excellent way to turn treasured fabric scraps into a distinctive handmade project that showcases both quilting technique and personality.