
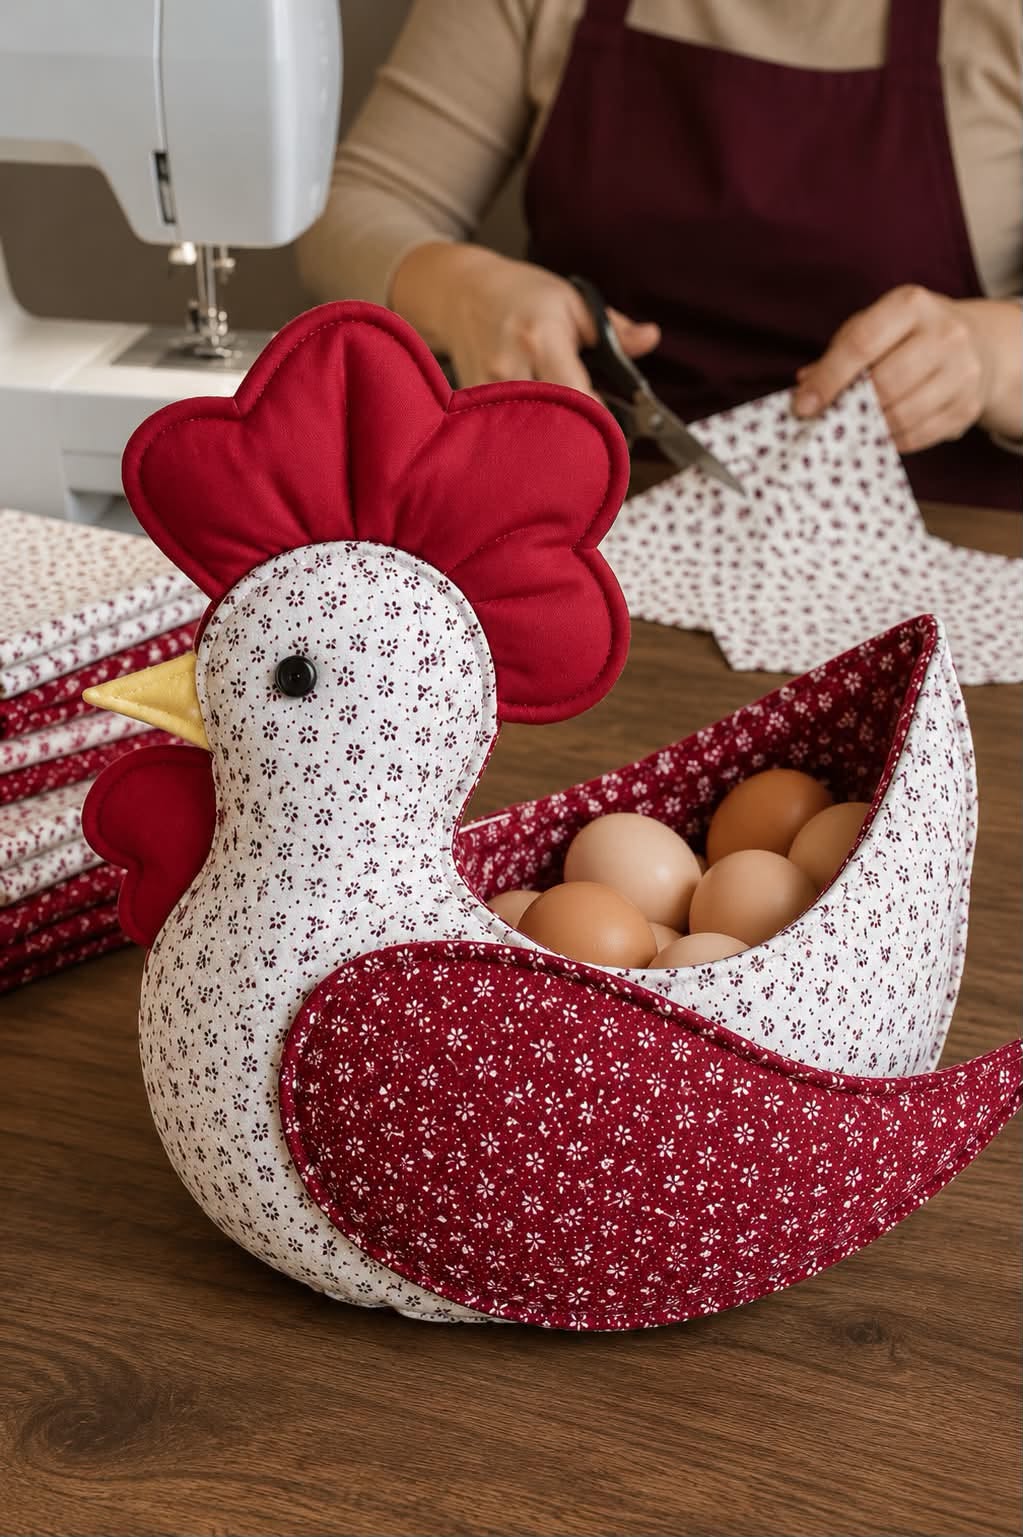
Chicken Egg Basket Pattern is a delightful quilted sewing project that combines practical kitchen storage with the warm personality of handmade country décor. Inspired by the charming fabric chicken shown in the reference image, this project creates a three-dimensional hen with an open back that functions as a soft basket for holding eggs or lightweight decorative items. With its curved body, oversized wing, bright comb, contrasting lining, and carefully finished edges, the design is an excellent way to practice quilting, appliqué, curved sewing, binding, and dimensional construction in one creative project.
What makes this Chicken Egg Basket Pattern especially appealing is how easily it can be personalized. Traditional red and cream fabrics create the farmhouse appearance seen in the inspiration photo, while yellow, sage green, blue, gingham, floral prints, or patchwork scraps can completely change its character. The wing provides a generous area for showcasing a favorite fabric, and the comb, wattle, beak, lining, and piping offer additional opportunities for coordinating contrasting colors. The finished chicken is decorative enough to display on a kitchen counter while remaining useful as a fabric basket.
Although the finished project looks detailed, its construction becomes much easier when divided into individual components. The main body is created from mirrored side panels that curve upward to form the neck and tail, while a shaped gusset or base provides width and stability. Batting gives the basket structure, and the open upper section creates the egg-holding compartment. This tutorial explains a practical method for recreating the project from the photograph. Because the image is a visual reference rather than a measured commercial template, the suggested dimensions can be adjusted according to your preferred finished size.
Materials, Measurements, and Preparing the Chicken Egg Basket Pattern
For a medium Chicken Egg Basket Pattern, prepare approximately 1/2 yard (46 cm) of quilting cotton for the main chicken body. A small floral print on a cream or white background works beautifully because it creates a soft traditional appearance while allowing the contrasting details to stand out.
DISCOVER MORE FREE PATTERNS HERE!
You will also need approximately 1/3 yard (30 cm) of contrasting fabric for the basket lining and wing. In the reference style, deep red fabric works particularly well against the lighter body. Prepare additional scraps of solid red for the comb and wattle and yellow or gold fabric for the beak.
Use cotton or polyester batting to give the chicken its characteristic quilted structure. Medium-loft batting works well because it creates softness without making the seams excessively bulky. Fusible fleece can also be used when you want the basket walls to remain more upright.
Other useful supplies include matching sewing thread, pins or sewing clips, a fabric marker, paper for templates, fabric scissors or a rotary cutter, a cutting mat, iron, sewing machine, hand-sewing needle, and polyester fiberfill for lightly stuffing the comb and other dimensional details. A small button may be used for the eye on a decorative basket.
A convenient finished size is approximately 12–14 inches (30–36 cm) long, 9–11 inches (23–28 cm) tall, and approximately 6–7 inches (15–18 cm) wide through the basket section. These measurements provide enough interior room for several eggs while keeping the chicken compact enough for a countertop.
Begin by drawing the complete chicken silhouette on pattern paper. Include the rounded breast, neck, head, gently rising back opening, and pointed tail. Create separate templates for the wing, comb, wattle, beak, base gusset, and lining. Unless your templates already include it, add a consistent 1/4-inch (6 mm) seam allowance around all sewn edges.
Quilting the Body and Making the Chicken Details
Cut two mirrored main-body pieces from the exterior fabric, two from the lining fabric, and two from batting or fusible fleece. If you are using traditional batting, layer each exterior piece with batting and quilt them together before beginning the dimensional assembly.
The quilting can be simple or elaborate. Straight diagonal lines spaced approximately 1 inch (2.5 cm) apart create a classic diamond texture, while gentle curves or free-motion quilting give the chicken a softer handcrafted appearance. Keep the quilting reasonably close together so the batting remains stable.
Next, prepare the oversized quilted chicken wing. Cut two mirrored wing pieces from contrasting fabric and one layer of thin batting for each visible wing if you plan to decorate both sides. Sew the fabric pieces right sides together with batting against the wrong side, leaving a small turning opening.
Trim the wing seam allowance, clip around the curved areas, turn the wing right side out, and press carefully. Close the opening and topstitch approximately 1/8 inch (3 mm) from the edge. Additional echo quilting inside the wing can emphasize its sweeping feather-like shape.
For the comb, draw a rounded three- or four-lobed shape similar to the bright red feature above the chicken’s head. Cut two pieces from red fabric, place right sides together, stitch around the outer edge, clip the curves, and turn. Add a small amount of fiberfill or batting if you want the comb to stand prominently.
Create the wattle in the same manner using a smaller rounded red shape. The beak can be made from two small yellow triangles sewn together and lightly stuffed. Press all pieces before assembly so they remain smooth and easy to position.
Constructing the Three-Dimensional Egg Basket
The most important part of the Chicken Egg Basket Pattern is creating enough depth to transform the flat chicken panels into a functional basket. Rather than simply sewing two silhouettes together, use a gusset along the lower body to establish a stable interior compartment.
Cut a long gusset strip approximately 4–5 inches (10–13 cm) wide, adjusting its length to follow the lower curve from the chicken’s breast around the base toward the tail. Fuse or baste batting to the exterior gusset if additional structure is required.
Pin or clip one long edge of the gusset around the lower edge of the first exterior chicken panel, keeping right sides together. Sew slowly around the curves with a 1/4-inch (6 mm) seam allowance. Clip the seam allowance where necessary so it relaxes naturally.
Attach the second exterior panel to the opposite side of the gusset. At this stage, the project begins to develop its recognizable dimensional chicken shape. Turn it temporarily to the right side and inspect the silhouette before continuing.
Construct the lining using the same general method but leave a turning opening in the bottom or side seam. The lining should fit smoothly inside the exterior shell without excessive wrinkles. Deep red floral fabric creates a particularly attractive contrast inside the egg compartment.
Insert the exterior shell into the lining with right sides facing. Carefully match the curved upper basket opening, neck area, and tail edges. Stitch around the opening, then turn the entire chicken through the opening left in the lining. Press and topstitch the upper edge for additional stability.
Attaching the Wing, Face, and Professional Finishing Details
Position the prepared wing over the side of the chicken so its rounded upper edge begins near the center of the body and its pointed end sweeps naturally toward the tail. Pin carefully before stitching because the wing is one of the strongest visual features of the finished Chicken Egg Basket Pattern.
Attach the wing with edge stitching or appliqué stitching. You can stitch completely around the wing or leave selected areas slightly dimensional. Echo quilting approximately 1/4 inch (6 mm) inside the wing edge gives the piece an especially polished quilted appearance.
Position the comb along the upper head seam before closing that section permanently. The raw edge of the comb should disappear inside the seam while the decorative lobes extend upward. Attach the wattle beneath the beak using the same enclosed-seam technique whenever possible.
Add the yellow fabric beak at approximately the center of the face. Keep its size proportional to the head; a beak around 2–2½ inches (5–6.5 cm) long generally works well for a medium basket.
Embroider the eye with black thread or use a securely attached decorative button when the project is intended only as household décor. Embroidery is preferable when you want the entire basket to remain soft and washable.
Finally, close the lining opening with ladder stitch, press the project carefully, and shape the basket with your hands. The bottom should sit relatively flat while the body remains softly rounded. If additional support is needed, a removable covered base insert can be placed inside the basket.
FAQ About the Chicken Egg Basket Pattern
Is the Chicken Egg Basket Pattern suitable for beginners?
A confident beginner can complete this project, although experience sewing curves will help. The most challenging portion is attaching the gusset evenly around the curved chicken body.
What fabric works best for this project?
Medium-weight quilting cotton is ideal because it is stable, washable, easy to quilt, and available in countless coordinating prints.
How large should the finished basket be?
A practical medium version can measure approximately 12–14 inches (30–36 cm) long and 9–11 inches (23–28 cm) tall. You can enlarge or reduce the entire template proportionally.
What seam allowance should I use?
A consistent 1/4-inch (6 mm) seam allowance works well, particularly around detailed curves.
Does the chicken need batting?
Yes, batting is highly recommended. It provides the characteristic quilted texture while helping the basket maintain its three-dimensional shape.
Can I use fusible fleece instead of quilt batting?
Yes. Fusible fleece can create a slightly firmer basket. Depending on its thickness, you may not need additional batting.
Can scraps be used for this pattern?
Absolutely. The wing, beak, comb, wattle, lining, and decorative accents are excellent opportunities to use leftover fabric from previous quilting projects.
How can I make the basket stand more firmly?
Use structured interfacing or fusible fleece and create a reasonably wide gusset. You can also add a removable fabric-covered stabilizer to the bottom.
Can I add binding around the opening?
Yes. Instead of turning the exterior and lining together, you can finish the opening with contrasting bias binding. Red binding against a cream floral body creates a particularly attractive farmhouse finish.
Can I make the wing from patchwork?
Yes. Piece several fabric scraps together before cutting the wing template. This is a wonderful way to turn the project into a true patchwork chicken basket.
Can I change the colors?
Certainly. Red and cream create a traditional farmhouse look, but blue and white, sage and cream, yellow and orange, black and white, or multicolored scraps can all produce beautiful results.
Is it necessary to stuff the chicken body?
No. The body functions primarily as the walls of the basket, so batting and interfacing usually provide enough structure. Only the comb, wattle, and other small dimensional details may require light stuffing.
Can it be used for storing real eggs?
It can be used as decorative countertop storage for clean, intact eggs where appropriate, but fabric is absorbent and not food-contact equipment. Keep the basket clean and dry, and follow the normal egg-storage guidance applicable where you live.
How should the finished basket be washed?
If all materials are washable, gentle hand washing or a delicate machine cycle may be appropriate. Allow the basket to air dry and reshape it while damp.
Conclusion
The Chicken Egg Basket Pattern is a creative combination of quilting, decorative sewing, and practical fabric construction. By starting with two chicken-shaped body panels and adding batting, a gusset, contrasting lining, a quilted wing, comb, wattle, beak, and facial details, you can transform ordinary pieces of fabric into an eye-catching three-dimensional kitchen accessory.
Throughout this tutorial, we explored how to draft the chicken silhouette, choose coordinating fabrics, quilt the exterior panels, prepare dimensional details, construct the gusset, install the lining, attach the oversized wing, and finish the curved basket opening neatly. Using a consistent 1/4-inch seam allowance, careful pressing, and patient stitching around the curves will make a noticeable difference in the final result.
The best part of this project is the opportunity for personalization. Make a classic red-and-cream chicken like the inspiration, create a cheerful yellow farmhouse hen, use vintage florals for a cottage-style version, or combine leftover quilt scraps for a colorful Chicken Egg Basket Pattern that is completely unique.
PATTERN VIDEO:
If you make this project, leave your sincere opinion about the pattern and share your suggestions. I would love to know which colors and fabrics you would choose for your chicken and what other creative quilt and sewing projects you would like to see next.