
The Christmas Hanging Kitchen Towel Pattern is a charming holiday sewing project that combines beautiful Christmas fabrics, adorable appliqué designs, and practical kitchen organization. Featuring three festive characters—Santa Claus, a cheerful snowman, and a sweet reindeer—these handmade hanging towels bring warmth and personality to any kitchen during the Christmas season.
One of the most attractive features of this Christmas Quilted Kitchen Towel is its decorative fabric topper with a convenient button closure. The topper hangs securely from an oven handle, cabinet handle, or towel bar, while the gathered fabric towel hangs gracefully below. The festive appliqué faces add a handmade touch, making these accessories look like miniature Christmas decorations rather than ordinary kitchen towels.
This project is especially appealing to quilters and sewing enthusiasts who enjoy creating useful gifts. The combination of colorful cotton fabrics, lightweight batting, decorative stitching, and simple appliqué techniques makes it an excellent project for practicing several essential sewing skills. You can make all three characters as a coordinated Christmas collection or choose your favorite design for a personalized holiday accessory.
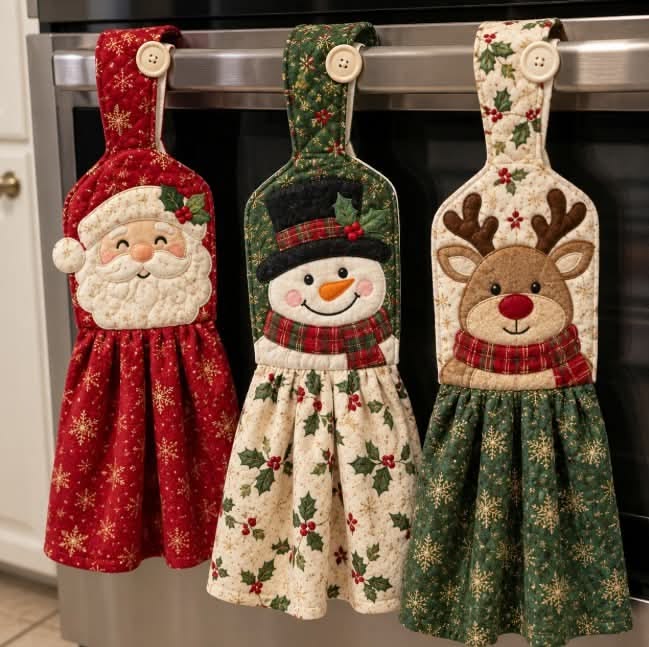
In this complete Christmas Hanging Kitchen Towel Tutorial, you will learn how to select fabrics, prepare the cutting pieces, create the padded topper, assemble the appliqué characters, sew the gathered towel, and attach the button closure. The instructions provide practical measurements in inches and centimeters, along with an original sewing method inspired by the reference image.
DISCOVER MORE FREE PATTERNS HERE!
Materials and Measurements for the Christmas Hanging Kitchen Towel Pattern
Before starting your Christmas Kitchen Towel Sewing Pattern, prepare the materials and choose a coordinated fabric collection. Traditional Christmas prints are particularly beautiful for this project, especially red fabric with gold snowflakes, forest green fabric with festive motifs, and cream-colored fabric decorated with holly leaves.
For the three designs shown in the reference image, the Santa towel uses red Christmas fabric, the snowman features cream and green fabrics with a plaid scarf, and the reindeer combines a cream topper with a green gathered towel. Coordinating colors between the topper and the towel creates a balanced, professional appearance.
High-quality quilting cotton is ideal because it is easy to cut, press, and sew. Lightweight cotton batting gives the decorative topper a slightly padded appearance, while fusible interfacing helps stabilize the appliqué pieces and button closure.
Materials needed
- Christmas quilting cotton in red, green, cream, and coordinating prints.
- Small scraps of white, beige, brown, orange, pink, and black fabric.
- Lightweight cotton batting.
- Medium-weight fusible interfacing.
- Fusible appliqué web.
- Three buttons, approximately ¾–1 inch (2–2.5 cm) in diameter.
- Coordinating sewing thread.
- Embroidery floss for facial details.
- Sewing machine.
- Universal sewing needle, size 80/12.
- Rotary cutter and cutting mat.
- Quilting ruler.
- Fabric scissors.
- Pins or sewing clips.
- Fabric marking pen.
- Iron and ironing board.
- Hand-sewing needle.
- Optional decorative embroidery thread.
- Optional prewashed cotton kitchen towels instead of handmade gathered fabric towels.
Finished measurements
Each hanging towel can be made approximately:
| Component | Finished Size |
|---|---|
| Total hanging length | 21–23 in (53–58 cm) |
| Decorative topper width | 5½–6 in (14–15 cm) |
| Decorative topper height, excluding strap | 6–7 in (15–18 cm) |
| Hanging strap length | 5–6 in (12.5–15 cm) |
| Hanging strap width | 1½–2 in (4–5 cm) |
| Gathered towel width | 10–12 in (25–30 cm) |
| Gathered towel length | 13–15 in (33–38 cm) |
| Seam allowance | ¼ in (6 mm), unless otherwise stated |
These measurements are suitable for a medium-sized kitchen hanging towel. You can enlarge or reduce the pattern depending on the oven handle or cabinet where the towel will hang.
Fabric cutting guide for one towel
| Piece | Cutting Measurement | Quantity |
|---|---|---|
| Topper front | 7 × 8 in (18 × 20.5 cm) | 1 |
| Topper back | 7 × 8 in (18 × 20.5 cm) | 1 |
| Batting for topper | 7 × 8 in (18 × 20.5 cm) | 1 |
| Hanging strap fabric | 4 × 12 in (10 × 30.5 cm) | 1 |
| Gathered towel fabric | 22 × 17 in (56 × 43 cm) | 1 |
| Fusible interfacing | 7 × 8 in (18 × 20.5 cm) | 1 |
| Character appliqué scraps | As needed | Several |
The topper rectangles are starting blanks. They will be trimmed into the rounded shape after the appliqué design has been positioned.
The gathered towel fabric is wider than the finished towel because it will be gathered across the top.
Suggested Christmas fabric combinations
Santa Claus: Red fabric with gold snowflakes, white beard fabric, peach-colored face, and green holly accents.
Snowman: Cream fabric with holly leaves, black fabric for the hat, orange fabric for the carrot nose, and red-and-green plaid for the scarf.
Reindeer: Cream fabric with Christmas prints, warm brown fabric for the face, darker brown fabric for the antlers, and forest green fabric for the towel.
Basic sewing techniques used
Appliqué: Attaching decorative fabric shapes to a background fabric.
Topstitching: Sewing close to a finished edge for reinforcement and decoration.
Gathering: Creating soft folds by pulling long basting stitches.
Layering: Combining fabric, batting, and backing.
Buttonhole Sewing: Creating a reinforced opening for a button.
Edge Stitching: Sewing near an edge to secure layers.
These techniques make the Christmas Hanging Kitchen Towel Pattern a rewarding project for beginners who already know how to operate a sewing machine.
Step-by-Step Tutorial: Making the Quilted Christmas Towel Topper
The decorative topper is the most recognizable feature of this project. Its rounded shape, padded construction, and hanging strap give the finished towel a polished appearance.
The reference image shows three character toppers with carefully arranged appliqué details. Each character uses the same basic topper construction, allowing you to make several matching towels without learning an entirely new sewing method.
Step 1: Prepare the fabric
Wash and dry your cotton fabrics before cutting.
Press them thoroughly to remove wrinkles.
Place the fabric on a cutting mat.
Use a quilting ruler to measure each piece.
Cut the topper front, topper back, batting, and interfacing according to the cutting guide.
Keep the pieces organized by character.
Step 2: Draw the topper shape
Take the 7 × 8-inch topper front rectangle.
Mark a finished shape approximately 6 inches wide and 7 inches tall.
Round the upper corners gently.
Keep the lower edge straight.
The topper should resemble a rounded rectangle with slightly curved shoulders.
Trace the same shape onto the backing fabric.
Do not cut away the seam allowance yet.
Step 3: Apply the interfacing
Place the fusible interfacing against the wrong side of the topper front fabric.
Follow the manufacturer’s pressing instructions.
Allow the fabric to cool completely.
The interfacing helps prevent distortion while sewing the appliqué.
It also provides additional support for the decorative details.
Step 4: Prepare the batting
Place the batting against the wrong side of the topper front.
Smooth it gently.
Pin or baste the layers together.
Trim excess batting if necessary.
The batting should cover the entire decorative area.
This creates the slightly padded appearance associated with quilted kitchen accessories.
Step 5: Add simple quilting stitches
Use a straight stitch to sew subtle quilting lines around the outer area of the topper.
Keep the stitches approximately ½–¾ inch (1.3–2 cm) apart if adding parallel quilting.
Avoid quilting through areas where the facial appliqué will be placed.
Alternatively, use outline quilting around the finished character.
The goal is to stabilize the topper without distracting from the Christmas design.
Step 6: Prepare the hanging strap
Take the 4 × 12-inch fabric strip.
Fold it in half lengthwise with right sides together.
Sew along the long edge using a ¼-inch seam allowance.
Turn the strip right side out.
Press it flat.
Topstitch along both long edges.
The finished strap will measure approximately 1¾ inches wide.
Step 7: Position the hanging strap
Fold the strap upward from the top center of the topper.
Leave enough length to wrap around an oven handle.
Pin the lower end to the topper.
The strap should extend approximately 5–6 inches above the decorative topper.
Baste the strap securely.
The upper end will receive a buttonhole.
Step 8: Prepare the topper backing
Place the topper front and back right sides together.
Make sure the hanging strap is positioned between the layers, with its free end safely tucked away from the seam.
Pin around the outer edges.
Sew the sides and upper curved edge using a ¼-inch seam allowance.
Leave the bottom edge open for attaching the gathered towel.
Step 9: Turn and press
Clip small notches along the curved seam allowance without cutting the stitching.
Turn the topper right side out.
Push out the curved corners carefully.
Press the entire piece.
Topstitch around the sides and upper edge approximately ⅛ inch (3 mm) from the edge.
This creates a neat, professional finish.
How to Create Santa Claus, Snowman, and Reindeer Christmas Appliqué Designs
The appliqué characters are the most delightful part of the Christmas Hanging Kitchen Towel Pattern.
Each character is created using small fabric shapes attached to the front of the topper. The pieces can be secured with fusible web and finished using a narrow zigzag stitch, blanket stitch, or decorative machine appliqué.
For best results, complete the appliqué on the topper front before sewing the topper to its backing.
Santa Claus appliqué tutorial
Santa’s cheerful face features a white beard, soft peach-colored face, red hat, and small holly decoration.
Step 1: Cut the face. Draw an oval approximately 3½ inches wide and 3 inches tall. Cut it from peach-colored fabric.
Step 2: Cut the beard. Draw a rounded white beard approximately 4½ inches wide and 3½ inches tall. Add gentle scallops along the lower edge.
Step 3: Cut the hat. Create a curved red hat shape approximately 4½ inches wide. Cut a narrow white strip for the hat brim.
Step 4: Prepare the mustache. Cut two small white curved shapes, approximately 1½ inches long.
Step 5: Add fusible web. Apply fusible web to the wrong side of each appliqué piece.
Step 6: Position the pieces. Place the face first, followed by the beard, hat, brim, and mustache.
Step 7: Press carefully. Fuse the shapes according to the adhesive manufacturer’s instructions.
Step 8: Stitch the edges. Use a narrow zigzag or blanket stitch around each piece.
Step 9: Embroider the face. Add smiling eyes, eyebrows, cheeks, and a small nose.
Step 10: Add the holly decoration. Attach two tiny green leaves and three red berries near the hat brim.
The finished Santa topper should have a cheerful, welcoming expression.
Snowman appliqué tutorial
The snowman design features a rounded white face, black winter hat, carrot-shaped nose, and festive plaid scarf.
Step 1: Cut the face. Create a white oval approximately 4 inches wide and 3 inches tall.
Step 2: Cut the hat. Use black fabric to make a rounded winter hat with a slightly curved brim.
Step 3: Add the hatband. Cut a narrow red-and-green plaid strip.
Step 4: Cut the nose. Use orange fabric to create a small carrot-shaped triangle.
Step 5: Prepare the scarf. Cut two plaid strips approximately 1 inch wide.
Step 6: Arrange the design. Position the face, hat, nose, and scarf on the topper.
Step 7: Fuse the pieces. Press the appliqué pieces carefully.
Step 8: Stitch the edges. Secure each shape using matching thread.
Step 9: Add facial details. Embroider two small black eyes and a curved smile.
Step 10: Add rosy cheeks. Use pink fabric circles or soft embroidery stitches.
The snowman looks especially beautiful against cream fabric decorated with holly leaves.
Reindeer appliqué tutorial
The reindeer design features warm brown fabric, soft ears, dark antlers, a bright red nose, and a festive plaid scarf.
Step 1: Cut the head. Draw a rounded brown face approximately 4 inches wide and 3½ inches tall.
Step 2: Cut the antlers. Create two branching antler shapes from dark brown fabric.
Step 3: Cut the ears. Make two oval ear shapes approximately 1½ inches long.
Step 4: Add inner ears. Cut smaller beige or cream shapes.
Step 5: Prepare the nose. Cut a small red circle approximately ¾ inch in diameter.
Step 6: Prepare the scarf. Cut a narrow plaid strip and a short scarf tail.
Step 7: Arrange the pieces. Position the antlers behind the head, followed by the ears, face, nose, and scarf.
Step 8: Fuse the appliqué. Press each piece securely.
Step 9: Sew around the edges. Use matching thread and a narrow zigzag stitch.
Step 10: Embroider the expression. Add two black eyes and a small curved mouth.
The finished reindeer should have a friendly appearance, with the red nose serving as the central decorative detail.
Tips for beautiful Christmas appliqué
Use sharp fabric scissors when cutting small pieces.
Choose contrasting fabrics so the facial details remain visible.
Keep the appliqué shapes proportional to the topper.
Use a short stitch length around tight curves.
Press gently to avoid shifting small pieces.
Add embroidery details after the appliqué has been securely stitched.
Avoid placing bulky decorations directly beneath the button closure.
Sewing the Gathered Kitchen Towel and Completing the Christmas Hanging Design
The gathered fabric towel creates the soft, decorative lower section visible in the reference image.
Unlike a traditional flat kitchen towel, this design uses a wide piece of fabric gathered along the upper edge. The gathering adds fullness and gives the finished accessory a charming handmade appearance.
You can use decorative quilting cotton for the gathered section or adapt the construction to use an absorbent cotton towel.
Step 1: Prepare the towel fabric
Cut a rectangle measuring 22 × 17 inches (56 × 43 cm).
Press the fabric.
Fold each side edge under by ¼ inch.
Fold again by ¼ inch.
Press and stitch.
Repeat along the lower edge.
Leave the upper edge unfinished for gathering.
Step 2: Sew the gathering stitches
Set your sewing machine to a long straight stitch.
Sew one row approximately ¼ inch from the upper edge.
Sew a second row approximately ½ inch from the upper edge.
Do not backstitch.
Leave long thread tails at both ends.
Step 3: Gather the fabric
Hold the bobbin threads gently.
Pull them to create small gathers.
Distribute the gathers evenly.
Continue until the gathered edge measures approximately 5½–6 inches wide.
The gathered width should match the lower edge of the topper.
Step 4: Attach the gathered towel
Insert the gathered upper edge between the front and back layers at the open bottom of the topper.
Turn the raw edges inward approximately ¼ inch.
Pin the towel securely.
Make sure the gathers are evenly distributed.
Sew across the bottom edge.
Add a second reinforcing row of stitching.
This secures the gathered fabric to the decorative topper.
Step 5: Create the buttonhole
Wrap the hanging strap around the intended oven handle or towel bar.
Mark the correct buttonhole position.
Use your sewing machine’s buttonhole function.
Make a buttonhole suitable for the selected button.
Carefully open the buttonhole using a seam ripper.
Reinforce the stitching if necessary.
Step 6: Attach the button
Fold the strap into its hanging position.
Mark the corresponding button placement on the topper.
Sew the button securely.
Use several passes of strong thread.
Test the closure.
The strap should hold the towel comfortably without pulling excessively.
Step 7: Add decorative topstitching
Topstitch around the lower edge of the topper.
Reinforce the gathered attachment seam.
Check the side seams.
Trim loose threads.
Press carefully around the appliqué.
Avoid pressing directly on delicate decorative elements.
Step 8: Final inspection
Hang the finished towel on an oven handle.
Check that the strap closes securely.
Make sure the towel hangs straight.
Adjust the gathers if necessary.
Inspect the appliqué stitching.
Your Christmas Hanging Kitchen Towel is complete.
Alternative method: Using a ready-made kitchen towel
For a more absorbent version, use a cotton or terry kitchen towel instead of decorative quilting cotton.
Cut the towel to the desired length if necessary.
Finish any cut edges.
Gather the upper edge using the same method.
Attach it to the topper.
This variation is especially practical for everyday kitchen use.
Christmas decorating ideas
Traditional Christmas Kitchen: Make Santa, snowman, and reindeer towels using red, green, and cream fabrics.
Vintage Christmas Style: Choose muted burgundy, sage green, and antique cream.
Farmhouse Christmas: Use buffalo plaid, natural linen, and rustic cotton prints.
Elegant Holiday Kitchen: Combine forest green, champagne gold, and ivory.
Playful Christmas Collection: Use bright red, cheerful green, and colorful holiday prints.
Coordinated Gift Sets: Pair a hanging towel with matching quilted potholders or fabric coasters.
Frequently Asked Questions About Christmas Hanging Kitchen Towels
1. Is this Christmas Hanging Kitchen Towel Pattern suitable for beginners?
Yes. The basic construction is beginner-friendly, although the detailed appliqué requires patience and careful stitching.
2. What fabric is best for the topper?
Quilting cotton is an excellent choice because it is stable, easy to sew, and available in many Christmas prints.
3. Do I need batting?
Batting is recommended for a softly padded quilted topper, but it is optional.
4. Can I use a ready-made kitchen towel?
Yes. A cotton or terry kitchen towel is a practical alternative to the gathered fabric version.
5. What is the best button size?
A button approximately ¾–1 inch in diameter works well for most designs.
6. Can I make the topper without appliqué?
Absolutely. You can use beautiful Christmas fabric alone or add simple embroidery.
7. Can I wash the finished towel?
Yes, provided all fabrics and embellishments are washable. Follow the care instructions for your materials.
8. Can I use felt for the character faces?
Yes, but washable cotton appliqué is generally preferable for towels that will be laundered frequently.
9. How do I prevent the appliqué edges from fraying?
Use fusible web and finish the edges with a narrow zigzag or blanket stitch.
10. Can I make the hanging strap longer?
Yes. Measure the handle where the towel will hang and adjust the strap length accordingly.
11. Can I sell handmade Christmas hanging towels?
You can generally sell towels you create from your own original work, while respecting any applicable pattern, artwork, or licensing restrictions.
12. Can I make matching Christmas kitchen accessories?
Yes. The same appliqué characters can decorate potholders, aprons, table runners, fabric baskets, and quilted placemats.
13. How many towels can I make from one yard of fabric?
The number depends on fabric width, print direction, and whether the same fabric is used for the topper and gathered towel. Plan your cutting layout before purchasing materials.
14. Can I use embroidery instead of fabric appliqué?
Yes. Embroidered faces can create a beautiful alternative, especially for smaller decorative toppers.
15. Are these towels safe to hang on an oven handle?
They can be used on a cool oven handle for decoration or drying hands. Keep the fabric away from burners, heating elements, and hot oven surfaces, and remove it before cooking if it could contact heat.
Conclusion
The Christmas Hanging Kitchen Towel Pattern is a wonderful holiday sewing project that combines traditional quilting techniques, creative fabric appliqué, and practical kitchen decoration. With three adorable character designs—Santa Claus, snowman, and reindeer—you can create a coordinated collection that brings Christmas charm to your home.
The padded topper, secure button closure, and beautifully gathered towel create a decorative accessory that looks attractive while remaining useful. The project also offers an enjoyable opportunity to practice fabric cutting, appliqué stitching, quilting, gathering, and finishing techniques.
One of the greatest advantages of this DIY Christmas Hanging Kitchen Towel is the freedom to personalize every detail. You can choose traditional Christmas prints, vintage-inspired colors, elegant fabrics, or cheerful modern designs to match your decorating style.
These handmade towels also make thoughtful Christmas gifts for family members, friends, neighbors, and anyone who appreciates sewing and handmade home accessories.
Whether you create a single Santa towel or a complete set of three festive characters, this Christmas Quilted Kitchen Towel Tutorial offers a creative and rewarding way to celebrate the holiday season.
With beautiful fabrics, careful stitching, and a little imagination, you can transform simple cotton materials into charming Christmas decorations that can be enjoyed year after year.