
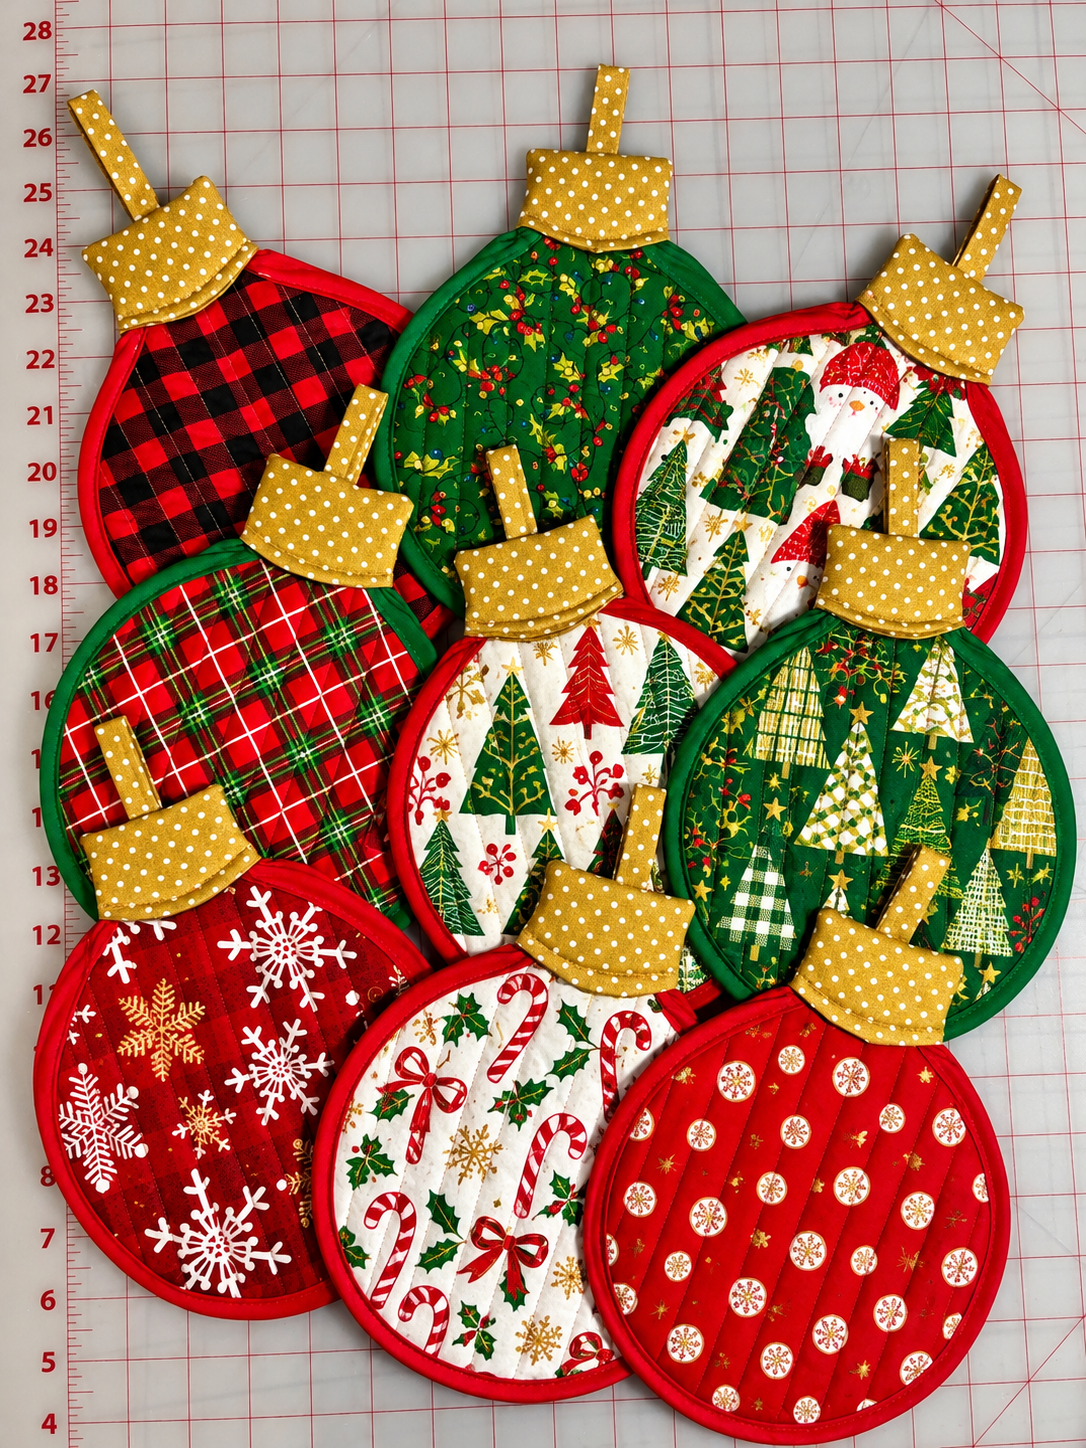
One of the most appealing features of this Christmas Ornaments Tutorial is its versatility. Each ornament follows the same basic construction method, but the fabric combinations can be changed to create completely different designs. The reference image features eight gorgeous quilted ornaments arranged together, each with its own Christmas fabric and contrasting binding. The golden polka-dot caps create a consistent decorative element throughout the collection, while the circular quilted bodies showcase a variety of cheerful holiday patterns. This makes the project especially suitable for using leftover quilting cotton, fat quarters, and small fabric scraps from previous sewing projects. The simple circular shape is easy to prepare, and the straight quilting lines add texture without requiring complicated free-motion quilting techniques.
Making handmade quilted Christmas ornaments is also an enjoyable opportunity to practice essential sewing skills while producing decorations that can be treasured for many holiday seasons. Beginners can develop confidence with fabric cutting, layering, straight-line quilting, binding, and decorative finishing. More experienced quilters can experiment with patchwork panels, different quilting patterns, and creative embellishments. These ornaments can be hung on Christmas trees, displayed on decorative hooks, attached to wrapped gifts, or arranged together as a festive wall decoration. In this detailed tutorial, you will learn how to select the best materials, prepare the pattern pieces, assemble the quilted fabric layers, sew the circular ornament bodies, construct the fabric caps, and complete the hanging loops. With careful measurements and a little creativity, you can make an entire collection of beautiful fabric Christmas ornaments that reflect your personal holiday decorating style.
Materials and Measurements for the Christmas Ornaments Tutorial
1. Choosing the Best Fabric for Quilted Christmas Ornaments
DISCOVER MORE FREE PATTERNS HERE!
The best fabric for this Christmas Ornaments Tutorial is high-quality quilting cotton. Cotton is easy to cut, press, sew, and quilt, making it an excellent choice for both beginners and experienced sewing enthusiasts. Its stable woven structure helps the ornaments maintain their circular shape, while the wide selection of holiday prints makes it easy to create attractive designs.
For a traditional Christmas appearance, select red, green, cream, and gold fabrics. Buffalo plaid, Christmas trees, snowflakes, candy canes, and holly prints are particularly suitable. Combining different patterns with a consistent ornament cap fabric helps create a coordinated collection.
2. Complete Materials and Sewing Supplies
Before beginning your quilted Christmas ornament pattern, gather the following materials:
-
Christmas-themed quilting cotton fabrics.
-
Gold or mustard-yellow polka-dot cotton fabric.
-
Red and green cotton fabric for binding.
-
Low-loft cotton or polyester quilt batting.
-
Lightweight fusible interfacing.
-
Matching sewing thread.
-
Sewing machine.
-
Quilting needle, size 80/12.
-
Rotary cutter and cutting mat.
-
Fabric scissors.
-
Quilting ruler.
-
Fabric marking pencil.
-
Sewing pins or clips.
-
Iron and ironing board.
-
Walking foot for straight-line quilting.
-
Hand-sewing needle.
-
Cardstock or template plastic for the circular pattern.
Using a walking foot is recommended because it helps feed the three fabric layers evenly through the sewing machine.
3. Recommended Measurements for Each Ornament
The ornaments in the reference image have rounded quilted bodies, rectangular decorative caps, and narrow hanging loops.
The following measurements provide a practical starting point for making a similar design.
| Pattern piece | Cutting measurement |
|---|---|
| Finished ornament body | 6 in (15.2 cm) diameter |
| Front fabric | 7 × 7 in (17.8 × 17.8 cm) |
| Backing fabric | 7 × 7 in (17.8 × 17.8 cm) |
| Quilt batting | 7 × 7 in (17.8 × 17.8 cm) |
| Fabric cap, cut 2 | 4 × 3 in (10.2 × 7.6 cm) |
| Hanging loop strip | 2 × 6 in (5.1 × 15.2 cm) |
| Bias binding width | 2¼ in (5.7 cm) |
| Seam allowance | ¼ in (6 mm) |
These are suggested measurements for recreating the pictured style rather than exact dimensions verified from the photograph.
4. Preparing the Fabric Before Cutting
Start by pressing all the Christmas fabrics to remove wrinkles and creases. Smooth fabric is essential for accurate cutting and professional-looking quilting.
If you plan to wash the finished ornaments, prewash and dry the cotton fabrics according to their care instructions. This can help reduce unexpected shrinkage and color bleeding.
Place the fabric on a cutting mat and use a quilting ruler to measure the required pieces. Cut carefully with a rotary cutter to keep the edges straight.
Prepare one front square, one backing square, and one batting square for each ornament. Keep the pieces organized so the fabric combinations remain consistent.
5. Understanding the Quilt Sandwich Construction
A quilt sandwich is created by placing batting between two fabric layers.
For these Christmas ornaments, the backing fabric is positioned with its wrong side facing the batting, while the decorative front fabric is placed with its right side facing outward.
The batting adds thickness and creates the soft padded appearance visible in the finished decorations.
Once the three layers are aligned, they are secured with quilting stitches. The stitching holds the fabric together and creates decorative texture.
Low-loft batting is particularly suitable because it provides structure without making the ornaments excessively bulky.
6. Selecting Beautiful Christmas Color Combinations
The reference image demonstrates how bright colors can make quilted Christmas decorations visually appealing.
Red buffalo plaid paired with green binding creates a traditional rustic appearance. Green Christmas tree prints with red binding offer an equally festive contrast.
White fabrics featuring candy canes and holly leaves look beautiful with bright red borders.
Gold polka-dot fabric caps provide a decorative finishing touch and coordinate well with all the different prints.
For a more sophisticated collection, consider combining burgundy, forest green, antique cream, and muted gold.
The most important design principle is to maintain harmony between the main fabric, binding, and ornament cap.
Step-by-Step Christmas Ornaments Tutorial: How to Make Quilted Fabric Decorations
1. Create the Circular Ornament Template
Begin by drawing a circle measuring 6 inches (15.2 cm) in diameter on sturdy cardstock or template plastic.
Use a compass or circular quilting ruler to achieve a smooth, symmetrical shape.
Cut out the template carefully.
This circle will determine the finished size of the ornament body.
For a collection of matching decorations, use the same template for every ornament.
You can also create additional templates measuring 4 or 5 inches if you want smaller Christmas ornaments.
2. Assemble and Quilt the Fabric Layers
Place the backing fabric on your work surface with the wrong side facing upward.
Position the batting directly on top of the backing fabric.
Add the decorative Christmas fabric with its right side facing upward.
Smooth the layers carefully and secure them with quilting pins.
Using a sewing machine with a walking foot, stitch straight parallel lines across the fabric sandwich.
Space the quilting lines approximately ½ inch (1.3 cm) apart to create the padded appearance shown in the reference image.
A stitch length of 2.5–3 mm works well for this project.
3. Cut the Quilted Circular Ornament Body
Once the quilting is complete, place the circular template over the quilted fabric.
Position the template so the most attractive part of the Christmas print appears in the center.
Trace around the template using a washable fabric marker.
Cut carefully through all three layers with sharp fabric scissors.
Check the edges to ensure that the backing fabric and batting are aligned.
If necessary, trim any uneven areas.
Repeat this process for the remaining ornaments.
4. Sew the Decorative Fabric Binding
The colorful binding is an important feature of this Christmas Ornaments Tutorial because it creates a neat border around each circular ornament.
Cut a bias binding strip approximately 2¼ inches (5.7 cm) wide and 23–25 inches (58–64 cm) long.
Fold the binding lengthwise with the wrong sides together and press.
Position the binding along the front edge of the quilted circle, aligning the raw edges.
Sew around the circular shape using a ¼-inch (6 mm) seam allowance.
Join the binding ends neatly, fold the binding toward the back, and secure it with small hand stitches or careful machine stitching.
Because the binding is cut on the bias, it can curve smoothly around the circular ornament.
5. Construct the Decorative Gold Fabric Cap
The gold polka-dot cap gives the ornament its recognizable Christmas bauble shape.
Cut two rectangles measuring 4 × 3 inches (10.2 × 7.6 cm).
Apply lightweight fusible interfacing to the wrong side of one rectangle.
Place the two rectangles right sides together and stitch around the top and side edges, leaving the bottom open.
Trim the corners carefully, turn the cap right side out, and press.
Fold the lower raw edges inward by approximately ¼ inch (6 mm).
Position the cap over the upper portion of the ornament body, overlapping the quilted circle by approximately ½ inch (1.3 cm).
Secure the cap with neat topstitching, making sure the fabric lies flat.
6. Create and Attach the Hanging Loop
Cut a strip of fabric measuring 2 × 6 inches (5.1 × 15.2 cm).
Fold the strip lengthwise with the right sides together and stitch along the long edge.
Turn the fabric tube right side out and press it flat.
Fold the finished strip in half to form a hanging loop.
Insert the raw ends behind the top of the ornament cap.
Secure the loop with several rows of stitching to ensure it can support the ornament’s weight.
For the strongest attachment, insert the loop while assembling the cap and reinforce the stitching before the cap is attached to the ornament.
7. Finish and Inspect the Christmas Ornament
After attaching the cap and hanging loop, inspect the entire ornament carefully.
Trim any loose threads and check that the binding is securely attached.
Make sure the circular body remains smooth and evenly shaped.
Press the ornament gently using a pressing cloth.
Avoid applying excessive pressure because this can flatten the quilt batting.
Your first handmade quilted Christmas ornament is now complete.
Repeat the same steps using different Christmas fabrics to create a coordinated collection.
Creative Christmas Ornament Designs and Quilting Ideas
1. Traditional Red and Green Christmas Ornaments
Traditional Christmas colors remain among the most popular choices for handmade holiday decorations.
Use red buffalo plaid, green holly prints, and Christmas tree fabrics to create a festive collection.
Combine red ornament bodies with green binding and green ornament bodies with red binding.
Gold fabric caps provide an attractive contrast and help unify the collection.
These ornaments look especially beautiful on Christmas trees decorated with warm white lights.
They can also be used as handmade gift toppers or festive decorations for holiday wreaths.
2. Vintage Christmas Fabric Ornaments
Vintage-inspired quilted Christmas ornaments are perfect for creating a nostalgic holiday atmosphere.
Choose muted red, antique cream, forest green, and mustard-yellow fabrics.
Small floral prints, traditional plaid patterns, and classic Christmas motifs work particularly well.
Use subtle quilting lines to create a soft, handmade appearance.
Decorative buttons or embroidered details can be added to the ornament caps.
These ornaments complement farmhouse Christmas decorations, rustic interiors, and traditional holiday displays.
3. Elegant White and Gold Christmas Decorations
For a sophisticated Christmas theme, use white, ivory, champagne, and metallic gold fabrics.
Choose delicate snowflake prints or subtle holiday patterns.
Use cream-colored binding and gold fabric caps.
Quilt the ornaments with matching thread for a clean and elegant finish.
These decorations look beautiful when displayed with pearl garlands, white ribbons, and gold Christmas ornaments.
The neutral color palette also works well with modern and minimalist holiday decorating styles.
4. Scrap Fabric Patchwork Christmas Ornaments
This Christmas Ornaments Tutorial is an excellent project for using leftover quilting fabrics.
Instead of using one fabric for the ornament front, sew several small fabric pieces together to create a patchwork panel.
Press the seams carefully before assembling the quilt sandwich.
Add batting and backing fabric, then quilt the entire panel.
Cut the circular ornament shape from the completed quilted fabric.
This technique allows you to combine different Christmas prints in one ornament.
Each finished decoration becomes a unique piece of handmade patchwork art.
5. Personalized Christmas Ornaments for Gifts
Handmade ornaments make thoughtful gifts for family members, friends, teachers, and neighbors.
Choose fabrics that reflect the recipient’s favorite colors or decorating style.
You can personalize the ornaments with embroidered initials, dates, or short holiday messages.
For a family Christmas collection, create one ornament for each family member.
Add a small fabric label to the back with the year it was made.
These personalized decorations can become meaningful keepsakes that are enjoyed for many years.
6. Creating a Coordinated Christmas Ornament Collection
Making several ornaments together is an efficient way to complete this quilting project.
Begin by cutting all the fabric squares, batting pieces, caps, and hanging loops.
Next, assemble and quilt the fabric sandwiches in batches.
Cut the circular shapes and prepare the binding strips.
Attach the binding to each ornament before sewing the decorative caps.
Finish by adding the hanging loops and pressing the completed decorations.
This organized process saves time and makes it easier to create a beautiful coordinated set of quilted fabric Christmas ornaments.
Professional Quilting Tips, Common Mistakes, and Finishing Techniques
1. How to Achieve Smooth Circular Edges
Smooth circular edges are essential for professional-looking Christmas ornaments.
Always use a sharp rotary cutter or fabric scissors when cutting the quilted circles.
Avoid stretching the fabric while attaching the binding.
Bias binding is particularly useful because it naturally follows curved edges.
Sew slowly and adjust the fabric gently as you move around the circle.
Press the binding carefully after stitching to create a smooth and even finish.
2. How to Prevent Fabric Layers from Shifting
Fabric shifting is a common challenge when quilting small projects.
Secure the quilt sandwich with pins or temporary basting before sewing.
Use a walking foot to feed the layers evenly through the sewing machine.
Begin quilting near the center and work outward whenever practical.
Avoid pulling or stretching the fabric while stitching.
Keep the quilting lines evenly spaced to maintain a balanced appearance.
These simple techniques help produce smooth and attractive quilted Christmas ornaments.
3. Choosing the Right Batting Thickness
The thickness of the batting affects the final appearance of the ornament.
Low-loft cotton batting creates a soft and relatively flat finish.
Polyester batting can provide a slightly puffier appearance.
Avoid very thick batting if you want the binding to remain easy to sew.
For ornaments that will be hung on a Christmas tree, lightweight construction is particularly useful.
Test a small sample before making the complete collection to determine which batting produces your preferred texture.
4. Avoiding Common Sewing Mistakes
One common mistake is cutting the ornament circle before quilting the fabric layers.
Quilting the larger fabric sandwich first makes the material easier to handle and helps maintain an accurate circular shape.
Another mistake is using straight-grain binding on a tight curve, which can cause wrinkles.
Always check that the fabric cap is centered before attaching it.
Make sure the hanging loop is securely stitched so the ornament does not fall.
Careful preparation and consistent seam allowances will improve the finished appearance of every ornament.
5. Cleaning and Storing Handmade Christmas Ornaments
Proper storage helps preserve handmade fabric Christmas ornaments for future holiday seasons.
Before storing, inspect the ornaments for loose threads or damaged stitching.
Remove dust gently with a soft brush or lint roller.
If washing is necessary, follow the care recommendations for the fabrics and batting used.
Allow the ornaments to dry completely before storing them.
Place the decorations flat in a clean storage box, separating delicate embellishments with tissue paper.
Store the box in a cool, dry location away from direct sunlight.
6. Making the Finished Ornaments Look Professional
Small finishing details can make a significant difference in the appearance of your Christmas Ornaments Tutorial project.
Use consistent measurements when cutting every ornament.
Choose binding colors that complement the main fabric.
Maintain even quilting lines and consistent stitch lengths.
Press each fabric component before assembly.
Trim loose threads and secure the hanging loops carefully.
Finally, arrange the completed ornaments together to check that the colors and decorative details create a balanced holiday collection.
Frequently Asked Questions About the Christmas Ornaments Tutorial
What is the best fabric for quilted Christmas ornaments?
Quilting cotton is one of the best choices because it is stable, easy to sew, and available in many beautiful Christmas prints. Cotton also works well with batting and decorative quilting stitches.
Are these Christmas ornaments suitable for beginners?
Yes. This project is suitable for beginners who have basic sewing machine experience. The main techniques include straight-line quilting, cutting circular shapes, applying bias binding, and sewing simple fabric caps.
What size should quilted Christmas ornaments be?
A finished diameter of approximately 6 inches (15.2 cm) is a practical starting point. Smaller ornaments measuring 4–5 inches (10.2–12.7 cm) can also be made using the same construction method.
Can I make these ornaments without a sewing machine?
Yes. The ornaments can be sewn by hand using small running stitches, backstitches, and slip stitches. However, hand sewing will require more time, especially when quilting the fabric layers and attaching the binding.
What type of batting works best for fabric Christmas ornaments?
Low-loft cotton or polyester batting works well. It provides a soft padded texture without making the ornaments excessively thick or difficult to finish.
Can I use leftover quilt fabric scraps?
Absolutely. This is an excellent scrap-friendly quilting project. Small fabric pieces can be sewn together to create patchwork panels before the ornament shapes are cut.
How do I keep the circular ornament edges smooth?
Use a precise circular template, cut carefully, and apply bias binding rather than straight-grain binding. Bias binding stretches gently around curved edges and helps prevent puckering.
Can these ornaments be used as Christmas gifts?
Yes. Handmade quilted ornaments make thoughtful gifts for family members, friends, teachers, and neighbors. They can also be personalized with embroidered names, initials, or dates.
How many ornaments can I make from one fat quarter?
A standard fat quarter measuring approximately 18 × 22 inches (45.7 × 55.9 cm) can provide several 7-inch front squares, depending on cutting layout. Additional fabric is required for the backs, caps, loops, and binding.
Can I add decorative embroidery or embellishments?
Yes. Embroidery, fabric appliqué, decorative buttons, and ribbons can enhance the ornaments. Attach embellishments securely and avoid small detachable decorations if the ornaments will be accessible to young children or pets.
How long does it take to make one quilted Christmas ornament?
A beginner may need approximately 45–90 minutes to complete the first ornament, depending on experience and finishing methods. Making several ornaments in batches can reduce the average time required for each piece.
How should I store quilted Christmas ornaments after the holidays?
Store them flat in a clean, dry box. Avoid placing heavy decorations on top of them, and keep them away from moisture and direct sunlight to preserve the fabric colors and quilting texture.
Conclusion
The Christmas Ornaments Tutorial is a creative and rewarding quilting project that combines festive fabrics, simple sewing techniques, and beautiful handmade details. With their circular quilted bodies, colorful fabric binding, decorative gold caps, and convenient hanging loops, these ornaments capture the cheerful spirit of traditional Christmas decorations.
One of the greatest advantages of this quilted Christmas ornament pattern is its flexibility. You can use traditional red and green fabrics, elegant white and gold combinations, vintage Christmas prints, or leftover patchwork scraps to create decorations that suit your personal style. The project is also an excellent opportunity to practice essential quilting skills, including fabric preparation, quilt sandwich construction, straight-line stitching, curved binding, and decorative finishing.
Whether you make a single ornament or an entire coordinated collection, these handmade fabric Christmas ornaments offer a meaningful way to decorate your home and celebrate the holiday season. They are beautiful additions to Christmas trees, thoughtful handmade gifts, and charming keepsakes that can be enjoyed year after year. With a little patience, creativity, and attention to detail, this Christmas Ornaments Tutorial can help transform simple pieces of fabric into festive decorations filled with warmth, color, and handmade charm.