
One of the most appealing characteristics of the Christmas Tree Patchwork Pattern is its versatility. Unlike a traditional rectangular quilt, this project features a distinctive Christmas tree outline, with angled branches and a pointed top that create an instantly recognizable festive shape. The patchwork sections are assembled using strips of cotton fabric, creating geometric arrangements inspired by classic quilting methods such as strip piecing, chevron blocks, and log cabin construction. These techniques allow quilters to combine different Christmas prints while maintaining an organized and balanced design. Whether you prefer traditional holiday colors or a more modern palette, this project offers countless possibilities for personalization and creativity.
Creating a Christmas Tree Patchwork Pattern is also an excellent opportunity to practice essential quilting skills, including accurate cutting, seam alignment, fabric pressing, quilt sandwich preparation, machine quilting, and binding. Although the finished project looks elaborate, it can be constructed through manageable stages that make the process accessible to confident beginners and intermediate quilters. This tutorial explains how to plan the tree shape, select suitable materials, calculate fabric measurements, assemble the patchwork panels, add batting and backing, and finish the decorative details. With careful preparation and attention to detail, you can create a beautiful handmade patchwork Christmas tree that becomes a treasured part of your holiday decorations for years to come.
Materials, Fabric Selection, and Measurements for the Christmas Tree Patchwork Pattern
1. Choosing the Best Fabrics for Your Christmas Tree Quilt
DISCOVER MORE FREE PATTERNS HERE!
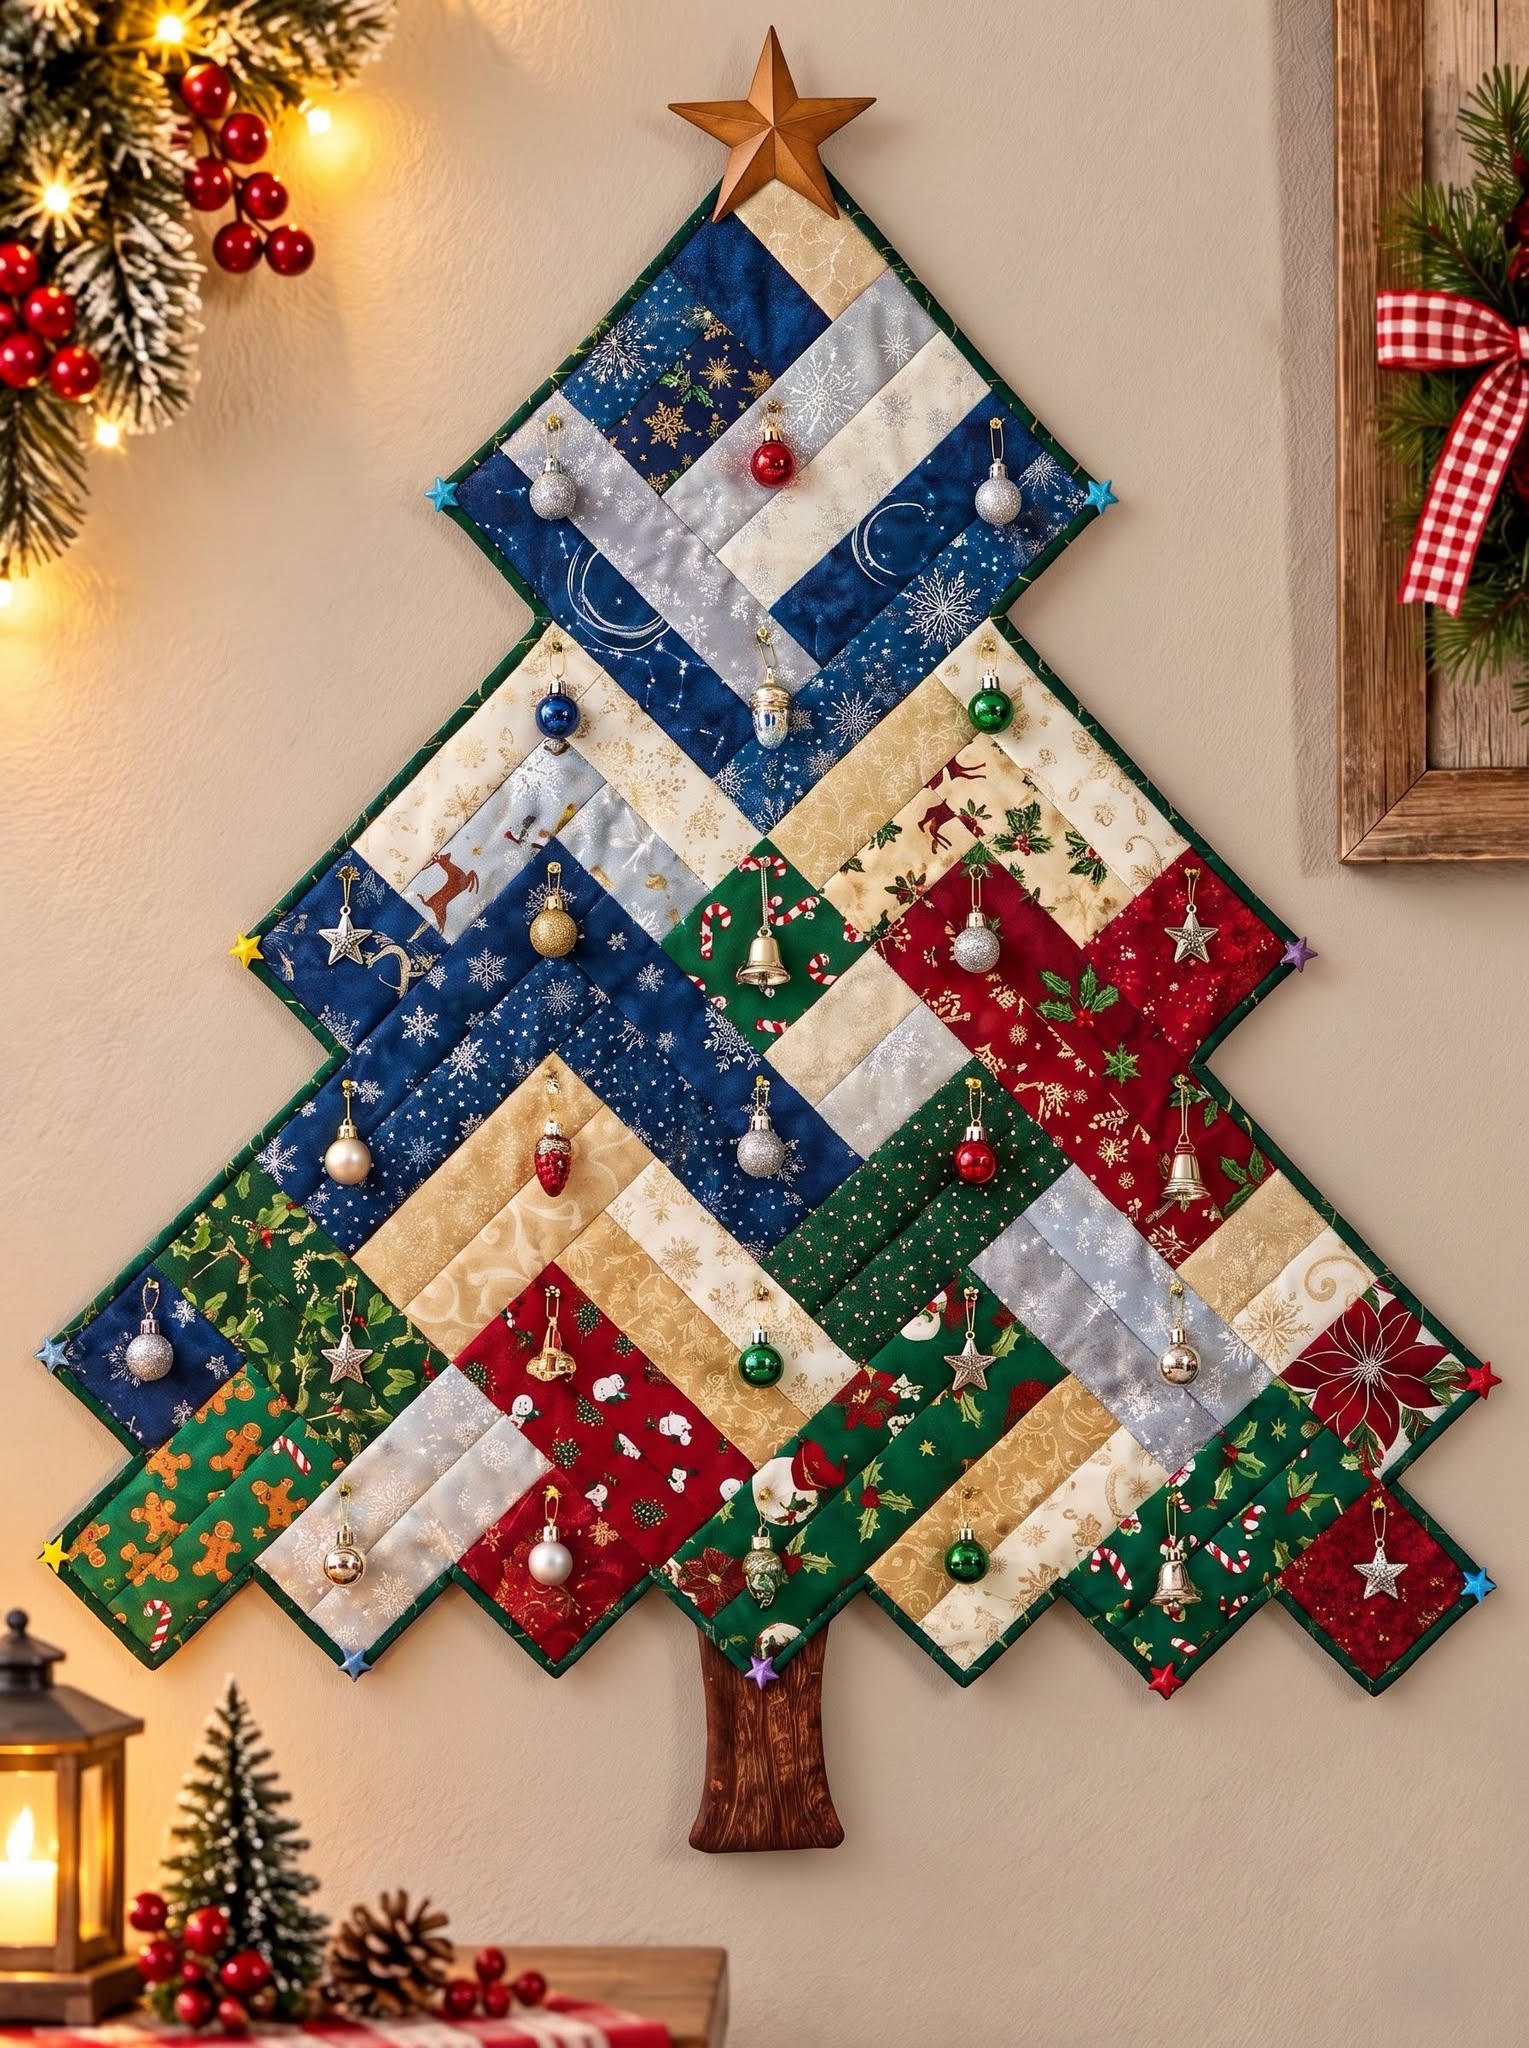
The first step in making a Christmas Tree Patchwork Pattern is selecting fabrics that complement one another while creating an attractive holiday appearance. High-quality quilting cotton is the best option because it is easy to cut, sew, press, and quilt. The design in the reference photograph features a combination of festive prints, including snowflakes, reindeer, candy canes, holly leaves, Christmas ornaments, and metallic-inspired patterns. Using fabrics with different print scales creates visual interest and helps individual patchwork sections stand out.
For a traditional Christmas appearance, combine deep red, forest green, cream, and gold. For a winter-inspired variation, use navy blue, silver, white, and icy blue. Mixing dark and light fabrics is especially important because it creates contrast between the geometric sections.
2. Essential Materials and Sewing Supplies
Before starting your patchwork Christmas tree wall hanging, prepare the following materials:
-
8–12 coordinating Christmas cotton fabrics, approximately 1/8–1/4 yard each.
-
3/4 yard (0.7 m) of quilting cotton for the backing.
-
A piece of low-loft quilt batting approximately 36 × 40 inches (91 × 102 cm).
-
Approximately 1/3 yard (0.3 m) of fabric for binding, depending on the final outline.
-
Fabric scraps in brown or dark wood tones for the tree trunk.
-
Coordinating polyester or cotton sewing thread.
-
Rotary cutter and self-healing cutting mat.
-
Acrylic quilting ruler.
-
Sewing machine with a 1/4-inch quilting foot.
-
Fabric scissors.
-
Quilting pins or fabric clips.
-
Iron and ironing board.
-
Fabric marking pencil or removable marker.
-
Optional wooden or felt star decoration.
-
Optional lightweight Christmas ornaments.
-
Optional wooden dowel and hanging sleeve.
Choose lightweight decorations so the finished quilt hangs evenly without pulling or distorting the fabric.
3. Recommended Finished Measurements
The following measurements provide a practical starting point for a medium-sized decorative Christmas tree quilt.
| Component | Suggested finished size |
|---|---|
| Total tree height, excluding topper | 36 in (91.4 cm) |
| Maximum tree width | 32 in (81.3 cm) |
| Upper tree section | 12 in (30.5 cm) wide |
| Middle tree section | 23 in (58.4 cm) wide |
| Lower tree section | 32 in (81.3 cm) wide |
| Visible trunk | 4 × 5 in (10.2 × 12.7 cm) |
| Patchwork strip width, finished | 2 in (5.1 cm) |
| Patchwork strip width, cut | 2.5 in (6.4 cm) |
| Seam allowance | 1/4 in (6 mm) |
| Binding strip width | 2.25 in (5.7 cm) |
These are suggested project dimensions rather than measurements extracted from the photograph. The finished size can be adjusted according to your available wall space.
4. Understanding the Patchwork Construction
The Christmas Tree Patchwork Pattern combines strip-pieced fabric sections with a shaped outer silhouette. Instead of cutting every decorative piece individually, you can sew several strips together to form larger patchwork panels. These panels are then arranged diagonally to create the chevron-inspired appearance visible in the photograph.
For a manageable construction, create one oversized rectangular patchwork top first, then cut it into the tree silhouette using a full-size paper template. This method makes it easier to align the decorative strips and produces a consistent outline.
It is important to cut the tree shape only after the patchwork top has been assembled and pressed.
5. Preparing and Cutting the Fabric Strips
Begin by pressing all fabrics to remove wrinkles and ensure accurate cutting. Use your rotary cutter and quilting ruler to cut strips measuring 2.5 inches (6.4 cm) wide.
Prepare approximately 35–45 strips in assorted lengths, depending on your planned arrangement. Many strips can be cut between 8 and 20 inches (20–51 cm) long.
For more variety, include a few strips measuring 3 inches (7.6 cm) wide before sewing, creating sections with slightly different proportions.
Arrange the fabric strips on a large table or design wall before sewing. Alternate dark and light colors to create a balanced composition.
6. Planning the Christmas Tree Silhouette
The tree-shaped outline is one of the most important features of this Christmas quilt wall hanging.
To create a full-size template, tape together large sheets of paper or use pattern drafting paper. Draw a vertical centerline measuring 36 inches (91.4 cm).
Mark the widest lower section at approximately 32 inches (81.3 cm). Create stepped branches that become progressively narrower toward the top.
The tree should have a pointed upper section, wider middle branches, and a broad lower section. Add a small rectangular trunk at the bottom.
Make sure the outline is symmetrical by folding the paper along the centerline and cutting both sides together.
Step-by-Step Christmas Tree Patchwork Pattern: Cutting, Sewing, and Assembling the Quilt
Step 1: Create the First Patchwork Strip Sets
Begin your Christmas Tree Patchwork Pattern by arranging several fabric strips into groups of three or four.
Choose contrasting colors to create visual movement. For example, combine navy blue with silver, cream with gold, and forest green with deep red.
Place two strips right sides together and sew along one long edge using a consistent 1/4-inch (6 mm) seam allowance.
Add the remaining strips one at a time, pressing the seams after each addition.
Press the seams toward the darker fabric whenever possible, unless a different direction helps reduce bulk.
Continue until you have several strip-pieced panels.
Step 2: Construct Chevron-Inspired Patchwork Sections
To create the diagonal arrangements visible in the reference image, prepare additional strip sets and position them at opposing angles.
One effective technique is to create rectangular strip panels and cut them into angled sections using a quilting ruler.
Arrange the angled pieces so the fabric strips form repeated V-shaped patterns.
When joining these sections, match the seam intersections carefully to maintain clean geometric lines.
Pin the fabric layers before sewing to prevent shifting.
If you are new to diagonal piecing, begin with larger sections because they are easier to align than small, intricate pieces.
Step 3: Assemble the Complete Patchwork Quilt Top
Once the individual patchwork panels are ready, arrange them into a large rectangular composition measuring at least 35 × 39 inches (89 × 99 cm).
This oversized layout provides sufficient fabric for cutting the tree-shaped silhouette.
Place the patchwork panels on a flat surface and experiment with different arrangements.
Position darker fabrics near some of the outer edges and lighter fabrics toward selected central areas to create depth.
Sew the panels together using a 1/4-inch seam allowance, checking that the overall surface remains flat.
Press the completed patchwork top carefully before moving to the next stage.
Step 4: Transfer and Cut the Christmas Tree Shape
Place your full-size Christmas tree paper template over the completed patchwork top.
Adjust its position to highlight the most attractive fabric combinations.
Trace around the template using a removable fabric marker.
Before cutting, check that the outline includes all the necessary seam and binding allowances.
If your template represents the finished outer shape, cut the quilt top approximately 1/4 inch (6 mm) outside the marked line.
Carefully cut along the outer silhouette using sharp fabric scissors.
For this construction method, the tree shape should include the pointed top and stepped branch edges, but the trunk can be prepared separately.
Step 5: Prepare the Quilt Sandwich and Add Quilting Stitches
Lay the backing fabric on a flat surface with the wrong side facing upward.
Place the batting on top, followed by the Christmas tree patchwork top with the right side facing upward.
For easier quilting, keep the batting and backing slightly larger than the shaped patchwork top.
Smooth the layers carefully to remove wrinkles.
Secure the layers with quilting pins or temporary basting stitches.
Quilt along selected patchwork seams using the stitch-in-the-ditch technique, or sew straight lines approximately 1 inch (2.5 cm) apart.
You can also add decorative quilting patterns such as gentle swirls, stars, or snowflake-inspired motifs.
After quilting, trim the excess batting and backing to match the tree silhouette.
Step 6: Add the Trunk, Binding, and Hanging Details
Create the trunk using a brown fabric rectangle measuring approximately 4.5 × 5.5 inches (11.4 × 14 cm), including seam allowances.
Add batting and backing to the trunk, then quilt it using simple vertical lines.
Finish its exposed edges and attach it securely to the back of the lower tree section so approximately 5 inches (12.7 cm) remain visible.
Next, prepare bias binding strips measuring approximately 2.25 inches (5.7 cm) wide. Bias binding is particularly helpful for navigating the tree’s angled corners.
Sew the binding around the entire silhouette, carefully folding and mitering the corners.
Finish by adding a hanging sleeve to the back and attaching a decorative star at the top.
Your handmade Christmas Tree Patchwork Pattern is now ready for its final decorations.
Creative Decorating Ideas and Professional Finishing Techniques for a Christmas Tree Quilt
1. Adding Beautiful Christmas Ornaments
One of the most charming features of the Christmas Tree Patchwork Pattern is the addition of miniature ornaments. The reference image features small red, green, silver, and gold decorations hanging across the quilted surface.
To recreate this appearance, attach lightweight ornaments using small stitched fabric loops.
Distribute the decorations evenly to maintain visual balance.
Avoid attaching heavy glass ornaments directly to the quilt because they may damage the fabric or cause the wall hanging to sag.
Lightweight plastic, felt, or fabric ornaments are safer and more suitable for quilted decorations.
2. Creating a Decorative Christmas Star
A star topper adds a beautiful finishing touch to your patchwork Christmas tree wall hanging.
You can make a fabric star using gold quilting cotton and a small amount of batting.
Cut two matching star shapes, sew them right sides together, and leave a small opening for turning.
Turn the star right side out, lightly stuff it, and close the opening with invisible stitches.
Attach the star securely to the top of the tree.
Alternatively, use a lightweight wooden star for a rustic holiday appearance.
3. Choosing the Best Quilting Designs
The quilting stitches contribute significantly to the overall appearance of the finished project.
Straight-line quilting works beautifully with geometric patchwork because it emphasizes the shapes and seams.
For a more decorative finish, consider free-motion quilting with snowflakes, stars, or swirling patterns.
A combination of straight-line and free-motion quilting can create attractive contrast.
Use thread colors that blend with the fabrics or choose a contrasting metallic-inspired thread for subtle sparkle.
Always test decorative thread on a fabric sample before quilting the finished project.
4. Making a Scrappy Christmas Tree Quilt
A scrappy Christmas Tree Patchwork Pattern is an excellent way to use leftover fabric from previous holiday sewing projects.
Instead of purchasing an entirely new collection of fabrics, combine small pieces of Christmas-themed cotton in different colors and prints.
Cut scraps into strips or rectangles and join them into larger patchwork panels.
Try to distribute strong colors evenly across the tree so one section does not become visually overwhelming.
Scrappy quilting creates a charming handmade appearance and makes every finished Christmas tree unique.
5. Creating a Modern or Vintage Christmas Tree
The same Christmas Tree Patchwork Pattern can be adapted to different decorating styles.
For a modern appearance, use solid fabrics in emerald green, white, gold, and navy blue.
For a vintage-inspired design, choose faded red, cream, sage green, and antique gold.
Traditional Christmas prints with small holly leaves, stars, and candy canes create a nostalgic atmosphere.
You can also make a Scandinavian-inspired version using red, white, gray, and simple geometric patterns.
The key is maintaining a balanced color palette while allowing the patchwork arrangement to remain the main visual feature.
6. Hanging and Displaying Your Finished Quilt
Once your Christmas tree quilt wall hanging is complete, choose a suitable location where it can be displayed safely.
A living room wall, hallway, entryway, or sewing room can provide an attractive background.
For a professional hanging method, sew a fabric sleeve across the upper back of the quilt and insert a lightweight wooden dowel.
Because the project has an irregular silhouette, additional hidden hanging points may be needed to prevent the branches from folding forward.
Make sure the quilt hangs evenly and does not touch candles, fireplaces, heaters, or other heat sources.
With proper support, the finished decoration can become a beautiful centerpiece for your holiday home.
Expert Quilting Tips, Common Mistakes, and Care Instructions
1. Maintaining Accurate Seam Allowances
Accurate seam allowances are essential for creating a well-aligned Christmas Tree Patchwork Pattern.
Use a consistent 1/4-inch (6 mm) seam allowance throughout the project.
Even small variations can cause patchwork panels to become uneven.
A quilting foot with a built-in seam guide can help improve accuracy.
Measure your strip sets after sewing to confirm that the finished widths match your calculations.
If necessary, adjust your sewing machine needle position before assembling the larger sections.
2. Preventing Fabric Distortion During Sewing
Diagonal patchwork pieces may contain bias edges that stretch more easily than straight-grain fabric.
Handle these pieces gently and avoid pulling them while sewing.
Press the seams with an up-and-down motion rather than dragging the iron across the fabric.
Use pins or fabric clips to stabilize long seams.
If the fabric begins stretching, consider using a light spray starch before cutting.
Careful handling helps maintain the geometric shapes and prevents unwanted distortion.
3. Creating Clean Corners and Branch Points
The stepped outline of the Christmas Tree Patchwork Pattern requires special attention during binding.
Sharp corners can become bulky if too much fabric accumulates in one area.
Trim excess seam allowances carefully without cutting into the stitching.
Use bias binding for improved flexibility around angled edges.
At inside corners, clip only as needed, stopping short of the stitching line.
Take your time when sewing around each branch point to achieve a smooth and professional finish.
4. Selecting the Right Batting
Low-loft cotton or cotton-blend batting is ideal for a decorative Christmas tree quilt wall hanging.
It provides enough structure to support the patchwork while keeping the finished project relatively lightweight.
Thick polyester batting may create excessive bulk around the corners and binding.
For a flatter appearance, choose a thin batting designed for wall quilts.
Always check the manufacturer’s recommended quilting distance before selecting your quilting design.
Proper batting selection improves both the appearance and durability of the finished project.
5. Avoiding Common Patchwork Mistakes
One common mistake is cutting the Christmas tree silhouette before the patchwork panels are completely assembled.
This can make alignment more difficult and increase fabric waste.
Another frequent problem is failing to press seams consistently.
Uneven seams may create bulky intersections and distort the geometric design.
Always arrange your fabrics before sewing and check the overall color balance.
Take measurements throughout the construction process rather than waiting until the final assembly.
These simple habits can significantly improve the quality of your finished quilt.
6. Cleaning and Storing Your Christmas Tree Quilt
Proper care helps preserve the colors and structure of your handmade Christmas Tree Patchwork Pattern.
Remove all detachable ornaments before cleaning.
For lightly soiled wall hangings, gentle spot cleaning is often sufficient.
If the fabrics and batting are washable, hand wash carefully in cool water using mild detergent.
Avoid wringing the quilt, as this may distort the patchwork.
Allow it to dry flat and reshape the corners while damp.
When the holiday season ends, store the quilt in a clean, dry location away from direct sunlight and moisture.
Frequently Asked Questions About the Christmas Tree Patchwork Pattern
What is a Christmas Tree Patchwork Pattern?
A Christmas Tree Patchwork Pattern is a quilting project that combines different fabric pieces to create a decorative Christmas tree design. It can be used as a wall hanging, table decoration, or seasonal textile artwork.
Is this Christmas tree quilt suitable for beginners?
Yes, confident beginners can complete this project if they are comfortable using a sewing machine, cutting fabric accurately, and sewing basic patchwork seams. The angled sections and shaped binding require additional patience.
What fabrics are best for a Christmas Tree Patchwork Pattern?
Quilting cotton is the recommended fabric because it is durable, easy to sew, and available in many festive prints.
How much fabric do I need?
For the suggested wall hanging, approximately 1.5–2 yards of assorted fabric in total is a useful starting estimate for the patchwork top, depending on the size of your scraps and cutting waste. Additional fabric is required for backing and binding.
What size should the finished Christmas tree quilt be?
A finished size of approximately 32 inches (81 cm) wide and 36 inches (91 cm) tall works well for a medium-sized wall decoration.
Can I make a larger Christmas tree quilt?
Yes. Enlarge the tree template and increase the number of patchwork strips to create a larger design.
What quilting technique is used in this project?
The design combines strip piecing, geometric patchwork arrangements, and traditional quilt sandwich construction.
Can I use leftover fabric scraps?
Absolutely. This project is especially suitable for using Christmas-themed fabric scraps from previous sewing projects.
Do I need a special sewing machine?
No. A standard sewing machine with straight-stitch capability is sufficient for most of the construction.
What seam allowance should I use?
A consistent 1/4-inch (6 mm) seam allowance is recommended for patchwork assembly.
Can I add Christmas lights to the quilt?
Battery-operated LED lights designed for fabric decorations may be used cautiously if they remain cool and are installed according to the manufacturer’s instructions. Avoid mains-powered lights, exposed wiring, and any lighting system that generates heat.
How do I attach ornaments without damaging the quilt?
Use small sewn fabric loops or reinforced attachment points. Choose lightweight ornaments to avoid pulling on the fabric.
Can I make this quilt without batting?
Yes. You can create a lighter fabric wall hanging without batting, although it will have less structure and a different appearance.
What is the best binding for a Christmas tree quilt?
Bias binding is a practical choice because it adapts more easily to the angled corners and irregular silhouette.
Can I make the Christmas tree quilt in modern colors?
Yes. Modern combinations such as navy blue and silver, emerald green and gold, or white and burgundy can create beautiful results.
How long does it take to complete the project?
The project may take approximately 8–15 hours, depending on the complexity of the patchwork, quilting design, and decorative details.
Can I sell handmade Christmas tree quilts?
Generally, you can sell quilts made from your own original designs, subject to applicable laws and any rights associated with third-party patterns or artwork.
How should I store the quilt after Christmas?
Store it clean and completely dry in a breathable cotton bag or wrapped in acid-free tissue paper. Avoid prolonged compression and damp storage areas.
Conclusion
The Christmas Tree Patchwork Pattern is a delightful quilting project that combines traditional sewing techniques with festive creativity. Its distinctive tree-shaped silhouette, colorful fabric strips, and decorative Christmas details make it a beautiful addition to holiday home decor.
By following this step-by-step Christmas Tree Patchwork Pattern tutorial, you can transform ordinary quilting cotton and fabric scraps into a charming seasonal wall hanging. From selecting coordinating Christmas prints to assembling geometric patchwork panels, quilting the layers, and finishing the edges, each stage offers an opportunity to develop your sewing skills.
The design shown in the reference image provides wonderful inspiration for combining rich holiday colors, decorative ornaments, and elegant geometric patterns. However, the project can be adapted to suit many different decorating styles, from traditional Christmas themes to modern and vintage-inspired arrangements.
Whether you make this handmade patchwork Christmas tree for your own home, as a thoughtful holiday gift, or as part of a seasonal craft collection, the finished quilt represents the warmth and creativity of handmade Christmas decorations. With careful stitching, beautiful fabrics, and a little imagination, your Christmas Tree Patchwork Pattern can become a treasured holiday decoration that brings joy year after year.