
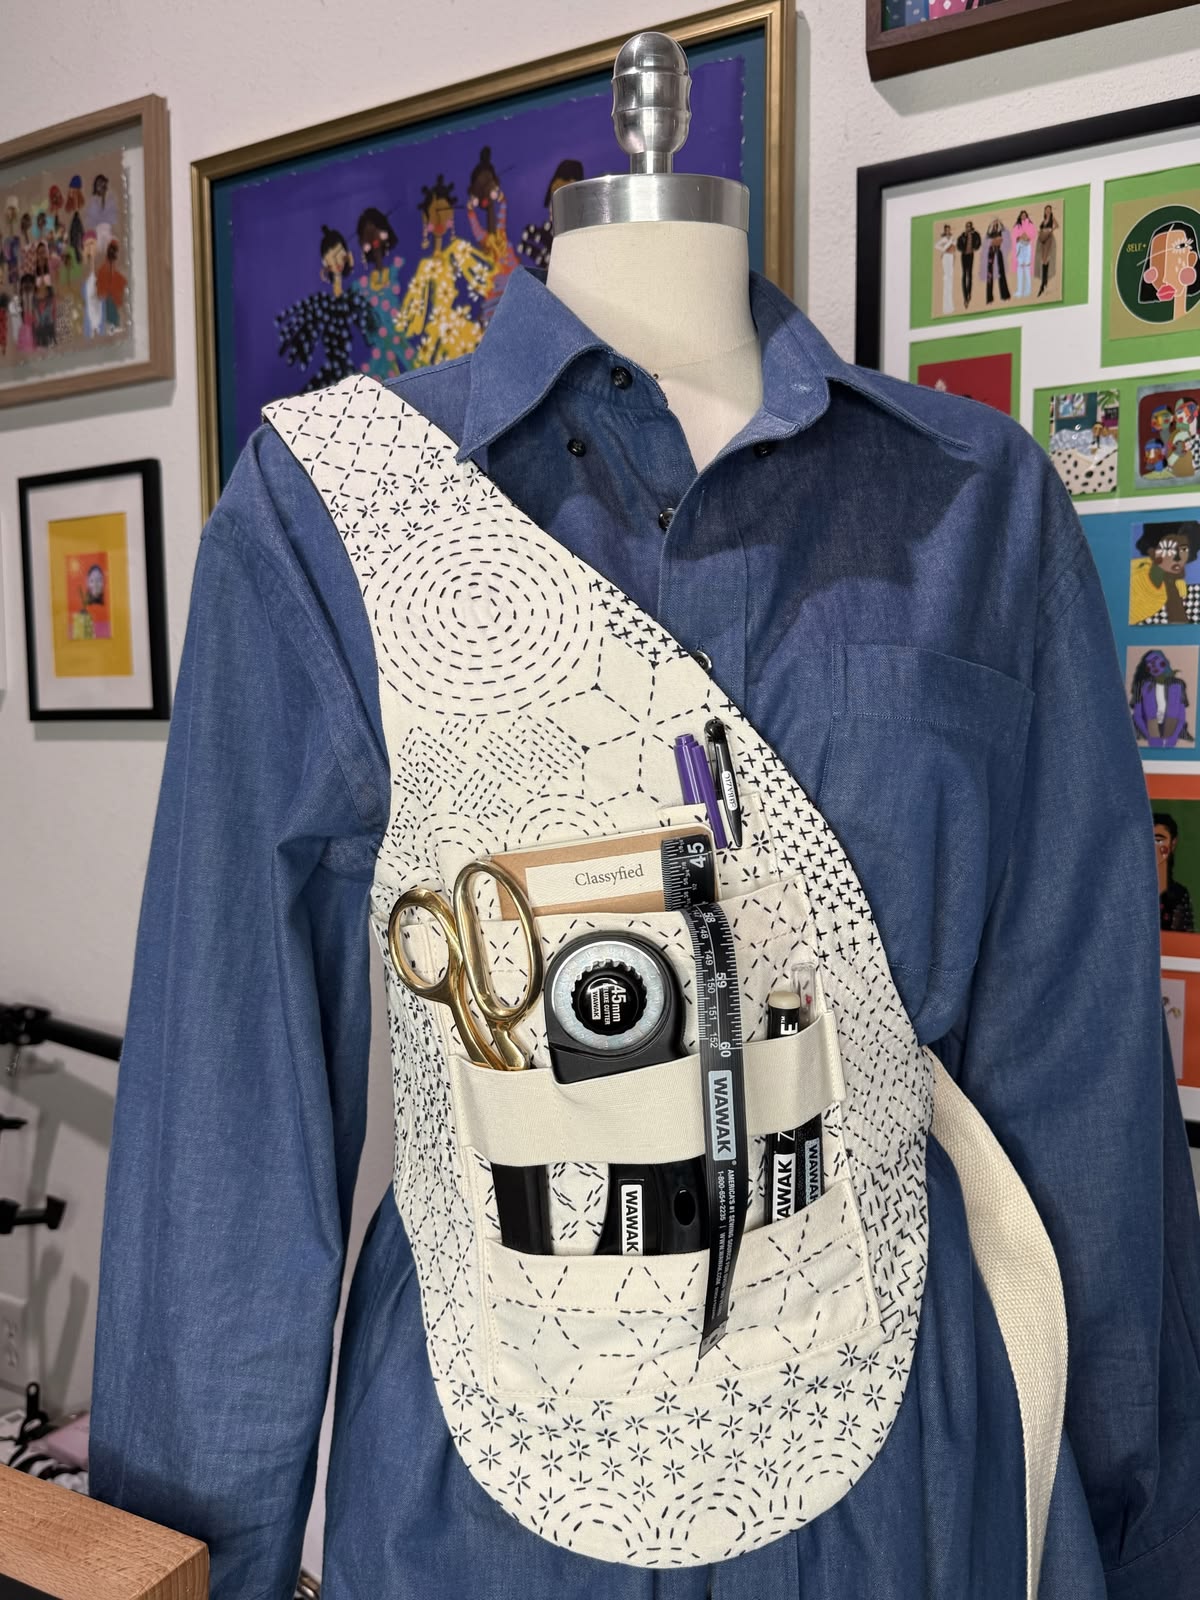
Crossbody Craft Organizer Pattern is a practical sewing and quilting project designed for makers who want to keep scissors, measuring tools, marking pens, rulers, thread accessories, and other essentials close at hand while working. Inspired by the organizer shown in the reference image, this project combines a comfortable crossbody strap with a roomy quilted body and several divided front pockets, creating a wearable sewing tool organizer that is both functional and attractive.
One of the most appealing features of this Crossbody Craft Organizer Pattern is that it can be customized for the tools you actually use. Instead of searching through drawers or repeatedly reaching across the sewing table, frequently used supplies can be organized into individual compartments. Narrow sections work well for pens and marking pencils, medium sections can accommodate small rulers and seam gauges, while larger pockets can hold scissors, measuring tapes, clips, and small notebooks. The result is especially useful when moving between a cutting table, sewing machine, ironing station, classroom, or quilting retreat.
The construction is also an excellent opportunity to combine quilting, practical sewing, pocket construction, topstitching, and bag-making techniques in one manageable project. The organizer can be made from coordinated quilting cottons, canvas, linen blends, denim, or leftover quilted fabric. Decorative hand stitching similar to sashiko can transform a simple neutral fabric into a beautiful handmade accessory. The measurements below are adaptable, so you can enlarge or reduce the organizer according to your preferred tools and body size.
Materials, Measurements and Preparing the Quilted Organizer
For a medium-sized Crossbody Craft Organizer, plan for a finished body approximately 10 inches wide × 14 inches tall (25 × 36 cm). The bottom can be gently rounded, similar to the reference project, which makes the organizer comfortable against the body and gives it a polished bag-like appearance.
DISCOVER MORE FREE PATTERNS HERE!
You will need approximately ½ yard (46 cm) of exterior fabric, ½ yard (46 cm) of lining fabric, and about ¼–½ yard (23–46 cm) of fabric for the pockets and strap, depending on whether you use contrasting materials. Cotton canvas or quilting cotton reinforced with interfacing works particularly well.
For structure, use lightweight fusible fleece, cotton batting, or medium-weight fusible interfacing. Batting produces the softer quilted organizer appearance, while interfacing creates a flatter and slightly firmer result. You can even combine lightweight interfacing with thin batting when additional support is needed.
Other supplies include coordinating thread, scissors or a rotary cutter, cutting mat, acrylic ruler, sewing machine, iron, marking tool, pins or clips, and a 90/14 universal or quilting needle. A denim needle may be more suitable if you choose heavy canvas or denim.
A practical cutting plan for the main body is two exterior pieces measuring approximately 11 × 15 inches (28 × 38 cm) and two lining pieces of the same size. These measurements include room for seam allowances and trimming.
Cut batting slightly larger than each exterior piece. Quilt the exterior to the batting first and trim it afterward. This prevents minor shrinkage caused by quilting from affecting the final dimensions.
For the large front pocket, cut one piece approximately 10½ × 9 inches (27 × 23 cm). For an additional upper pocket, use approximately 10½ × 5½ inches (27 × 14 cm). Pocket dimensions can be changed according to your tools.
A standard ½-inch (1.3 cm) seam allowance works well for the main construction. For pocket topstitching, sew approximately ⅛ inch (3 mm) from the finished edge.
Before cutting the final rounded body, draw the shape on paper. Begin with a rectangle and round the two lower corners. A dinner plate or curved quilting ruler can help create identical curves.
If you want the decorative hand-quilted appearance of the inspiration image, mark geometric lines, circles, crosses, stars, or running-stitch patterns across the exterior fabric before assembling the organizer. Use contrasting thread and a simple running stitch to create the handmade texture.
Creating the Front Tool Pockets and Compartments
The pocket system is the heart of this Crossbody Craft Organizer Pattern. A well-designed pocket arrangement is more useful than simply adding several large compartments, so decide what you want to carry before sewing the divisions.
Begin with the largest pocket piece. Fold the upper edge toward the wrong side by ¼ inch (6 mm), then fold again by approximately ½ inch (1.3 cm). Press thoroughly and topstitch.
For additional strength, you can interface the pocket before hemming it. This is particularly helpful when the compartment will hold heavier tools such as large sewing scissors.
Position the large pocket approximately 1½–2 inches (4–5 cm) above the bottom of the organizer. Align its lower and side edges with the body and pin or clip securely.
Next, decide where the pocket divisions should be placed. A useful arrangement is one wide compartment for scissors, one medium compartment for a tape measure, and two narrow compartments for marking pens or seam gauges.
Mark vertical stitching lines using an erasable fabric marker. For example, you might create sections measuring approximately 3 inches, 3½ inches, 1½ inches, and 2 inches (7.5, 9, 4, and 5 cm).
Stitch each marked line from the lower edge to the pocket opening. Backstitch carefully at the top because this point receives significant stress when tools are repeatedly inserted and removed.
For additional durability, sew a small triangle or narrow bar tack at the top of every pocket divider. This simple reinforcement can significantly extend the organizer’s useful life.
Add the second pocket above the first if desired. The reference design uses layered compartments, which allows shorter objects to remain visible rather than disappearing inside one deep pocket.
A shallow upper pocket approximately 4–5 inches (10–13 cm) deep is ideal for small rulers, cards, packets of needles, seam rippers, or fabric markers.
You can divide this pocket as well. However, avoid making every section extremely narrow. Leaving at least one generous compartment provides flexibility for unusual tools.
When planning the compartments, place the actual tools over the fabric. This is more reliable than choosing pocket dimensions only from measurements.
Leave approximately ½ inch (1.3 cm) of ease around bulky items. A pocket exactly the same width as a pair of scissors may become difficult to use after seam allowances and quilting reduce the available space.
A narrow elastic strip can also be sewn across one section to hold marking pens or small cylindrical tools securely.
Continue adjusting and testing until the arrangement feels natural. The objective is to create a wearable sewing organizer that allows tools to be removed with one hand without making them so loose that they fall out.
Sewing the Main Body and Crossbody Strap
Once all pockets are attached to the front exterior panel, place the front and back exterior pieces right sides together.
Sew around both sides and the rounded bottom using a ½-inch (1.3 cm) seam allowance, leaving the upper edge open.
Clip small notches into the curved seam allowance without cutting through the stitching. These clips help the rounded lower edge turn smoothly.
Turn the exterior right side out temporarily and inspect the shape.
If the bottom curve appears uneven, turn it back and correct the stitching before continuing.
Now sew the lining pieces together in the same way, but leave approximately 4 inches (10 cm) unstitched along the bottom or one side. This opening will later be used for turning.
Do not turn the lining right side out yet.
Next, prepare the crossbody strap. For a fabric strap approximately 1½ inches (3.8 cm) wide when finished, cut a strip approximately 4 inches (10 cm) wide.
The length depends on the wearer. A practical adjustable range is approximately 40–55 inches (102–140 cm).
For a fixed strap, measure diagonally from one shoulder to the opposite hip and add several inches for seam allowances and comfort.
Fold the strap lengthwise with wrong sides together and press.
Open it.
Fold both long raw edges toward the center crease.
Press again.
Fold along the original center crease so the raw edges are enclosed.
Topstitch along both long edges.
For a stronger strap, insert a strip of cotton webbing or interfacing before the final fold.
If you want an adjustable crossbody organizer, add a slider buckle and rectangular ring or D-ring using standard adjustable bag-strap construction.
The inspiration piece appears to have a broad, comfortable strap. This is particularly useful because scissors and metal sewing tools can add noticeable weight.
Attach the strap ends near the upper side edges of the exterior organizer.
Baste each end approximately ¼ inch (6 mm) from the raw edge.
Make sure the strap is not twisted.
Place the exterior bag inside the lining with right sides facing.
The strap should remain sandwiched between these layers.
Match the upper edges and side seams.
Pin or clip all the way around.
Sew around the opening using the chosen seam allowance.
For additional security, reinforce the areas where the strap meets the organizer by sewing across them twice.
Pull the organizer through the opening left in the lining.
Push out the seams carefully and press.
Close the lining opening with an edge stitch or invisible ladder stitch.
Push the lining inside the organizer and press the upper edge.
Finish with one or two rows of topstitching around the opening. This gives the project a professional finish and helps keep the lining from rolling outward.
Quilting Details, Finishing and Customizing the Organizer
Decorative quilting is where this Crossbody Craft Organizer Pattern can become truly personal. The reference project demonstrates how simple neutral fabric can gain visual interest through contrasting stitched patterns.
Try combining straight running stitches with circles, crosses, stars, grids, diamonds, and irregular geometric motifs. The stitching does not need to be perfectly symmetrical.
If you prefer machine quilting, use parallel lines approximately ½–1 inch (1.3–2.5 cm) apart. A walking foot makes it easier to keep the layers smooth.
Another attractive option is a simple diamond quilting pattern. Mark diagonal lines in both directions and stitch them before constructing the bag.
Scrap lovers can create the exterior from several small pieces of fabric. Join scraps first, press the seams, then quilt the resulting patchwork panel to batting.
Denim scraps are particularly suitable for a sturdy version. Combine different shades of blue denim with colorful hand stitching for a practical scrap fabric organizer.
For the pocket area, consider adding a removable key ring or swivel hook. This can hold embroidery scissors, a thimble case, measuring tape, or small notions pouch.
A small magnetic snap can be installed at the upper opening if you want the organizer to remain partially closed. However, an open top provides faster access when the project is being used as a working tool holder.
Bias binding is another finishing option. Instead of sewing the body right sides together, quilt the exterior and lining as one unit and bind the outer perimeter with coordinating bias tape.
Check every pocket after assembly.
Insert the tools you intend to carry and make sure each compartment remains comfortable to use.
If a pocket opening feels too loose, add a small snap, elastic loop, or short line of stitching.
Trim loose threads and press the organizer one final time.
Avoid pressing directly over synthetic batting at extremely high temperatures.
Your finished Crossbody Craft Organizer should sit comfortably from shoulder to opposite hip, keeping the pocket area accessible around waist level.
Suggested Finished Measurements
A versatile adult-sized organizer can be approximately 10 × 14 inches (25 × 36 cm) with a 1½-inch (3.8 cm) wide strap.
For a compact version, reduce the body to approximately 8 × 11 inches (20 × 28 cm).
For a larger studio organizer, increase it to approximately 12 × 16 inches (30 × 41 cm).
The pattern can therefore be adapted for quilting, embroidery, knitting, crochet, drawing, gardening, or other crafts simply by changing the pocket arrangement.
FAQ – Crossbody Craft Organizer Pattern
What is a Crossbody Craft Organizer Pattern?
It is a sewing pattern for creating a wearable organizer with a crossbody strap and multiple compartments for craft supplies.
Is this project suitable for beginners?
Yes. A confident beginner who can sew straight seams, make pockets, and topstitch can complete the project.
What is the best fabric for the organizer?
Quilting cotton, canvas, linen blends, and lightweight denim are all good options.
Does the fabric need interfacing?
Lightweight quilting cotton generally benefits from interfacing or batting. Heavy canvas may require less reinforcement.
What finished size should I make?
Approximately 10 × 14 inches (25 × 36 cm) is a useful medium size.
How wide should the strap be?
A finished width of approximately 1½–2 inches (3.8–5 cm) distributes weight comfortably.
How long should a crossbody strap be?
Approximately 40–55 inches (102–140 cm) works for many adults, but measuring the intended wearer gives the best result.
Can I make the strap adjustable?
Yes. Add a slider and suitable ring hardware.
Can I use fabric scraps?
Absolutely. This project is excellent for scrap quilting because the body and pockets can be pieced from relatively small fabrics.
Can I use old jeans?
Yes. Recycled denim makes a strong organizer, although bulky seam intersections should be avoided.
How many pockets should I add?
There is no required number. Design the compartments around your own scissors, rulers, pens, measuring tapes, and notions.
How can I prevent the pockets from tearing?
Backstitch or bar tack at the upper end of every pocket divider.
Can I add a zipper?
Yes. A zippered compartment can be incorporated for small items that need extra security.
Can the organizer be machine quilted?
Yes. Straight-line, diamond, grid, or free-motion quilting can all be used.
Can I hand quilt it?
Yes. Contrasting running stitches create a beautiful handmade appearance similar to the reference style.
Can I wash the finished organizer?
Usually yes when washable fabrics and batting are used. Prewashing cotton fabrics can help reduce later shrinkage.
What can I carry in it?
Scissors, seam rippers, marking pens, measuring tapes, small rulers, clips, needles, thread, crochet hooks, embroidery tools, and other lightweight craft supplies.
Should I carry rotary cutters in an open pocket?
A rotary cutter should only be stored with its blade fully retracted or otherwise safely covered. A secured pocket is preferable for sharp tools.
Conclusion
The Crossbody Craft Organizer Pattern combines quilting, storage, and wearable convenience in one useful handmade project. With a softly structured body, multiple divided pockets, and a comfortable shoulder strap, the organizer keeps frequently used supplies within easy reach while leaving both hands free for sewing, cutting, pressing, or crafting.
The design is also highly customizable. Use elegant neutral canvas with decorative hand stitching, colorful quilting cotton, recycled denim, coordinated patchwork scraps, or a combination of several materials. Adjusting the pocket sizes and divisions allows the same basic pattern to serve a quilter, embroiderer, crocheter, knitter, artist, or general craft enthusiast.
Taking time to reinforce the pocket openings and strap attachments will make a noticeable difference in durability. Accurate pressing, secure topstitching, and a structured lining will also help the finished organizer retain its shape even when carrying several tools.
Most importantly, this Crossbody Craft Organizer Pattern turns an everyday storage solution into a creative sewing project. It is practical enough for regular use in a sewing room or quilting class while offering plenty of space for decorative quilting, hand stitching, fabric combinations, and personal details that make every finished organizer unique.