
The Denim Cap Pattern is a practical sewing project that transforms unwanted jeans into a comfortable, structured sun visor with plenty of handmade character. Instead of discarding denim that is worn at the knees or no longer fits, you can reuse the strongest sections—including the waistband, leg fabric, belt loops, and even original topstitching—to create an accessory that looks intentionally designed. This project is especially attractive for anyone interested in upcycled denim sewing, sustainable crafts, scrap-friendly projects, and useful handmade accessories.
One of the best things about this DIY denim cap is that the original jeans can provide much of the visual detail. Traditional golden topstitching, faded areas, seams, belt loops, and metal buttons can all become design features. The curved visor requires several layers for stability, while the headband can be made from the original waistband or constructed from fresh strips of denim. An adjustable back strap makes the finished cap more versatile and comfortable.
The Denim Cap Pattern is also an excellent project for developing practical sewing skills. You will learn how to cut curved pieces, stabilize denim, sew multiple layers accurately, topstitch around a curved brim, create an adjustable band, and work with reclaimed garment components. The measurements below are designed as a customizable adult starting point. Because head sizes vary, measure the intended wearer before cutting the final band.
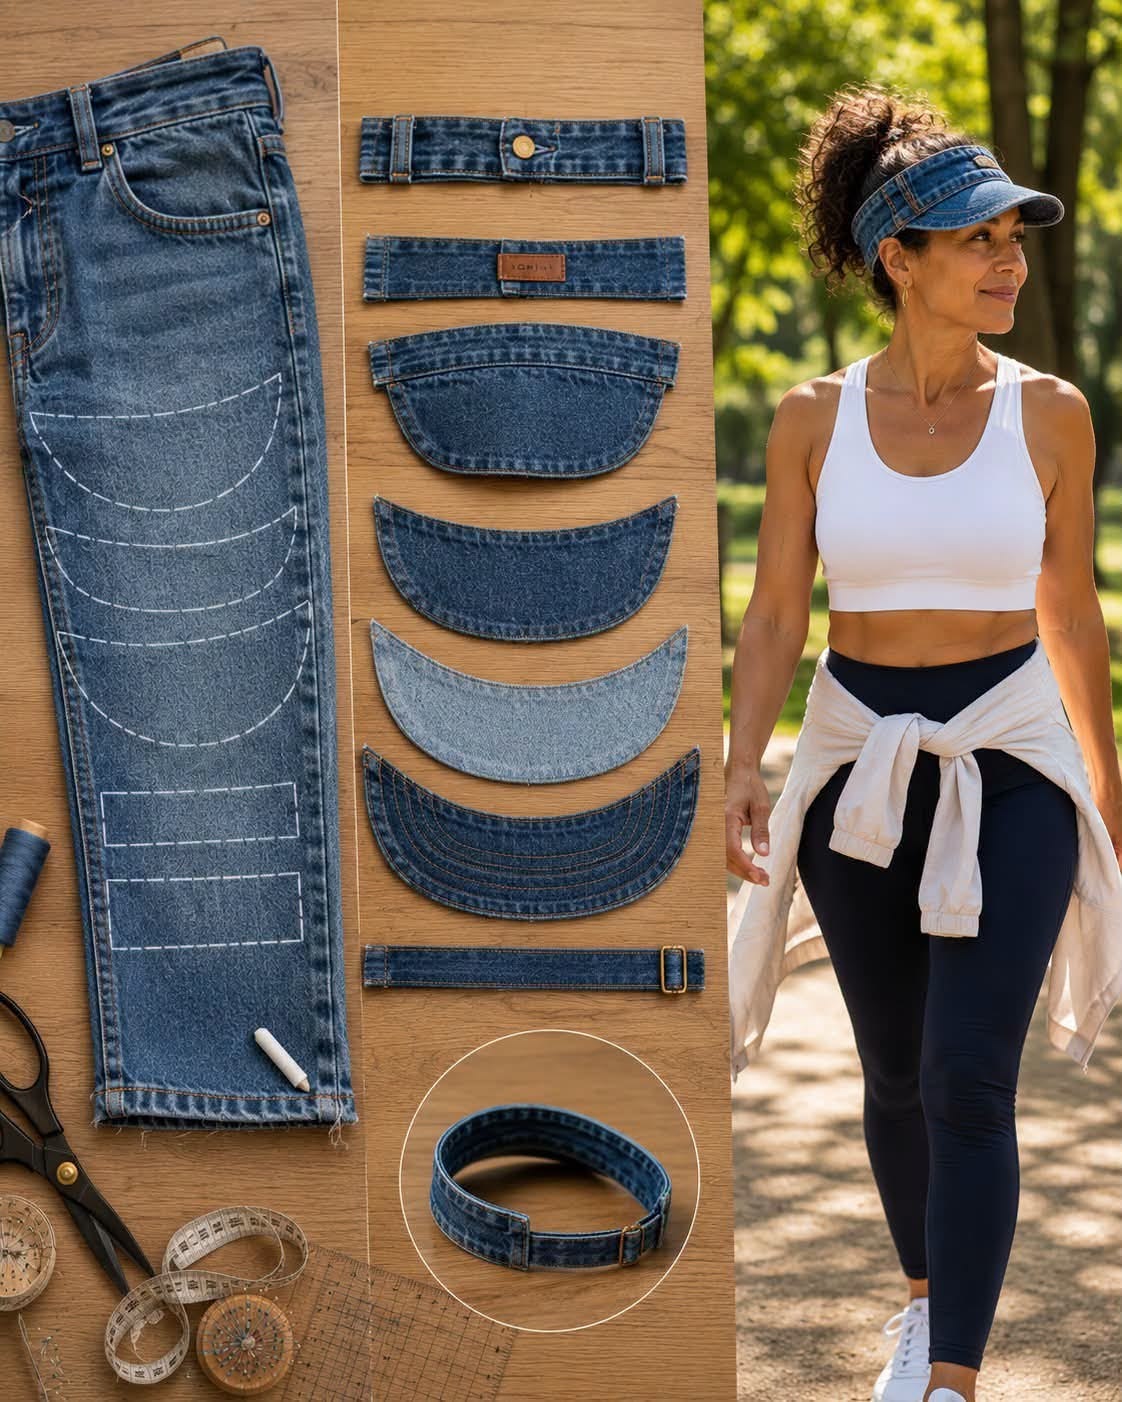
Materials, Measurements, and Preparing Your Old Jeans
Choose a pair of medium-weight jeans for this project. Extremely stretchy denim may produce a visor that feels too soft, while very heavy workwear denim can become difficult to sew once several layers are stacked together. A medium-weight 100% cotton denim or denim with only a small percentage of stretch is generally easiest to handle.
DISCOVER MORE FREE PATTERNS HERE!
For one adult visor, one pair of jeans is usually more than enough. You will also need approximately 1/4 yard (23 cm) of medium- to heavyweight fusible interfacing, matching or contrasting polyester thread, a denim sewing-machine needle in size 90/14 or 100/16, fabric scissors, pins or clips, a marking tool, measuring tape, and an iron.
For a medium adult size, begin with a target head circumference of approximately 22–23 inches (56–58.5 cm). Measure around the head where the visor will naturally sit. Do not make the measurement excessively tight.
A useful finished visor width is approximately 7.5–8.5 inches (19–21.5 cm) from side to side. The center projection—the distance from the forehead edge to the outermost front edge—can be approximately 3–3.5 inches (7.5–9 cm). These measurements produce a practical everyday sun visor rather than an oversized dramatic brim.
The headband can finish at approximately 1.5–2 inches (3.8–5 cm) high. If you want to preserve the original jeans waistband, carefully remove it with a seam ripper. Keep useful belt loops and the button section intact whenever possible. Original jeans hardware can give the completed upcycled denim visor a professional ready-to-wear appearance.
Before cutting, wash and dry the jeans. Press the usable fabric flat. Avoid badly weakened areas, even if their fading is attractive, because the brim needs enough strength to maintain its shape. Save decorative scraps separately; they can later become a back strap or reinforcement patches.
Drafting and Sewing the Curved Denim Visor
The visor is the most recognizable element of the Denim Cap Pattern, so take time to create a balanced template. On paper, draw a horizontal line approximately 8 inches (20.3 cm) long. Mark its center. From the center, measure approximately 3.25 inches (8.3 cm) outward to establish the depth of the visor.
Draw a smooth convex curve connecting the outer ends through this center-front point. Next, create the inner curve that will sit against the forehead. This curve should be considerably shallower and should correspond approximately to the front portion of the headband. The resulting template will resemble a broad crescent.
Add a 3/8-inch (1 cm) seam allowance around the template unless you have already incorporated the allowance into the dimensions. Cut two mirrored denim pieces. Cut one or two matching pieces of firm interfacing, depending on how structured you want the finished brim.
Fuse the interfacing to the wrong side according to the manufacturer’s instructions. For a particularly firm visor, you can add a layer of sew-in stabilizer between the denim pieces. Avoid making the seam allowances unnecessarily bulky; trim the stabilizer away from the outer seam allowance when appropriate.
Place the two denim visor pieces right sides together. Sew around the outer curved edge using the 3/8-inch (1 cm) seam allowance, leaving the inner concave edge open. Sew slowly and keep the curve smooth rather than stopping abruptly to reposition the fabric.
Trim the curved seam allowance to approximately 1/4 inch (6 mm) and carefully clip the curves without cutting through the stitches. Turn the visor right side out and use your fingers or a blunt turning tool to smooth the outer curve. Press thoroughly.
Topstitch approximately 1/8 inch (3 mm) from the outer edge. Add two or three additional parallel rows approximately 1/4 inch (6 mm) apart. These rows are decorative, but they also reinforce the brim and help produce the classic structured denim cap appearance.
Making the Denim Headband and Adjustable Back Strap
There are two excellent approaches to the headband. The first is to reuse the original waistband from the jeans. The second is to cut a new band from the leg fabric. Reusing the waistband preserves authentic jeans details and reduces construction time, but a newly constructed band provides more control over sizing.
For a newly made band, cut a denim strip approximately 4–5 inches (10–12.5 cm) wide and long enough to extend around the required portion of the head plus seam allowances. Remember that a visor remains open at the back, so the adjustable straps complete the circumference.
Fuse lightweight interfacing to half of the band if your denim is soft. Fold the strip lengthwise with right sides together and sew where required, then turn and press. Alternatively, construct it similarly to quilt binding by pressing the long edges toward the center and folding again.
Mark the center of the visor and the center of the front headband. Match these points carefully. Clip the visor’s raw inner curve to the lower edge of the band. Sew slowly using approximately a 3/8-inch (1 cm) seam allowance. The center marks should remain aligned so the visor does not lean to one side.
Fold the remaining band layer over the raw seam and secure it with topstitching. Stitch approximately 1/8 inch (3 mm) from the edge for a crisp finish. A second parallel line of stitching can imitate the original topstitching commonly found on jeans.
For the adjustable back, prepare two narrow straps approximately 1–1.25 inches (2.5–3.2 cm) wide when finished. One strap can measure approximately 4 inches (10 cm) and hold a metal slider or D-ring. The second can measure approximately 7–9 inches (18–23 cm) so that it passes through the hardware and adjusts to different head sizes.
If your jeans contain suitable belt loops, they can also be incorporated into the design. Reinforce every strap attachment with a small rectangular or box-shaped stitching pattern. These areas receive repeated tension during use and should be substantially stronger than a simple straight seam.
Topstitching, Fit Adjustments, and Professional Finishing
Before declaring your Denim Cap Pattern complete, try the visor on and check its position. The band should sit securely without causing pressure around the forehead. The brim should project horizontally or angle slightly downward depending on personal preference.
If the band feels loose even when the strap is tightened, shorten the fixed section at the back. If it feels too tight at its largest adjustment, lengthen the adjustable strap. This is why checking the wearer’s actual head circumference before construction is preferable to relying solely on standard sizing.
Topstitching is especially important on denim. Use regular matching thread for a subtle appearance or heavier golden-brown topstitching thread to reproduce the traditional jeans aesthetic. If using heavy thread, test the tension and needle combination on scraps before sewing the actual project.
Pressing should happen throughout construction rather than only at the end. Denim responds well to steam, but always test the fabric first. A tailor’s ham or rolled towel can help maintain the curved shape of the band while pressing.
Trim all loose threads and inspect the brim for symmetry. When viewed from directly above, the left and right sides should mirror one another. If one side projects noticeably farther, the issue usually comes from inaccurate cutting or from stretching the inner curve while attaching it to the headband.
For additional personalization, add decorative denim patches, embroidery, contrasting topstitching, fabric labels, appliqué, or a reclaimed jeans pocket detail. Keep heavy decorations away from the center of the visor because additional weight can cause the brim to sag.
Frequently Asked Questions About the Denim Cap Pattern
Can I make this Denim Cap Pattern entirely from old jeans?
Yes. The main fabric, waistband, belt loops, straps, and decorative details can all come from discarded jeans. You will usually still need interfacing or another stabilizer for the brim.
What is the best denim for this project?
Medium-weight denim is the easiest choice. It provides enough structure while remaining manageable when multiple layers are sewn together.
What size needle should I use?
A 90/14 denim needle works for many medium-weight fabrics. For particularly heavy seam intersections, a 100/16 denim needle may perform better.
How large should the visor brim be?
A practical adult visor can measure approximately 7.5–8.5 inches (19–21.5 cm) wide and project approximately 3–3.5 inches (7.5–9 cm) at the center.
Do I need interfacing?
It is strongly recommended. Without stabilization, many denim fabrics will gradually droop, particularly after washing.
Can I use stretchy jeans?
Yes, but stabilize the visor carefully. Stretch denim is more likely to distort around curved seams.
How do I make the visor fit different head sizes?
Use an adjustable back strap with a slider, buckle, D-rings, hook-and-loop tape, or another suitable closure. An adjustable design is particularly useful when making the cap as a gift.
Can I reuse the original jeans waistband?
Absolutely. It is one of the most interesting features of an upcycled jeans visor, especially when the original button, belt loops, label, and topstitching remain visible.
Why is my brim wrinkled after turning?
The seam allowance may not have been clipped sufficiently, or the interfacing may be too stiff. Clip carefully around the curves, press the brim, and topstitch it to stabilize the shape.
How can I make the visor more rigid?
Add a second layer of firm interfacing or use a thin sew-in brim stabilizer between the denim layers. Avoid overly thick materials that your domestic sewing machine cannot handle safely.
Should the seam allowance be included in the template?
You can draft either way, but label the template clearly. This tutorial recommends a 3/8-inch (1 cm) seam allowance.
Can I make this design for children?
Yes. Measure the child’s head and reduce the headband and visor proportionally. Avoid loose or unsuitable hardware on items intended for very young children.
Can the finished denim cap be washed?
Usually, yes, provided all materials used are washable. Gentle washing and air drying help preserve the brim’s structure.
Conclusion
The Denim Cap Pattern is an excellent example of how ordinary jeans can become something completely different through thoughtful sewing. The faded denim, existing topstitching, waistband, belt loops, and hardware that once belonged to a pair of pants can provide both the materials and the decorative character for a stylish handmade visor.
Success comes from paying particular attention to three areas: accurate curved cutting, sufficient brim stabilization, and careful headband sizing. Sew the curved visor slowly, press every stage, reinforce the adjustable straps, and test the fit before completing the final topstitching.
Once you understand the basic construction, this upcycled denim sewing project offers enormous room for creativity. Dark indigo jeans can produce a sophisticated visor, heavily faded denim creates a relaxed vintage style, and contrasting golden topstitching can emphasize every handmade detail.
Most importantly, the Denim Cap Pattern turns fabric that might otherwise be discarded into a practical accessory with a completely new purpose. It is a satisfying project for anyone who enjoys denim recycling, sustainable sewing, DIY accessories, handmade caps, and creative upcycling—and every pair of old jeans provides an opportunity to make the next version slightly different from the last.