
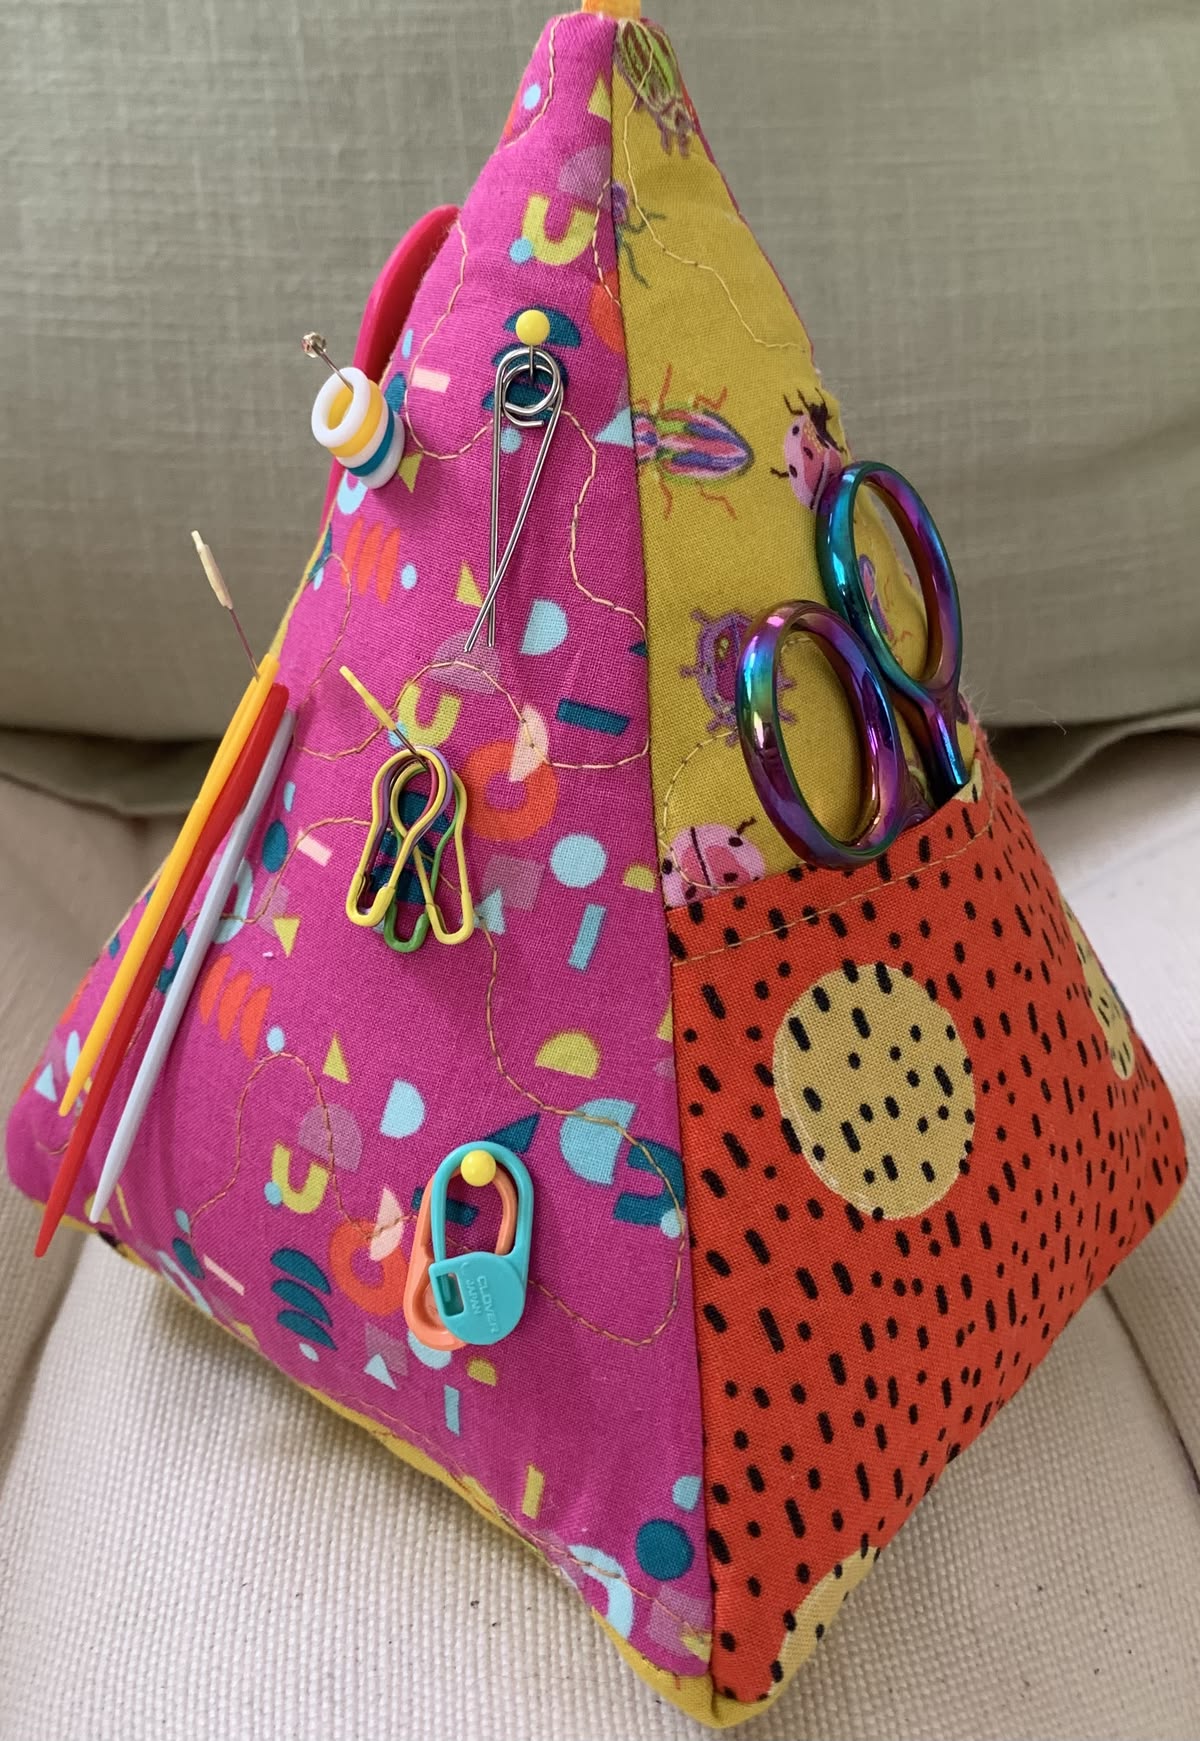
The Desk Pincushion Pattern is a clever fabric project that combines a traditional pincushion with practical storage for the small tools that always seem to disappear while you sew. Inspired by the pyramid-shaped organizer shown in the photo, this design creates a stable three-dimensional sewing accessory with padded sides, useful pockets, and plenty of room for pins, needles, clips, small scissors, seam rippers, and other notions. It is also a wonderful project for using colorful fabric scraps, making it both economical and visually interesting.
Unlike a flat pincushion, this quilted desk organizer stands upright on the sewing table. Its triangular sides provide several working surfaces, allowing you to separate different tools instead of keeping everything in one container. One side can hold pins, another can include a pocket for scissors, and another can be reserved for stitch markers or sewing clips. Because the organizer has a broad base and a padded body, it can remain conveniently beside your sewing machine without taking up much workspace.
Another advantage of this Desk Pincushion Pattern is how easily it can be customized. Bright prints create a playful scrap-friendly version, while coordinating florals, solids, or traditional quilting cottons can produce a more elegant result. The project is suitable for confident beginners as well as experienced quilters because it uses familiar techniques such as straight stitching, quilting, topstitching, pocket construction, and assembling dimensional fabric pieces. The measurements below are a practical starting point and can be adjusted to create a larger or smaller organizer.
Materials, Measurements, and Preparing the Pattern Pieces
For a medium-size fabric desk pincushion, prepare four coordinating quilting cotton fabrics, lightweight cotton batting or fusible fleece, matching polyester thread, and a firm stabilizer if you want the organizer to hold a particularly crisp pyramid shape. You will also need fabric scissors or a rotary cutter, quilting ruler, cutting mat, pins or clips, hand-sewing needle, sewing machine, iron, and an appropriate filling material.
DISCOVER MORE FREE PATTERNS HERE!
A useful finished size is approximately 8 inches (20 cm) wide at the base and 9 inches (23 cm) high. This creates enough surface area for several tools while keeping the organizer compact enough for an ordinary sewing table. Remember that the exact finished dimensions may vary slightly according to seam allowance, padding thickness, and how firmly the project is stuffed.
Create four matching triangular side panels. A practical starting measurement for each triangle is approximately 9 inches (23 cm) high with an 8-inch (20 cm) base. Add a 1/4-inch (6 mm) seam allowance around the pattern if it is not already included. Cut four outer triangles, four lining triangles, and four corresponding pieces of batting or fusible fleece.
The photograph shows a fun combination of contrasting fabrics, and this approach works particularly well for a scrap fabric sewing project. Try choosing fabrics that are different enough to identify each side easily. Small geometric prints, sewing-themed fabrics, florals, dots, and bold solids are all excellent options. The contrasting panels make the pyramid structure more noticeable and help transform leftover fabric into something useful.
Before assembly, fuse or baste the batting to the wrong side of each outer triangle. Quilt the layers using straight lines, gentle curves, diamonds, or free-motion quilting. Quilting does more than decorate the project: it also strengthens the fabric and gives the finished pincushion organizer a padded, professional appearance.
Press every piece carefully before continuing. Accurate preparation is especially important with a geometric project because four slightly different triangles may prevent the pyramid from standing evenly. Check that all corresponding edges have matching lengths before adding the pockets or sewing the main structure.
Making the Storage Pockets and Quilted Side Panels
One of the most useful features of this Desk Pincushion Pattern is the addition of small storage pockets. Instead of covering every panel, choose one or two sides for pockets and leave the remaining panels exposed for pins and needles. This gives the organizer a balanced combination of soft pincushion surfaces and practical storage.
For a scissor pocket, cut a rectangle approximately 4 x 5 inches (10 x 13 cm). Fold the upper edge twice toward the wrong side and topstitch it to create a clean finish. Alternatively, bind the top edge with contrasting fabric. Position the pocket near the lower portion of one triangular panel, making sure that the scissors will remain below the pointed top of the pyramid.
Baste the pocket around its sides and bottom, leaving the upper edge completely open. For greater organization, sew one or two vertical dividing lines through a wider pocket. These sections can hold a seam ripper, marking pencil, crochet hook, small ruler, or turning tool. Avoid making the compartments excessively narrow because the quilting and seam allowances will reduce the usable space.
Small loops can also be added for sewing clips and stitch markers. Make narrow fabric tubes, ribbon loops, or short strips of elastic and secure them into the side seams. A small metal ring can be attached for safety pins or removable markers. These details are optional, but they turn a simple pincushion into a true multifunctional sewing station.
After the accessories have been positioned, quilt the exposed areas of each triangle. Keep dense quilting away from very small pockets because excessive stitching may make them stiff. A medium quilting density usually provides enough stability while preserving the soft surface needed for inserting pins.
Now place each completed outer panel beside its matching lining piece. Confirm that pockets face upward and that any loops or decorative elements point toward the center rather than beyond the seam allowance. This quick check can prevent accessories from accidentally becoming trapped incorrectly when the pyramid sides are joined.
Sewing and Assembling the Pyramid Desk Pincushion
Arrange the four prepared triangular panels in the order you want them to appear around the finished organizer. Sew the first two triangles together along one long edge using a consistent 1/4-inch (6 mm) seam allowance. Begin at the base and sew toward the top point, backstitching gently at both ends.
Add the third panel to the free edge of the second triangle and repeat the process with the fourth. You will now have a connected series of triangular panels. Before closing the final seam, check the alignment of the base edges and make sure the top points meet neatly. Small differences can usually be corrected before the last seam is sewn.
Join the first and fourth panels to close the pyramid. Reduce bulky seam allowances near the top point if necessary, but do not cut too close to the stitching. Turn the structure carefully and use a blunt turning tool to shape the top. Avoid using scissors or another sharp object because it can puncture the fabric.
A separate square base can make the organizer particularly stable. For the suggested dimensions, begin with an approximately 8 x 8-inch (20 x 20 cm) base and adjust it to match the actual perimeter created by your four panels. Because fabric thickness and triangle geometry can alter the finished dimensions, measuring the sewn body before cutting the final base is more reliable than relying only on theoretical measurements.
Attach three sides of the base to the pyramid, leaving part of the fourth side open for turning and filling. If you are constructing the project with a separate lining, assemble the lining in the same basic manner and place it inside the outer shell before completing the final closure.
Stuff the organizer gradually. Polyester fiberfill works well for the upper sections because it creates a soft pincushion surface. For additional weight at the bottom, place a small sealed fabric pouch filled with plastic pellets or another suitable craft-weighting material inside the base before finishing the stuffing. Keep loose granular filling securely contained in an inner pouch so it cannot escape through seams.
Finishing, Customizing, and Using Your Desk Organizer
Once the pyramid pincushion has an even shape, close the remaining opening with a ladder stitch by hand. Take small stitches so the closure blends into the seam. Massage the filling toward the corners and check that the organizer stands upright without leaning noticeably to one side.
Topstitching can emphasize the triangular seams and reinforce heavily used areas. If your sewing machine can comfortably handle the thickness, stitch approximately 1/8 inch (3 mm) from selected seams. Do not force an unusually thick stuffed section beneath the presser foot; decorative topstitching is easier before final stuffing.
Now organize the tools according to how frequently you use them. Keep pins and needles on an unobstructed padded panel. Place scissors in the deeper pocket, sewing clips on loops, and small marking tools in narrow compartments. This arrangement helps keep sharp tools visible and makes the sewing desk organizer much easier to use during a project.
Fabric selection offers endless possibilities. A rainbow scrap version can make every panel different, while a coordinated version might combine pink, teal, yellow, and orange. Christmas prints can transform the same pattern into a seasonal gift, and vintage florals can create a traditional quilting-room accessory. Denim scraps are another interesting option, although bulky seams should be graded carefully.
You can also change the dimensions. A miniature version can hold only pins and clips, while a larger quilted tool organizer can accommodate embroidery scissors, measuring tapes, rulers, and marking pens. When resizing, enlarge or reduce all corresponding pieces proportionally so the pyramid maintains its balanced shape.
Finally, inspect the finished project for loose threads and check every pocket seam. Press only where practical after stuffing, using caution with synthetic filling. Your completed Desk Pincushion Pattern should now provide a colorful centerpiece for the sewing table while keeping frequently used notions conveniently within reach.
FAQ About the Desk Pincushion Pattern
What fabric is best for a Desk Pincushion Pattern?
Medium-weight quilting cotton is one of the easiest choices because it is stable, easy to quilt, and available in countless prints. Cotton scraps are especially useful when creating a colorful patchwork version.
Can I make this project from fabric scraps?
Yes. This is an excellent fabric scrap project because each triangular section can use a different print. Smaller remnants can also become pockets, loops, and decorative details.
What should I use inside the pincushion?
Polyester fiberfill is convenient for creating a soft padded structure. If additional stability is needed, batting or fusible fleece can reinforce the exterior panels before assembly.
How can I stop the organizer from tipping over?
Keep the base broad, distribute the stuffing evenly, and consider adding a securely enclosed weighted pouch inside the bottom. The weight should always be contained separately rather than poured loosely into the organizer.
What seam allowance should I use?
A 1/4-inch (6 mm) seam allowance works well for quilting cotton. Whatever allowance you choose, use it consistently on every panel so the triangular sections align correctly.
Can beginners sew this pattern?
Yes, although it is helpful to already understand basic straight stitching and seam allowances. The dimensional assembly may look complicated at first, but the project is essentially constructed by joining several prepared triangular panels.
Do I need to quilt the fabric first?
It is recommended but not absolutely necessary. Quilting the outer fabric to batting gives the project additional structure, protects the fabric, and produces the padded appearance associated with a traditional quilted pincushion.
Can I add more pockets?
Absolutely. You can customize each side with pockets, elastic loops, fabric tabs, or small rings. Just avoid covering every surface if you want plenty of exposed fabric for inserting pins.
How large should the finished organizer be?
A practical desktop version can measure around 8 inches (20 cm) across the base and 9 inches (23 cm) high, although the design can be resized according to your workspace.
Is this suitable as a handmade gift?
Yes. A handmade sewing organizer is particularly useful for quilters, sewists, embroiderers, and other crafters. Filling the pockets with a few new sewing notions can turn it into a complete handmade gift set.
Conclusion
The Desk Pincushion Pattern is a creative way to combine quilting, organization, and scrap-friendly sewing in one practical project. Its dimensional pyramid construction provides several useful surfaces while the padded panels, pockets, and optional loops give pins, scissors, clips, and small sewing tools their own convenient places.
More importantly, the pattern leaves plenty of room for creativity. You can work with coordinated quilting cottons, bold fabric scraps, seasonal prints, or leftover pieces from previous projects. By carefully preparing the triangular panels, adding functional pockets, quilting the layers, and assembling the structure with consistent seam allowances, you can create a sturdy quilted desk pincushion that is decorative enough to display and practical enough to use every day.
VIDEO PATTERN
Whether you make one for your own craft room or prepare several as handmade gifts, this Desk Pincushion Pattern turns a relatively small amount of fabric into a useful sewing companion. It is a satisfying project for practicing dimensional construction and a charming way to keep the sewing table colorful, tidy, and ready for the next creative project.