DIY Giant Monster Toy – Sewing Pattern is a fun, imaginative, and highly creative quilt/fabric project that brings personality and playfulness into handmade creations. This pattern is perfect for crafters who enjoy combining sewing techniques with soft toy design to create something bold, oversized, and full of character.
One of the most exciting aspects of the DIY Giant Monster Toy – Sewing Pattern is its freedom of design. Unlike traditional quilt blocks, this project allows you to explore shapes, textures, and colors in a more expressive way, resulting in a unique toy that can be customized to reflect any style—from cute and friendly to quirky and wild.
In this complete guide, you will learn everything you need to create your own DIY Giant Monster Toy – Sewing Pattern, including understanding the structure, choosing the best materials, following a step-by-step process, and exploring creative customization ideas.
1. Understanding the DIY Giant Monster Toy – Sewing Pattern
The DIY Giant Monster Toy – Sewing Pattern is built around soft toy construction rather than traditional flat quilting.
DISCOVER MORE FREE PATTERNS HERE!
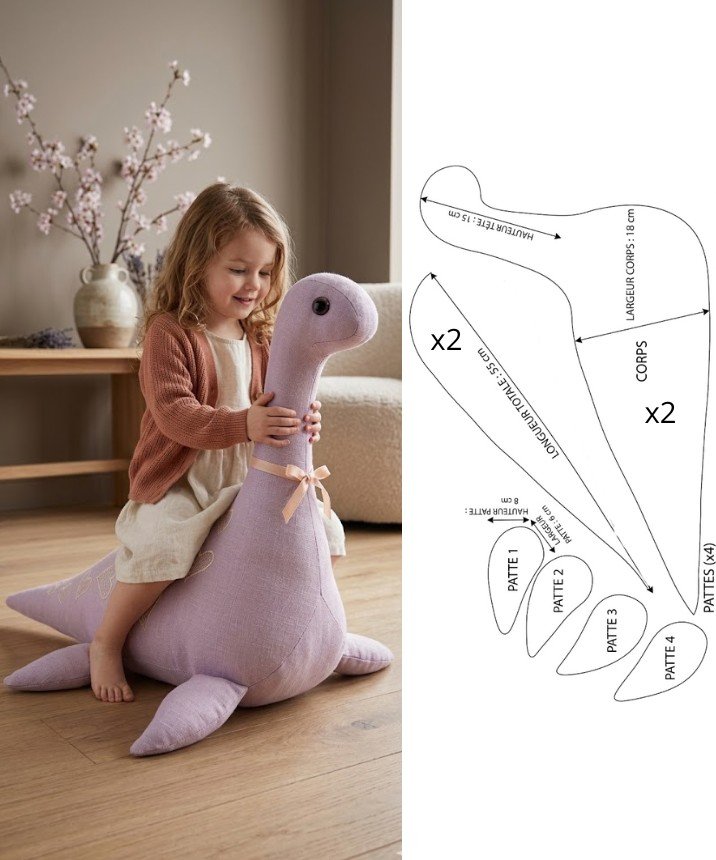
The design typically includes large fabric panels that form the body of the monster.
Additional pieces such as arms, legs, ears, and facial features are created separately and attached.
One of the key features of the DIY Giant Monster Toy – Sewing Pattern is its oversized and plush structure.
The project often incorporates quilted elements to add texture and durability.
Understanding how each component connects is essential for achieving a balanced and sturdy toy.
2. Best Materials for DIY Giant Monster Toy – Sewing Pattern
Choosing the right materials is essential for achieving the best results with your DIY Giant Monster Toy – Sewing Pattern.
Soft yet durable fabrics such as cotton, fleece, or plush materials are highly recommended.
Using a mix of textures can enhance the playful and unique look of the monster.
Polyester fiberfill is ideal for stuffing and shaping the toy.
Strong thread is important to ensure that seams can withstand handling and play.
Basic tools include scissors, pins, a sewing machine, and a quilting ruler.
Optional materials such as felt, buttons (securely attached), or embroidery thread can be used for facial features.
Selecting high-quality materials ensures both safety and durability.
3. Step-by-Step DIY Giant Monster Toy – Sewing Pattern Process
Creating your own DIY Giant Monster Toy – Sewing Pattern becomes manageable when broken into clear steps.
Start by cutting the main body pieces according to your pattern template.
Prepare additional parts such as limbs and facial features.
Sew the smaller components first, turning them right side out and stuffing lightly if needed.
Assemble the main body by sewing the large panels together, leaving an opening for stuffing.
Attach the smaller parts securely during or after assembling the body.
Fill the toy with stuffing until it reaches the desired shape and firmness.
Close the opening carefully and reinforce any stress points.
4. Creative Ideas for DIY Giant Monster Toy – Sewing Pattern
The DIY Giant Monster Toy – Sewing Pattern offers endless opportunities for creativity and personalization.
You can experiment with bold colors, patterns, and textures to create a truly unique monster.
Adding exaggerated features like oversized eyes or long arms can enhance the playful design.
This project is perfect for children’s gifts, room décor, or themed collections.
The DIY Giant Monster Toy – Sewing Pattern can also be adapted into smaller plush toys or decorative cushions.
You might consider using recycled fabrics for an eco-friendly approach.
Creating a collection of different monster characters can result in a fun and imaginative set.
FAQ About DIY Giant Monster Toy – Sewing Pattern
Is this pattern suitable for beginners?
Yes, it is beginner-friendly with basic sewing knowledge.
What fabric works best?
Soft fabrics like cotton, fleece, or plush are ideal.
How do I make the toy durable?
Use strong thread and reinforce seams, especially at stress points.
Can I wash the finished toy?
Yes, if made with washable materials.
How long does it take to complete?
It may take several hours depending on size and complexity.
Can I sell toys made from this pattern?
Yes, handmade plush toys are popular and can be sold.
Conclusion
The DIY Giant Monster Toy – Sewing Pattern is a fun and creative project that allows you to explore sewing and design in a playful way. In this guide, you learned how to understand the structure, choose the best materials, follow a step-by-step process, and explore creative ideas.
This pattern is perfect for creating something unique, expressive, and full of personality.
DISCOVER MORE FREE PATTERNS HERE!
Now it’s your turn to bring your DIY Giant Monster Toy – Sewing Pattern to life. Experiment with colors, shapes, and details to create a monster that reflects your creativity. Don’t forget to leave your honest opinion and share your suggestions—your feedback helps inspire even more amazing sewing ideas!