
The Dog Clothing Pattern is a charming sewing and quilting project that combines comfort, warmth, and beautiful handmade style. Inspired by the adorable dog coat shown in the reference image, this design features soft dusty pink fabric, delicate floral embroidery, a gently rounded back panel, and an adjustable front closure. The result is a lovely garment that helps keep your furry companion comfortable during cooler days while adding a touch of elegance to everyday walks.
One of the most appealing features of this Quilted Dog Coat Pattern is its practical wraparound construction. Unlike complicated pet garments that require multiple fitted pieces, this design uses one main body panel with an integrated neck section and an adjustable belly strap. The coat rests comfortably across the dog’s back, wraps gently around the chest, and fastens securely without restricting natural movement. Its simple construction makes it an excellent project for sewing enthusiasts who enjoy creating useful accessories for their pets.
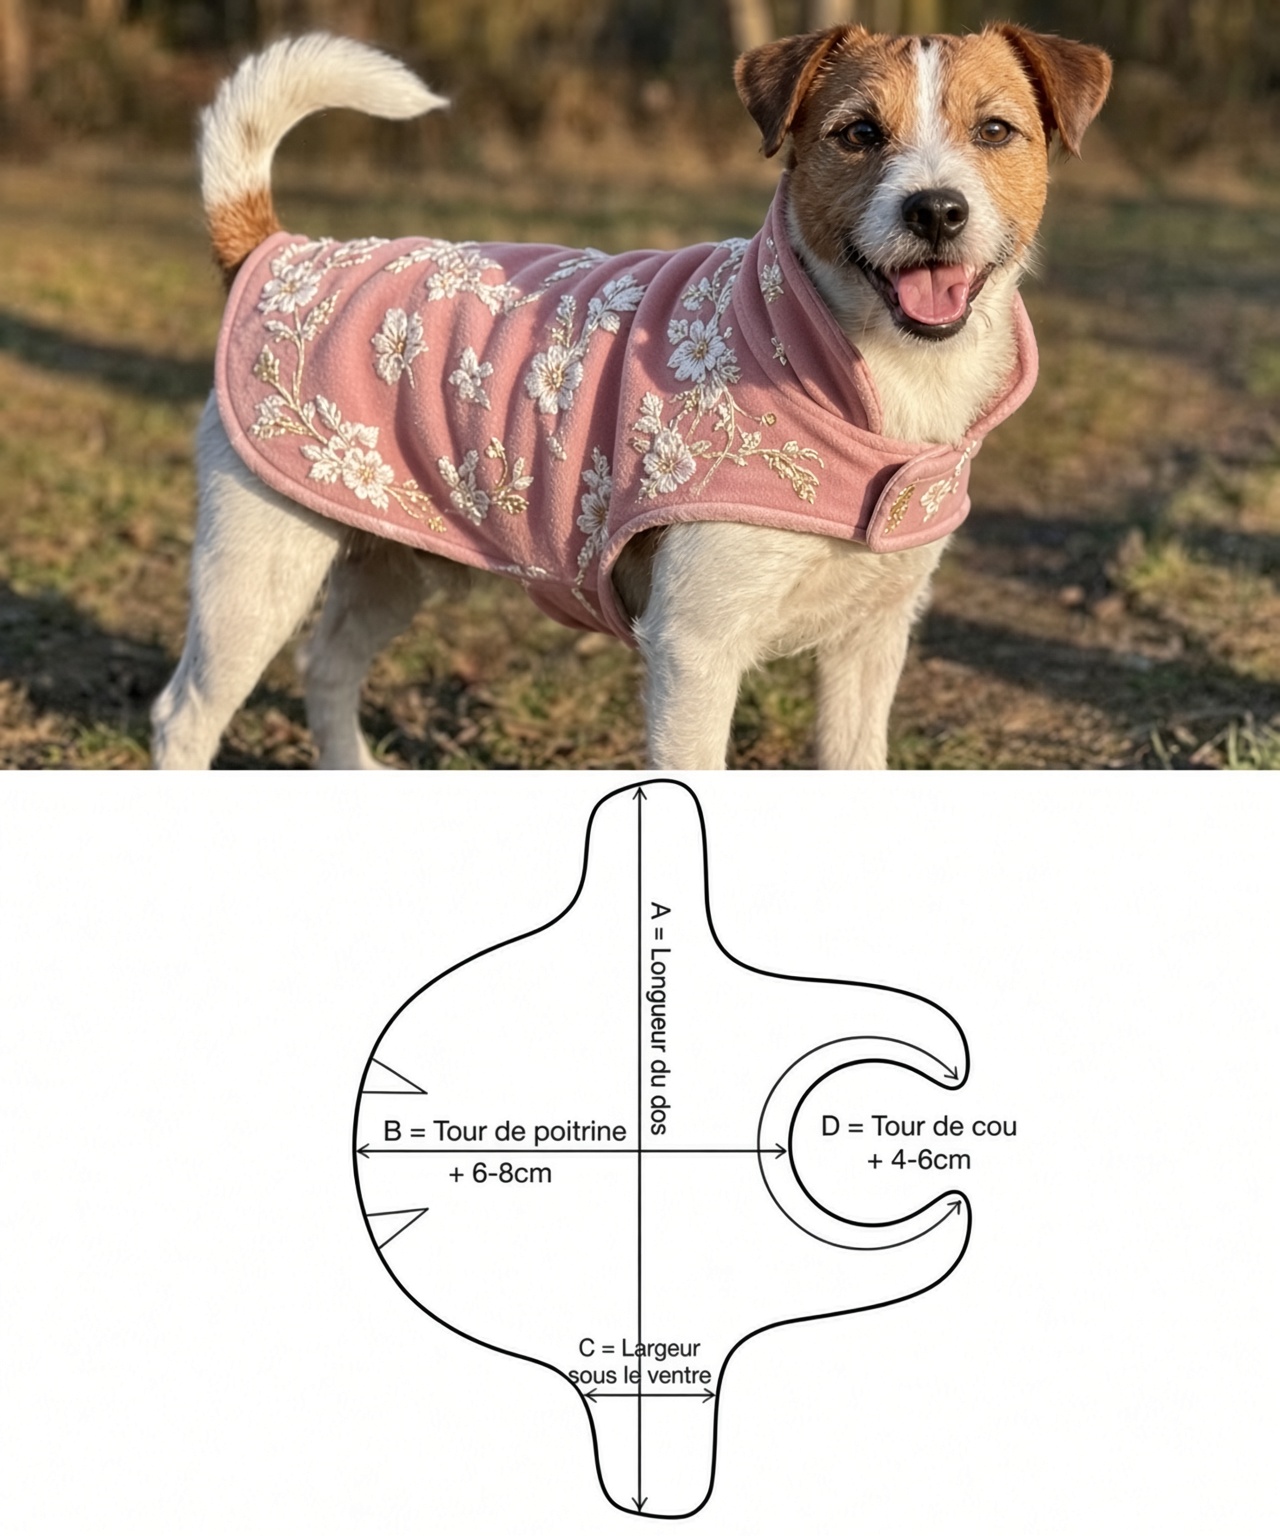
The reference image shows a small dog wearing a beautiful pink floral coat with rounded edges and matching fabric binding. The soft fabric follows the dog’s body, while the front section wraps comfortably around the chest. Beneath the photograph, a sewing template illustrates the basic shape and highlights four important measurements: back length, chest circumference, belly width, and neck circumference. These measurements provide the foundation for creating a personalized Dog Clothing Sewing Pattern that fits your pet properly.
In this complete Dog Clothing Pattern Tutorial, you will learn how to measure your dog, draft a custom coat template, select suitable fabrics, cut the main pieces, assemble the quilted layers, create adjustable straps, and finish the garment with professional-looking binding. The instructions use both inches and centimeters and include practical fitting advice, creative fabric combinations, frequently asked questions, and helpful sewing techniques for making a comfortable handmade dog coat.
DISCOVER MORE FREE PATTERNS HERE!
Materials, Measurements, and Preparation for the Dog Clothing Pattern
Before beginning your DIY Quilted Dog Coat, choosing the right fabric is essential. The material should feel soft against your dog’s body while providing enough warmth and durability for everyday wear.
Quilting cotton is an excellent choice for the decorative exterior because it comes in beautiful colors and patterns. However, for a warmer garment, combine it with lightweight batting and a soft lining. Cotton flannel, brushed cotton, or lightweight fleece can provide additional comfort.
For a design similar to the reference image, choose dusty rose or muted pink fabric decorated with delicate white floral motifs. A matching pink binding creates a neat finish around the curved edges. If embroidered fabric is unavailable, floral quilting cotton or a small-scale botanical print can produce a similarly elegant appearance.
Materials needed
- ½ yard of dusty pink quilting cotton or embroidered fabric.
- ½ yard of soft cotton flannel or lightweight fleece for the lining.
- ½ yard of low-loft quilt batting.
- Approximately 2 yards (1.8 meters) of coordinating bias binding.
- 6–8 inches (15–20 cm) of sew-on hook-and-loop fastener.
- Coordinating polyester sewing thread.
- Sewing machine.
- Size 80/12 or 90/14 sewing machine needle.
- Fabric scissors.
- Rotary cutter and cutting mat.
- Flexible measuring tape.
- Fabric marking pencil.
- Sewing clips or pins.
- Iron and ironing board.
- Large paper for drafting the template.
- Quilting ruler.
- Hand-sewing needle.
Choose washable materials and avoid loose beads, buttons, or other decorations that your dog could chew or swallow.
Essential dog measurements
The template in the reference image identifies four measurements that help determine the shape of the coat.
| Measurement | Description |
|---|---|
| A – Back length | Measure from the base of the neck to the beginning of the tail |
| B – Chest circumference | Measure around the widest part of the chest, behind the front legs |
| C – Belly strap width | Measure the desired width of the strap passing beneath the belly |
| D – Neck circumference | Measure around the base of the neck |
The reference template suggests adding approximately 6–8 cm (2⅜–3⅛ inches) to the chest measurement and 4–6 cm (1⅝–2⅜ inches) to the neck measurement.
These are starting allowances, not fixed requirements. The final fit depends on the dog’s body shape, coat thickness, fabric, and closure placement.
Suggested size guide
| Dog Size | Back Length | Chest Circumference | Neck Circumference |
|---|---|---|---|
| Extra Small | 20–25 cm (8–10 in) | 30–38 cm (12–15 in) | 20–25 cm (8–10 in) |
| Small | 25–33 cm (10–13 in) | 38–48 cm (15–19 in) | 25–33 cm (10–13 in) |
| Medium | 33–43 cm (13–17 in) | 48–61 cm (19–24 in) | 33–41 cm (13–16 in) |
| Large | 43–56 cm (17–22 in) | 61–76 cm (24–30 in) | 41–51 cm (16–20 in) |
These measurements are approximate. Always measure your individual dog rather than relying only on the size chart.
Understanding the coat construction
The Dog Clothing Pattern is built around a shaped fabric panel that covers the dog’s back.
A curved section at the front forms the neckline and chest closure.
An integrated or separately attached belly strap wraps underneath the torso.
The exterior fabric, batting, and lining are assembled into a lightweight quilt sandwich.
Decorative quilting secures the layers, while bias binding finishes the outer edge.
Adjustable hook-and-loop fasteners allow the garment to be fitted comfortably.
Step-by-Step Dog Clothing Pattern: Drafting and Cutting the Coat
Accurate measurements are the most important part of making a comfortable Handmade Dog Coat.
Every dog has a slightly different body shape, even within the same breed.
For this reason, creating a personalized paper template is strongly recommended.
Step 1: Measure your dog’s back
Ask your dog to stand naturally on a level surface.
Place the measuring tape at the base of the neck, where a collar would normally rest.
Measure along the spine to the beginning of the tail.
Record this measurement as A.
For example, a small dog might have a back length of 30 cm (approximately 12 inches).
Avoid measuring too far down the tail.
Step 2: Measure the chest circumference
Wrap the measuring tape around the widest part of the dog’s chest.
This is usually located just behind the front legs.
Keep the tape comfortably snug without squeezing.
Record this measurement as B.
For example, a small dog might have a chest circumference of 44 cm (approximately 17⅜ inches).
The finished coat should allow enough room for normal breathing and movement.
Step 3: Measure the neckline
Measure around the base of the dog’s neck.
Record this measurement as D.
Add a comfortable allowance for the closure.
For a small dog, approximately 4 cm of additional room may be a useful starting point.
The neckline should not press against the throat.
Step 4: Determine the belly strap width
Measure the area beneath the dog’s chest where the strap will pass.
Choose a strap width that provides support without restricting movement.
For a small dog, a finished strap width of approximately 5–7 cm (2–2¾ inches) may work well.
Record this as C.
Keep the strap clear of the front legs.
For male dogs, position the strap so it does not interfere with urination.
Step 5: Draft the main paper template
Fold a large sheet of paper in half lengthwise.
Use the fold as the center back line.
Mark the measured back length along the fold.
Draw a gently rounded rear edge near the tail.
Shape the side edges so they follow the dog’s rib cage.
At the front, draw the neckline and overlapping chest sections.
Add a belly strap extending from one side of the body panel.
The template should resemble a broad curved coat with a narrower front section.
Step 6: Add seam allowances
Add a ¼-inch (6 mm) seam allowance around the entire template.
If you plan to finish the raw edges with binding, this allowance can be adjusted according to your chosen construction method.
Mark the center back line.
Mark the neck opening.
Mark the belly strap placement.
Mark the front closure overlap.
Label the template before cutting it out.
Step 7: Test the paper pattern
Place the paper template gently over your dog’s back.
Check the neckline.
Bring the belly strap underneath the chest.
Check that the rear edge ends near the beginning of the tail.
Make sure the front legs can move freely.
Adjust the paper template wherever necessary.
This fitting stage helps prevent wasted fabric.
Step 8: Cut the fabric pieces
Lay the exterior fabric on a flat surface.
Place the paper template on top.
Pin securely.
Cut one exterior piece.
Repeat with the lining fabric.
Cut one matching piece of low-loft batting.
Transfer all placement marks.
You should now have three matching layers.
How to Sew the Quilted Dog Coat and Add Adjustable Closures
Once the fabric pieces are prepared, you can begin assembling the Quilted Dog Clothing Pattern.
The goal is to create a soft, flexible garment with secure seams and smooth edges.
Step 1: Prepare the quilt sandwich
Place the lining fabric wrong side up.
Position the batting over the lining.
Place the exterior fabric right side up.
Smooth the layers carefully.
Make sure the edges are aligned.
Secure the layers using quilting pins or temporary basting stitches.
Step 2: Quilt the coat body
Attach a walking foot to your sewing machine.
Mark a simple diagonal quilting grid.
Space the quilting lines approximately 2–3 inches (5–7.5 cm) apart.
Sew along the marked lines.
Avoid stretching the fabric.
The quilting holds the layers together and adds a beautiful textured appearance.
For a softer look, use gentle curved quilting lines instead.
Step 3: Trim the quilted panel
Lay the quilted panel flat.
Check that the layers remain aligned.
Trim any excess batting or lining.
Smooth the curved edges.
Remove temporary marking lines according to the marking tool instructions.
The coat should now resemble the original paper template.
Step 4: Prepare the neckline
Position the coat so the neckline is easy to access.
Check the curved front opening.
Trim any uneven edges.
If necessary, make small adjustments to improve the shape.
The neckline should form a smooth curve without sharp corners.
This helps the garment rest comfortably around the dog’s shoulders.
Step 5: Attach the bias binding
Open one folded edge of the bias binding.
Align it with the raw edge of the coat.
Sew around the entire perimeter.
Work slowly around the curves.
Fold the binding over the raw edge to the opposite side.
Secure it with a narrow topstitch.
Use matching thread for a professional finish.
Step 6: Reinforce the belly strap
The belly strap experiences repeated movement during wear.
Sew an additional line of stitching along both sides.
If the strap feels too flexible, add a small piece of interfacing before finishing the edges.
Check that the strap remains soft.
Avoid making it excessively stiff.
The strap should wrap comfortably beneath the dog’s chest.
Step 7: Attach the hook-and-loop fasteners
Cut the hook-and-loop tape into suitable lengths.
Position one section on the underside of the belly strap.
Place the matching section on the corresponding coat panel.
Check the overlap before sewing.
Stitch around all four edges of each fastener piece.
For additional strength, sew a small rectangle with diagonal reinforcement stitching.
Repeat for the front chest closure.
Step 8: Test the closure placement
Place the coat on your dog.
Fasten the neckline loosely.
Wrap the belly strap underneath the torso.
Secure the closure.
Check that the coat remains centered.
Make sure the dog can walk, sit, and lie down comfortably.
Adjust the fastener positions if necessary.
Step 9: Finish the decorative details
Inspect the outer binding.
Trim loose threads.
Add a small fabric label if desired.
For a floral appearance, use embroidered fabric or carefully stitched floral appliqués.
Avoid bulky decorations near the neck or belly.
The finished coat should remain lightweight and comfortable.
Step 10: Complete the final fitting
Allow your dog to move naturally while wearing the coat under supervision.
Watch for rubbing near the front legs.
Check the neckline and belly strap.
Make sure the coat does not slide excessively.
Remove the garment if your dog appears uncomfortable.
Your Handmade Quilted Dog Coat is now ready for short, supervised outings in suitable weather.
Beautiful Dog Clothing Designs, Fabric Combinations, Finishing Tips, and Creative Variations
The Dog Clothing Pattern can be customized in many beautiful ways.
You can create a delicate floral coat, a colorful patchwork design, or a simple everyday garment using durable cotton fabrics.
The shape can also be adapted for different seasons by changing the lining and batting.
Step 1: Create a vintage floral dog coat
Choose dusty pink fabric with delicate white flowers.
Use cream-colored cotton flannel for the lining.
Finish the edges with matching pink binding.
This creates a soft, elegant appearance similar to the reference image.
The floral design looks especially beautiful on small and medium-sized dogs.
Step 2: Make a colorful patchwork version
Join small quilting cotton squares into a decorative fabric panel.
Use coordinating colors such as sage green, cream, terracotta, and mustard.
Press the seams carefully.
Cut the coat exterior from the completed patchwork panel.
Add batting and lining.
Quilt the layers together for a cheerful handmade finish.
Step 3: Create a warm winter coat
Choose a sturdy cotton exterior.
Use lightweight fleece for the lining.
Add thin batting if additional warmth is needed.
Keep the garment flexible.
Avoid excessively thick layers around the neck and front legs.
A comfortable fit is more important than heavy insulation.
Step 4: Make a lightweight spring coat
Use two layers of breathable cotton fabric.
Omit the batting.
Choose floral prints, gingham, or pastel colors.
Finish with narrow cotton binding.
This creates a lighter decorative coat suitable for mild weather.
Step 5: Add a personalized name
Embroider your dog’s name on the back panel.
Position the lettering away from the neckline and closure.
Use soft embroidery thread.
Keep the design flat.
Personalized embroidery adds a thoughtful handmade detail.
Step 6: Finish the coat professionally
Inspect every seam.
Check the hook-and-loop fasteners.
Trim loose threads.
Press the coat gently if the fabric allows.
Confirm that the binding lies flat.
Wash the coat according to the fabric manufacturer’s instructions.
Allow it to dry completely before use.
Beautiful Color Combinations for the Dog Clothing Pattern
Dusty Pink and Ivory: A delicate floral combination inspired by the reference image.
Sage Green and Cream: A soft vintage palette with a sophisticated appearance.
Navy Blue and White: A timeless combination suitable for classic pet accessories.
Terracotta and Beige: A warm rustic palette inspired by autumn colors.
Lavender and Pale Pink: A gentle pastel combination with a cheerful handmade look.
Forest Green and Gold: A rich, elegant combination suitable for winter coats.
Red and White: A bright seasonal palette that works beautifully for holiday-themed pet clothing.
Helpful Tips for a Perfect Quilted Dog Coat
Measure your dog carefully. Accurate measurements are essential for a comfortable fit.
Use soft lining fabric. The inside of the coat should feel gentle against the dog’s body.
Avoid tight necklines. The garment must not restrict breathing or natural movement.
Keep the belly strap adjustable. Hook-and-loop closures allow minor fitting adjustments.
Use lightweight batting. Thick batting can make small coats uncomfortable.
Check the leg openings. The dog should be able to walk and run naturally.
Supervise your dog. Remove the coat if it becomes caught, twisted, wet, or uncomfortable.
Frequently Asked Questions About the Dog Clothing Pattern
1. Is the Dog Clothing Pattern suitable for beginners?
Yes. The project is suitable for confident beginners who understand basic sewing, quilting, and binding techniques.
2. What fabric is best for a dog coat?
Quilting cotton, cotton canvas, flannel, and lightweight fleece are useful choices depending on the season.
3. How do I determine the correct size?
Measure your dog’s back length, chest circumference, and neck circumference before drafting the template.
4. Can I make the coat without batting?
Yes. Omitting the batting creates a lighter garment suitable for mild weather.
5. Can I use fabric scraps?
Absolutely. Fabric scraps are excellent for creating colorful patchwork dog coats.
6. How do I prevent the coat from slipping?
Use correctly positioned adjustable closures and make sure the garment fits comfortably around the chest.
7. Can I use buttons instead of hook-and-loop tape?
Hook-and-loop tape is generally easier to adjust. Avoid detachable decorations that could be chewed or swallowed.
8. Can I make the coat for a large dog?
Yes. Enlarge the template according to the dog’s individual measurements.
9. How much room should I leave around the chest?
The reference suggests approximately 6–8 cm of additional circumference, but the appropriate ease depends on the dog’s size and the fabric thickness.
10. Can I add a hood?
Yes, but a hood should not obstruct the dog’s eyes, ears, breathing, or natural movement.
11. Is this coat waterproof?
Not unless you use suitable water-resistant materials and construction techniques.
12. How do I wash the finished coat?
Follow the fabric manufacturer’s care instructions. Gentle washing and air drying are suitable for many quilted cotton garments.
13. Can I use embroidered fabric?
Yes. Embroidered fabric creates a beautiful decorative finish, provided the inside remains smooth and comfortable.
14. Can I make matching accessories?
Yes. Coordinating bandanas, blankets, leash pouches, and pet mats can create a beautiful handmade set.
15. Can I sell handmade dog coats?
Handmade pet clothing created from your own work can generally be sold, subject to applicable pattern rights, product safety requirements, and local regulations.
Conclusion
The Dog Clothing Pattern is a beautiful sewing and quilting project that combines practical comfort with charming handmade style. Its soft fabric layers, gently rounded shape, adjustable closures, and decorative floral details create a lovely garment inspired by the reference image.
One of the greatest advantages of this design is its flexibility. By adjusting the back length, chest circumference, neckline, and belly strap, you can create a coat that fits your dog’s individual body shape.
The project also provides an enjoyable opportunity to practice pattern drafting, accurate fabric cutting, quilting, bias binding, and adjustable closure construction.
For sewing enthusiasts who love creating accessories for their pets, this Quilted Dog Coat Pattern is a rewarding way to combine creativity with practical craftsmanship.
Whether you choose dusty pink floral fabric, vintage sage green, classic navy blue, or cheerful patchwork colors, the finished coat can become a unique handmade addition to your dog’s wardrobe.
With careful measurements, soft materials, secure stitching, and attention to comfort, your Handmade Dog Clothing Pattern can help keep your furry companion cozy while showcasing the beauty of personalized sewing and quilting.