
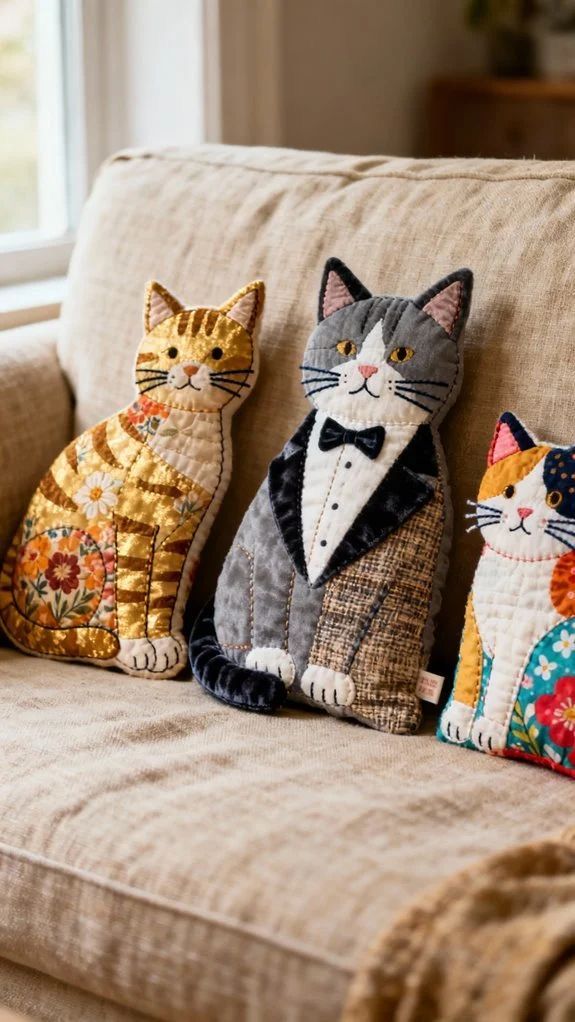
Fabric Cat Cushion Pattern is a charming sewing and quilting project that transforms coordinated fabrics, small scraps, batting, and creative appliqué into a decorative cat-shaped cushion full of personality. Inspired by the handmade cats shown in the reference image, this project combines patchwork, quilting, appliqué, and simple dimensional sewing techniques. The result can be displayed on a sofa, bed, reading chair, nursery shelf, or craft-room bench, and every cat can look completely different simply by changing the fabrics and facial details.
One of the most enjoyable features of this Fabric Cat Cushion Pattern is the freedom it gives you to use fabrics already available in your sewing room. Floral cotton, gingham, solids, tiny prints, textured fabrics, and leftover quilt pieces can all become parts of the cat’s body. A golden floral combination can create a warm country-style cat, gray and neutral fabrics can produce an elegant version, while colorful scraps can give the cushion a playful patchwork appearance. Because the pieces are relatively small, this is also an excellent fabric scrap project.
The construction may look detailed, but it becomes manageable when divided into stages. You will first prepare a full-size cat template, select and quilt the fabrics, build the body panel, add the face and decorative sections, and finally join the front and back before adding stuffing. The following tutorial uses practical measurements and a 1/4-inch (6 mm) seam allowance as a starting point. Because the photograph is a visual reference rather than a measured sewing template, the dimensions can be adjusted to create a taller, wider, or smaller finished cat.
Materials, Measurements, and Preparing the Fabric Cat Pattern
For one medium Fabric Cat Cushion Pattern, prepare approximately 1/2 yard (46 cm) of fabric for the main body and backing, plus several coordinating scraps for the chest, paws, ears, muzzle, side patches, clothing details, and other decorative sections. Quilting cotton is particularly easy to handle because it presses cleanly and holds detailed shapes well.
DISCOVER MORE FREE PATTERNS HERE!
You will also need lightweight cotton batting or fusible fleece, polyester fiberfill, coordinating sewing thread, embroidery floss, fabric scissors or a rotary cutter, pins or clips, a marking pen, an iron, and a sewing machine. Optional supplies include fusible appliqué web, small buttons, ribbons, and decorative threads. If the cushion will be accessible to young children, embroidered facial details are preferable to loose buttons.
A useful finished size for this design is approximately 18 inches (46 cm) tall and 9–10 inches (23–25 cm) wide at the widest part. For a larger sofa cushion, enlarge the template proportionally. Keep the body slightly wider near the lower section so the finished cushion has enough volume to stand or lean comfortably.
Draw the main template on paper first. Create a gently rounded cat body that narrows toward the neck and finishes with two triangular ears at the top. Instead of drawing complicated individual pieces immediately, establish the complete silhouette first. Add the 1/4-inch seam allowance around the perimeter unless it is already incorporated into your template.
Cut one front foundation from cotton and one matching piece from batting. The backing can be cut immediately or after the front has been quilted. Cutting the back later allows you to correct minor changes in size caused by quilting.
Before assembling anything permanently, arrange your chosen fabrics over the paper template. Think of the cat as a miniature quilt: the belly can become one fabric section, the chest another, and the sides can incorporate floral or patchwork panels. Photographing your arrangement before sewing can help you remember the final composition.
Creating the Quilted Body, Face, and Patchwork Details
Begin the front by layering the foundation fabric over batting. Quilt these layers together using straight vertical lines, gentle curves, crosshatching, or free-motion designs. The visible quilting is an important characteristic of the Fabric Cat Cushion Pattern, giving the finished project the handcrafted texture associated with traditional quilted accessories.
Next, create the major colored sections. For a striped cat, appliqué narrow curved strips across the body using fabric in a darker shade. For a patchwork version, arrange floral pieces over the belly or sides. A raw-edge appliqué produces a casual handmade effect, while turned-edge appliqué creates a cleaner traditional finish.
The face deserves extra attention because it establishes the cat’s personality. Cut two small inner-ear triangles from pink or contrasting fabric and position them inside the larger ears. Prepare a rounded or oval muzzle in cream or white fabric and place it approximately in the lower half of the face.
Create the nose from a tiny pink fabric triangle or embroidery. Add the mouth with dark embroidery thread, followed by three whisker lines on each side. Small embroidered lines above the face can suggest tabby markings and give the cat additional character.
For the eyes, embroidery is one of the safest and most versatile choices. Satin stitch can create expressive eyes in amber, green, blue, or black. Decorative buttons can also create the vintage handcrafted appearance seen in many quilted cat designs, but buttons should be attached extremely securely and are best reserved for decorative cushions rather than toys intended for small children.
Once all appliqué sections are positioned, stitch around their edges. A narrow zigzag, blanket stitch, or straight topstitch works beautifully. Take your time around small curves, particularly the muzzle and paws. Shorter stitch lengths generally make curved areas easier to control.
Sewing the Paws, Tail, and Assembling the Cat Cushion
The lower body can be made especially charming by adding separate paw shapes. Cut small cream or coordinating fabric pieces and appliqué them near the bottom edge. Embroider two or three short lines onto each paw to suggest toes without adding unnecessary bulk.
A tail can be incorporated directly into the front appliqué or constructed as a lightly stuffed dimensional piece. For a dimensional tail, cut two curved pieces right sides together, stitch around them while leaving the attachment end open, clip the curves, turn right side out, and add only a small amount of fiberfill.
If you want the tailored appearance of the center cat in the reference style, build clothing details from fabric appliqué. A small triangular shirt front, contrasting jacket panels, and a fabric bow can transform the basic quilted cat cushion into an elegant character. These additions use the same appliqué techniques as the belly patches.
After all decorative work is complete, place the finished front over the backing fabric with right sides facing. Pin carefully around the ears and curves. If you made a dimensional tail, position it inside the sandwich with its raw attachment edge aligned with the cushion’s side seam.
Sew around the entire silhouette using the established 1/4-inch (6 mm) seam allowance, leaving approximately 3–4 inches (7.5–10 cm) open along a relatively straight lower or side section. Reinforce the beginning and end of the stitching with backstitches.
Before turning, clip into the seam allowance around inward curves and trim excess fabric from the ear points without cutting through the stitching. Turn the cushion carefully through the opening and use a blunt turning tool to define both ears. Press lightly, taking care not to flatten the quilted texture.
Stuffing, Finishing, and Customizing Your Fabric Cat Cushion Pattern
Add polyester fiberfill gradually rather than inserting one large handful. Begin with the ears and upper head, pushing small portions into narrow areas before filling the body. This prevents empty corners and produces a smoother finished silhouette.
Continue filling until the Fabric Cat Cushion Pattern feels comfortably firm but not rigid. Overstuffing can distort the appliqué and make the seams look strained, while insufficient filling may cause the cushion to collapse. Massage the fiberfill periodically to distribute it evenly.
Turn the raw edges of the opening inward and close it with ladder stitch using strong matching thread. Small, closely spaced stitches will make the closure almost invisible. Inspect the perimeter afterward and correct any loose seams before using the cushion.
For additional definition, you can topstitch approximately 1/8 inch (3 mm) from selected appliqué edges. Free-motion quilting can also be added before assembly to create spirals, feathers, waves, or simple outlines across larger fabric areas.
This pattern is particularly suitable for scrap quilting. Try a calico cat cushion with orange, black, turquoise, and cream patches; a farmhouse version using beige and floral prints; or an elegant tuxedo cat made with black, white, gray, and subtle checked fabrics. Every combination changes the personality without changing the fundamental construction.
A handmade label can be stitched discreetly onto the back before final assembly. Adding the maker’s name and year transforms the project into a meaningful keepsake, particularly when the cushion is intended as a birthday, housewarming, Mother’s Day, or holiday gift.
FAQ About the Fabric Cat Cushion Pattern
Is the Fabric Cat Cushion Pattern suitable for beginners?
Yes. A simplified version is approachable for confident beginners. The basic skills include straight sewing, curved seams, appliqué, simple quilting, turning, and hand closing. More elaborate facial or clothing details can be added as your confidence increases.
What is the best fabric for a quilted cat cushion?
Quilting cotton is an excellent choice because it is stable, easy to cut, and available in countless prints. Linen blends and lightweight denim can also work, although very thick upholstery fabrics can make small appliqué details difficult.
Can I make the cushion entirely from scraps?
Absolutely. In fact, this is one of the advantages of the Fabric Cat Cushion Pattern. The belly, ears, paws, muzzle, stripes, clothing, and decorative patches require relatively small pieces.
Should batting be used inside the front panel?
Batting is highly recommended if you want the visible quilted texture shown in this style of project. It gives the front dimension and makes decorative quilting more noticeable.
How large should I make the cat cushion?
Approximately 18 inches (46 cm) tall is a practical medium size. You can enlarge or reduce the template while maintaining the same proportions.
What seam allowance should I use?
A 1/4-inch (6 mm) seam allowance works well for this project. Whatever allowance you select, use it consistently throughout construction.
Can I add a zipper instead of permanently closing the cushion?
Yes. A zipper can be installed in the back panel to create a removable cover. This is especially useful if you plan to use the cat as an everyday sofa cushion.
Can I make several different cat designs from the same template?
Yes. One basic silhouette can produce many characters. Change the body fabrics, eye colors, stripes, patches, bow ties, floral sections, and facial markings to create an entire collection.
Can the eyes be made with buttons?
Buttons can work well on decorative cushions for adults, but embroidered or securely appliquéd eyes are a better choice when loose embellishments could present a hazard to young children or pets.
How do I keep the ears pointed after stuffing?
Push small amounts of fiberfill into each ear before filling the head. A blunt turning tool can help position the filling carefully inside the tips.
Can the project be machine washed?
That depends on the fabrics, batting, embellishments, and filling you select. Prewashing washable cotton fabrics before cutting can reduce later shrinkage. Delicate appliqué or decorative elements may require gentle washing.
What quilting design works best?
Simple vertical lines are excellent for beginners. Free-motion spirals, gentle waves, echo quilting, or small geometric patterns can provide additional texture for more experienced quilters.
Conclusion
The Fabric Cat Cushion Pattern is a wonderful way to combine traditional quilting techniques with playful character sewing. Beginning with a simple cat silhouette, you can build layers of personality through patchwork fabric, appliqué, embroidery, decorative quilting, dimensional details, and carefully selected colors.
Throughout this tutorial, we covered how to prepare an approximately 18-inch (46 cm) cat template, select coordinated fabrics, quilt the foundation, construct the face, add paws and a tail, assemble the front and back, stuff the cushion evenly, and finish the opening neatly. These same techniques can then be adapted to create dozens of completely different cat designs.
The most enjoyable part is making each cat unique. One can feature warm golden florals, another sophisticated gray patchwork, and another an explosion of colorful scraps. You can even create cats inspired by different seasons, favorite fabric collections, or the markings of a beloved pet.
If you make your own Fabric Cat Cushion Pattern, leave your sincere opinion about the project and share your suggestions. I would love to know which fabric combination you would choose and what other quilted animal patterns you would like to see in future tutorials.