
The Fabric Christmas Tree Pattern is a colorful and beginner-friendly quilting project that turns small fabric scraps into a modern patchwork Christmas tree. Built from narrow strips, triangular sections, and a simple trunk, this festive block is an excellent way to use leftover quilting cotton while creating handmade Christmas décor. The irregular angles between the fabric strips give the tree movement and personality, while the clean background keeps the finished design bright and easy to recognize.
This Christmas tree quilt block can be used in many different projects. A single block can become a pillow cover, mini wall hanging, pot holder, table mat, mug rug, or fabric gift. Several blocks can be joined to create a Christmas table runner or full quilt. Because every section of the tree can use a different fabric, no two blocks need to look exactly alike. Green scraps create a traditional tree, but red, gold, blue, pink, or multicolored fabrics can produce completely different effects.
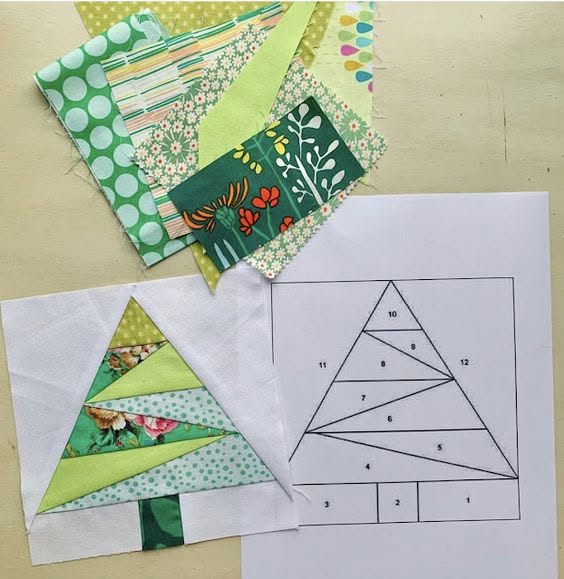
The construction is similar to foundation paper piecing, making it particularly useful for creating sharp angles and maintaining the triangular tree silhouette. The numbered sections shown in a typical foundation template indicate the sewing sequence rather than individual fabric colors. Once you understand how each piece is added and pressed, the method becomes repetitive and surprisingly relaxing. For this tutorial, the suggested unfinished block size is approximately 10½ × 10½ inches (26.7 × 26.7 cm), finishing at about 10 × 10 inches (25.4 × 25.4 cm) after assembly.
Materials, Measurements, and Fabric Preparation
For one Fabric Christmas Tree Pattern block, collect approximately eight to twelve small scraps of quilting cotton. Green should be the dominant color if you want a traditional Christmas appearance, but combining light, medium, and dark values will make the individual sections easier to distinguish.
DISCOVER MORE FREE PATTERNS HERE!
You will also need approximately one fat quarter of white, cream, or another low-volume fabric for the background. Choose a relatively quiet background because busy prints can compete visually with the scrappy Christmas tree.
Prepare a small piece of dark green, brown, or patterned fabric for the trunk. A finished trunk approximately 1½–2 inches (3.8–5 cm) wide looks proportional on a 10-inch block.
For foundation piecing, print or trace the tree template onto lightweight foundation paper. Regular printer paper can work, although thinner foundation paper is easier to remove after sewing. Confirm the printed scale before beginning.
Basic supplies include a sewing machine, neutral cotton thread, rotary cutter, quilting ruler, cutting mat, fabric scissors, iron, pins or fabric clips, and a short stitch setting for paper piecing. A stitch length around 1.5–1.8 mm perforates the paper sufficiently for easier removal later.
When cutting scraps, do not try to cut every irregular shape perfectly before sewing. Foundation paper piecing is generally easier when fabric pieces are cut slightly oversized. Allow at least 3/8–1/2 inch (1–1.3 cm) beyond every seam line so that each piece comfortably covers its designated area after it is opened and pressed.
How to Piece the Scrappy Christmas Tree
The central feature of this Fabric Christmas Tree Pattern is a tall triangle divided into irregular horizontal and diagonal sections. Instead of constructing the entire triangle first and trimming it afterward, foundation piecing allows you to sew directly according to the lines of the template.
Begin with the lowest central tree section indicated on your foundation pattern. Place the first fabric scrap against the back of the paper so that its right side faces away from the paper. Make certain the fabric completely covers the first numbered area plus the surrounding seam allowance.
Position the fabric for the next section right sides together with the first fabric. Hold the paper toward a light source if necessary to check that the second fabric crosses the correct sewing line. Stitch directly along the printed line separating the two sections.
Fold the foundation paper backward along the newly sewn seam and trim the excess fabric to approximately 1/4 inch (6 mm). Return the paper to its original position, open the second fabric, and press it flat.
Continue working through the numbered sections in sequence. Alternate floral prints, polka dots, stripes, stars, geometric fabrics, and solid greens. Changing both color and print scale produces the lively scrappy appearance that makes this Christmas tree design distinctive.
As the pieces become narrower toward the top, check fabric placement carefully before stitching. A scrap that appears large enough before sewing may not cover the entire section after it is flipped open. Testing the fold before sewing prevents unnecessary seam ripping.
Adding the Trunk, Background, and Squaring the Quilt Block
After completing the internal sections of the tree, add the fabric pieces that establish the triangular outer edges. These pieces are usually made from the background fabric and should extend generously beyond the final block boundary.
The left and right sides of the tree must remain straight and symmetrical. Use the printed foundation lines as your guide rather than judging the triangle by eye. Accurate exterior seams are what give the finished Christmas tree quilt block its crisp silhouette.
At the bottom, construct the trunk section using one narrow colored rectangle positioned between two background rectangles. A useful starting measurement for a 10-inch block is a trunk approximately 1¾ inches (4.5 cm) wide and 2 inches (5 cm) tall before final trimming.
Sew the trunk unit beneath the completed tree section, matching the trunk approximately with the center of the triangular tree. Pinning at the center first helps prevent the trunk from drifting sideways while stitching.
Press the joining seam carefully. Whenever possible, avoid dragging the iron from side to side because this can distort bias edges. Instead, place the iron down, lift it, and reposition it. This simple quilting technique helps preserve accurate block dimensions.
Finally, place the completed block on your cutting mat and square it to approximately 10½ × 10½ inches (26.7 × 26.7 cm). Leave a consistent 1/4-inch (6 mm) seam allowance beyond the intended finished boundary.
Quilting, Finishing, and Christmas Project Ideas
Once your Fabric Christmas Tree Pattern block is complete, carefully remove the foundation paper. Fold the paper backward along each seam and tear it away gradually. Holding the stitches with one hand while removing the paper helps prevent distortion.
If you want to turn the block into a mini quilt, cut batting and backing approximately 1–2 inches (2.5–5 cm) larger than the quilt top on every side. Layer the backing, batting, and tree block and baste them together.
Simple straight-line quilting is particularly effective for this project. Quilt around the outer triangular shape of the tree or follow individual patchwork seams. You can also quilt horizontal lines across the background to contrast with the irregular tree sections.
For additional Christmas detail, decorative stitching can imitate garland. Small fabric circles may represent ornaments, while an appliqué star can be positioned at the top. Metallic thread can add subtle sparkle, although these decorations are completely optional.
A single finished block makes an attractive Christmas pillow, especially after adding borders to enlarge it to approximately 16 × 16 inches (40.5 × 40.5 cm). Use envelope-style backing for a removable pillow cover.
For a table runner, make three to five trees and arrange them in a horizontal row. Alternate the direction or fabric colors of the trees for more movement. Add sashing between the blocks and finish with batting, backing, quilting, and binding.
The same block can also become a Christmas stocking panel, reusable gift-bag pocket, placemat, kitchen wall hanging, or centerpiece for a larger Christmas patchwork quilt. Making multiple trees is a practical way to use even very small scraps left from previous sewing projects.
Frequently Asked Questions About the Fabric Christmas Tree Pattern
What size should the finished Christmas tree block be?
A convenient size is approximately 10 × 10 inches (25.4 × 25.4 cm) finished. However, the template can be enlarged or reduced depending on your project.
Is this pattern suitable for beginners?
Yes. It is especially useful for learning foundation paper piecing because the shapes are relatively large and the sewing sequence is straightforward.
What fabrics work best?
Standard 100% quilting cotton is ideal because it presses well, holds its shape, and is easy to sew accurately.
Can I use fabric scraps?
Absolutely. This design is particularly suitable for scraps because many of the internal tree sections require only small pieces.
Do all the fabrics need to be green?
No. Green creates a traditional Christmas tree, but rainbow scraps, red-and-white prints, blue fabrics, metallic Christmas prints, or even vintage florals can be used.
How much fabric do I need?
For one block, scraps are usually sufficient for the tree. Approximately a fat quarter of background fabric gives you comfortable room for cutting and trimming.
What seam allowance should I use?
Maintain approximately a 1/4-inch (6 mm) seam allowance between foundation-pieced sections.
Why are the pieces numbered?
The numbers indicate the sewing order. Piece 1 is positioned first, followed by piece 2, piece 3, and so forth.
Do I sew through the paper?
Yes. In traditional foundation paper piecing, you stitch directly through the fabric and paper along the printed seam lines.
What stitch length should I use?
Approximately 1.5–1.8 mm works well. Short stitches make the foundation paper easier to remove.
When should I remove the paper?
Keep the paper attached until the block has been completely assembled and squared. It helps stabilize the bias edges during construction.
How do I prevent fabric pieces from being too small?
Cut them generously. Each scrap should extend at least 3/8–1/2 inch (1–1.3 cm) beyond the section it needs to cover.
Can I make several trees for a quilt?
Yes. Repeating this scrappy tree quilt block can create an entire Christmas forest. Change the fabrics in every block while maintaining the same background for visual consistency.
Can batting be added behind the block?
Yes. Once the piecing is complete, layer the block with batting and backing exactly as you would any traditional quilt project.
What is the best way to finish a mini quilt?
Quilt the layered piece, square the edges, and finish with approximately 2¼-inch (5.7 cm) binding strips.
Conclusion
The Fabric Christmas Tree Pattern combines the charm of scrap quilting with the precision of foundation paper piecing. Its triangular silhouette is simple enough to recognize immediately, while the irregular strips inside the tree provide plenty of opportunities for creative fabric combinations.
Accuracy comes primarily from following the numbered sewing sequence, keeping every scrap generously oversized, trimming seams consistently, and pressing after each addition. These basic steps help produce crisp angles without requiring complicated traditional piecing calculations.
The project is also an excellent fabric scrap buster. Tiny pieces of favorite floral, geometric, polka-dot, striped, and holiday fabrics can become individual layers of the tree instead of remaining unused in a scrap bin. Mixing different shades of green with occasional contrasting prints gives the block a lively handmade character.
Whether you turn your Fabric Christmas Tree Pattern into a pillow, table runner, placemat, wall hanging, handmade gift, or full Christmas quilt, the same basic block can be adapted in dozens of ways. Each new combination of fabrics creates a different tree, making this an especially enjoyable pattern to repeat throughout the holiday sewing season.