
Hard Candy Block Pattern is a charming quilt-block project that transforms simple pieces of fabric into the appearance of a wrapped piece of candy. The design in the reference image combines a rich red candy print with a soft neutral background, creating a festive block that works beautifully for Christmas quilts, table runners, placemats, pillows, wall hangings, and handmade seasonal decorations. The small fabric bows add an especially playful three-dimensional finish.
Although the finished Hard Candy Block Pattern looks detailed, the construction can be approached with familiar patchwork techniques. The central candy is created as an elongated geometric unit with angled ends, while contrasting sections at opposite corners suggest the twisted ends of a candy wrapper. The surrounding neutral pieces complete the square and make the red design stand out clearly. For traditional quilt piecing, maintaining a consistent 1/4-inch (6 mm) seam allowance is important because small variations accumulate across multiple seams.
Another advantage of this project is its flexibility. You do not have to make a Christmas version. Pink and white fabrics can create a Valentine candy, orange and purple can produce a Halloween block, while bright scraps can turn the same design into a cheerful candy-shop quilt. The tutorial below is an original interpretation of the photographed project and can be adjusted to your preferred finished dimensions.
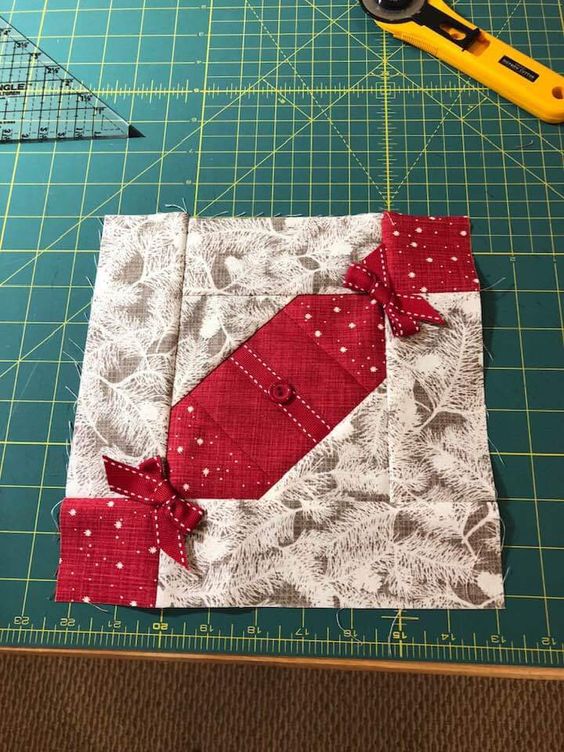
Materials and Cutting for the Hard Candy Block Pattern
Start with good-quality quilting cotton in at least two contrasting colors. For a block similar to the photograph, choose a deep red fabric with a small-scale print for the candy and a cream, white, or pale gray print for the background. Small prints are particularly effective because their details remain visible even after the pieces are cut into smaller sections.
DISCOVER MORE FREE PATTERNS HERE!
For one practice block, you need only a few fabric scraps. Gather approximately a fat eighth of background fabric and a smaller red scrap for the candy. You will also need coordinating cotton thread, an iron, ironing surface, rotary cutter, self-healing cutting mat, quilting ruler, sewing machine, pins or clips, and a removable fabric marker.
A convenient target is a block measuring approximately 10 inches (25.4 cm) finished, or 10 1/2 inches (26.7 cm) unfinished before joining it to other blocks. These measurements are suggestions, so you can enlarge the design for pillows and wall quilts or reduce it for smaller decorative projects.
For the central candy, begin with a red rectangle approximately 4 x 7 inches (10.2 x 17.8 cm). You will modify its corners with background pieces to produce the angled wrapper shape. Because this is a customizable block rather than a fixed commercial template, consider making the first version from inexpensive scraps before cutting special fabric.
Cut several neutral squares and rectangles for the background. Instead of trying to calculate every irregular shape directly, the easiest method is to build the candy center first and then add background sections around it until you have a complete square.
Reserve additional red fabric for two wrapper-end accents. If you want the dimensional bows shown in the reference image, also cut two narrow strips approximately 1 1/2 x 6 inches (3.8 x 15.2 cm). These dimensions can be modified depending on how large you want the bows to appear.
Piecing the Central Hard Candy Quilt Block
Lay the red rectangle horizontally or diagonally on your work surface and decide which direction the candy will travel through the block. In the reference project, the candy runs diagonally from the lower-left area toward the upper-right area, creating strong visual movement.
To form the angled ends, place a background square right sides together over one corner of the red rectangle. Draw a diagonal line from corner to corner on the wrong side of the background square.
Sew directly along the marked diagonal. Trim away the excess fabric approximately 1/4 inch (6 mm) beyond the stitching line, then fold the background triangle outward and press it carefully.
Repeat the process on the required corners until the red rectangle develops angled ends. Take your time with these seams. Bias edges created by diagonal cuts can stretch more easily than straight-grain fabric, so handle them gently when pressing. Light, controlled pressing is preferable to aggressively moving the iron across the unit.
Check the central unit against your ruler after each major step. The candy should remain straight and symmetrical. If one side becomes noticeably longer, correct the problem before adding additional background pieces.
Continue surrounding the center with neutral rectangles and squares. Sew one section at a time using your consistent 1/4-inch seam allowance, press, and then attach the next section. This gradual construction method makes it easier to keep the block flat and square.
Making the Candy Wrappers, Bows, and Background
The two red corner sections are what transform the central geometric shape into recognizable wrapped candy. Place one red section near the lower-left corner and the second toward the upper-right corner, visually aligning them with the ends of the center candy.
These sections can be traditionally pieced into the block. Sew each red rectangle or square to the appropriate neutral background pieces, press the seams, and then incorporate the resulting units into the larger block.
If you are new to patchwork, lay all completed units on your table before joining them. Arrange them exactly as they should appear in the finished block. This simple step helps prevent accidentally rotating one section while sewing.
Now create the optional bows. Fold each narrow red strip lengthwise with right sides together and sew along the long edge. Turn the strip right side out using a turning tool, then press it flat.
Fold or tie each strip into a small decorative bow. Hand-sew one bow near each end of the central candy, positioning it where the candy appears to meet its wrapper. Use several secure stitches through the center of each bow.
For a bed quilt that will receive frequent washing, you may prefer to omit dimensional bows. A completely flat Hard Candy quilt block is easier to quilt and maintain. For table runners, wall hangings, decorative cushions, and Christmas displays, however, the bows create wonderful texture.
Squaring and Finishing the Hard Candy Block Pattern
Once all the sections have been joined, place the block on your ironing surface. First set the seams gently, then press them according to the construction of your block. Pressing toward the darker fabric is a common approach when it prevents dark seam allowances from showing through pale fabric.
Place a large square ruler over the finished patchwork. Check the vertical and horizontal edges as well as the diagonal direction of the candy. Do not immediately trim large amounts from one side; first determine whether the entire block can be centered and squared evenly.
For a 10-inch finished block, trim the completed unit to approximately 10 1/2 inches (26.7 cm) unfinished. The extra 1/2 inch accounts for the seam allowances that will eventually disappear when the block is joined to neighboring blocks.
If you plan to make many Hard Candy blocks, create the first block completely before cutting an entire quilt. Measure it carefully. Once you know your cutting and seam allowance produce the desired dimensions, batch-cut the remaining pieces.
When assembling multiple blocks, alternate the direction of the candies. One can travel from lower left to upper right, while the next travels from upper left to lower right. This alternating arrangement creates additional movement across the finished quilt.
After assembling the quilt top, create the traditional quilt sandwich using backing fabric, batting, and the completed top. Straight-line quilting works particularly well with this geometric block. You could quilt around each candy, use diagonal lines, create a simple grid, or quilt only through the background so the candy appears slightly raised.
FAQ About the Hard Candy Block Pattern
What is a Hard Candy Block Pattern?
A Hard Candy Block Pattern is a decorative patchwork block designed to resemble an individually wrapped piece of candy. Contrasting fabrics create the candy, wrapper ends, and surrounding background.
Is this quilt block suitable for beginners?
Yes. A beginner who can sew straight seams and follow basic patchwork construction can make this block. The diagonal corner technique provides useful practice without requiring highly advanced quilting skills.
What fabric should I use?
100% quilting cotton is an excellent choice because it is stable, easy to cut, easy to press, and available in many prints.
What seam allowance should I use?
Use a consistent 1/4-inch (6 mm) seam allowance for the patchwork unless you intentionally draft your version differently. Consistency is essential because even small seam variations can change the final block dimensions.
What is a scant 1/4-inch seam?
A scant quarter-inch seam is just slightly narrower than a full 1/4 inch. Some quilters use it to compensate for the tiny amount of fabric consumed by the thread and fold when a seam is pressed.
Do I need a special quilting presser foot?
No, but a 1/4-inch quilting foot can make maintaining a consistent seam easier.
How large should the block be?
There is no required size for this customizable version. Approximately 10 inches (25.4 cm) finished is a convenient starting size.
Can I make a larger candy block?
Absolutely. Enlarge all components proportionally to create a pillow front, oversized quilt block, or wall hanging.
Can I make the candy in different colors?
Yes. Red is ideal for Christmas, but pink, blue, yellow, green, orange, purple, and multicolored scraps can all work beautifully.
Can every block contain a different candy?
Yes. In fact, a quilt containing many different candy colors can be especially attractive and is an excellent scrap quilt project.
Are the fabric bows necessary?
No. They are decorative. You can leave them off and rely entirely on the pieced wrapper shapes.
Should I add the bows before quilting?
For a decorative project, you can attach them before final assembly, but keep them away from your quilting path. Another option is to attach them securely after quilting.
How do I keep diagonal pieces from stretching?
Handle bias edges gently and avoid pulling them while sewing or pressing. Press with an up-and-down motion instead of aggressively sliding the iron.
Can I use scraps for this block?
Definitely. The Hard Candy Block Pattern is an excellent scrap-friendly design because the candy and wrapper sections require relatively small pieces.
Would this pattern work for a Christmas table runner?
Yes. Three, four, or five blocks arranged in a row could create an attractive handmade Christmas table runner.
Can I make placemats from the blocks?
Yes. Enlarge the block or add borders around it until you reach your preferred placemat dimensions.
What batting should I use?
Standard cotton or cotton-blend quilting batting works well for most quilts, table runners, and decorative wall projects.
How should I quilt around the candy?
You can stitch around the candy outline, use straight diagonal quilting, crosshatching, echo quilting, or a simple grid.
Why did my finished block become too small?
Check your cutting accuracy and seam allowance. Even a slightly oversized seam can reduce the final dimensions after several seams accumulate.
Can I turn one block into a pillow?
Yes. Add borders if necessary, quilt the block with batting, and use it as the front panel of a decorative cushion cover.
Conclusion
The Hard Candy Block Pattern is a delightful way to combine simple patchwork construction with a recognizable and playful design. Its central geometric candy, contrasting wrapper pieces, and optional fabric bows create a block that immediately stands out without requiring overly complicated sewing techniques.
For a traditional holiday appearance, combine red quilting cotton with cream, ivory, or pale gray background fabric. Small stars, dots, snowflakes, and subtle botanical prints can give the block the cozy Christmas character visible in the inspiration image.
Accuracy is particularly important when assembling the smaller pieces. Careful rotary cutting, a consistent 1/4-inch seam allowance, and gentle pressing will help the individual sections fit together correctly and keep the final block square.
Once you have completed one Hard Candy quilt block, try experimenting with color. A collection of pink, turquoise, yellow, orange, green, and purple candies against one consistent background can create a completely different quilt while using exactly the same construction method.
The block can also be adapted to many projects. Use a single candy for a pillow or mini quilt, several blocks for a table runner, or dozens of blocks for a larger quilt. Leftover pieces from other projects can become colorful candies, making this a useful design for reducing your fabric-scrap collection.
VIDEO PATTERN
Most importantly, treat the Hard Candy Block Pattern as a creative framework rather than a rigid formula. Change the dimensions, rotate the candy, eliminate the bows, add embroidery, combine prints, or make every candy unique. With careful piecing and your favorite fabrics, this simple block can become a cheerful handmade quilt project with plenty of personality.