
A beautiful Kitchen Apron Pattern is one of the most practical and rewarding sewing projects you can create at home. Whether you enjoy cooking, baking, gardening, or spending time in your craft room, a handmade apron offers comfort, protection, and personal style. This classic sewing project combines simplicity with elegance, making it an excellent choice for beginners and experienced quilters alike. With its clean silhouette, adjustable neck strap, long waist ties, and spacious front pocket, this apron is designed to be both functional and attractive.
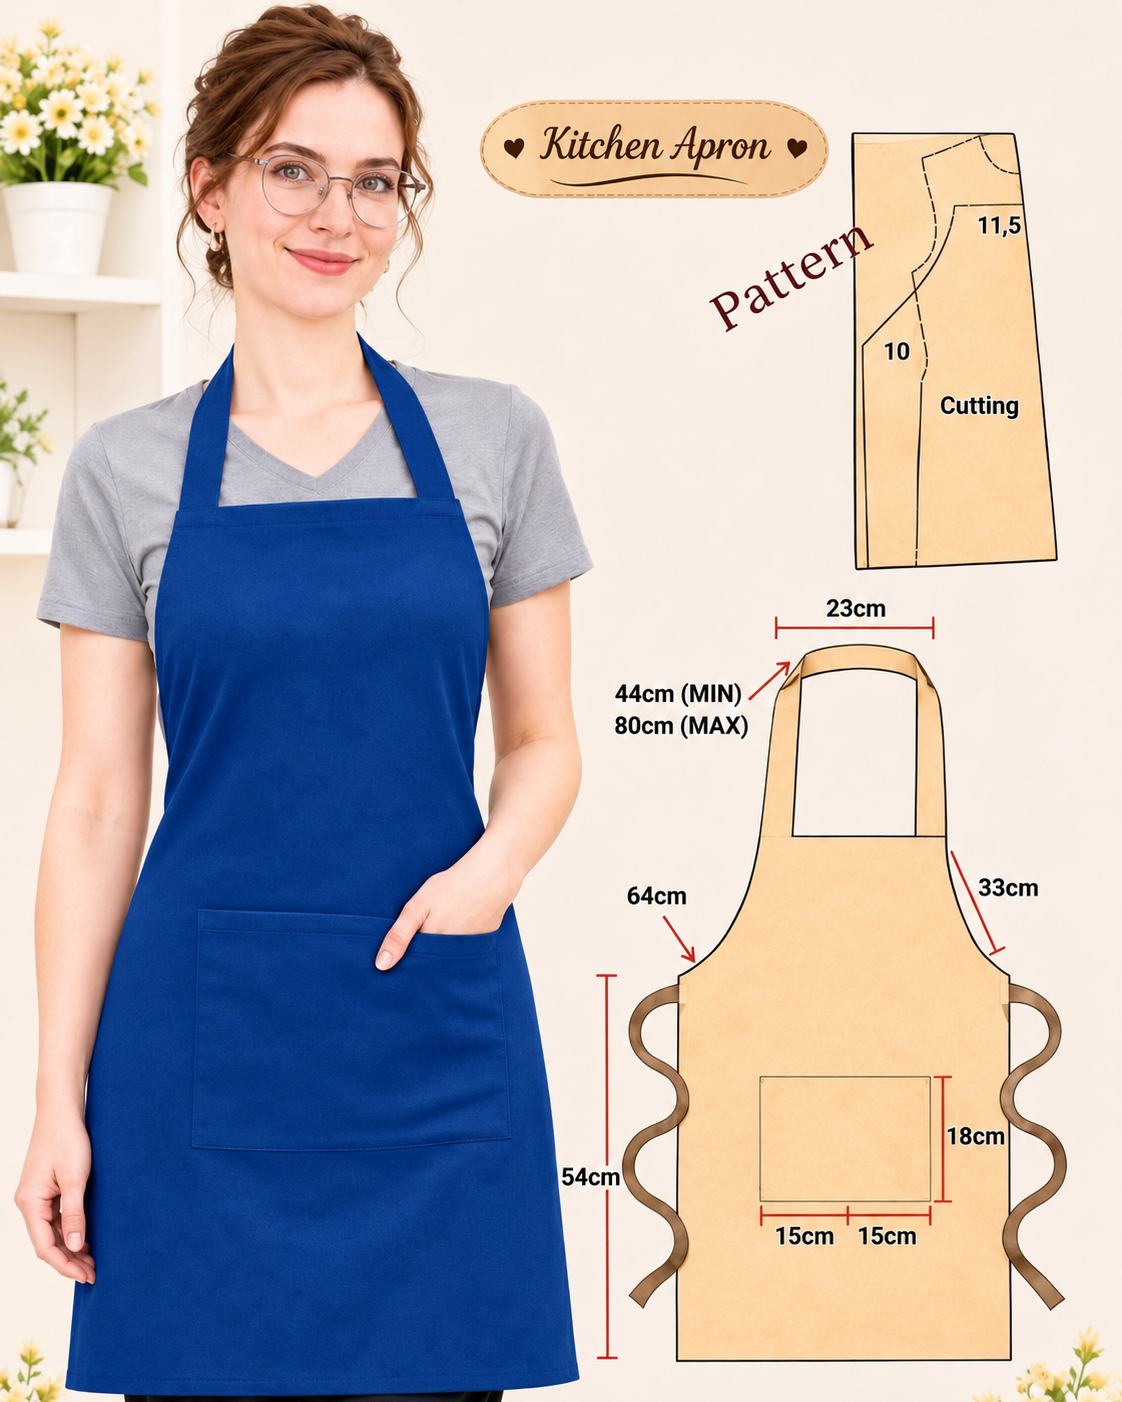
The elegant royal blue apron featured in this project demonstrates how a simple design can become a timeless kitchen accessory. Its rich color creates a sophisticated appearance, while the smooth fabric and carefully stitched edges give it a professional finish. The Kitchen Apron Sewing Pattern features a comfortable bib that protects the upper body, a gently curved waist, and a generous lower section that provides excellent coverage. The large front pocket makes the design even more useful, offering convenient storage for cooking utensils, recipe cards, or small sewing tools.
One of the greatest advantages of making your own DIY Kitchen Apron is the opportunity to customize every detail. You can select your favorite cotton fabrics, adjust the measurements, add decorative quilting, or personalize the apron with embroidery and colorful pockets. This project is also an excellent way to practice essential sewing techniques, including cutting fabric, creating neat hems, attaching straps, and sewing patch pockets. With a few basic supplies and clear step-by-step instructions, you can transform ordinary fabric into a charming apron that you will enjoy wearing for years.
Kitchen Apron Pattern Materials, Measurements, and Fabric Selection
Choosing the right materials is the first step toward creating a beautiful and durable handmade kitchen apron. Since an apron is frequently exposed to spills, flour, water, and everyday wear, selecting a sturdy, washable fabric is particularly important. Cotton canvas, cotton twill, denim, and medium-weight quilting cotton are all suitable choices, depending on the weight and appearance you prefer.
DISCOVER MORE FREE PATTERNS HERE!
For an apron similar to the royal blue example, cotton twill is an excellent option because it offers durability while remaining comfortable. If you prefer a softer apron with colorful printed fabrics, quilting cotton can also work beautifully. Adding lightweight interfacing or an optional quilted lining can provide additional structure without making the finished apron uncomfortable.
Materials needed:
-
1–1.2 meters (approximately 1⅛–1⅓ yards) of medium-weight cotton fabric, depending on fabric width and strap length.
-
Matching polyester or cotton sewing thread.
-
Sewing machine with a universal needle.
-
Fabric scissors or rotary cutter.
-
Measuring tape and quilting ruler.
-
Fabric marking pen or tailor’s chalk.
-
Sewing pins or fabric clips.
-
Iron and ironing board.
-
Pattern paper for creating the apron template.
-
Optional lightweight fusible interfacing.
-
Optional cotton batting and backing fabric for a quilted version.
-
Optional embroidery thread for decorative details.
The reference design provides several useful measurements. These can serve as a starting point for developing a practical Kitchen Apron Pattern while allowing adjustments for different body sizes.
Kitchen Apron Pattern Measurements
| Apron section | Suggested measurement |
|---|---|
| Upper bib width | 23 cm |
| Upper side shaping | Approximately 33 cm |
| Overall apron length | Approximately 80 cm |
| Lower apron section | Approximately 54 cm |
| Lower apron width | Approximately 64 cm |
| Front pocket width | 30 cm |
| Front pocket height | 18 cm |
| Neck strap | Adjustable, approximately 44–80 cm |
| Waist ties | Approximately 70–85 cm each |
| Seam allowance | 1 cm where applicable |
The photographed diagram contains several measurements, including 23 cm, 33 cm, 54 cm, 64 cm, and the 30 × 18 cm pocket. Because some diagram labels do not clearly identify their measurement direction, the table above uses them as design guides rather than claiming they form a complete, verified cutting pattern.
For a comfortable adult apron, an overall length of approximately 80 cm provides generous coverage from the upper chest to the thighs. However, the ideal length depends on the wearer’s height and personal preference. Shorter aprons can be more convenient for quick kitchen tasks, while longer versions offer additional protection during baking and food preparation.
The large front apron pocket is one of the most useful features of this design. Measuring approximately 30 cm wide and 18 cm tall, it provides enough space for everyday kitchen essentials. You can leave it as a single pocket or divide it into two sections with a vertical line of stitching.
When choosing colors, consider the kitchen environment where the apron will be worn. Royal blue creates a sophisticated, modern appearance, while burgundy, emerald green, floral prints, and classic gingham offer different decorative possibilities. For a charming farmhouse-inspired design, cream-colored cotton with contrasting plaid pockets can be especially attractive.
Before cutting, wash and dry your fabric according to its care instructions. Prewashing reduces the risk of unexpected shrinkage after the apron is finished. Press the material thoroughly so that your measurements and cutting lines remain accurate.
How to Cut the Kitchen Apron Pattern and Prepare the Pieces
Creating the basic shape of a Kitchen Apron Sewing Pattern is relatively straightforward because the design is symmetrical. Instead of cutting two separate halves and sewing them together, you can fold the fabric lengthwise and cut the main apron body as one continuous piece. This method produces a smooth front surface without an unnecessary center seam.
Begin by preparing a large sheet of pattern paper. Draw a vertical center line approximately 80 cm long. This line represents the center front of the apron and will help maintain symmetry during the drafting process. At the upper edge, mark half of the desired bib width, approximately 11.5 cm from the center line.
Next, measure downward to establish the waist and lower apron section. Mark approximately 32 cm from the center line at the widest lower area to create a finished width of about 64 cm. Connect the upper bib to the wider body with a smooth curved line. The curve should fit comfortably around the sides of the torso without forming sharp corners.
Step 1: Draft the main apron body. Fold your pattern paper along the center front line. Draw one half of the apron, including the upper bib, curved sides, and lower rectangular section. Cut through both layers of paper and unfold to reveal a symmetrical apron template. Check the shape against your body or a well-fitting apron before proceeding.
Step 2: Add the seam allowances. If you drafted the pattern using finished dimensions, add approximately 1 cm around the neckline and curved sides. Allow additional fabric for the bottom hem if desired. Mark the fold line clearly at the center front so the apron can be cut accurately.
Step 3: Cut the apron fabric. Fold the fabric right sides together, aligning the grain and smoothing away wrinkles. Position the center front edge of the pattern along the fold. Secure the template with pins or pattern weights, then carefully cut around the outer edges.
Step 4: Prepare the front pocket. For a finished pocket measuring approximately 30 × 18 cm, cut a rectangle about 32 × 21 cm. This allows for 1 cm side and bottom seam allowances and a 2 cm top hem plus a 1 cm turn-under. Fold and press the pocket edges before attaching it to the main apron.
Step 5: Cut the neck strap and waist ties. For straps approximately 2.5 cm wide when finished, cut fabric strips about 7 cm wide to allow for folding and seam allowances. Prepare one neck strap according to your preferred adjustment method and two long waist ties. The waist ties should be long enough to fasten comfortably around the wearer’s waist.
Step 6: Prepare the decorative options. If you want to make a quilted kitchen apron, cut lightweight batting and backing fabric slightly larger than the main apron body before trimming them to the final shape. You can also prepare contrasting fabric strips, appliqué motifs, or embroidered decorations at this stage.
The most important part of cutting is maintaining the apron shape and following the fabric grain. An uneven upper bib or asymmetrical curved sides can affect how the finished apron hangs. Take time to measure both sides and verify that the pocket is centered.
For beginners, using inexpensive cotton fabric to create a test version can be extremely helpful. This allows you to adjust the bib width, side curves, and overall length before cutting your favorite material.
Step-by-Step Kitchen Apron Sewing Instructions
Once all the fabric pieces are prepared, you can begin assembling your DIY Kitchen Apron Pattern. This stage involves simple construction techniques that create a polished, durable finish. Sewing carefully, pressing each seam, and maintaining consistent stitch lengths will greatly improve the appearance of the completed apron.
Start by setting up your sewing machine with a straight stitch of approximately 2.5 mm. Select a needle suitable for your chosen fabric. A universal 80/12 needle generally works well with medium-weight cotton, while heavier denim or canvas may require a stronger needle.
Step 1: Finish the curved apron edges. Fold the raw edges of the apron toward the wrong side by approximately 0.5 cm, then fold again by another 0.5 cm. Press carefully along the curved sections, using steam when necessary. Stitch close to the inner folded edge, guiding the fabric slowly to prevent puckering.
Step 2: Hem the top and bottom edges. Fold the upper bib edge toward the wrong side and press. Repeat along the bottom edge, creating an even hem. Sew using a straight stitch, keeping the distance from the folded edge consistent. For a more decorative finish, add a second row of topstitching.
Step 3: Construct the neck strap. Fold the strap lengthwise with the right sides together and sew along the long raw edge. Turn the strap right side out, press it flat, and topstitch along both long edges. Attach the ends securely to the upper bib corners. If you prefer an adjustable strap, use a fabric loop, D-rings, or a suitable slider mechanism rather than permanently stitching both ends.
Step 4: Prepare the waist ties. Fold each long fabric strip lengthwise and sew along the long edge and one short end. Turn the strips right side out and press. Close the remaining open ends neatly or incorporate them into the apron attachment seams. Reinforce the tie ends with additional stitching to prevent fraying.
Step 5: Attach the waist ties. Position the ties at the points where the curved upper sides meet the wider lower section. Pin them carefully, ensuring both ties are placed at equal heights. Stitch each tie securely with a reinforced rectangular or box-shaped seam. This additional stitching is important because the straps experience regular pulling when the apron is tied.
Step 6: Sew the front pocket. Fold the upper pocket edge toward the wrong side by 1 cm, then fold another 2 cm and topstitch. Press the remaining three edges inward by approximately 1 cm. Position the pocket at the center of the apron, usually around the lower abdominal area, and secure it with pins.
Stitch around the left side, bottom, and right side of the pocket, leaving the upper edge open. Backstitch at the upper corners or add small reinforcement stitches to improve durability. If desired, divide the pocket into two compartments by sewing a vertical line through its center.
After attaching the pocket, inspect the apron for loose threads or uneven seams. Press the finished garment thoroughly, paying particular attention to the pocket corners, side curves, and bib. This final pressing stage helps create the clean, professional appearance seen in the reference design.
For a true quilted kitchen apron, the construction can include an additional quilting stage before the edges and straps are finished. Layer the apron front, lightweight batting, and backing fabric, then baste them together. Sew evenly spaced straight quilting lines or a diamond grid across the main apron body.
Once the quilting is complete, trim the layers to the apron shape and finish the raw edges with bias binding. This approach creates a softly padded apron with beautiful quilted texture. Keep the batting lightweight so the apron remains flexible, breathable, and comfortable for kitchen activities.
Creative Kitchen Apron Pattern Ideas, Customization, and Care
The classic Kitchen Apron Pattern is an ideal foundation for creative sewing projects because it can be adapted to almost any style. By changing colors, adding decorative elements, or experimenting with pocket arrangements, you can turn one simple template into an entire collection of handmade aprons.
A royal blue apron with matching straps creates a modern and elegant look. For a more feminine and delicate version, consider blush pink fabric with white floral appliqué or soft lavender cotton with cream-colored accents. Emerald green combined with gold-colored decorative stitching can create a particularly rich appearance.
If you enjoy traditional patchwork, use leftover quilting fabrics to make the front pocket. Arrange small fabric squares into a simple checkerboard design, stitch them together, and trim the assembled patchwork to the required pocket dimensions. The colorful pocket creates an attractive contrast against a solid-colored apron body.
Another wonderful option is a Christmas Kitchen Apron Pattern. Select festive fabrics in red, green, white, and gold, then add decorative borders or small appliqué shapes such as stars, bells, and Christmas trees. These seasonal aprons are excellent for holiday baking, family celebrations, and thoughtful handmade gifts.
You can also personalize an apron with embroidery. Add a first name, a favorite cooking phrase, or a small floral design to the upper bib. Embroidery is easiest to complete before assembling the apron because the fabric can be positioned comfortably inside an embroidery hoop.
For additional functionality, consider adding a towel loop near one waist seam or creating separate compartments within the main pocket. A divided pocket can hold a recipe card, a small notebook, or kitchen accessories. Avoid placing bulky or heavy items inside, as this may cause the apron to pull forward.
Caring for your handmade quilted apron is relatively simple when washable fabrics are used. Most cotton aprons can be machine washed according to the fabric manufacturer’s recommendations. Use a gentle or regular wash cycle depending on the materials and decorations, and avoid harsh bleach on colored fabrics.
After washing, reshape the apron and allow it to dry according to the fabric’s care instructions. Press the apron while slightly damp if necessary, taking care around embroidery, appliqué, and delicate trims. Proper cleaning and storage will help preserve the fabric’s color and keep the finished apron looking beautiful.
A handmade apron can also become a meaningful gift for someone who loves cooking, baking, sewing, or gardening. Pair it with coordinating fabric potholders, a matching oven mitt, or a handmade kitchen towel to create a charming gift set.
Frequently Asked Questions About the Kitchen Apron Pattern
Is this Kitchen Apron Pattern suitable for beginners?
Yes. This project is beginner-friendly because it uses simple fabric shapes, straight seams, and basic hemming techniques. The curved sides require a little care, but they are manageable with slow stitching and proper pressing.
What is the best fabric for a kitchen apron?
Cotton twill, cotton canvas, and medium-weight quilting cotton are excellent choices. They are comfortable, durable, and generally easy to maintain. Quilting cotton is especially useful when creating colorful patchwork designs.
How much fabric do I need to make one apron?
Approximately 1–1.2 meters of fabric is a practical starting point for many adult aprons. The exact amount depends on fabric width, apron size, strap length, and whether you add a lining or decorative details.
Can I make a quilted version of this apron?
Absolutely. Add lightweight cotton batting between the apron front and backing fabric, then stitch decorative quilting lines before finishing the edges. Lightweight batting is recommended to maintain comfort.
How do I adjust the apron for different sizes?
Modify the overall length, bib width, and lower body width of the paper template. The waist ties and neck strap can also be lengthened or shortened to provide a better fit.
Can I add more pockets to the apron?
Yes. You can divide the existing large pocket into two sections or add additional small pockets. Be sure to reinforce the upper corners because these areas receive frequent use.
Is this apron washable?
Yes, provided the fabric, thread, batting, and decorations are washable. Prewashing the fabric before cutting helps minimize shrinkage and maintain the apron’s shape after laundering.
Conclusion
The Kitchen Apron Pattern is a timeless and practical sewing project that brings together creativity, functionality, and personal style. Its classic silhouette, comfortable neck strap, adjustable waist ties, and spacious front pocket make it an excellent accessory for everyday kitchen activities.
Whether you choose elegant royal blue cotton, cheerful floral prints, traditional gingham, or colorful patchwork, this DIY Quilted Kitchen Apron can be customized to reflect your personality and sewing preferences. The straightforward construction also makes it an ideal opportunity to develop essential sewing skills while creating something genuinely useful.
With carefully selected materials, accurate measurements, and attention to finishing details, you can make a beautiful handmade kitchen apron that combines comfort and durability. It is a wonderful project for your own home, a thoughtful gift for someone special, and a creative way to transform fabric into an accessory that can be enjoyed for many years.