
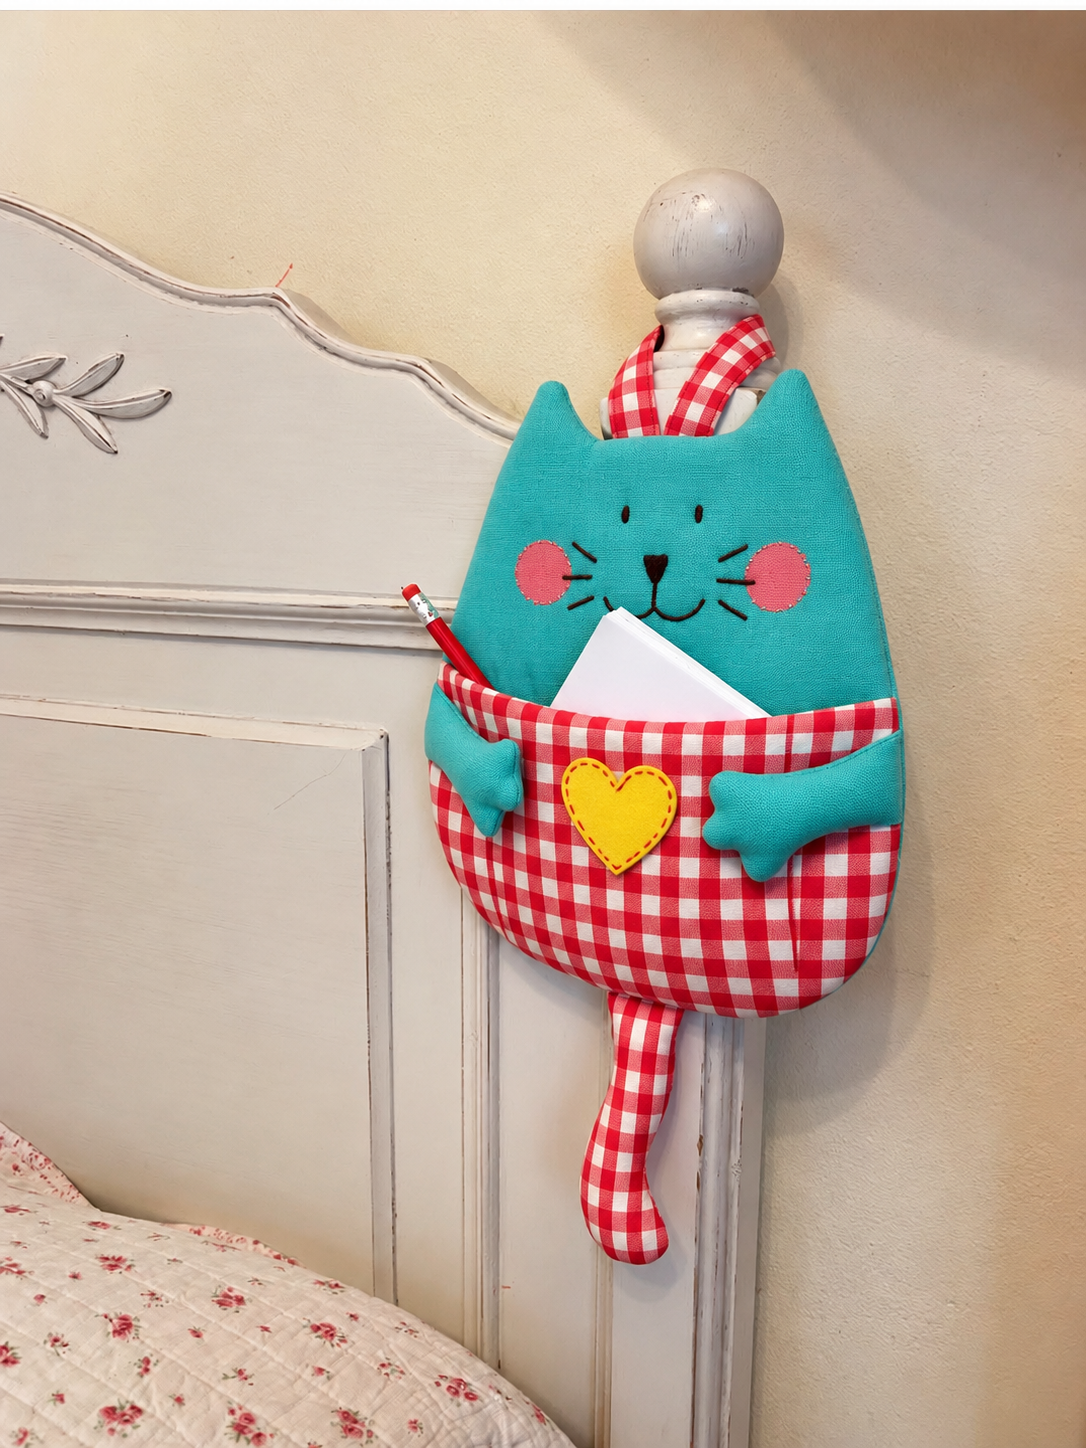
The Kitten Bag Tutorial is a charming sewing and quilting project that transforms ordinary fabric into a practical hanging organizer shaped like a friendly cat. With pointed ears, embroidered facial features, little padded paws, a roomy gingham pocket, and a playful hanging tail, this project combines decorative sewing with useful storage. It is especially suitable for holding letters, notebooks, pencils, small craft supplies, sewing notions, or lightweight everyday items while adding a cheerful handmade accent to a room.
Although it is called a Kitten Bag, the design works more like a soft hanging fabric organizer than a traditional handbag. The cat’s body forms the backing, while a large curved pocket covers the lower portion. The turquoise upper body contrasts beautifully with the red-and-white gingham pocket in the pictured version, while pink cheeks and a yellow heart appliqué provide small pops of color. These elements can easily be changed to coordinate with a sewing room, bedroom, nursery, or craft space.
This tutorial uses straightforward quilting and sewing techniques, making it approachable for confident beginners while still offering enough detail to interest experienced makers. The measurements are suggested starting points and can be adjusted. Because the organizer is decorative rather than intended to carry heavy loads, lightweight cotton combined with batting or interfacing provides a good balance of structure and softness. The result is a personalized fabric kitten organizer that is useful, decorative, and enjoyable to sew.
Materials, Measurements, and Preparing the Kitten Bag Pattern
For the main body of the Kitten Bag Tutorial, choose quilting cotton, cotton canvas, or another stable woven fabric. A turquoise or aqua fabric recreates the cheerful appearance shown in the inspiration. For the pocket, tail, and optional hanging loop, prepare a contrasting red-and-white gingham. Small scraps of pink, yellow, and black fabric or felt can be used for the cheeks, heart, nose, and facial details.
DISCOVER MORE FREE PATTERNS HERE!
You will also need lightweight batting or fusible fleece, lining fabric, coordinating sewing thread, embroidery floss, a fabric marker, scissors or rotary cutter, quilting ruler, pins or clips, a hand-sewing needle, and a sewing machine. Fusible interfacing can be substituted for batting when a flatter organizer is preferred.
For a medium organizer, make the finished kitten approximately 14 in (35.5 cm) wide and 18 in (45.5 cm) tall, excluding the tail and hanging loop. Cut the main body slightly larger to provide room for seam allowances. A practical starting template is approximately 15 × 19 in (38 × 48 cm) at its widest and tallest points.
Draw the body as a large rounded rectangle or oval with two pointed ears incorporated into the upper edge. Each ear can extend approximately 2.5–3 in (6.5–7.5 cm) above the head. Keep both sides symmetrical by drawing half of the template on folded paper, cutting it out, and unfolding it before transferring the shape to fabric.
The front pocket should cover roughly the lower 40–45% of the kitten. For the suggested size, begin with a piece approximately 15 in (38 cm) wide by 8–9 in (20–23 cm) high, then round the bottom corners to follow the body. Add a lining piece of the same size. Remember to include approximately ¼–⅜ in (6–10 mm) seam allowance unless your template already includes it.
Before cutting expensive fabric, create the complete pattern from paper and place every component together: body, pocket, paws, tail, cheeks, and heart. This simple preparation helps confirm proportions and prevents surprises during assembly. The dimensions can then be enlarged or reduced while maintaining the same general construction.
Sewing the Quilted Cat Body, Face, and Decorative Details
Cut one kitten body from the exterior fabric, one from lining fabric, and one from batting or fusible fleece. If using fusible material, follow the manufacturer’s instructions to attach it to the wrong side of the exterior piece. Keep the batting slightly inside the seam allowance if excessive bulk develops around the edges.
Quilt the main body before adding the pocket. Simple vertical lines approximately 1–1.5 in (2.5–4 cm) apart work well, although diagonal crosshatching, gentle curves, or free-motion quilting can also be used. Quilting stabilizes the layers and gives the finished quilted kitten organizer a more substantial handmade appearance.
Next, mark the face while the front panel is still flat. Position the eyes around the upper-middle area of the head, leaving enough empty space below for the pocket. Embroider two small vertical eyes with black thread. Create a triangular nose approximately ½ in (1.3 cm) wide and add a curved mouth and three whiskers on each side.
For the cheeks, cut two pink circles approximately 1.5–2 in (4–5 cm) in diameter. Felt can be stitched directly around the edge, while cotton appliqué benefits from fusible web or turned edges. Place one cheek on either side of the face and stitch around each circle with a small straight, blanket, or zigzag stitch.
The heart is another attractive appliqué detail. Cut a yellow heart approximately 3–3.5 in (7.5–9 cm) tall. Position it near the center of the finished pocket. A contrasting blanket stitch creates a handcrafted appearance, while a narrow machine zigzag provides extra security.
Press the completed body carefully from the reverse side. Do not iron directly over dimensional embellishments. At this point, the cat should already have much of its personality, and completing these decorative features before final assembly is considerably easier than trying to sew them after the organizer has been constructed.
Making the Pocket, Paws, Tail, and Assembling the Kitten Bag
To construct the fabric storage pocket, place the exterior gingham and pocket lining right sides together. Sew along the upper edge using approximately a ¼ in (6 mm) seam allowance. Turn the pieces right side out, press the seam neatly, and topstitch approximately ⅛ in (3 mm) from the finished upper edge.
Position the pocket across the lower front of the kitten body. Align its curved lower and side edges with the body. Baste around those edges while leaving the top completely open. If desired, stitch one or two vertical dividing lines through the pocket to create separate compartments for pencils, scissors, mail, or other lightweight supplies.
For each paw, cut two mirrored pieces approximately 4–5 in (10–13 cm) long. Place pairs right sides together, stitch around them while leaving a small turning opening, clip the curves, turn right side out, and lightly stuff with polyester fiberfill or small batting scraps. Close the openings before positioning the paws over the pocket.
Place one paw on each side so they appear to hug the gingham pocket. The paws can be sewn securely at their upper ends while leaving the lower sections slightly dimensional. Avoid attaching them only with a few loose stitches if the organizer will be handled frequently.
Create the tail from two gingham strips shaped into a gentle curve. A finished tail approximately 2–2.5 in (5–6.5 cm) wide and 10–12 in (25–30 cm) long works nicely with the suggested organizer size. Sew the pieces right sides together, leaving the upper end open, turn, press, and optionally add a small amount of batting.
Baste the tail to the lower body with its raw end positioned inside the seam allowance. Place the lining over the decorated front with right sides facing, making certain the paws and tail remain safely away from unintended stitching. Sew around the perimeter, leaving a turning opening. Clip curves and ear points carefully, turn the organizer right side out, press, close the opening, and topstitch around the outer edge.
Finishing, Hanging, Quilting Tips, and Customizing the Pattern
The Kitten Bag Tutorial needs a secure hanging method. A fabric loop is one of the simplest options. Cut a strip approximately 2 × 8 in (5 × 20 cm), fold the long edges toward the center, fold again, and topstitch. Insert the loop securely into the upper seam between the ears or attach it to the back with reinforced stitching.
If you expect the organizer to contain several objects, reinforce the hanging area with an additional square of interfacing inside the back panel. The organizer is intended primarily for lightweight storage, so avoid filling it with heavy tools, books, or objects that could place excessive stress on the fabric loop or wall fixture.
Topstitching approximately ⅛–¼ in (3–6 mm) from the outer edge gives the cat a crisp finished outline. Slow down around the ears and curves. A shorter stitch length can provide better control around these areas, particularly where several fabric and batting layers meet.
The design is extremely easy to personalize. Replace the turquoise body with orange fabric for a ginger kitten, gray for a classic tabby-inspired look, black for a Halloween version, or patchwork scraps for a colorful scrap fabric cat organizer. The gingham pocket can also be replaced with floral, polka-dot, striped, or novelty cotton.
You can customize the face as well. Embroidered closed eyes create a sleepy kitten, while different cheek colors completely change its personality. Small fabric bows, quilted flowers, initials, or appliquéd names can make the project suitable for personalized handmade gifts.
Once finished, check every seam and hanging point. Trim loose threads and gently press the organizer. Insert only lightweight items at first to ensure the hanger is secure. Your completed Kitten Bag Pattern should maintain its shape while the pocket remains flexible enough for practical everyday use.
Suggested Pattern Measurements
| Pattern Piece | Suggested Size |
|---|---|
| Main kitten body | Approx. 15 × 19 in (38 × 48 cm) before finishing |
| Finished organizer | Approx. 14 × 18 in (35.5 × 45.5 cm) |
| Front pocket | Approx. 15 × 8–9 in (38 × 20–23 cm) |
| Each paw | Approx. 4–5 in (10–13 cm) long |
| Tail | Approx. 10–12 in (25–30 cm) long |
| Cheeks | Approx. 1.5–2 in (4–5 cm) diameter |
| Heart | Approx. 3–3.5 in (7.5–9 cm) tall |
| Hanging-loop strip | Approx. 2 × 8 in (5 × 20 cm) |
| General seam allowance | ¼–⅜ in (6–10 mm) |
These measurements are intentionally flexible. When resizing the project, enlarge or reduce the paper templates together so the paws, pocket, face, and tail remain proportional.
Recommended Assembly Order
A convenient construction sequence is: prepare the templates and cut the fabrics; stabilize and quilt the front body; embroider the face; attach cheeks and other appliqués; construct and attach the pocket; sew and lightly stuff the paws; make the tail; prepare the hanging loop; baste dimensional pieces in position; join the front and lining; turn and press; close the opening; and finish with topstitching.
Following this order prevents the pocket or dimensional pieces from interfering with the quilting and makes the small decorative details much easier to control.
FAQ About the Kitten Bag Tutorial
Is the Kitten Bag Tutorial suitable for beginners?
Yes. It is appropriate for confident beginners who can sew curved seams, turn fabric pieces, make simple appliqués, and perform basic topstitching. Making a paper template first simplifies the construction considerably.
Does this project need to be quilted?
Not necessarily, but quilting gives the organizer more body and durability. If you prefer not to quilt it, use medium-weight fusible interfacing to stabilize the main fabric.
What fabric works best?
Quilting cotton is an excellent choice because it is easy to cut, sew, press, and combine with batting. Cotton canvas can also be used when additional structure is desired.
Can I use fabric scraps?
Absolutely. The paws, cheeks, heart, tail, pocket, ears, and even sections of the body can be made from scraps, making this a useful scrap-busting sewing project.
How can I make the pocket stronger?
Add lightweight interfacing to the pocket exterior and reinforce the upper edge with topstitching. For greater organization, sew vertical divisions into the pocket.
Can I enlarge the Kitten Bag Pattern?
Yes. Enlarge the complete paper pattern proportionally. Remember that larger organizers may require heavier interfacing and a stronger hanging system.
Can I make it without the tail?
Yes. The tail is decorative and does not affect the function of the organizer.
Can I add more pockets?
Yes. You can divide the large front pocket or add smaller appliquéd pockets. Avoid adding excessive bulk where the side seams will be sewn.
Should the paws be stuffed?
A very small amount of stuffing gives them dimension. They can also be left flat if you prefer a simpler quilted appearance.
Can this be washed?
That depends on the fabrics, batting, appliqué materials, and embellishments selected. Prewashing cotton fabrics can help minimize later shrinkage. Follow the care requirements of the least washable component.
What can I store inside it?
It works well for lightweight items such as letters, notepads, crochet hooks, pencils, small sewing supplies, patterns, or craft accessories. It should not be treated as a load-bearing storage bag.
How do I keep the ears pointed?
Trim excess seam allowance at the ear tips before turning, without cutting through the stitches. Use a blunt turning tool to gently shape each point and then press carefully.
Conclusion
The Kitten Bag Tutorial combines quilting, appliqué, embroidery, dimensional sewing, and practical storage in one cheerful project. Its recognizable cat silhouette and oversized gingham pocket make it decorative enough for display while still providing useful organization for lightweight everyday items.
The pattern is also highly adaptable. Different fabrics can turn the same design into a playful children’s-room organizer, a country-style sewing-room accessory, or a colorful scrap-quilting project. Details such as the embroidered kitten face, padded paws, contrasting pocket, heart appliqué, and dangling tail allow each version to develop its own personality.
PATTERN VIDEO:
Most importantly, build the project carefully from the inside out: stabilize the body, complete the decorative work while the panel is flat, reinforce the pocket and hanger, and finish the curves with patient pressing and topstitching. With those basic techniques, this Kitten Bag Pattern becomes an enjoyable handmade project that combines the charm of a fabric kitten with the usefulness of a hanging organizer.