
Organizer Bag Pattern is a practical sewing and quilting project designed to keep frequently used supplies close at hand while adding a handmade touch to a sewing space. Inspired by the compact hanging organizer shown in the reference image, this project creates a small fabric basket with two sturdy hanging loops, a structured body, and a contrasting lining. It can hang from the handle of a sewing machine, cabinet knob, craft cart, hook, or another secure support, making it especially useful for collecting thread ends, fabric scraps, clips, measuring tools, or other lightweight notions.
A handmade fabric organizer bag is particularly useful because its dimensions can be adapted to the space where it will be used. Instead of creating a large storage basket that occupies valuable table space, this design hangs vertically and keeps the work surface clear. The exterior can feature coordinating quilting cottons, scraps from previous projects, patchwork, or a favorite print, while the lining gives the bag a clean interior finish. Adding interfacing or batting helps the organizer maintain the slightly boxy shape visible in the inspiration photo.
This quilted organizer bag pattern is also an approachable project for confident beginners. The basic construction involves rectangles, straight seams, boxed corners, lining, and fabric hanging loops. These are useful techniques that appear in tote bags, storage baskets, zipper pouches, and many other sewing projects. The dimensions below are suggested starting measurements rather than a traced commercial pattern, so they can be adjusted to suit your sewing machine and preferred finished size.
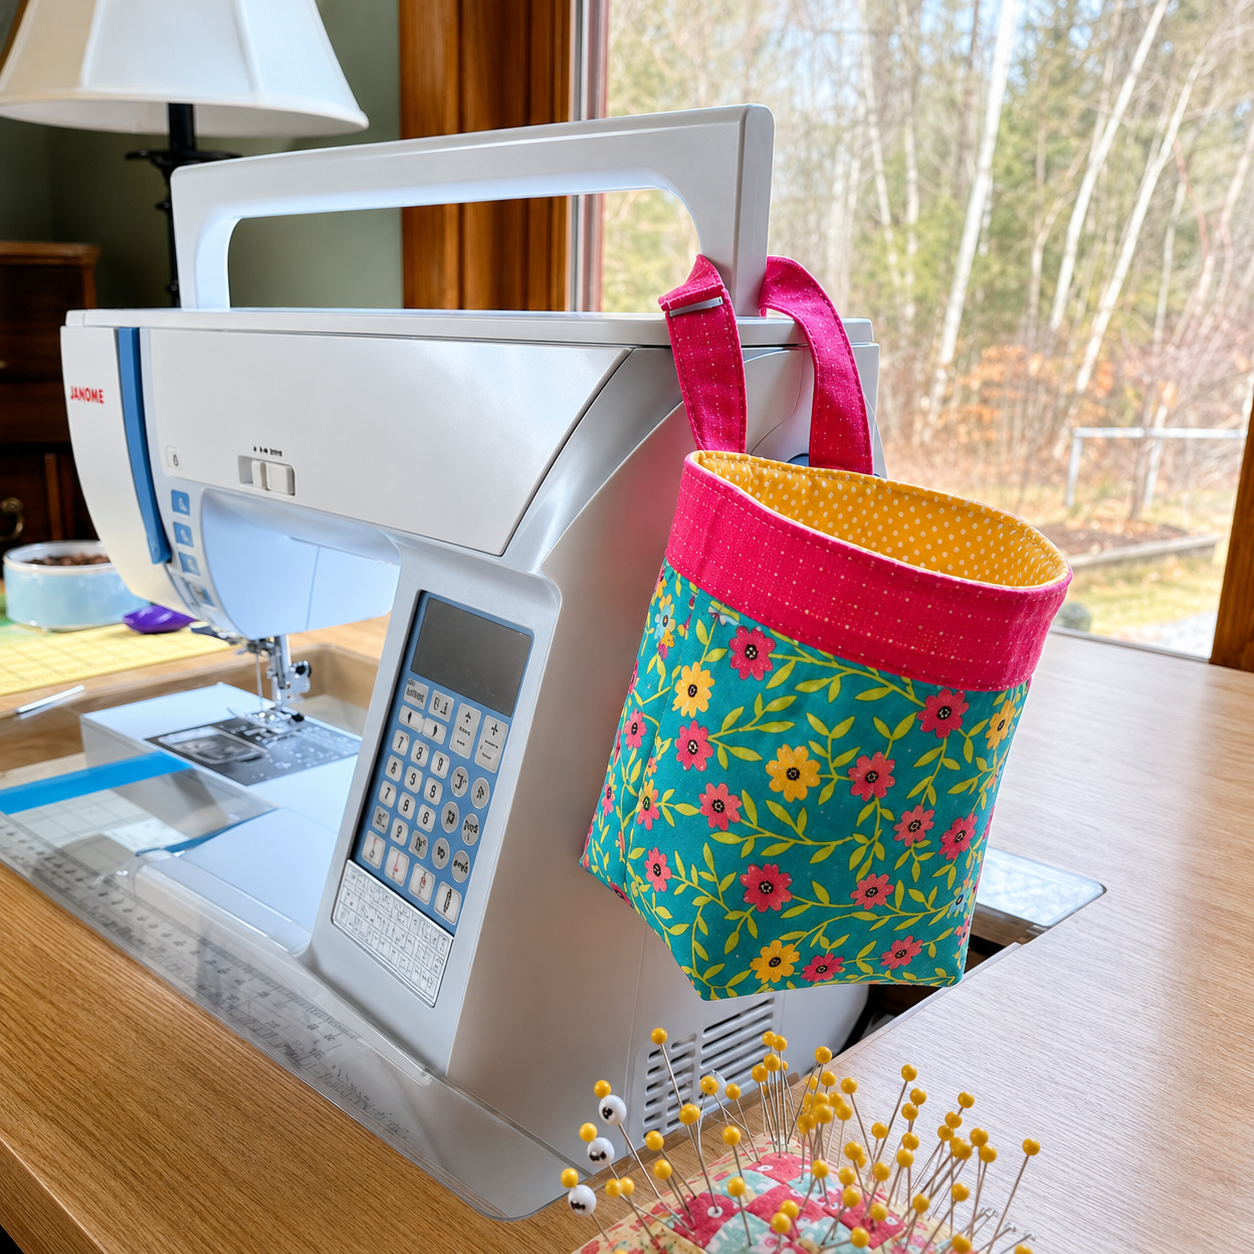
Materials and Measurements for the Organizer Bag Pattern
For a medium organizer similar to the photographed project, begin with two exterior fabric rectangles measuring approximately 9 x 11 inches (23 x 28 cm). Quilting cotton works beautifully because it is easy to sew and available in countless prints. Canvas can also be used if you want a firmer organizer.
DISCOVER MORE FREE PATTERNS HERE!
Cut two lining pieces in the same dimensions. A contrasting lining is especially attractive because a narrow portion of it may remain visible around the upper opening. Light-colored lining also makes small notions easier to find inside the finished sewing organizer bag.
For additional structure, cut two pieces of fusible interfacing or thin batting slightly smaller than the exterior panels. Medium-weight fusible interfacing creates a crisp basket, while thin batting gives the project a softer, quilted appearance.
For the hanging straps, cut two strips approximately 3 x 10 inches (7.5 x 25 cm). These measurements can be changed depending on the size of the handle, hook, or support where you plan to hang the organizer. Always test the loop size before final assembly.
You will also need coordinating thread, scissors or a rotary cutter, quilting ruler, cutting mat, sewing clips or pins, an iron, and a sewing machine. A ¼-inch (6 mm) or ⅜-inch (1 cm) seam allowance can work well, but use the same allowance consistently throughout construction.
Before cutting, decide how large you actually want the finished basket. An organizer approximately 7–8 inches (18–20 cm) wide, 8–9 inches (20–23 cm) tall, and 3–4 inches (7.5–10 cm) deep is useful beside many sewing machines without becoming excessively bulky.
Cutting, Interfacing, and Preparing the Hanging Loops
Begin your Organizer Bag Pattern by pressing all fabrics carefully. Accurate cutting becomes much easier when quilting cotton is completely flat. If you are using directional fabric, determine which edge will become the top before cutting the panels.
Fuse the interfacing to the wrong side of both exterior pieces according to the manufacturer’s instructions. If using batting instead, baste or quilt it to the exterior fabric. Simple vertical lines, diagonal quilting, or a basic grid can add attractive texture.
Next, prepare the two hanging straps. Fold each strip in half lengthwise with wrong sides together and press. Open it again, then fold both long raw edges inward until they meet the center crease.
Fold the strip along the original center crease once more. You now have a narrow four-layer strap with the raw edges enclosed. Topstitch close to both long edges. Repeat with the second strip.
Bring the ends of each strap together to form a loop. Before sewing them into the organizer, temporarily place the loops around your intended support. For the type of sewing-machine handle shown in the inspiration image, the loops should be long enough to hang freely without interfering with machine controls or moving parts.
Baste the loop ends to the upper edge of one exterior panel, positioning them evenly. Make sure the loops point downward toward the center of the fabric while their raw ends extend slightly beyond the upper seam line. Reinforce the attachment with an additional row of stitching because these areas receive the greatest amount of stress.
Sewing the Organizer Bag and Creating the Boxed Bottom
Place the two exterior panels right sides together. Align all edges carefully and clip them in place. Sew down both sides and across the bottom, leaving the top completely open.
To give the fabric organizer basket its three-dimensional shape, create boxed corners. At one bottom corner, separate the layers and align the side seam directly over the bottom seam. The corner should flatten into a triangle.
Measure approximately 1½–2 inches (3.8–5 cm) inward from the point, depending on how deep you want the organizer. Draw a line perpendicular to the seam and stitch directly across it. Repeat on the opposite corner.
Trim the excess corner fabric approximately ¼ inch (6 mm) beyond the stitching. Turn the exterior right side out temporarily and inspect the shape. The organizer should now have a flat bottom rather than resembling a flat pouch.
Construct the lining in the same manner. Place the two lining rectangles right sides together and sew around the sides and bottom, but leave a 3–4 inch (7.5–10 cm) turning opening somewhere along the bottom seam. Box both lining corners to exactly the same depth used for the exterior.
Test the lining inside the exterior before continuing. Both pieces should have similar dimensions. If the lining appears slightly too large, take a marginally deeper seam along its sides. A lining that is just slightly smaller usually sits more neatly inside the finished bag.
Assembling, Topstitching, and Using the Finished Organizer
With the exterior right side out and the lining wrong side out, insert the exterior into the lining. The right sides of both fabrics should now face each other. Align the upper raw edges and match the side seams.
Make sure the hanging loops remain tucked between the exterior and lining. Stitch completely around the upper opening. For additional strength, stitch across the strap areas twice.
Reach through the opening previously left in the lining and gently pull the entire Organizer Bag Pattern right side out. Work slowly around the corners to avoid placing unnecessary pressure on the seams.
Push the lining down into the exterior and shape all four bottom corners. Press the upper edge carefully. Allowing approximately ⅛–¼ inch (3–6 mm) of contrasting lining to show can create the attractive decorative edge seen in many handmade organizers.
Topstitch around the entire upper opening approximately ⅛ inch (3 mm) from the edge. This closes the layers visually, keeps the lining from rolling outward, and adds reinforcement around the hanging straps. Close the turning opening in the lining with a narrow machine stitch or invisible hand stitching.
Finally, hang the organizer in its intended position and check that it stays clear of all moving parts, ventilation areas, controls, needles, presser mechanisms, and electrical components. Use it only where it does not interfere with safe operation of your sewing machine.
FAQ About the Organizer Bag Pattern
What is an Organizer Bag Pattern?
It is a sewing template and construction method for making a small fabric container designed to organize lightweight sewing, quilting, or craft supplies.
Is this organizer difficult to sew?
No. It is suitable for confident beginners who can sew straight seams and are ready to learn lining and boxed corners.
What fabric works best?
Quilting cotton, canvas, denim, and lightweight home décor fabric are all good possibilities.
Can I make the organizer from fabric scraps?
Absolutely. A patchwork exterior is an excellent way to use leftover quilting cotton.
Should I use interfacing?
Interfacing is recommended because it helps the organizer remain upright instead of collapsing when empty.
Can I use batting instead?
Yes. Thin batting gives the bag a softer quilted structure and allows you to add decorative quilting.
How large should the organizer be?
A finished size around 7–8 inches (18–20 cm) wide and 8–9 inches (20–23 cm) tall is a practical starting point, but dimensions can be customized.
How deep should the bottom be?
Approximately 3–4 inches (7.5–10 cm) provides useful capacity without making the basket excessively bulky.
What can I keep inside it?
It can hold lightweight items such as fabric scraps, thread tails, sewing clips, small rulers, marking tools, or other notions.
Can I use it as a thread catcher?
Yes. In fact, this compact hanging design makes an excellent sewing thread catcher.
Can I add pockets?
Yes. Sew flat or divided pockets onto the lining before assembling the lining pieces.
Can the loops be made longer?
Certainly. Measure the intended hanging location before cutting your straps.
Can I use webbing for the straps?
Yes. Cotton webbing is a quick and sturdy alternative to handmade fabric straps.
Can I add a button closure?
Yes. A fabric loop and button, snap, or magnetic closure can be incorporated if desired.
How do I make the bag stand more firmly?
Use medium or heavyweight interfacing and consider adding a removable bottom insert.
Can I quilt the exterior?
Yes. Fuse or baste batting behind the exterior panels and quilt them before assembling the bag.
Can denim be used?
Yes. Recycled denim can produce an especially durable organizer, although bulky seams may require a suitable denim needle.
How can I make the lining fit neatly?
Make the lining fractionally smaller than the exterior and press it carefully into the corners.
Can I make several organizers in different sizes?
Yes. Once you understand the rectangular construction, the dimensions are easy to scale.
Where can the finished organizer be used?
Besides a sewing area, it can work beside a craft desk, embroidery station, quilting table, or other appropriate storage location.
Conclusion
The Organizer Bag Pattern is a simple project with genuinely useful results. By combining two exterior panels, a clean fabric lining, structural interfacing, boxed corners, and two hanging loops, you can create a compact organizer similar to the one shown in the inspiration image.
One of the biggest advantages of this design is customization. The organizer can be made taller for fabric scraps, shallower for clips and notions, or wider for general craft storage. Changing the dimensions does not significantly alter the basic sewing process.
Fabric selection provides even more creative possibilities. Try floral quilting cotton with a solid lining for a traditional sewing-room look, bright prints for a cheerful organizer, or recycled denim for a sturdy and practical version. Patchwork panels can also turn small leftover fabrics into a completely unique quilted organizer bag.
Beginners can use this project to practice several important sewing skills, including accurate cutting, interfacing, strap construction, boxed corners, lining insertion, turning, and topstitching. These techniques provide an excellent foundation for progressing to larger bags and storage baskets.
When hanging the finished organizer from or near a sewing machine, placement matters. Make certain the bag and straps stay completely away from moving components, controls, ventilation openings, cords, and the needle area. If the machine’s design does not provide an appropriate safe hanging location, place the organizer on a nearby hook or craft station instead.
Functional, customizable, and scrap-friendly, the Organizer Bag Pattern is a satisfying addition to a handmade sewing space. Once you have completed the first one, the same construction method can easily be adapted into matching thread catchers, craft baskets, notion holders, and small storage bags for an organized and attractive workspace.