
The Patchwork Christmas Tree Block Pattern is a charming quilting project that brings together the warmth of traditional patchwork, the beauty of vintage fabrics, and the joyful spirit of Christmas. Featuring simple triangular Christmas trees surrounded by delicate floral prints, gingham patterns, and soft green fabrics, this design is perfect for creating a cozy holiday quilt. Its timeless appearance makes it especially appealing to quilters who enjoy classic country-style sewing projects and handmade Christmas decorations.
One of the most wonderful features of this Christmas Tree Quilt Block is its simple yet striking construction. Each tree is formed from a triangular piece of fabric, with a narrow rectangular trunk positioned underneath. The surrounding background fabrics create a beautiful contrast that highlights the Christmas tree silhouette. By using different combinations of muted greens, warm creams, burgundy reds, and traditional holiday prints, quilters can create individual blocks that feel unique while still belonging to a coordinated collection. This versatility makes the design suitable for both beginners and experienced quilting enthusiasts.
Creating a Patchwork Christmas Tree Quilt is also an excellent opportunity to use leftover fabric scraps from previous projects. Small pieces of cotton fabric can be transformed into beautiful miniature trees, making this pattern both economical and environmentally thoughtful. Whether you plan to assemble the blocks into a full Christmas quilt, a festive table runner, decorative pillow covers, or a holiday wall hanging, the finished project offers the satisfaction of creating something beautiful by hand. With basic sewing tools, accurate measurements, and a little creativity, you can reproduce this delightful Christmas tree design and enjoy it for many holiday seasons.
1. Materials and Fabric Selection for the Patchwork Christmas Tree Block
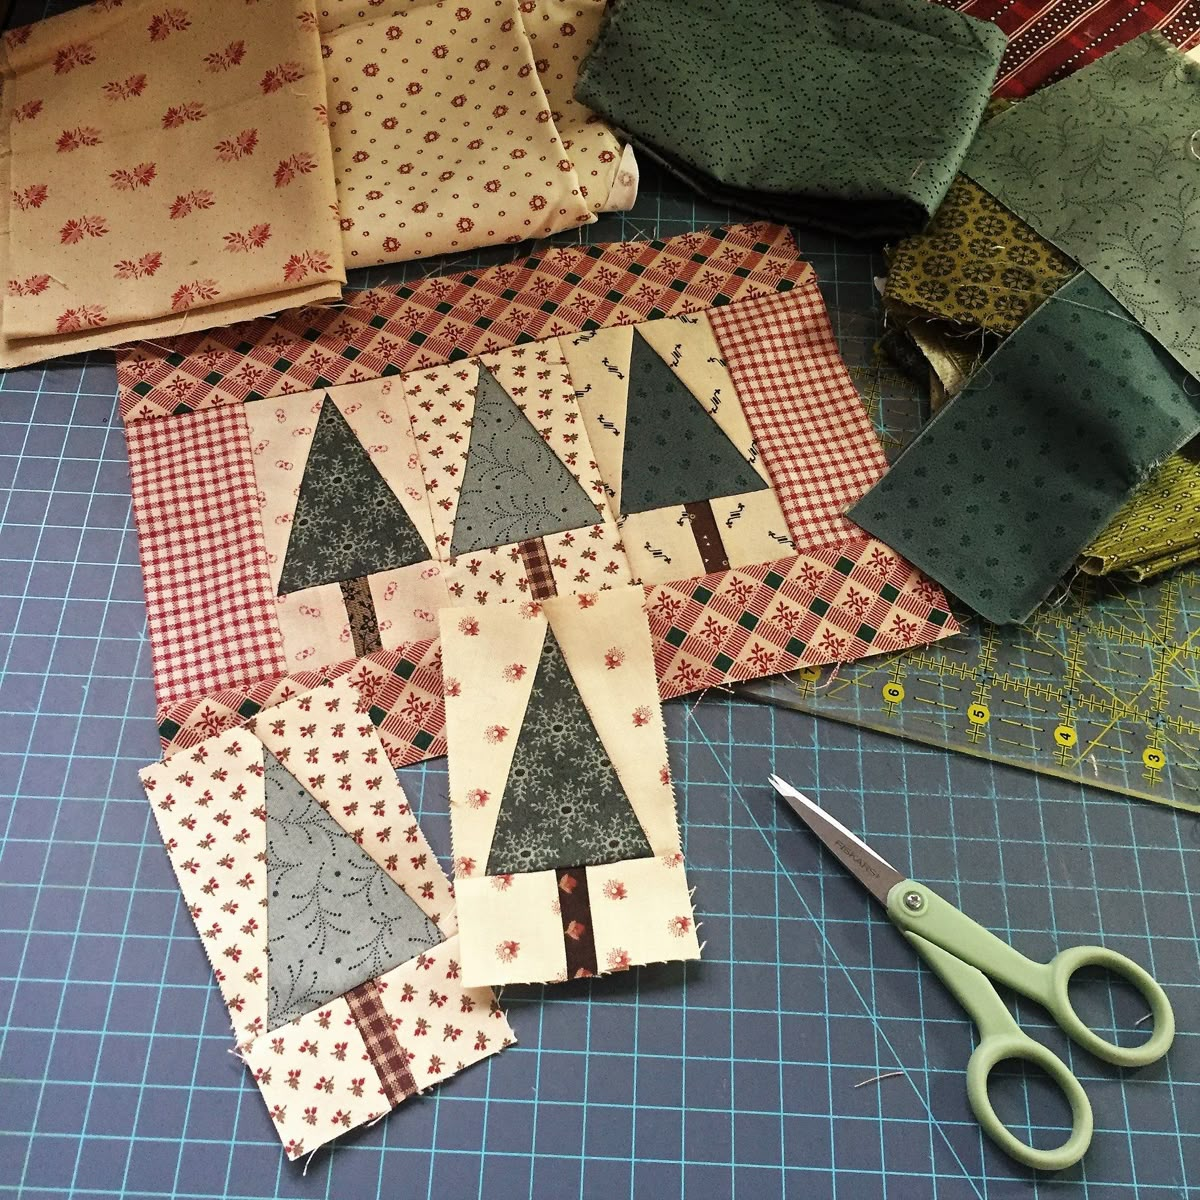
The first step in making a beautiful Patchwork Christmas Tree Block is choosing fabrics that complement the traditional holiday design. The image features an attractive combination of muted forest greens, warm cream backgrounds, soft red floral prints, and classic red-and-white gingham. These colors produce a nostalgic country-style appearance that works particularly well for Christmas quilts inspired by vintage patchwork traditions.
DISCOVER MORE FREE PATTERNS HERE!
For the best results, use 100% cotton quilting fabric. Cotton is easy to cut, press, and sew, making it an ideal material for precise patchwork construction. It also provides enough stability to maintain the triangular shape of the Christmas trees. Choose fabrics with small-scale prints, including delicate flowers, leaves, dots, and traditional holiday motifs. Smaller prints work especially well because the entire design remains visible within each tree.
For this tutorial, we will create a 20 × 25 cm (approximately 8 × 10 in) unfinished rectangular Christmas tree block, using traditional piecing techniques. The construction is an original, beginner-friendly interpretation inspired by the photograph, rather than an exact reconstruction of its unseen cutting instructions.
Materials needed:
-
Forest green cotton fabric for the Christmas tree.
-
Cream or beige cotton fabric for the background.
-
Dark brown or burgundy cotton fabric for the trunk.
-
Coordinating red floral, gingham, or Christmas-themed fabrics.
-
Cotton quilting thread in a neutral color.
-
Sewing machine with a quarter-inch presser foot.
-
Rotary cutter and self-healing cutting mat.
-
Quilting ruler and fabric scissors.
-
Straight pins or sewing clips.
-
Iron and ironing board.
-
Fabric marking pencil or washable marker.
-
Lightweight quilting batting if making a finished quilted project.
-
Backing fabric for the final quilt, pillow, or table runner.
An important consideration when choosing fabric is the contrast between the tree and its background. For example, a dark green triangle stands out beautifully against cream cotton, while a medium sage green tree creates a softer and more delicate appearance. You can also experiment with burgundy, olive green, muted gold, and dusty red to introduce variety without losing the traditional Christmas atmosphere.
Before cutting your fabric, press each piece carefully to remove wrinkles. If you normally prewash quilting cotton, wash all fabrics consistently to reduce differences in shrinkage. Organize the materials by color and prepare a small collection of coordinating prints for each tree. These simple preparations make the sewing process more efficient and help produce a cleaner, more professional Christmas patchwork block.
One of the greatest advantages of this pattern is that it requires relatively little fabric. Even a small collection of quilting scraps can provide enough material for several trees. When making multiple blocks, alternate the green fabrics and cream backgrounds to create visual variety. Repeating selected red and brown prints throughout the project will help unify the overall quilt design.
2. How to Cut and Sew the Christmas Tree Quilt Block
Constructing the Christmas Tree Quilt Block Pattern requires accurate cutting and careful alignment, but the basic technique is straightforward. The tree consists of a large triangular section made with green fabric and two contrasting cream background pieces. A narrow brown rectangle forms the trunk, while additional cream fabric completes the lower section. This method creates a recognizable Christmas tree silhouette without requiring complicated sewing techniques.
Begin by preparing the triangular tree section. Cut one green rectangle measuring approximately 15 × 17 cm (6 × 6¾ in). Mark the midpoint along the upper edge and draw two diagonal lines connecting this point to the bottom corners. Cut along these lines to create a symmetrical triangle. This will form the central tree shape, with a pointed top and wide base.
Next, prepare two cream background pieces large enough to cover the spaces on either side of the triangle. Cut two rectangles approximately 12 × 19 cm (4¾ × 7½ in) and divide each diagonally, choosing the triangles that align with the tree’s sloping sides. Because diagonal cuts create bias edges, handle these pieces gently to avoid stretching. Leave sufficient fabric for seam allowances and trimming after the pieces are joined.
Position one cream background triangle against a sloping side of the green tree, with the fabric right sides facing together. Match the diagonal edges carefully, allowing for the quarter-inch seam allowance. Pin the fabrics and sew slowly along the diagonal. Press the seam toward the darker fabric or open, according to your preference. Repeat the process on the opposite side, creating a rectangular unit with the green triangular tree centered between the cream background pieces.
Now prepare the Christmas tree trunk. Cut one brown rectangle measuring approximately 2.5 × 5 cm (1 × 2 in). Cut two cream rectangles approximately 8 × 5 cm (3⅛ × 2 in). Sew the cream pieces to opposite sides of the brown trunk using a consistent 6 mm (¼-inch) seam allowance. Press the seams carefully, ensuring that the trunk remains straight and centered. The completed lower section should resemble a narrow brown trunk surrounded by cream fabric.
Join the triangular tree section to the lower trunk section, aligning the trunk with the center of the tree’s base. Sew the two units together with right sides facing. Press the joining seam and inspect the completed shape. Add background strips around the design as needed, then trim the unit to a consistent size. To achieve the proposed 20 × 25 cm unfinished block, use the finished tree unit as the central motif and add coordinating fabric borders until it reaches the target dimensions.
Repeat these steps to make additional patchwork Christmas tree blocks. The photograph shows several tree units featuring slightly different shades of green and a variety of cream background prints. Reproducing this approach gives the quilt a charming scrappy appearance. For a balanced project, alternate dark green, sage green, olive green, and muted charcoal-green fabrics throughout your blocks.
3. Creative Ways to Arrange and Assemble Christmas Tree Quilt Blocks
After completing several Christmas Tree Patchwork Blocks, the next step is deciding how to arrange them. The individual tree units can be used in many ways, from small decorative accessories to full-sized bed quilts. Their simple geometric construction makes them easy to combine with traditional patchwork elements such as gingham borders, floral fabric strips, and contrasting sashing.
One attractive arrangement is to place three or four Christmas tree blocks in a horizontal row. Separate each block with narrow strips of red-and-cream gingham fabric. This creates a beautiful Christmas table runner that can decorate a dining table, sideboard, or kitchen counter. For added visual interest, alternate the tree fabrics so that each block features a slightly different shade of green.
Another option is to create a full Christmas Tree Patchwork Quilt by arranging the blocks in multiple rows and columns. For example, five blocks across and six rows down will create thirty individual Christmas trees. The final dimensions will depend on your chosen block size, sashing width, and borders. Using cream sashing creates a light, delicate appearance, while dark red or forest green sashing produces a stronger traditional Christmas color scheme.
The image also demonstrates how patterned fabric strips can frame the tree units. Red gingham provides a classic country-style contrast, while floral prints introduce softness and movement. To reproduce this look, cut border strips approximately 5 cm (2 in) wide and sew them around your assembled tree blocks. Press the seams carefully and trim the finished units so that all blocks remain uniform in size.
For a more decorative arrangement, combine Christmas tree blocks with simple patchwork squares, stars, or traditional nine-patch blocks. This creates variety and adds complexity without requiring every section to use advanced quilting techniques. A particularly attractive layout alternates Christmas tree blocks with small red-and-cream patchwork squares, creating a festive checkerboard effect across the quilt.
When assembling multiple blocks, lay them on a large flat surface before sewing. This allows you to evaluate the distribution of fabrics and adjust the placement of individual trees. Avoid grouping all the darkest greens together or placing identical background prints directly next to each other. A balanced arrangement of colors and patterns helps create a harmonious handmade Christmas quilt that feels thoughtfully designed.
Once the desired arrangement is complete, sew the blocks together in rows using a consistent quarter-inch seam allowance. Press adjoining seam allowances in opposite directions when possible, helping the intersections nest neatly. Join the rows carefully, matching seams and corners. Finally, add a coordinating outer border to frame the entire project and enhance its traditional holiday appearance.
4. Quilting, Finishing, and Decorating with the Christmas Tree Block Pattern
Once the quilt top is assembled, the final stage involves quilting and finishing your Patchwork Christmas Tree Quilt. This process adds texture, durability, and a professional appearance to the project. Whether you are making a small wall hanging or a larger bed quilt, the finishing techniques are similar and can be adapted according to your sewing experience.
Begin by preparing the quilt backing and batting. Cut both materials slightly larger than the assembled quilt top to provide enough room for quilting. Place the backing fabric right side down on a clean, flat surface. Smooth the batting over the backing, then position the quilt top right side up. Carefully remove wrinkles and secure the layers using quilting safety pins, temporary basting spray, or long hand-basting stitches.
For a traditional look, use straight-line quilting along the borders and surrounding the Christmas tree shapes. Stitching approximately 6 mm (¼ in) away from the tree outlines helps emphasize their geometric forms. You can also add diagonal quilting lines through the cream background areas, creating a subtle diamond pattern. These techniques are beginner-friendly and complement the simple structure of the blocks.
If you enjoy more decorative quilting, try adding free-motion quilting to the background fabrics. Gentle swirls, tiny leaves, or flowing curved lines can create the appearance of winter greenery around the Christmas trees. The small floral prints in the photograph are particularly well suited to delicate quilting motifs. Choose a thread color that blends with the background to create texture without distracting from the patchwork design.
After quilting, carefully trim the excess batting and backing fabric. Prepare binding strips from coordinating cotton, typically cut approximately 6.4 cm (2½ in) wide for double-fold binding. Join the strips diagonally and press them in half lengthwise. Attach the binding around the quilt edges, folding neatly at each corner. Finish by machine or hand stitching, ensuring that all raw edges are completely enclosed.
A finished Christmas Tree Quilt Block can also be transformed into smaller handmade decorations. One block makes a charming holiday pillow front, while several blocks joined in a vertical arrangement can become a beautiful wall hanging. Small tree blocks can be used to create placemats, fabric gift bags, or decorative seasonal panels. These projects are excellent ways to enjoy the pattern without committing to a large quilt.
Finally, consider adding personal finishing touches to make your project even more special. A small embroidered star above each tree, decorative hand-quilting stitches, or a fabric label on the back can transform a simple patchwork project into a treasured keepsake. Display the finished piece alongside wooden decorations, greenery, candles, and traditional Christmas ornaments to create a warm and inviting holiday atmosphere.
Frequently Asked Questions About the Patchwork Christmas Tree Block Pattern
Is the Patchwork Christmas Tree Block suitable for beginners?
Yes. This pattern is a great choice for beginners who understand basic sewing techniques. It primarily involves straight seams, triangular fabric pieces, and rectangular trunk sections. Accurate cutting and careful pressing will help achieve professional-looking results.
What size should a Christmas Tree Quilt Block be?
Christmas tree blocks can be made in many sizes. This tutorial uses an approximately 20 × 25 cm (8 × 10 in) unfinished rectangular block. You can resize the design for larger quilts or smaller decorative projects, provided the tree and background pieces are adjusted proportionally.
Can I make the Christmas trees with fabric scraps?
Absolutely! This scrappy Christmas Tree Quilt Pattern is an excellent way to use leftover quilting cotton. Small green scraps are perfect for the triangular trees, while cream and beige remnants can become the background pieces. Narrow brown scraps work beautifully for the trunks.
What are the best colors for a vintage Christmas quilt?
Traditional vintage Christmas quilts often feature muted forest green, sage green, burgundy, warm cream, dark brown, and soft red. Small floral prints, gingham checks, and reproduction-style cotton fabrics help create an authentic country-inspired appearance.
Can I make this Christmas Tree Block using foundation paper piecing?
Yes. Foundation paper piecing is an excellent alternative for creating accurate tree shapes and maintaining sharp triangular points. It can be especially helpful when making small blocks or working with narrow fabric pieces. Always use a properly scaled template designed for your chosen finished block size.
How many Christmas tree blocks are needed for a full quilt?
The number depends on the quilt size and block dimensions. A small lap quilt may require approximately 20–30 blocks, while a larger bed quilt may need considerably more. Sashing and borders also affect the final measurements, so calculate your layout before cutting all the fabric.
What fabric works best for Christmas tree quilt blocks?
High-quality 100% cotton quilting fabric is recommended because it is easy to sew, press, and cut accurately. Fabrics with small-scale patterns are especially attractive for this design because their details remain visible within the triangular shapes.
Can I use this pattern for Christmas pillows or table runners?
Yes. The pattern is extremely versatile. A single block can become a decorative pillow panel, while three or four blocks can create a festive table runner. You can also use individual blocks for wall hangings, placemats, and handmade Christmas gifts.
Conclusion
The Patchwork Christmas Tree Block Pattern is a beautiful combination of traditional quilting techniques, charming vintage fabrics, and timeless Christmas creativity. Its simple triangular tree shapes, warm cream backgrounds, and delicate green and red prints make it an appealing project for quilters who love classic holiday decorations. Each block offers an opportunity to experiment with fabric combinations while maintaining a cohesive festive design.
One of the most rewarding aspects of this DIY Christmas Tree Quilt Block is its versatility. Whether you use it to create a large Christmas quilt, a decorative table runner, a cozy pillow, or a handmade wall hanging, the pattern brings warmth and personality to any space. Its straightforward construction makes it accessible to beginners while still offering plenty of creative possibilities for experienced quilters.
By combining carefully selected fabrics, accurate cutting, and thoughtful finishing techniques, you can transform simple cotton scraps into a beautiful handmade Christmas patchwork project. The finished blocks capture the nostalgic charm of traditional quilting and provide a wonderful way to celebrate the holiday season through creativity, craftsmanship, and the joy of sewing.