
The Patchwork House Block Pattern is one of the most charming and timeless designs in the world of quilting. Featuring a cozy little house with a colorful roof, walls, windows, and a welcoming door, this traditional patchwork block brings warmth, creativity, and a wonderful handmade feeling to any quilting project. Whether you are creating a large quilt, a decorative pillow, or a beautiful wall hanging, the house block is an excellent choice.
One of the most attractive features of the Patchwork House Quilt Block is the opportunity to combine different fabric colors, prints, and textures. Floral cotton fabrics, vintage-inspired patterns, gingham prints, and colorful fabric scraps can all be used to create unique little houses. Each finished block can represent a different home, making this design especially meaningful for family quilts, housewarming gifts, and handmade decorations.
This Patchwork House Block Tutorial explains how to create a beautiful house design using traditional piecing and simple quilting techniques. The instructions include materials, fabric measurements, cutting directions, assembly steps, and professional finishing tips. The project is suitable for confident beginners and experienced quilters who enjoy transforming small pieces of fabric into beautiful, personalized patchwork creations.
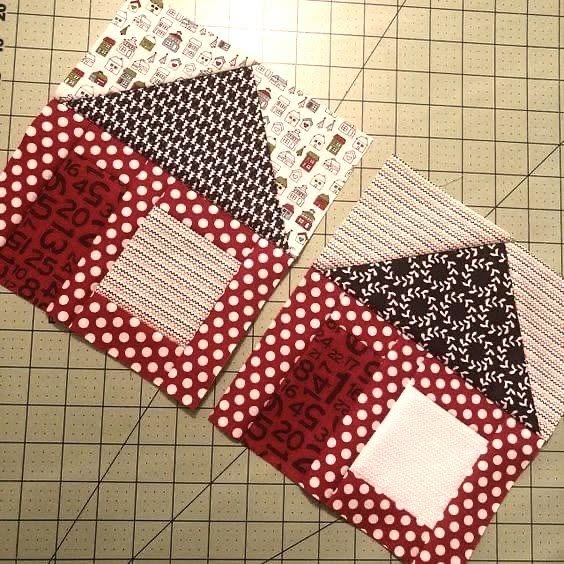
1. Materials, Fabric Selection, and Measurements
Before beginning your Patchwork House Block Pattern, choose the fabrics and prepare your sewing supplies.
DISCOVER MORE FREE PATTERNS HERE!
Cotton quilting fabric is recommended because it is easy to cut, sew, press, and combine with other materials.
For a traditional appearance, select a combination of warm colors, floral prints, and contrasting fabrics.
Materials Needed
- 100% cotton quilting fabric in several colors.
- Background fabric in cream, white, or light blue.
- Fabric for the house walls.
- Contrasting fabric for the roof.
- Fabric scraps for the door and windows.
- Rotary cutter.
- Quilting ruler.
- Self-healing cutting mat.
- Sewing machine.
- Matching cotton or polyester thread.
- Fabric scissors.
- Sewing pins or clips.
- Iron and ironing board.
- Optional lightweight fusible interfacing.
- Optional batting and backing fabric for a finished quilted project.
Recommended Fabric Colors
A beautiful Patchwork House Quilt Block can be created using:
- Cream and burgundy for a vintage farmhouse appearance.
- Light blue and white for a fresh cottage-inspired design.
- Emerald green and beige for an elegant country style.
- Red, pink, and floral prints for a romantic patchwork house.
- Mustard yellow and brown for an autumn-inspired block.
- Scrappy multicolored fabrics for a cheerful traditional quilt.
Choose fabrics with enough contrast to make the roof, walls, windows, and door clearly visible.
Finished Block Measurements
This tutorial creates one square house block.
| Measurement | Size |
|---|---|
| Finished block | 12 × 12 inches (30.5 × 30.5 cm) |
| Unfinished block | 12½ × 12½ inches (31.8 × 31.8 cm) |
| Finished house width | Approximately 8 inches (20.3 cm) |
| Finished house height | Approximately 8 inches (20.3 cm), including roof |
| Seam allowance | ¼ inch (0.6 cm) |
All cutting measurements include a ¼-inch seam allowance, unless otherwise indicated.
Fabric Cutting Guide
Cut the following pieces for one house block.
| Fabric Piece | Quantity | Cutting Size |
|---|---|---|
| Background – top strip | 1 | 12½ × 2½ inches |
| Background – side strips | 2 | 2¼ × 8½ inches |
| Background – roof corner squares | 2 | 4½ × 4½ inches |
| Background – bottom strip | 1 | 12½ × 2½ inches |
| Roof fabric – rectangle | 1 | 8½ × 4½ inches |
| House walls – upper strip | 1 | 8½ × 2½ inches |
| House walls – middle sections | 2 | 2½ × 2½ inches |
| House walls – lower sections | 2 | 3½ × 2½ inches |
| Window fabric | 2 | 2½ × 2½ inches |
| Door fabric | 1 | 2½ × 4½ inches |
The cutting layout uses a simple pieced roof and rectangular house body, making it easy to reproduce.
The roof corner squares will be used to create angled roof sections with the stitch-and-flip technique.
Prepare the Fabrics
Press all fabrics before cutting.
Use a quilting ruler and rotary cutter to create accurate straight edges.
Separate the pieces into groups for the roof, house walls, windows, door, and background.
Accurate cutting is essential for keeping the finished block square.
2. How to Make the Patchwork House Roof and Windows
The roof is one of the most recognizable features of a Patchwork House Block.
A contrasting roof fabric creates a beautiful silhouette and helps the little house stand out against the background.
The following steps use a traditional stitch-and-flip technique to create angled roof corners.
Step 1: Prepare the Roof Rectangle
Place the 8½ × 4½-inch roof rectangle on your work surface with the right side facing up.
Choose a roof fabric that contrasts with the background.
Red, burgundy, dark green, and navy blue are excellent choices.
Step 2: Mark the Roof Corners
Take the two 4½ × 4½-inch background squares.
On the wrong side of each square, draw a diagonal line from one corner to the opposite corner.
Use a removable fabric marking pencil.
These diagonal lines will guide the sewing.
Step 3: Create the Left Roof Angle
Place one background square right sides together over the left end of the roof rectangle.
Align the square with the left and top edges.
Sew directly along the marked diagonal line, running from the upper-left corner of the square to its lower-right corner.
Trim the excess fabric approximately ¼ inch beyond the seam on the corner side.
Press the background triangle outward.
Step 4: Create the Right Roof Angle
Place the second background square over the right end of the roof rectangle.
Align it with the top and right edges.
Sew along the opposite diagonal, running from the lower-left corner of the square to its upper-right corner.
Trim the excess corner fabric, leaving a ¼-inch seam allowance.
Press the background triangle outward.
The roof unit should still measure 8½ × 4½ inches.
You now have a pitched-roof shape with two background corners.
Step 5: Prepare the Window Pieces
Take the two 2½ × 2½-inch window squares.
Choose a contrasting fabric such as pale blue, cream, or soft yellow.
Small geometric prints can create the appearance of decorative windowpanes.
For additional detail, sew narrow fabric strips or use decorative stitching to create window frames.
Step 6: Create the Window Row
Arrange the following pieces from left to right:
House wall section – window – house wall section – window.
However, for this particular cutting layout, the window row is assembled as two identical pairs:
2½-inch wall square + 2½-inch window square.
Sew each pair using a ¼-inch seam allowance.
Press the seams toward the darker fabric.
Each pair should measure 4½ × 2½ inches.
Join the two pairs together.
The completed row should measure 8½ × 2½ inches.
This creates a simple arrangement with two contrasting window sections.
3. Step-by-Step Assembly of the Patchwork House Block
Once the roof and window sections are prepared, you can begin assembling the main house.
The construction uses horizontal rows that are sewn together to form a complete patchwork unit.
Working carefully at this stage will help maintain accurate measurements.
Step 1: Prepare the Upper Wall
Take the 8½ × 2½-inch upper wall strip.
Place it above the window row.
Align the raw edges.
Sew the two pieces together using a ¼-inch seam allowance.
Press the seam toward the upper wall strip.
The combined unit should measure 8½ × 4½ inches.
Step 2: Create the Door Row
Take the two 3½ × 2½-inch lower wall sections.
Place the 2½ × 4½-inch door fabric between them.
The door is taller than the wall sections, so the lower section must be assembled in two stages.
First, cut an additional 2½ × 2½-inch piece from the same wall fabric for the space directly above the door.
Sew this square to the top of the door rectangle.
The resulting door unit measures 2½ × 6½ inches.
To keep the construction simple and the finished block accurately sized, use the door as an appliqué instead of inserting this taller unit into the lower row.
Set the pieced door unit aside for another project if already assembled.
Step 3: Assemble the Lower Wall
Sew the two 3½ × 2½-inch wall rectangles together with an additional 2½ × 2½-inch wall square between them.
This produces an 8½ × 2½-inch lower wall row.
Press the seams carefully.
For the door detail, cut a new fabric rectangle measuring 2½ × 3½ inches.
Position this rectangle centrally on the lower portion of the house.
Step 4: Attach the Door Appliqué
Turn under the door rectangle’s side and top edges by approximately ¼ inch.
Position the door on the lower wall area, with its bottom edge aligned near the bottom of the house.
Secure it using pins or a small amount of fabric-safe temporary adhesive.
Stitch around the visible sides and top with a narrow straight stitch.
Alternatively, use fusible appliqué with a blanket stitch around the edges.
Step 5: Join the House Rows
Arrange the upper wall and window unit above the lower wall row.
Sew the rows together with a ¼-inch seam allowance.
Press the seam.
The assembled house body measures approximately 8½ × 6½ inches.
Step 6: Attach the Roof
Place the completed roof unit above the house body.
Align the side edges carefully.
Sew the roof to the house body.
Press the seam toward the roof.
The combined house unit measures 8½ × 10½ inches.
Step 7: Add the Side Background
The original side strips measure 2¼ × 8½ inches and are intended for a shorter house body.
For this taller version, cut two replacement background strips measuring 2½ × 10½ inches.
Sew one strip to each side of the house.
Press the seams toward the background.
The unit should now measure 12½ × 10½ inches.
Step 8: Finish the Square Block
To achieve the planned 12½-inch unfinished square, add two background strips measuring 12½ × 1½ inches, one at the top and one at the bottom.
These replace the larger top and bottom strips in the initial cutting guide.
Sew the strips in place with a ¼-inch seam allowance.
Press carefully.
The finished unfinished block should measure 12½ × 12½ inches.
After the block is joined into a quilt with ¼-inch seams, the visible finished size will be 12 × 12 inches.
Step 9: Square the Block
Place the block on a cutting mat.
Use a 12½-inch square quilting ruler.
Check that all corners form right angles.
Trim only small irregularities if necessary.
Avoid removing excessive fabric, which could affect the seam allowances.
Your Patchwork House Quilt Block is now ready for quilting or joining with other blocks.
4. Quilting, Finishing, and Creative House Block Project Ideas
A completed Patchwork House Block Pattern can be used in many different quilting projects.
The design is particularly attractive when several houses are combined into a colorful neighborhood quilt.
You can also create individual blocks for pillows, wall hangings, table decorations, and personalized handmade gifts.
How to Quilt the House Block
Place the finished patchwork block on top of a piece of quilt batting.
Add a backing fabric underneath.
Make sure the batting and backing are slightly larger than the quilt top.
Smooth the layers carefully.
Secure them using quilting pins or temporary basting spray.
Straight-Line Quilting
Straight-line quilting is an excellent option for beginners.
Sew parallel lines across the background.
Follow the roof seams to emphasize the house shape.
You can also quilt around the windows and door.
This technique adds texture while keeping the design simple.
Free-Motion Quilting
For a more decorative finish, use free-motion quilting.
Create small swirls or cloud shapes in the background.
Add curved quilting lines across the roof.
Quilt around the windows to emphasize their outlines.
Use contrasting thread for a more noticeable decorative effect.
Patchwork House Quilt
Create multiple house blocks using different fabric combinations.
Arrange the blocks in rows.
Use background sashing between them to create the appearance of a neighborhood.
For example, a quilt containing 4 rows of 3 house blocks will have 12 houses.
Each block can feature a different roof color, door fabric, and window arrangement.
Decorative House Pillow
A single 12-inch finished house block can become the centerpiece of a decorative pillow.
Add fabric borders to increase the size.
For a 16-inch finished pillow front, add 2½-inch-wide unfinished borders around the 12½-inch block.
Quilt the front panel and sew it to a matching pillow backing.
Insert a pillow form and close the opening.
This creates a lovely handmade accent for a sofa, chair, or bedroom.
Housewarming Gift
A Patchwork House Quilt Block makes a meaningful housewarming gift.
Choose colors that match the recipient’s home.
Add an embroidered family name or date.
Frame the finished quilted block or turn it into a decorative wall hanging.
The house motif represents warmth, comfort, and belonging.
Christmas Village Quilt
Use red, green, cream, and gold fabrics to create a festive village.
Add small embroidered snowflakes around the houses.
Choose white background fabric to resemble a snowy winter landscape.
This variation is especially beautiful for seasonal wall hangings and Christmas quilts.
Vintage Cottage Quilt
For a traditional cottage-inspired design, use floral prints, gingham fabrics, and soft pastel colors.
Combine dusty rose, sage green, cream, and pale blue.
Use different fabrics for each roof.
This creates a charming vintage-style quilt with a soft, romantic appearance.
Professional Quilting Tips
Maintain accurate seam allowances. A consistent ¼-inch seam helps the pieces fit together.
Press after every seam. Proper pressing keeps the block flat.
Use contrasting fabrics. The house details should remain visible against the background.
Measure each completed section. Checking dimensions early prevents assembly problems.
Choose coordinating prints. Small floral patterns and geometric fabrics work beautifully together.
Avoid stretching bias edges. Handle the roof corners gently after sewing.
Use a sharp rotary cutter. Clean fabric cuts improve accuracy.
Make a test block first. A sample helps you evaluate your fabric choices and cutting measurements.
Frequently Asked Questions About the Patchwork House Block Pattern
Is the Patchwork House Block suitable for beginners?
Yes. This project is suitable for confident beginners who understand basic sewing machine techniques and accurate cutting.
The roof uses a simple stitch-and-flip method, while the house body is assembled with straight seams.
What is the finished size of the house block?
The finished block measures approximately 12 × 12 inches (30.5 × 30.5 cm).
Before joining it to other blocks, it measures 12½ × 12½ inches.
Can I use fabric scraps?
Absolutely.
This is an excellent scrap-friendly quilting project.
Small pieces of leftover fabric can be used for windows, doors, roofs, and decorative details.
What fabric works best?
100% cotton quilting fabric is recommended.
It is easy to sew, press, and combine with other quilting fabrics.
Can I make a larger house block?
Yes.
You can enlarge the pattern by increasing the measurements of each component proportionally.
Remember to keep the seam allowances consistent.
Can I make a quilt using different house blocks?
Yes.
Combining houses with different roof colors, doors, and window fabrics creates a beautiful neighborhood-style quilt.
Do I need a special sewing machine?
No.
A regular sewing machine with a straight stitch is sufficient.
A ¼-inch presser foot is helpful but not essential.
Can I add embroidery to the house?
Yes.
You can embroider flowers, curtains, door handles, house numbers, or small decorative details.
Embroidery makes each house unique.
Can I sell finished projects made with this pattern?
You can generally sell handmade projects created from this original tutorial, subject to applicable local rules.
Patchwork house pillows, wall hangings, and quilts are attractive handmade gift items.
Conclusion
The Patchwork House Block Pattern is a beautiful quilting project that combines traditional patchwork techniques with endless creative possibilities.
With carefully selected fabrics, accurate cutting, and simple sewing methods, you can create a charming house block featuring a colorful roof, decorative windows, and a welcoming door.
The design is perfect for scrap quilting, vintage-inspired projects, seasonal decorations, and meaningful handmade gifts.
Whether you choose traditional farmhouse colors, cheerful floral prints, or sophisticated modern fabrics, each house block becomes a unique expression of your creativity.
Gather your favorite cotton fabrics, prepare your sewing machine, and enjoy creating a collection of beautiful Patchwork House Quilt Blocks that will bring warmth, color, and handmade charm to your quilting projects.