
Patchwork Owl Pattern is a beautiful sewing project that combines traditional patchwork charm with the personality of a handmade fabric owl. This design is especially appealing because it can be created with small pieces of coordinating cotton fabric, making it an excellent project for using treasured scraps left over from previous quilting projects. The finished owl features a rounded body, pointed ears, oversized sleepy eyes, contrasting wings, a small beak, and dimensional feet. With the measurements suggested in this tutorial, the finished project will be approximately 15 inches (38 cm) tall and 13.8 inches (35 cm) wide, although the pattern can easily be enlarged or reduced.
One of the most enjoyable aspects of this Patchwork Owl Pattern is choosing the fabrics. Floral cotton, gingham, polka dots, small geometric prints, and traditional quilting fabrics can all work beautifully together. The owl shown in the inspiration uses a combination of teal, cream, purple, and mustard tones, creating a colorful but balanced appearance. You do not need to reproduce those exact colors. In fact, using fabrics from your own scrap collection is one of the easiest ways to make every owl completely unique.
This project is suitable for confident beginners and intermediate sewists because it introduces several useful techniques without requiring complicated construction. You will practice fabric cutting, appliqué, curved sewing, blanket stitching, topstitching, stuffing, clipping seam allowances, and invisible hand sewing. The project can be completed as a stuffed decorative owl, but the same basic pieces can also be adapted for a quilt block, wall hanging, cushion front, or seasonal decoration.
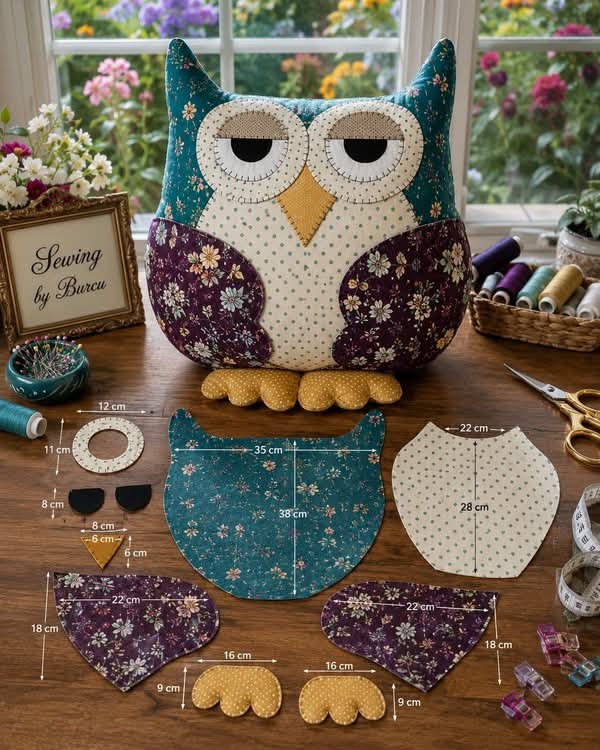
Materials, Measurements, and Cutting the Patchwork Owl
Begin your Patchwork Owl Pattern by selecting quilting-weight cotton fabrics. You will need approximately one fat quarter for the main body and smaller pieces for the belly, wings, eyes, beak, and feet. Cotton is recommended because it is easy to cut accurately, holds pressed shapes well, and is stable enough for detailed appliqué work.
DISCOVER MORE FREE PATTERNS HERE!
For the main body, prepare a symmetrical owl template approximately 35 cm (13.8 inches) wide and 38 cm (15 inches) tall. The top should include two pointed ear shapes, while the sides should curve outward gently before narrowing toward the lower portion. Cut two identical body pieces, one for the front and one for the back.
Create the central belly piece approximately 22 cm (8.7 inches) wide and 28 cm (11 inches) tall. This piece should have a rounded upper section and taper slightly toward the bottom. Cut one belly piece from a lighter fabric so it contrasts clearly against the main body. A cream fabric with tiny dots or subtle flowers works particularly well.
Next, cut two mirrored wing pieces. Each wing should measure approximately 22 cm (8.7 inches) wide by 18 cm (7.1 inches) tall at its widest points. Give the outer edge a smooth rounded shape. Floral fabrics are particularly attractive for the wings because they introduce another layer of color without overwhelming the owl’s face.
For the feet, cut shapes approximately 16 cm (6.3 inches) wide by 9 cm (3.5 inches) tall. Each foot can have three softly rounded toes. If you want flat appliqué feet, cut one piece for each foot. For dimensional stuffed feet, cut two matching pieces for each foot, giving you four foot pieces altogether.
Before cutting, remember that pieces being sewn right sides together need a seam allowance. A 1/4-inch (6 mm) seam allowance works well for this project. Appliqué pieces can be cut directly to their finished dimensions when using fusible web and decorative stitching around their raw edges.
Making the Owl Face, Eyes, Wings, and Appliqué Details
The face is what gives this Patchwork Owl Pattern its distinctive personality. Start with two large circular eye pieces approximately 12 cm (4.7 inches) in diameter. Cut both circles from the same cream or lightly patterned fabric to maintain symmetry.
Cut two black or dark-colored half-circle eyelids approximately 8 cm (3.1 inches) wide. Position each dark piece across the lower or middle portion of an eye circle. Slightly changing the angle of these eyelids can completely alter the owl’s expression, so arrange them before sewing.
For the beak, cut a small diamond or elongated triangle approximately 6 cm × 6 cm (2.4 × 2.4 inches). Mustard yellow, orange, or gold fabric creates a traditional owl appearance. The lower point of the beak should face downward between the two eyes.
Place the front body piece flat on your work surface and mark its vertical center lightly with a removable fabric marker. Position the central belly first. Place the wings symmetrically on either side, followed by the eyes and beak. Spend some time adjusting the arrangement before attaching anything permanently.
Lightweight fusible web can make the appliqué process considerably easier. Apply it to the wrong side of the belly, wings, eyes, eyelids, and beak according to the product instructions. Remove the paper backing, position each component, and press carefully. Always test your iron temperature on a scrap first.
Secure the appliqué pieces with a narrow zigzag stitch or decorative blanket stitch. Blanket stitching gives the owl a charming handmade appearance, especially around the large circular eyes. Work slowly around curves and keep the stitch width consistent. Contrasting thread can emphasize the patchwork character, while matching thread creates a more subtle finish.
Sewing and Assembling the Patchwork Owl Pattern
Once all appliqué components are attached, inspect the front carefully. Make sure both wings are positioned at similar heights and that the eyes appear balanced. It is much easier to correct appliqué details now than after the owl has been assembled and stuffed.
If you are creating dimensional feet, place two matching foot pieces right sides together. Sew around the curved toe section using a 1/4-inch (6 mm) seam allowance, leaving the straight upper edge open. Carefully clip between the toes without cutting through the stitching.
Turn each foot right side out and gently push the rounded toes into shape using a blunt turning tool. Add a very small quantity of polyester fiberfill if you want the feet to appear padded. Avoid overfilling because bulky feet can make final assembly difficult.
Position both completed feet along the bottom of the owl’s front body. The toes should point upward toward the owl temporarily because the feet will be enclosed between the front and back during sewing. Align the raw upper edges of the feet with the raw bottom edge of the body and baste them securely.
Place the back body piece over the decorated front with right sides together. Match the ear points and curved sides carefully. Pin or clip around the entire perimeter, making sure the feet remain safely inside. Sew around the body using approximately a 1/4-inch (6 mm) seam allowance, but leave an opening approximately 3 inches (7.5 cm) wide near the bottom.
Before turning, trim excess fabric around the ear tips and clip small notches along curved areas. These tiny adjustments help the finished body lie smoothly. Do not cut through the stitching. Turn the owl right side out through the opening and carefully push out the ears and curved edges.
Stuffing, Finishing, and Customizing Your Owl
Begin stuffing the ears first. Use small pieces of polyester fiberfill and push them gently into each point. Once the ears are shaped, gradually fill the head and body. Working with small amounts of stuffing produces a smoother result than inserting large handfuls.
Continue adding fiberfill until the owl feels comfortably firm but still soft. Check the shape frequently from the front and side. Add extra filling to any hollow areas, especially around the shoulders, lower body, and corners near the ears.
Once you are satisfied with the shape, fold the raw edges of the turning opening approximately 1/4 inch (6 mm) toward the inside. Pin the opening closed and sew it using a small ladder stitch. Pull the thread gently after every few stitches so the opening becomes almost invisible.
You can personalize the Patchwork Owl Pattern with embroidery, decorative buttons, ribbons, bows, small fabric flowers, or additional quilting stitches. If the owl will be accessible to babies or very young children, avoid buttons, beads, and other small detachable decorations. Embroidered details are a better choice in those situations.
Color selection can completely transform this project. Try burgundy, forest green, cream, and gold for a Christmas owl. Soft pink, lavender, mint, and white can create a nursery version. Brown, beige, rust, and mustard will give the owl a woodland-inspired appearance. Bright rainbow scraps are ideal for a cheerful sewing-room decoration.
The same Patchwork Owl Pattern can also become a flat quilting project. Instead of sewing and stuffing a back body, appliqué the complete owl onto a larger background square. Add batting and backing, quilt around the body and decorative elements, and finish with binding. This version can become a wall hanging, table decoration, pillow front, or centerpiece for a larger quilt.
FAQ About the Patchwork Owl Pattern
What is the finished size of the Patchwork Owl Pattern?
Using the measurements described in this tutorial, the owl will be approximately 38 cm (15 inches) tall and 35 cm (13.8 inches) wide. The exact finished size can vary slightly depending on seam allowance and stuffing.
What fabric works best for this project?
Quilting-weight cotton is an excellent choice. It is stable, easy to sew, available in countless prints, and works particularly well for appliqué.
Can I use fabric scraps?
Yes. This project is perfect for using leftover quilting cotton because most decorative components require relatively small pieces.
How much fabric do I need?
Approximately one fat quarter should comfortably provide the main body pieces, depending on your fabric width and template placement. The remaining elements can usually be cut from smaller scraps.
What seam allowance should I use?
A 1/4-inch or approximately 6 mm seam allowance is suitable for the body, feet, and other pieces that are sewn right sides together.
What size are the wings?
Each wing is approximately 22 × 18 cm (8.7 × 7.1 inches).
How large is the central belly?
The suggested belly measurement is approximately 22 × 28 cm (8.7 × 11 inches).
How large should the eyes be?
Each main eye circle can measure approximately 12 cm (4.7 inches) in diameter.
What size should I make the beak?
A beak approximately 6 × 6 cm (2.4 × 2.4 inches) works well with the suggested body size.
What are the approximate foot measurements?
Each foot can measure approximately 16 × 9 cm (6.3 × 3.5 inches).
Do I need fusible web?
It is optional, but highly useful. Fusible web keeps appliqué pieces from moving while you sew around them.
Which stitch is best for the appliqué?
A decorative blanket stitch creates a traditional handmade appearance. A narrow zigzag stitch is another excellent choice.
Can the owl be sewn completely by hand?
Yes, although the project will take longer. Use small backstitches for structural seams and blanket stitches for appliqué.
Can I enlarge the pattern?
Yes. Increase every template piece by the same percentage. Maintaining proportional scaling is important so the eyes, wings, feet, and body continue to fit together correctly.
Can I make a miniature version?
Certainly. Reduce all pieces proportionally. Keep in mind that very small curves and ear points become more difficult to turn.
What should I use for stuffing?
Polyester fiberfill is convenient because it is lightweight and easy to distribute evenly.
How do I prevent lumps when stuffing?
Use small portions of fiberfill and distribute them gradually. Massage the body gently while filling it to smooth uneven areas.
Why do the ears need to be trimmed before turning?
Excess seam allowance can collect inside pointed areas and prevent sharp ear tips. Carefully trimming the seam allowance reduces bulk.
Can this pattern become a pillow?
Yes. Simply enlarge the body pieces and add additional stuffing. You can also install a zipper in the back if you want a removable pillow insert.
Is this project suitable for beginners?
A beginner with basic sewing-machine experience should be able to complete it. The most important skills are sewing curves, making appliqués, turning small pieces, and closing the stuffing opening neatly.
Can I turn this into a quilt block?
Yes. Assemble the owl as a flat appliqué design on a background fabric instead of stuffing it. Add batting, backing, quilting, and binding to create a decorative quilt panel.
Conclusion
The Patchwork Owl Pattern is a creative way to transform simple cotton fabrics and leftover quilting scraps into an attractive handmade decoration. Throughout this project, you learn how to plan the body proportions, prepare appliqué pieces, create expressive eyes, construct dimensional feet, and assemble a softly stuffed owl.
The suggested measurements provide a practical starting point: approximately 35 × 38 cm for the main body, 22 × 28 cm for the central belly, 22 × 18 cm for each wing, 12 cm for each eye circle, and 16 × 9 cm for each foot. These measurements can be scaled proportionally whenever you want a different finished size.
The decorative stage is where this project becomes especially enjoyable. Combining floral fabrics, contrasting prints, blanket stitching, appliqué, and carefully coordinated colors allows every owl to develop its own personality. No two versions need to look exactly alike.
Careful construction is equally important. Accurate cutting, a consistent 1/4-inch seam allowance, clipping curved seams, trimming the ear points, gradual stuffing, and a neat ladder-stitch closure will help produce a professional-looking finished project.
You can use the completed Patchwork Owl Pattern as home décor, a sewing-room ornament, a decorative pillow, a seasonal decoration, or inspiration for a larger quilted project. Changing only the fabrics can take the same design from rustic and traditional to bright, modern, romantic, or festive.
I hope this tutorial inspires you to create your own fabric owl and experiment with the scraps already waiting in your sewing collection. After completing your Patchwork Owl Pattern, leave your sincere opinion about the project and share your suggestions for different colors, fabrics, sizes, or other patchwork animals you would like to see in future tutorials.