
The Pincushion Costume Pattern is a creative and colorful sewing project that transforms a traditional sewing accessory into an adorable wearable costume. Inspired by the reference image, this design features a large, rounded red pincushion skirt, decorative green fabric leaves, oversized colorful sewing pins, and a yellow measuring tape accessory. The result is a playful costume that celebrates sewing, quilting, and handmade creativity.
One of the most charming features of this DIY Pincushion Costume is its combination of recognizable sewing elements and whimsical costume design. The voluminous red skirt resembles a giant tomato-style pincushion, while the green leaves add a strawberry-inspired appearance. Brightly colored decorative pins create an eye-catching effect, making the costume ideal for Halloween celebrations, school costume events, sewing-themed parties, and creative family activities.
Making a Pincushion Costume Pattern is also an excellent opportunity to practice basic sewing techniques, gathering fabric, creating a comfortable waistband, working with lightweight batting, and constructing dimensional costume accessories. Although the finished costume looks elaborate, it can be created with beginner-friendly techniques and materials commonly found in sewing and quilting supplies.
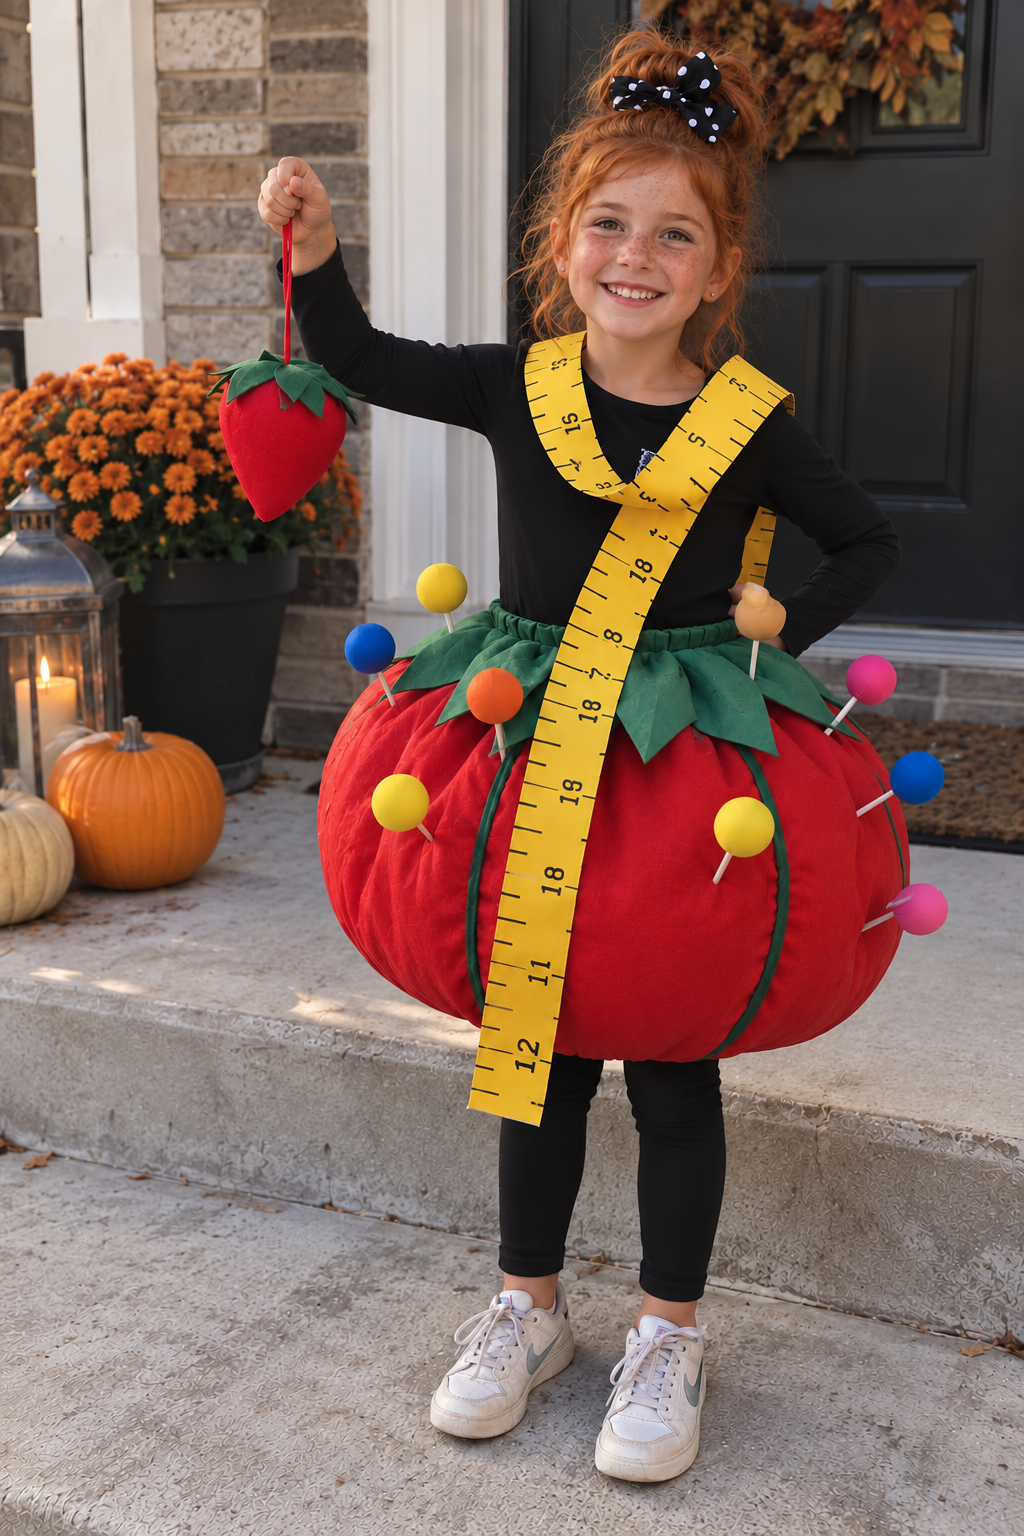
This tutorial explains how to make a fabric pincushion costume, including measurements, fabric cutting, skirt construction, decorative leaves, soft imitation pins, a measuring tape sash, and a matching strawberry-shaped accessory. The sample is designed for a child, but the same construction principles can be adapted for different sizes.
DISCOVER MORE FREE PATTERNS HERE!
Materials, Measurements, and Fabric Preparation for the Pincushion Costume Pattern
Before beginning the Pincushion Costume Pattern, select fabrics that are comfortable, lightweight, and easy to sew.
The red fabric forms the main body of the costume. Quilting cotton works well, although lightweight poplin or cotton blends can also be used.
For the green leaves, choose cotton fabric or soft felt. These materials are easy to cut into decorative shapes and can be attached around the waistband.
The rounded pincushion silhouette is created with a gathered outer skirt and a separate padded understructure. This approach provides volume without requiring the child to wear a heavy or excessively stuffed garment.
Materials needed
- 2–2½ yards (1.8–2.3 m) of red cotton fabric, depending on the child’s size and desired fullness.
- ½ yard (45 cm) of green cotton fabric or soft felt.
- ½ yard (45 cm) of yellow cotton fabric for the measuring tape accessory.
- 1 yard (90 cm) of lightweight lining fabric.
- 1–1½ yards (0.9–1.4 m) of lightweight polyester batting.
- Lightweight polyester fiberfill for decorative accessories.
- ¾-inch (2 cm) wide elastic for the waistband.
- Coordinating red, green, and yellow sewing thread.
- Small pieces of colorful felt for decorative pinheads.
- Soft foam balls or fabric-covered stuffing for oversized imitation pins.
- Flexible foam tubing or soft fabric tubes for imitation pin shafts.
- Fabric scissors.
- Measuring tape.
- Sewing machine.
- Hand-sewing needle.
- Fabric clips or sewing pins for construction.
- Fabric marker or tailor’s chalk.
- Iron and ironing board.
- Optional lightweight interfacing.
- Optional hook-and-loop tape for removable decorations.
Safety note: The oversized pins must be soft costume decorations, not real pins, skewers, wire, or sharp rods. Use securely sewn, lightweight components. Avoid detachable small parts, and ensure the costume does not interfere with walking, sitting, or visibility.
Suggested costume measurements
The following measurements are for a sample child with a waist circumference of approximately 24 inches (61 cm).
| Costume Component | Suggested Measurement |
|---|---|
| Child’s Waist | 24 in (61 cm) |
| Elastic Length | Approximately 23 in (58.5 cm), adjusted for comfort and overlap |
| Finished Skirt Length | 17 in (43 cm) |
| Outer Skirt Fabric Width | 72 in (183 cm) total |
| Outer Skirt Cutting Height | 20 in (51 cm) |
| Green Leaf Length | 6–8 in (15–20 cm) |
| Green Leaf Width | 4–5 in (10–13 cm) |
| Decorative Pinhead Diameter | 2–2½ in (5–6.5 cm) |
| Soft Decorative Pin Shaft | 4–6 in (10–15 cm) |
| Measuring Tape Sash Width | 3½–4 in (9–10 cm) |
| Sewing Seam Allowance | ½ in (1.3 cm), unless stated otherwise |
These measurements are starting points. Measure the child before cutting the fabric, especially the waist, hip circumference, and desired skirt length.
For a larger or smaller costume, adjust the skirt width and length proportionally.
Recommended fabric colors
| Component | Color | Purpose |
|---|---|---|
| Main Skirt | Bright Red | Pincushion Body |
| Decorative Leaves | Forest Green | Strawberry-Inspired Top |
| Measuring Tape | Golden Yellow | Sewing-Themed Accessory |
| Measurement Markings | Black | Printed Ruler Effect |
| Decorative Pinheads | Blue, Pink, Orange, Yellow | Colorful Details |
| Base Clothing | Black | Visual Contrast |
The red, green, and yellow combination closely reflects the costume in the reference image.
Step-by-Step Pincushion Costume Pattern: Creating the Rounded Fabric Skirt
The most important part of the Pincushion Costume Pattern is the oversized rounded skirt.
This section creates the main pincushion shape using a gathered red fabric shell and a lightweight padded underskirt.
The costume should appear full and rounded while remaining comfortable enough for movement.
Step 1: Measure and prepare the fabric
Measure the child’s waist and desired skirt length.
For the sample size, prepare a red fabric panel measuring approximately 72 inches wide by 20 inches high.
The panel may be made from two 36-inch-wide sections sewn together.
If joining sections, use a ½-inch seam allowance.
Press the seams open.
Step 2: Sew the outer skirt seam
Fold the red fabric panel with the right sides facing.
Align the short ends.
Sew the side seam using a ½-inch seam allowance.
Finish the raw edges with a zigzag stitch or serger.
Press the seam.
You now have a wide fabric tube.
Step 3: Create the waistband casing
Fold the upper edge toward the wrong side by ¼ inch.
Press.
Fold again by approximately 1¼ inches.
Stitch close to the lower folded edge, leaving a 2-inch opening for inserting elastic.
Keep the casing smooth.
Do not sew through both sides of the casing accidentally.
Step 4: Gather the lower edge
Sew two rows of long gathering stitches around the lower edge of the red skirt.
Do not backstitch.
Leave long thread tails.
Gently pull the gathering threads to reduce the lower circumference.
For a rounded shape, gather the hem toward a circumference of approximately 42–48 inches (107–122 cm).
Distribute the gathers evenly.
Step 5: Prepare the padded understructure
Cut a lightweight lining skirt approximately 42–48 inches wide and 17 inches long, adjusting the dimensions to match the gathered outer skirt.
Sew the lining into a tube.
Hem the lower edge.
Prepare a separate lightweight batting layer or several soft tulle layers to provide volume.
The batting should sit between the red outer shell and the lining rather than directly against the child’s skin.
Avoid creating a tightly stuffed skirt.
Step 6: Assemble the rounded silhouette
Position the lining inside the red outer skirt.
Match the lower edges.
Sew the gathered red edge to the lining hem area, enclosing the padding between the layers.
Keep the bottom opening wide enough for walking.
Distribute the batting evenly around the sides.
Secure the padding with a few hidden hand stitches.
The finished skirt should form a soft, rounded silhouette rather than a rigid ball.
Important: The child’s legs must remain free to move. The padded structure should not pull the hem inward so tightly that it restricts walking or sitting.
How to Make the Green Leaves, Decorative Pins, and Measuring Tape Sash
The decorative details transform the rounded red skirt into a recognizable Pincushion Costume.
The reference image includes green leaves around the waist, colorful oversized sewing pins, and a yellow measuring tape worn diagonally across the body.
These accessories can be made using basic sewing and simple fabric construction techniques.
Step 1: Cut the green fabric leaves
Draw a pointed leaf shape on paper.
For the sample costume, each leaf can measure approximately 7 inches long and 4½ inches wide.
Cut 10–12 leaf shapes from green fabric or felt.
If using cotton fabric, cut two pieces for each leaf.
Place the pieces right sides together.
Sew around the edges, leaving a small opening.
Turn the leaves right side out.
Press carefully.
Step 2: Attach the decorative leaves
Arrange the leaves around the upper section of the red skirt.
Overlap them slightly.
Position the pointed ends downward.
Sew the leaf bases to the skirt just below the waistband casing.
Avoid stitching through the elastic casing.
For additional texture, sew a decorative line down the center of each leaf.
Step 3: Make the oversized decorative pinheads
Cut circles from colorful felt.
Use blue, yellow, orange, pink, and other bright colors.
Sew two circles together, leaving a small opening.
Fill lightly with polyester fiberfill.
Close the opening securely.
Each pinhead should resemble a soft rounded ball.
Make approximately 8–12 decorative pinheads, depending on the size of the costume.
Step 4: Create the soft imitation pin shafts
Cut flexible foam tubing into lengths of approximately 4–6 inches.
Cover each piece with white fabric if desired.
Attach one end securely to a fabric pinhead.
Close the opposite end with a rounded fabric cap.
Do not use wire, wooden skewers, toothpicks, or other rigid pointed materials.
Sew the decorative pins to the costume at a shallow angle so they cannot project dangerously outward.
Step 5: Sew the yellow measuring tape sash
Cut two yellow fabric strips approximately 4½ inches wide and long enough to cross the child’s torso comfortably.
Join sections if necessary.
Place the strips right sides together.
Sew along the long edges using a ½-inch seam allowance.
Turn right side out.
Press.
Topstitch along both edges.
Add black measurement markings with fabric paint or a textile marker.
Allow the markings to dry completely.
Step 6: Create the strawberry pincushion accessory
Cut a red fabric circle approximately 10 inches in diameter.
Sew a gathering stitch around the edge.
Pull the thread gently to create a pouch.
Fill lightly with polyester fiberfill.
Close the opening securely.
Shape the fabric into a strawberry-like form.
Cut small green felt leaves and sew them over the gathered opening.
Attach a short fabric hanging loop.
The completed accessory can be carried or attached securely to the costume.
Professional Finishing, Costume Assembly, and Creative Pincushion Costume Ideas
Once the main components are complete, assemble the Pincushion Costume Pattern and check the overall fit.
The finished costume should be colorful and recognizable without becoming uncomfortable or difficult to wear.
The final details help create a professional appearance suitable for photographs, costume parties, and handmade sewing displays.
Step 1: Insert the waistband elastic
Measure the elastic comfortably around the child’s waist.
Allow enough length for the overlap required by the elastic joining method.
Use a safety pin or bodkin to thread the elastic through the waistband casing.
Overlap the elastic ends.
Sew them together securely.
Close the casing opening.
Distribute the gathers evenly.
Step 2: Arrange the padded skirt
Place the costume on a dress form or have the child try it on with assistance.
Adjust the padding so the skirt appears rounded.
Make sure the fullness is distributed evenly.
Check the front, back, and sides.
Remove or redistribute batting if the skirt becomes too heavy.
Step 3: Position the decorative pins
Arrange the oversized imitation pins around the red skirt.
Use different colors to create a playful appearance.
Position them away from the child’s arms and seating areas.
Sew each pin securely to the fabric.
Avoid placing protruding decorations where they could catch on objects.
Step 4: Add the measuring tape sash
Drape the yellow measuring tape sash diagonally across the torso.
Check the length while the child is standing.
Secure it with a comfortable, breakaway-style attachment or another easily released fastening.
Do not wrap the sash tightly around the neck.
Keep it away from the face.
Step 5: Coordinate the base clothing
Pair the costume with a black long-sleeved shirt and black leggings.
This creates a strong contrast with the bright red skirt.
Comfortable sneakers or flat shoes are recommended.
Avoid shoes that may make walking difficult.
A matching hair bow can complete the look.
Step 6: Complete the final inspection
Check every seam.
Make sure the waistband is secure.
Confirm that the leaves and decorative pins are firmly attached.
Inspect the measuring tape sash.
Have the child practice walking, sitting, and moving their arms.
Remove any decorations that interfere with movement.
The completed DIY Pincushion Costume should be comfortable, lightweight, colorful, and easy to recognize.
Beautiful Color Combinations for Pincushion Costumes
Classic Red and Green: This combination closely resembles the reference image. A bright red pincushion skirt with forest green leaves creates a charming strawberry-inspired design.
Vintage Burgundy and Olive Green: Burgundy fabric paired with olive green leaves creates a sophisticated retro sewing theme.
Bright Pink and Emerald Green: A vivid pink skirt with emerald green leaves offers a playful variation suitable for colorful costume celebrations.
Coral Red and Sage Green: Coral fabric and soft sage leaves create a cheerful costume with a slightly softer appearance.
Purple and Lavender: A purple pincushion skirt decorated with lavender accessories creates a whimsical fantasy-inspired costume.
Patchwork Multicolor: Combine colorful quilting cotton scraps to create a unique pincushion costume that celebrates traditional patchwork techniques.
Helpful Tips for Making a Comfortable Pincushion Costume
Choose lightweight fabrics. Heavy materials can make the skirt uncomfortable, especially when padding and decorative accessories are added.
Use soft costume decorations. Oversized imitation pins should always be made from flexible, padded materials without sharp components.
Measure before cutting. Accurate waist, hip, and skirt-length measurements help create a comfortable fit.
Distribute the padding evenly. Balanced padding helps maintain the rounded pincushion shape without creating excessive bulk.
Secure decorative accessories carefully. Reinforced stitching prevents leaves, pinheads, and other embellishments from becoming loose.
Prioritize comfortable movement. The child should be able to walk, sit, and move freely while wearing the finished costume.
Frequently Asked Questions About the Pincushion Costume Pattern
1. What is a Pincushion Costume Pattern?
A Pincushion Costume Pattern is a sewing project designed to create a wearable costume inspired by a traditional sewing pincushion.
2. Is this costume suitable for beginners?
Yes. Confident beginners can complete the project using basic sewing, gathering, and fabric assembly techniques.
3. What fabric is best for the pincushion skirt?
Lightweight cotton, quilting cotton, or cotton poplin is recommended.
4. How much fabric do I need?
For the sample child-sized costume, approximately 2–2½ yards of red fabric is a useful starting amount.
5. Can I make the costume for adults?
Yes. Increase the fabric dimensions and adjust the waistband, skirt length, and padding to fit the wearer.
6. How do I create the rounded skirt shape?
Use a gathered red outer skirt with a lightweight padded lining to create a rounded silhouette.
7. Can I use polyester fiberfill inside the skirt?
Yes, but use it sparingly and distribute it evenly. Lightweight batting or soft tulle is often easier to control.
8. Are real sewing pins suitable for this costume?
No. Use only soft imitation pins made from fabric, felt, and flexible foam.
9. How do I make the green leaves?
Cut pointed leaf shapes from green fabric or felt and sew them around the upper section of the skirt.
10. Can I make the measuring tape accessory?
Yes. Sew a long yellow fabric sash and add black measurement markings using fabric paint or a textile marker.
11. Can I add a matching strawberry accessory?
Absolutely. A small padded strawberry-shaped fabric ornament complements the costume beautifully.
12. What clothing should be worn underneath?
A comfortable black shirt and black leggings create a coordinated appearance.
13. Can I use fabric scraps for this project?
Yes. Fabric scraps are excellent for decorative leaves, pinheads, and small accessories.
14. How long does it take to sew the costume?
Depending on experience and decorative details, the project may require approximately five to ten hours.
15. Is the Pincushion Costume suitable for Halloween?
Yes. It is a creative costume for Halloween, sewing-themed parties, school celebrations, and handmade costume events, provided the fit and decorations are safe for the wearer.
Conclusion
The Pincushion Costume Pattern is a charming and imaginative sewing project that transforms a familiar sewing accessory into a colorful wearable design. Its oversized red skirt, decorative green leaves, soft imitation pins, and yellow measuring tape sash create a playful costume inspired by the reference image.
By following this step-by-step tutorial, you can learn how to sew a pincushion costume using accessible sewing techniques, lightweight fabrics, basic gathering methods, and carefully constructed decorative accessories.
One of the greatest advantages of this project is its flexibility. The costume can be customized with different fabric colors, patchwork details, decorative leaves, and sewing-themed accessories.
The rounded skirt creates the recognizable pincushion silhouette, while the colorful decorative pins and measuring tape make the costume instantly distinctive.
Careful measurements, secure stitching, lightweight padding, and comfortable construction are essential for achieving a successful result. Every accessory should be soft, securely attached, and positioned so the wearer can move freely.
Whether you are preparing for Halloween, a school celebration, or a sewing-themed event, the DIY Pincushion Costume offers a creative way to celebrate quilting, sewing, and handmade craftsmanship.
Enjoy choosing your favorite fabrics, experimenting with beautiful color combinations, and bringing your own Pincushion Costume Pattern to life through the wonderful art of sewing.