
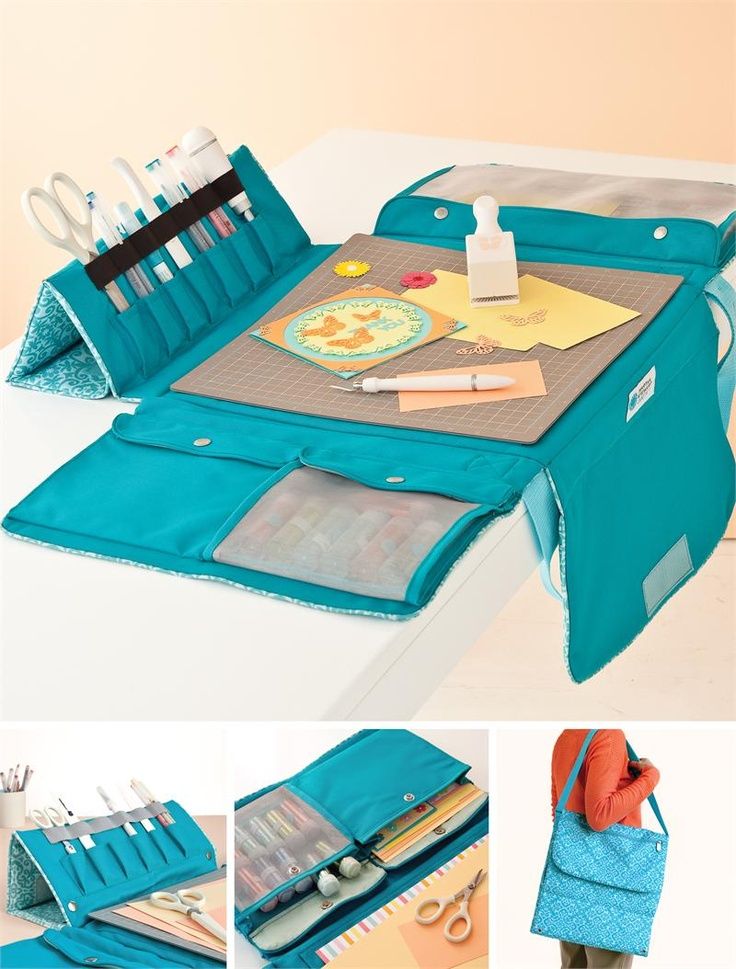
The Portable Quilt Craft Organizer is a practical sewing project designed for quilters, sewists, scrapbookers, and anyone who wants to keep creative supplies organized while working at home or traveling. Inspired by the organizer shown in the reference image, this project combines a padded work surface, multiple storage pockets, tool slots, transparent compartments, foldable sections, and carrying straps in one compact handmade organizer.
What makes this Portable Quilt Craft Organizer especially useful is its ability to transform from a closed carrying case into a complete portable workstation. When opened across a table, the central padded section can hold a small cutting mat while the surrounding pockets keep scissors, marking pens, rulers, rotary-cutting accessories, templates, fabric pieces, and other supplies close at hand. When the project is finished, the sections fold inward to protect the contents.
Although the organizer looks complex, it can be constructed systematically from rectangles of fabric, batting, interfacing, mesh or vinyl, binding, and a few pieces of hardware. The measurements in this tutorial create a medium organizer and can be adjusted according to your preferred cutting mat or craft supplies. This quilted craft organizer pattern is an excellent opportunity to practice quilting, binding, pocket construction, topstitching, installing snaps, and assembling structured fabric panels.
Materials, Measurements, Cutting Guide, and Preparation
Choose a durable quilting cotton, canvas, or home décor fabric for the main exterior. A medium-weight cotton is easier to sew, while canvas provides additional structure. For a colorful quilted version, the exterior can also be pieced from coordinating fabric scraps before the organizer panels are cut.
DISCOVER MORE FREE PATTERNS HERE!
For a medium organizer, plan on approximately 1½ yards (1.4 m) of main fabric, 1 yard (0.9 m) of lining fabric, 1 yard (0.9 m) of fusible fleece or batting, and ½–1 yard (0.45–0.9 m) of firm interfacing. You will also need approximately 4–5 yards (3.7–4.6 m) of binding.
A practical central work panel measures approximately 18 x 24 inches (46 x 61 cm). This accommodates many common craft cutting surfaces. Before cutting your fabric, measure the actual mat you intend to use and add approximately ½–1 inch (1.3–2.5 cm) of clearance if the organizer will include a dedicated mat pocket.
Cut one main center rectangle and one matching lining rectangle approximately 19 x 25 inches (48 x 64 cm). Cut batting approximately the same size. The exact finished dimensions are flexible, so resizing the organizer around your own cutting mat is often the best approach.
For the side storage panels, cut two rectangles approximately 10 x 19 inches (25 x 48 cm). For the front and rear folding panels, cut two approximately 8 x 19 inches (20 x 48 cm). Add matching lining and stabilizer pieces for each section. These measurements create the broad fold-out configuration visible in the inspiration.
Additional materials include clear vinyl or mesh for see-through pockets, elastic approximately ¾–1 inch (2–2.5 cm) wide, hook-and-loop tape or magnetic/snapping closures, coordinating thread, sewing clips, a walking foot if available, fabric scissors, rotary cutter, quilting ruler, removable fabric marker, and an iron.
Quilting the Main Work Surface and Constructing the Storage Pockets
Begin the Portable Quilt Craft Organizer with the central work section. Layer the backing fabric right side down, batting in the center, and exterior fabric right side up. Smooth the layers carefully and baste them together using pins, spray baste, or long temporary stitches.
Quilt the panel using straight lines, a grid, diagonal quilting, or another simple design. Lines spaced approximately 1–2 inches (2.5–5 cm) apart provide good stability without making the panel excessively rigid. After quilting, square the rectangle so all four edges are straight.
If you want the cutting mat to be removable, create a shallow pocket instead of sewing the mat permanently into the organizer. Add a fabric or mesh retaining strip along the lower edge and sides of the center panel. Leave enough room for the mat to slide in and out easily.
Next, construct the tool organizer panel. Cut a pocket rectangle approximately 8–9 inches (20–23 cm) high and the width of the side panel. Fold and press the upper edge twice by ¼ inch (6 mm), then topstitch. Position the pocket on its backing panel.
Mark vertical stitching lines approximately 1–1½ inches (2.5–4 cm) apart. Vary the spacing to accommodate different tools. Narrow channels are ideal for marking pens and pencils, while wider channels can hold scissors, seam gauges, small rulers, glue pens, and other quilting supplies.
For additional security, sew a horizontal strip of elastic across the upper portion of the tool slots. Stretch the elastic only slightly as you sew it into place. This helps prevent longer tools from falling out when the organizer is folded and carried.
Create one or two transparent storage pockets from vinyl or mesh. A pocket approximately 7 x 15 inches (18 x 38 cm) provides useful storage without adding excessive bulk. Bind the upper edge before attaching the remaining three sides to the organizer panel. Mesh is easier for beginners to sew, while clear vinyl provides excellent visibility.
Building the Folding Panels, Closures, and Carrying System
The folding structure is what transforms this project from a standard sewing mat into a true portable craft organizer. Each storage section should behave like a padded flap that folds over the center workspace.
Construct each flap by layering exterior fabric, batting or fusible fleece, and lining. Quilt the layers before adding pockets whenever possible. Keeping the quilting relatively simple will make the organizer easier to fold later.
Attach the side panels to the central panel with strong seams. Use approximately a ½-inch (1.3 cm) seam allowance, then reinforce each joining seam with topstitching. The panels should fold inward without excessive resistance. Avoid placing very thick batting directly inside these hinge areas.
Add the front and back folding panels in the same manner. Before permanently stitching them, fold the entire organizer experimentally. This is an important step because a fully loaded organizer becomes thicker than an empty one. A small amount of additional folding room can make the finished project significantly easier to close.
Install snaps, magnetic closures, or hook-and-loop tape on the appropriate flaps. Reinforce the fabric behind magnetic snaps with an additional square of interfacing. Position all closure hardware before finishing the binding whenever possible.
For carrying handles, cut two fabric strips approximately 4 x 28 inches (10 x 71 cm). Fold each strip lengthwise, press the raw edges toward the center, fold again, and topstitch along both long sides. Finished handles approximately 1 inch (2.5 cm) wide provide comfortable support.
If you prefer a shoulder-style quilt organizer bag, make one longer strap approximately 45–55 inches (114–140 cm). Attach it securely to reinforced side sections. A removable adjustable strap can also be made using swivel hooks, rectangle rings, and a strap slider.
Final Assembly, Binding, Pocket Organization, and Finishing
Before binding the organizer, place all sections on a large flat surface. Check that every pocket opens in the correct direction and that none of the tool slots will be accidentally closed by the final assembly seams.
Trim uneven batting from the edges. If several layers meet at one point, grade the seam allowances by trimming some layers slightly narrower than others. Reducing bulk is particularly important at the corners of a quilted organizer.
Apply binding around exposed edges using the same method used for quilt binding. A finished binding width of approximately ¼–⅜ inch (6–10 mm) works well. Bias binding is particularly useful around curved sections, although straight-grain binding is sufficient for rectangular panels.
At corners, create neat miters and secure them carefully. Machine stitching provides durability for an organizer that will be used frequently, while hand finishing the reverse side can create a cleaner traditional quilted appearance.
Now test the folding sequence. Place a cutting mat in the center, fill several pen channels, add scissors and lightweight supplies, and close the organizer. If a flap feels excessively tight, adjust its closure position rather than forcing the fabric.
The interior can be customized for your own craft routine. One section can hold quilting tools, another can store paper templates, another can carry fabric scraps, and transparent pockets can contain small notions. A removable zippered pouch can also be attached using snaps or hook-and-loop tape.
Finish by pressing the fabric carefully and trimming every loose thread. Avoid pressing directly against clear vinyl because high heat can damage it. Your completed Portable Quilt Craft Organizer should open flat enough to function as a work station and fold compactly enough to transport your essential supplies.
FAQ About the Portable Quilt Craft Organizer
What is a Portable Quilt Craft Organizer?
It is a foldable fabric organizer that combines a portable work surface with storage compartments for quilting, sewing, paper crafting, or other creative supplies.
Is this project suitable for beginners?
An adventurous beginner can make it, although it is most comfortable for someone who already understands straight seams, basic quilting, binding, and pocket construction.
What fabric works best?
Quilting cotton, canvas, denim, and home décor cotton are all useful choices. Lightweight quilting cotton should normally be reinforced with interfacing or fusible fleece.
How large should the organizer be?
A center section around 18 x 24 inches (46 x 61 cm) creates a useful medium-size workspace. Adjust it according to the cutting mat or supplies you want to carry.
Can I make it smaller?
Yes. A compact version can use a 12 x 18-inch (30 x 46 cm) center panel with proportionally smaller folding flaps.
Can I use fabric scraps?
Absolutely. This project works beautifully as a scrap fabric organizer. Piece scraps together first, quilt the resulting fabric, and then cut the required panels.
What batting should I use?
Low-loft cotton batting or fusible fleece provides cushioning without excessive thickness. Firm interfacing can be added where more structure is required.
Can I use foam stabilizer?
Yes. Thin bag-making foam creates excellent structure, especially in the central work area. Avoid excessive foam around folding hinges.
How do I make transparent pockets?
Use clear sewing vinyl or mesh. Bind the top edge first, then stitch the other edges to the backing panel.
What can I store in the tool slots?
They can hold fabric markers, pens, pencils, scissors, small rulers, seam gauges, glue pens, turning tools, and similar lightweight supplies.
Can I add zippers?
Yes. Zippered mesh pockets are an excellent upgrade for small notions that might otherwise fall out during transportation.
Should the cutting mat be permanently attached?
No. A removable mat is usually more practical because the organizer can be washed or stored more easily.
Can I add a shoulder strap?
Yes. Reinforce the attachment points with extra interfacing and use a long fabric or webbing strap.
How do I prevent the organizer from becoming floppy?
Combine batting with medium or firm interfacing. The central panel may need more stabilization than the folding flaps.
How do I keep tools from falling out?
Use elastic, covered pockets, snaps, zipper compartments, or a protective flap over the tool channels.
Can the organizer be washed?
That depends on the materials used. Fabric-only versions are generally easier to clean. Removable mats and accessories should be taken out first, and vinyl, foam, magnetic hardware, or specialty stabilizers may require more careful cleaning.
Conclusion
The Portable Quilt Craft Organizer combines several useful sewing techniques into one highly functional project. Instead of carrying a cutting mat, tools, templates, fabric, and notions separately, the finished organizer creates a compact system that can be unfolded directly onto a work surface.
The key to successful construction is planning the interior before sewing the final panels together. Decide which quilting tools and craft supplies you use most frequently, then customize the width and position of the pockets accordingly. A personalized layout will usually be more useful than perfectly copying another organizer.
Structure is equally important. Batting provides softness, interfacing provides stability, and reinforced seams allow the folding panels and carrying handles to withstand repeated use. Keeping the hinge areas slightly thinner helps the entire organizer close neatly even when the pockets contain supplies.
You can also make the design completely unique with patchwork fabrics, coordinated prints, contrasting binding, decorative quilting, or leftover fabric strips. Whether used for quilting retreats, sewing classes, craft groups, vacations, or everyday organization at home, this Portable Quilt Craft Organizer pattern creates a practical handmade workstation that keeps creative essentials protected, visible, and ready to use.