
The Quilted Car Organizer Pattern is a beautiful sewing project that combines romantic floral fabrics, practical storage pockets, and a charming heart-shaped design. Inspired by the handmade organizer shown in the reference image, this project features a cream floral background decorated with delicate pink roses, dusty rose fabric pockets, contrasting binding, and two matching fabric straps. The finished accessory has the appearance of a decorative heart while providing convenient storage for small personal items.
One of the most attractive features of this Heart-Shaped Quilted Car Organizer is its combination of elegance and functionality. Instead of using a traditional rectangular organizer, this pattern incorporates the soft curves of a heart to create a unique handmade accessory. The front includes two fabric pockets and a narrow central compartment, allowing you to organize small lightweight essentials. The delicate floral print and pink polka-dot pockets create a vintage-inspired appearance that complements cream, beige, and other neutral interiors.
Learning how to sew a Quilted Car Organizer Pattern is an excellent opportunity to practice accurate fabric cutting, curved seams, decorative quilting, pocket construction, binding, and reinforced strap attachment. This tutorial explains how to prepare a professional heart-shaped template, select coordinating fabrics, create the quilted base, sew the front pockets, attach the fabric straps, and finish the organizer with neat decorative stitching. The instructions are designed for confident beginners and experienced sewists who enjoy making practical accessories with beautiful fabric details.
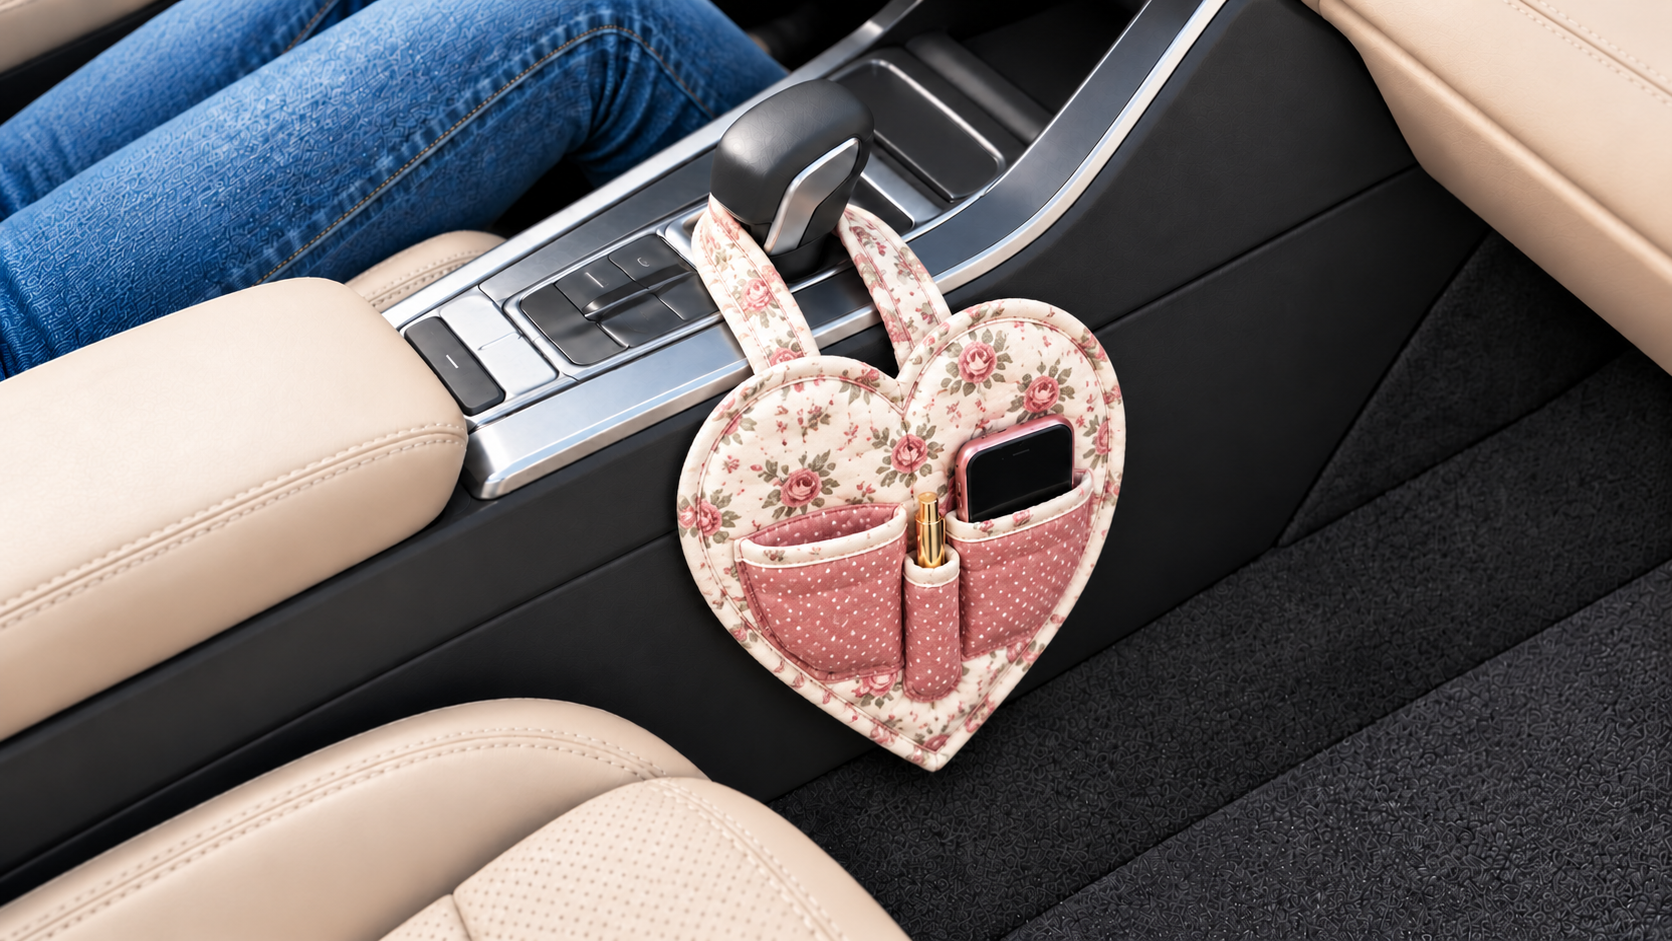
The finished Heart-Shaped Fabric Car Organizer measures approximately 9 inches (22.9 cm) wide and 9 inches (22.9 cm) tall, excluding the attachment straps. Although the reference image shows the organizer hanging near a vehicle’s gear selector, this tutorial treats that arrangement as decorative inspiration only. For actual vehicle use, attach the organizer to a suitable fixed location, such as an appropriate seat-back area, away from the gear selector, parking brake, pedals, controls, airbags, and moving seat mechanisms. This project is intended for lightweight items and should never interfere with safe vehicle operation.
DISCOVER MORE FREE PATTERNS HERE!
Materials, Fabric Selection, and Measurements for the Quilted Car Organizer Pattern
Before beginning your Quilted Car Organizer Pattern, gather all the fabrics and sewing supplies needed to complete the project. Choosing suitable materials is important because the organizer should maintain its heart shape while remaining lightweight and flexible.
High-quality quilting cotton is recommended for the exterior because it is easy to cut, sew, press, and quilt. Cotton fabrics also offer many beautiful floral and vintage patterns, making them ideal for creating a romantic handmade accessory.
For a design inspired by the reference image, choose cream cotton decorated with small pink roses for the main heart and dusty rose cotton with delicate white polka dots for the front pockets.
Use cream binding to frame the heart and create a soft, elegant finish.
Materials needed
- ¼ yard (0.23 m) of cream floral quilting cotton.
- ¼ yard (0.23 m) of dusty rose polka-dot cotton.
- ¼ yard (0.23 m) of coordinating cotton for the backing.
- ¼ yard (0.23 m) of lightweight fusible interfacing.
- Optional thin cotton quilt batting.
- Approximately 1 yard (0.9 m) of cream cotton bias binding.
- Coordinating sewing thread.
- Sewing machine.
- Universal sewing needle, size 80/12.
- Optional walking foot.
- Rotary cutter and cutting mat.
- Acrylic quilting ruler.
- Fabric scissors.
- Fabric marking pencil.
- Sewing pins or fabric clips.
- Iron and ironing board.
- Paper for creating the heart template.
- Optional decorative topstitching thread.
- Soft hook-and-loop fastening tape for adjustable attachment straps.
Avoid heavy embellishments, metal hardware, or rigid inserts that could create unnecessary bulk.
Lightweight interfacing helps maintain the heart shape while allowing the organizer to remain flexible.
Finished organizer measurements
| Component | Approximate Measurement |
|---|---|
| Finished Heart Width | 9 in (22.9 cm) |
| Finished Heart Height | 9 in (22.9 cm) |
| Left Pocket | 3 × 3½ in (7.6 × 8.9 cm) |
| Right Pocket | 3 × 3½ in (7.6 × 8.9 cm) |
| Central Narrow Pocket | 1 × 4 in (2.5 × 10.2 cm) |
| Strap Width | ¾ in (1.9 cm) |
| Strap Length | Adjustable to installation point |
| Seam Allowance | ¼ in (0.6 cm) |
| Recommended Fabric | Quilting Cotton |
| Skill Level | Confident Beginner |
These measurements can be adjusted according to the desired finished size.
The heart shape should be symmetrical, with two rounded upper curves and a pointed lower section.
Fabric cutting guide
| Pattern Piece | Cutting Size | Quantity |
|---|---|---|
| Heart Exterior | Heart template, 9½ × 9½ in overall | 1 |
| Heart Backing | Same heart template | 1 |
| Fusible Interfacing | Same heart template | 1 |
| Optional Quilt Batting | Slightly larger than heart template | 1 |
| Left Pocket | 3½ × 4 in (8.9 × 10.2 cm) | 2 |
| Right Pocket | 3½ × 4 in (8.9 × 10.2 cm) | 2 |
| Central Pocket | 1½ × 4½ in (3.8 × 11.4 cm) | 2 |
| Fabric Straps | 2 × 12 in (5.1 × 30.5 cm) | 2 |
| Bias Binding | 2½ in (6.4 cm) wide | As needed |
The heart template includes a ¼-inch seam allowance around the outer edge.
Because the heart includes curved edges, use true bias binding rather than straight-grain binding for a smoother finish.
Recommended fabric combinations
| Main Heart Fabric | Pocket Fabric | Binding |
|---|---|---|
| Cream Floral | Dusty Rose Polka Dots | Ivory |
| Sage Green Floral | White Cotton | Forest Green |
| Lavender Roses | Soft Purple | Cream |
| Baby Blue Floral | White Gingham | Pale Blue |
| Burgundy Floral | Beige Cotton | Burgundy |
| Vintage Pink Roses | Cream Polka Dots | Dusty Pink |
| Patchwork Scraps | Coordinating Cotton | Neutral Beige |
The cream floral and dusty rose combination creates a romantic vintage appearance similar to the reference image.
Before cutting, wash and press the fabrics according to their care instructions. Accurate pressing helps create neat seams and a professional-looking organizer.
Step-by-Step Quilted Car Organizer Pattern: Creating the Heart-Shaped Fabric Base
The first stage of the Quilted Car Organizer Pattern involves preparing the heart-shaped template and constructing the main fabric base.
The heart is the central feature of this design, so accurate cutting and careful shaping are essential.
A symmetrical template helps ensure that both sides of the finished organizer look balanced.
Step 1: Draw the heart template
Take a sheet of pattern paper measuring at least 10 × 10 inches.
Fold the paper vertically in half.
Draw one half of a heart, beginning with a rounded upper curve and ending at a pointed lower tip.
Cut along the drawn line while the paper remains folded.
Open the paper to reveal a symmetrical heart.
Adjust the shape until it measures approximately 9½ inches wide and 9½ inches tall.
Step 2: Cut the main fabric pieces
Place the heart template on the cream floral cotton.
Trace around the template using a fabric marking pencil.
Cut one exterior heart.
Repeat the process with the backing fabric.
Cut one matching piece of lightweight fusible interfacing.
Check that all pieces are identical.
Step 3: Apply the interfacing
Place the interfacing against the wrong side of the exterior heart.
Follow the manufacturer’s pressing instructions.
Press carefully without stretching the curved edges.
Allow the fabric to cool completely.
Check that the interfacing is securely attached.
Step 4: Prepare the optional batting
Place the exterior heart over a piece of thin cotton quilt batting.
Cut the batting slightly larger than the heart.
Smooth the fabric carefully.
Secure the layers with quilting pins or temporary basting stitches.
Avoid pulling the fabric out of shape.
Step 5: Quilt the heart-shaped panel
Mark simple quilting lines on the exterior fabric.
Use straight diagonal lines, gentle curves, or a small diamond pattern.
Sew slowly around the curved sections.
Keep the stitches evenly spaced.
Remove the temporary markings.
Trim excess batting from the edges.
Step 6: Prepare the backing
Place the backing fabric wrong side against the quilted exterior’s wrong side.
Align the curved edges carefully.
Pin or clip the layers together.
Baste around the perimeter using a narrow seam.
Keep the fabric smooth and flat.
The completed Quilted Heart Organizer Base should have a symmetrical heart shape with a soft quilted surface ready for pocket construction.
How to Sew the Front Pockets and Assemble the Heart-Shaped Car Organizer
After preparing the quilted heart base, the next stage of the Quilted Car Organizer Pattern involves constructing the front storage pockets.
The reference image features two rounded pink pockets and a narrow central compartment.
These details create a balanced appearance while adding practical storage space.
Step 1: Prepare the left pocket
Take the two left pocket fabric pieces.
Place them right sides together.
Sew around the edges using a ¼-inch seam allowance.
Leave a small turning opening.
Clip the curved corners if necessary.
Turn the pocket right side out.
Step 2: Prepare the right pocket
Repeat the same process with the right pocket fabric pieces.
Check that both pockets are identical.
Press the edges carefully.
Topstitch along the upper opening edge.
Keep the fabric smooth.
Step 3: Position the pockets
Place the quilted heart base right side up.
Position the left and right pockets on the lower half of the heart.
Keep the pockets symmetrical.
Leave a narrow space between them for the central compartment.
Pin or clip the pockets in place.
Step 4: Sew the front pockets
Topstitch along the sides and bottom of each pocket.
Leave the upper edges open.
Use a consistent stitch length.
Reinforce the upper corners with additional stitching.
Check that both pockets remain flat.
Step 5: Prepare the central narrow pocket
Take the two narrow pocket fabric pieces.
Place them right sides together.
Sew around the edges, leaving a small turning opening.
Turn the pocket right side out.
Press the fabric.
Topstitch along the upper edge.
Step 6: Attach the central pocket
Position the narrow pocket between the two larger pockets.
Align it vertically.
Pin the fabric in place.
Topstitch along the sides and bottom.
Reinforce the upper corners.
Check that all three pockets remain accessible.
The completed Heart-Shaped Quilted Car Organizer Front should feature two rounded storage pockets and a narrow central compartment arranged neatly over the floral background.
Attachment Straps, Bias Binding, Professional Finishing, and Creative Customization
The final construction stage of the Quilted Car Organizer Pattern involves preparing the fabric straps, finishing the heart-shaped edges, and checking the completed accessory.
These details help create a durable and attractive handmade organizer.
Because the heart includes several curved edges, careful binding is especially important.
Step 1: Prepare the attachment straps
Take the two fabric strips measuring 2 × 12 inches.
Fold each strip lengthwise with the wrong sides together.
Press the center crease.
Open the strip.
Fold both long edges toward the center.
Fold the strip in half again.
Step 2: Sew the straps
Topstitch along both long edges.
Check that the straps are smooth and evenly folded.
Trim loose threads.
Attach low-profile hook-and-loop fastening tape to the strap ends.
Reinforce the fastening tape with additional stitching.
Step 3: Position the straps
Place the heart organizer wrong side up.
Position the straps near the two upper curves of the heart.
Check that the straps are symmetrical.
Baste the straps securely to the backing.
Keep the straps away from the heart’s outer seam allowance.
Step 4: Prepare the bias binding
Cut cream cotton fabric strips on the bias.
Join the strips if necessary.
Press the binding lengthwise with the wrong sides together.
Align the raw edges with the heart perimeter.
Clip the binding in place.
Use additional clips around the curved sections.
Step 5: Sew the binding
Sew the binding around the heart using a ¼-inch seam allowance.
Move slowly around the upper curves.
Carefully shape the binding around the pointed lower section.
Fold the binding over the raw edges.
Secure it with machine stitching or hand stitching.
Press the finished heart gently.
Step 6: Inspect the finished organizer
Check the seams and pocket corners.
Make sure the straps are securely attached.
Trim any loose threads.
Test the organizer with a few lightweight items.
Confirm that it remains flat and maintains its heart shape.
For actual vehicle use, install it only at a suitable fixed location that does not interfere with controls, seat belts, airbags, or moving components.
The completed Handmade Heart-Shaped Quilted Car Organizer should feature a romantic floral exterior, dusty rose pockets, neat cream binding, and matching attachment straps.
Beautiful Color Combinations for Heart-Shaped Quilted Car Organizers
A cream and dusty rose Quilted Car Organizer creates a romantic vintage appearance similar to the reference image. The delicate pink roses and polka-dot pockets produce a charming handmade accessory.
A sage green and ivory Quilted Car Organizer offers a sophisticated cottage-inspired design. Soft green floral prints paired with cream pockets create a calm and elegant appearance.
A lavender and cream Quilted Car Organizer produces a delicate pastel variation. Lavender floral fabric combined with ivory binding creates a beautiful handmade accessory.
A baby blue and white Quilted Car Organizer creates a fresh classic design. Light blue floral cotton paired with white gingham pockets offers a cheerful appearance.
A burgundy and beige Quilted Car Organizer provides a rich vintage style. Deep burgundy floral fabric combined with neutral pockets creates an elegant accessory.
For a colorful patchwork variation, combine dusty rose, sage green, lavender, baby blue, cream, and burgundy fabric scraps. This combination creates a cheerful heart-shaped organizer with a unique handmade personality.
Helpful Tips for Sewing a Beautiful Heart-Shaped Quilted Car Organizer
Use lightweight quilting cotton for the exterior. This fabric is easy to sew and allows the heart shape to remain soft and flexible.
Apply lightweight fusible interfacing to strengthen the heart. This helps the organizer maintain its shape without becoming excessively stiff.
Use true bias binding around the curved edges. Bias-cut fabric stretches slightly and follows the heart shape more smoothly.
Reinforce the upper corners of each pocket. Strong stitching improves durability and helps the pockets withstand regular use.
Choose coordinating fabrics with small floral prints. Delicate roses, gingham checks, and polka dots create a beautiful vintage-inspired appearance.
Keep the organizer lightweight and avoid placing it near the gear selector or other vehicle controls. The reference image is decorative inspiration, not a recommended mounting position.
Frequently Asked Questions About the Quilted Car Organizer Pattern
1. Is the Quilted Car Organizer Pattern suitable for beginners?
Yes. This project is suitable for confident beginners who understand basic sewing techniques, pocket construction, curved seams, and binding.
2. What is a Heart-Shaped Quilted Car Organizer?
A Heart-Shaped Quilted Car Organizer is a handmade fabric accessory featuring a decorative heart-shaped base and small storage pockets.
3. What fabric is best for this pattern?
Quilting cotton is recommended because it is lightweight, durable, and easy to sew.
4. Do I need a sewing machine?
A sewing machine is recommended for accurate seams, quilting, pocket construction, and professional finishing.
5. What size is the finished organizer?
The suggested finished size is approximately 9 inches wide and 9 inches tall.
6. Can I make the organizer larger?
Yes. Enlarge the heart template and adjust the pocket measurements proportionally.
7. Can I make a smaller heart-shaped organizer?
Absolutely. Reduce the pattern dimensions to create a compact organizer for lightweight accessories.
8. What seam allowance should I use?
A ¼-inch (0.6 cm) seam allowance is recommended for most construction steps.
9. Can I use leftover quilting fabric scraps?
Yes. This project is an excellent way to use colorful cotton scraps from previous sewing projects.
10. Can I add more pockets?
Yes. Additional pockets can be added as long as they do not create excessive bulk or distort the heart shape.
11. Can I use different fabric patterns?
Yes. Floral prints, gingham, polka dots, stripes, and patchwork fabrics all work beautifully.
12. Can I make the organizer without quilt batting?
Yes. Lightweight fusible interfacing can provide structure without the additional thickness of batting.
13. How long does it take to sew a Heart-Shaped Quilted Car Organizer?
The time required depends on experience. Many sewists may need approximately three to five hours to complete the project.
14. How should I clean the finished organizer?
Gentle spot cleaning or hand washing is recommended, depending on the fabrics and interfacing used. Remove the organizer from the vehicle before cleaning.
15. Can I make Heart-Shaped Quilted Car Organizers as handmade gifts?
Yes. These organizers make thoughtful handmade gifts for people who enjoy romantic vintage fabrics, quilting, and practical handmade accessories.
Conclusion
The Quilted Car Organizer Pattern is a charming and creative sewing project that combines beautiful floral fabrics with practical storage pockets and a romantic heart-shaped design. Its delicate rose print, dusty pink pockets, cream binding, and matching fabric straps create an elegant handmade accessory inspired by the reference image.
By following the instructions in this tutorial, you can create a lovely Handmade Heart-Shaped Quilted Car Organizer using accurate fabric measurements, simple quilting techniques, carefully constructed pockets, and professional finishing methods.
One of the greatest advantages of this pattern is its versatility. Romantic dusty rose designs, elegant sage green combinations, delicate lavender variations, and colorful patchwork arrangements can all be created using the same basic construction.
The finished organizer can provide convenient storage for lightweight everyday essentials when installed in an appropriate location. Its heart-shaped design also makes it suitable for use as a small hanging organizer in a sewing room, bedroom, or craft space.
With accurate cutting, careful pressing, strong seams, neatly attached pockets, and beautifully finished bias binding, your Quilted Car Organizer can combine practical organization with the timeless charm of handmade quilting.
Enjoy selecting your favorite fabrics, experimenting with beautiful vintage color combinations, and bringing your own Quilted Car Organizer Pattern to life through the creative and rewarding art of sewing and quilting.