
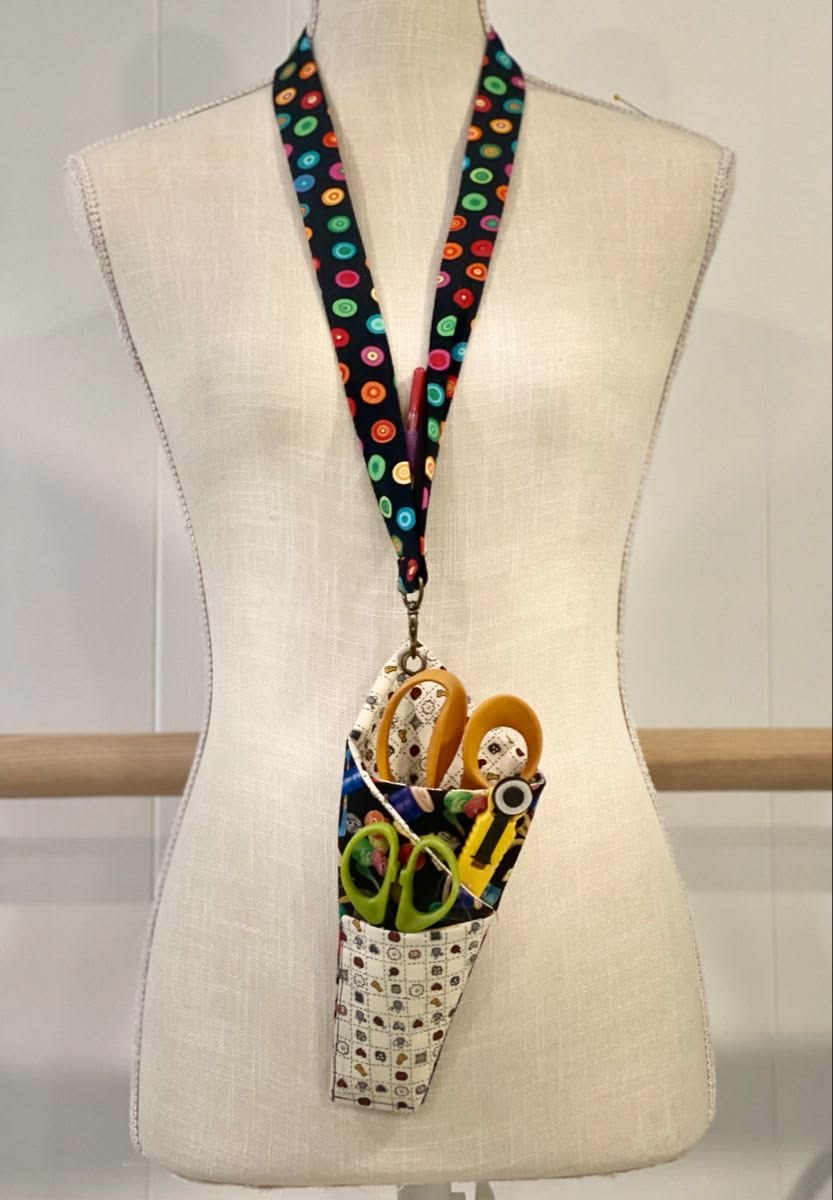
Scissor Door Pattern is a practical and creative quilting project designed to keep scissors and small sewing tools organized while adding a handmade touch to your sewing room. Inspired by the hanging organizer shown in the photo, this project combines a quilted fabric scissor holder, a narrow fabric lanyard, and a swivel hook so the finished accessory can hang from a door hook, sewing station, mannequin, cabinet knob, or craft-room organizer.
One of the most attractive features of this Scissor Door Pattern is its compact construction. Instead of storing scissors inside drawers where they can become difficult to find, the fabric pocket keeps frequently used tools visible and within easy reach. The tapered pocket can accommodate embroidery scissors, thread snips, small craft scissors, marking pencils, seam rippers, clips, and other lightweight notions. A coordinated fabric strap allows the entire organizer to hang conveniently when it is not being used.
This is also an excellent project for using quilting cotton scraps. The inspiration combines several playful sewing-themed prints, creating a colorful accessory without requiring much fabric. You can reproduce that scrappy appearance or make a sophisticated version using coordinated florals, solids, gingham, batiks, or traditional quilt prints. The tutorial below explains how to create the pocket, add batting and lining, sew the hanging strap, install the hardware, and finish the organizer with neat professional details.
Materials, Measurements and Fabric Preparation
For the main quilted scissor holder, choose medium-weight 100% quilting cotton. Cotton is particularly suitable because it is easy to cut accurately, presses beautifully, and is available in countless prints that coordinate with sewing-room décor.
DISCOVER MORE FREE PATTERNS HERE!
You will need approximately one fat quarter for the exterior, one fat quarter for the lining, a small piece of thin fusible fleece or batting, coordinating thread, and fabric for the neck or hanging strap. Scraps are perfectly suitable if you prefer a patchwork appearance.
The holder shown in the inspiration has a gently tapered shape. A practical finished measurement is approximately 4 inches (10 cm) wide across the upper opening, 2½–3 inches (6.5–7.5 cm) wide at the bottom, and 7–8 inches (18–20 cm) tall.
For larger dressmaking scissors, increase both the width and height. Before cutting expensive fabric, place your scissors on paper and draw the desired pocket around them, leaving room for seam allowances and easy removal.
Use a standard ¼-inch (6 mm) seam allowance unless otherwise noted. Add the seam allowance around your paper template before cutting the fabric.
Cut two exterior pieces using your tapered pocket template. Cut two matching lining pieces and two pieces of thin batting or fusible fleece. The stabilizer should provide enough structure to prevent the pocket from collapsing without making it excessively bulky.
For the hanging strap, cut a strip approximately 3–3½ inches (7.5–9 cm) wide and 34–40 inches (86–102 cm) long. The exact length depends on whether you want a short hanging loop or a longer lanyard similar to the inspiration.
You will also need a swivel hook, lobster clasp, or small snap hook. Hardware with an opening around ½–¾ inch (12–20 mm) generally works well for a lightweight sewing organizer.
An optional small D-ring can be incorporated between the pocket and clasp. This allows the pocket to be removed from the strap if desired.
Prepare a rotary cutter, cutting mat, acrylic ruler, fabric scissors, sewing clips or pins, iron, sewing machine, turning tool, and removable fabric marker.
If you want a quilted appearance, fuse the fleece to the wrong side of each exterior piece.
You can then add simple quilting lines before constructing the pocket. Diagonal lines, diamonds, vertical channels, or gentle crosshatching all work well.
Keep the quilting relatively simple because this is a small accessory.
Press each piece after quilting, then place your template over it again and trim the edges if quilting caused minor distortion.
For additional durability around the opening, consider adding a narrow strip of lightweight interfacing along the upper edge.
The most important measurement is the opening. Test your largest pair of scissors against the unsewn pieces before proceeding.
The handles should enter comfortably while remaining secure enough that the scissors do not fall out when the holder is hanging.
Sewing the Quilted Scissor Pocket
Begin by preparing the exterior and lining separately.
Place the two exterior pieces right sides together. Align the side and bottom edges carefully, leaving the top completely open.
Pin or clip around the perimeter.
Sew down one side, around the bottom, and up the opposite side using your ¼-inch seam allowance.
Backstitch at both ends because the upper corners receive extra stress when tools are inserted and removed.
If your pattern has a narrow bottom, sew slowly when approaching the corners.
A slightly rounded bottom rather than an extremely sharp point can make turning easier and provide more room for the tips of the scissors.
Trim excessive batting from the seam allowances.
Clip the bottom corners carefully without cutting through the stitching.
Turn the exterior right side out and gently shape the corners.
Press the exterior lightly.
Now construct the lining in exactly the same way, but leave a 2–3 inch (5–7.5 cm) turning opening along one side or across the bottom.
Do not turn the lining right side out yet.
Place the finished exterior pocket inside the lining so the right sides of the exterior and lining face each other.
Match the upper raw edges.
Align the side seams carefully.
Clip around the entire opening.
Sew around the upper edge using a ¼-inch seam allowance.
For a tapered holder, take extra care near the side seams so the lining does not twist.
Pull the exterior through the opening left in the lining.
Continue pulling until the entire project is right side out.
Push the lining into the exterior shell.
Use your fingers to roll the upper seam outward until it sits cleanly.
Press the upper edge.
Topstitch approximately ⅛ inch (3 mm) from the edge.
This topstitching provides a professional finish and helps prevent the lining from rolling outward during use.
Close the lining’s turning opening with a narrow machine stitch or invisible ladder stitch.
At this point, test the pocket.
Insert several pairs of scissors and a seam ripper.
The tools should stand upright while their handles remain accessible.
If you want separate internal sections, add vertical stitching before final assembly to create narrow compartments.
However, avoid making the compartments too small.
The organizer in the inspiration works particularly well because different tools can overlap naturally within one flexible opening.
A second exterior pocket can also be added.
Cut a smaller rectangle or tapered piece, finish its upper edge, and stitch it onto the front exterior panel before assembling the main holder.
This additional pocket is useful for a seam ripper, measuring gauge, marking pencil, crochet hook, or thread snips.
Once the pocket is complete, you can prepare the distinctive fabric hanging strap.
Making the Fabric Lanyard and Hanging Attachment
The long fabric strap transforms this simple pocket into the complete Scissor Door Pattern.
Take the fabric strip prepared earlier.
Press it in half lengthwise with wrong sides together.
Open the strip.
You should now have a clear center crease.
Fold each long raw edge inward until it meets the center crease.
Press again.
Fold the strip in half along the original center line.
All raw edges should now be enclosed.
This technique creates a strong four-layer fabric strap similar to handmade binding.
Topstitch approximately ⅛ inch (3 mm) from both long edges.
Sew slowly and maintain an even distance from the edges.
For additional strength, you can add another stitching line through the center.
Pass one end of the strap through the opening of your swivel hook.
Fold approximately 1 inch (2.5 cm) of fabric toward the wrong side.
Fold again to conceal the raw edge.
Stitch securely.
A small rectangular stitch pattern with an X through the center creates excellent reinforcement.
Repeat at the opposite end if your design uses additional hardware.
For a continuous lanyard similar to the photo, bring both strap ends together and connect them securely near the clasp.
Another option is to create a detachable strap with two snap hooks.
The pocket itself now needs a small attachment loop.
Cut a strip approximately 2 inches (5 cm) long from folded fabric or sturdy cotton webbing.
Fold it through a D-ring if using one.
Insert the raw ends into the upper side seam area of the holder and stitch securely.
If the pocket has already been completed, the loop can be sewn to the upper back section with a reinforced square-and-X stitch.
Connect the swivel hook to this loop.
Lift the entire organizer by the strap.
The pocket should hang vertically without twisting excessively.
Now load it with the tools you expect to store.
Check that the attachment remains stable.
Because scissors can be relatively heavy, reinforcement is important.
Do not rely on a single line of stitching at the attachment point.
Sew several passes or use a compact box stitch.
If the strap will hang around the neck while sewing, adjust the length before permanently joining the ends.
The pocket should rest around the upper chest or waist area without interfering with movement.
If it is intended exclusively as a door-hanging scissor organizer, a shorter strap may be more practical.
You can also add a breakaway connector to a neck-worn version for additional convenience.
Once the strap length has been tested, trim stray threads and give the project a final press.
Avoid pressing directly over plastic or metal hardware.
Your handmade hanging organizer is now ready for use.
Customizing and Finishing Your Scissor Door Pattern
One advantage of the Scissor Door Pattern is how easily it can be personalized.
The inspiration uses several contrasting prints, giving the organizer a cheerful handmade appearance. You can achieve a similar effect by combining small pieces from your fabric scrap collection.
For a coordinated sewing-room look, choose three fabrics from the same collection.
Use one for the exterior pocket, another for the lining, and the third for the strap.
A darker strap paired with a lighter pocket creates attractive contrast.
You can also piece the exterior from several narrow fabric strips.
Sew the scraps together first, press the seams, add batting, quilt the panel, and then cut the pocket shape from the completed patchwork.
This creates a genuine miniature quilted accessory.
Decorative stitching is another easy customization.
Use contrasting thread around the opening or add a small line of machine embroidery before assembly.
A monogram can turn the organizer into a personalized gift.
Consider adding a small label to the back with the recipient’s name.
For someone who sews frequently, additional pockets can make the design even more useful.
Create one main compartment for scissors and narrower compartments for a seam ripper, fabric marker, turning tool, small ruler, or crochet hook.
Do not overload the organizer.
The hanging system is best suited to lightweight sewing notions rather than heavy rotary cutters or large metal tools.
For an especially sturdy version, use canvas or lightweight denim for the exterior and quilting cotton for the lining.
Reduce the amount of batting if the exterior fabric is already heavy.
A soft floral version can create a romantic cottage look.
Black and white fabrics can produce a contemporary sewing-room accessory.
Bright rainbow scraps create a playful design similar to the inspiration.
Christmas fabrics can transform the pattern into a useful handmade holiday gift.
A set consisting of a scissor holder, pincushion, needle book, and fabric basket can make a beautiful gift for another quilter.
You can even coordinate all four accessories from the same group of scraps.
Before using the finished holder regularly, inspect every seam.
Pay particular attention to the strap connection and hardware attachment.
Reinforce any area that appears weak.
Because scissors have pointed ends, make sure the bottom of the pocket contains sufficient padding.
For extra protection, insert a second layer of batting or a small piece of heavyweight interfacing into the lower section.
The completed hanging sewing organizer should feel structured but flexible, keeping frequently used tools accessible without occupying valuable table space.
FAQ – Scissor Door Pattern
What is a Scissor Door Pattern?
It is a sewing pattern for making a hanging fabric organizer designed to hold scissors and other small sewing tools. A fabric strap or loop allows it to hang from a convenient location.
What fabric should I use?
100% quilting cotton works very well. Canvas, lightweight denim, or home décor cotton can also be used when additional structure is desired.
How large should the pocket be?
A useful starting size is approximately 4 inches (10 cm) wide at the opening and 7–8 inches (18–20 cm) tall. Adjust the dimensions according to your scissors.
Do I need batting?
Yes, thin batting or fusible fleece is recommended because it provides cushioning and structure.
Can I use fabric scraps?
Absolutely. This is an excellent scrap quilting project, especially because the pocket and strap require relatively narrow pieces.
What seam allowance should I use?
A consistent ¼-inch (6 mm) seam allowance works well for most of the construction.
Can I make separate compartments?
Yes. Vertical stitching can divide the pocket into sections for different tools.
How long should the hanging strap be?
Approximately 34–40 inches (86–102 cm) is a useful range for a longer lanyard. Shorten it considerably if the organizer will only hang from a door or wall hook.
What hardware works best?
A small swivel hook or lobster clasp is practical because the pocket can easily be detached.
Can I make the holder without hardware?
Yes. Sew a permanent fabric loop directly to the pocket if you prefer an entirely fabric construction.
How can I make the pocket stronger?
Use fusible fleece, additional interfacing, reinforced attachment stitches, and quality quilting cotton.
Can I add quilting to the holder?
Yes. Straight lines, diamonds, or crosshatching can provide extra structure and decorative texture.
Can I use it for tools other than scissors?
Yes. It can hold seam rippers, fabric markers, small rulers, thread snips, crochet hooks, clips, and similar lightweight tools.
Would this make a good handmade gift?
Yes. It is small, useful, customizable, and can easily be paired with other sewing accessories.
Can beginners make this pattern?
Yes. The project uses approachable techniques including straight stitching, lining construction, topstitching, and making a fabric strap.
How do I protect the bottom from scissor tips?
Use batting and consider adding heavyweight interfacing or an extra reinforcement layer inside the bottom portion.
Can I make a larger version?
Yes. Trace your largest scissors and enlarge the pocket while maintaining sufficient ease around the handles and tips.
Conclusion
The Scissor Door Pattern is a clever way to combine quilting, organization, and everyday practicality in one small sewing project. With a padded fabric pocket and convenient hanging strap, frequently used scissors and sewing notions can remain accessible without cluttering the worktable.
The design shown in the inspiration is especially appealing because it mixes playful quilting fabrics with a long coordinated strap and simple metal hardware. The result feels like a miniature piece of functional patchwork rather than an ordinary storage accessory.
For the best result, concentrate on accurate cutting, a consistent ¼-inch seam allowance, sufficient reinforcement at the hanging point, and enough batting to protect the bottom of the pocket. Test the dimensions with your actual scissors before final assembly so the finished organizer fits your tools comfortably.
PATTERN VIDEO:
Once you have made the first quilted scissor holder, the pattern is easy to customize. Create one from floral scraps, another from bright modern prints, or make a coordinated set for your sewing room. Small, practical, and highly customizable, this Scissor Door Pattern is a wonderful project for turning leftover quilting fabric into an organizer you can enjoy every time you sew.