
Sewing Machine Bag Pattern is a practical fabric project designed to protect a sewing machine from dust while also creating a beautiful handmade accessory for the sewing room. Inspired by the project shown in the reference image, this design combines a structured outer cover, soft lining, rounded upper corners, optional decorative appliqués, and a front section that can open to make placing or removing the machine much easier. The result is a functional fabric sewing machine cover that can be customized to fit many domestic sewing machines.
One of the best things about making a Sewing Machine Bag Pattern yourself is the ability to adapt every measurement to your own machine. Sewing machines vary considerably in height, width, depth, handle position, and overall shape. Instead of relying completely on one fixed size, this tutorial uses the approximate proportions visible in the project while also explaining how to measure your own machine. This approach helps produce a cover that is neither excessively loose nor uncomfortably tight.
The purple gingham fabric in the inspiration gives the project a cheerful handmade appearance, while the small heart details add personality without making the design complicated. You can reproduce this style with cotton fabric, gingham, quilting cotton, lightweight canvas, or home décor fabric. Adding interfacing or batting provides structure, while a smooth cotton lining protects the machine. With accurate measurements and patient assembly, this project is approachable for confident beginners while still offering enough customization for experienced sewists.
Materials, Measurements, and Preparing the Pattern Pieces
For this Sewing Machine Bag Pattern, begin with approximately 1½ to 2 yards (1.4–1.8 m) of exterior fabric and approximately the same amount of lining. The exact quantity depends on the size of your sewing machine and the width of your fabric. Directional prints may require additional material because all pieces need to face the same direction.
DISCOVER MORE FREE PATTERNS HERE!
You will also need approximately 1½ yards (1.4 m) of fusible interfacing, fleece, or thin batting. Medium-weight fusible interfacing creates a relatively crisp cover, while fusible fleece provides additional softness and protection. For a structured bag intended to be transported occasionally, consider combining firm interfacing with a padded layer.
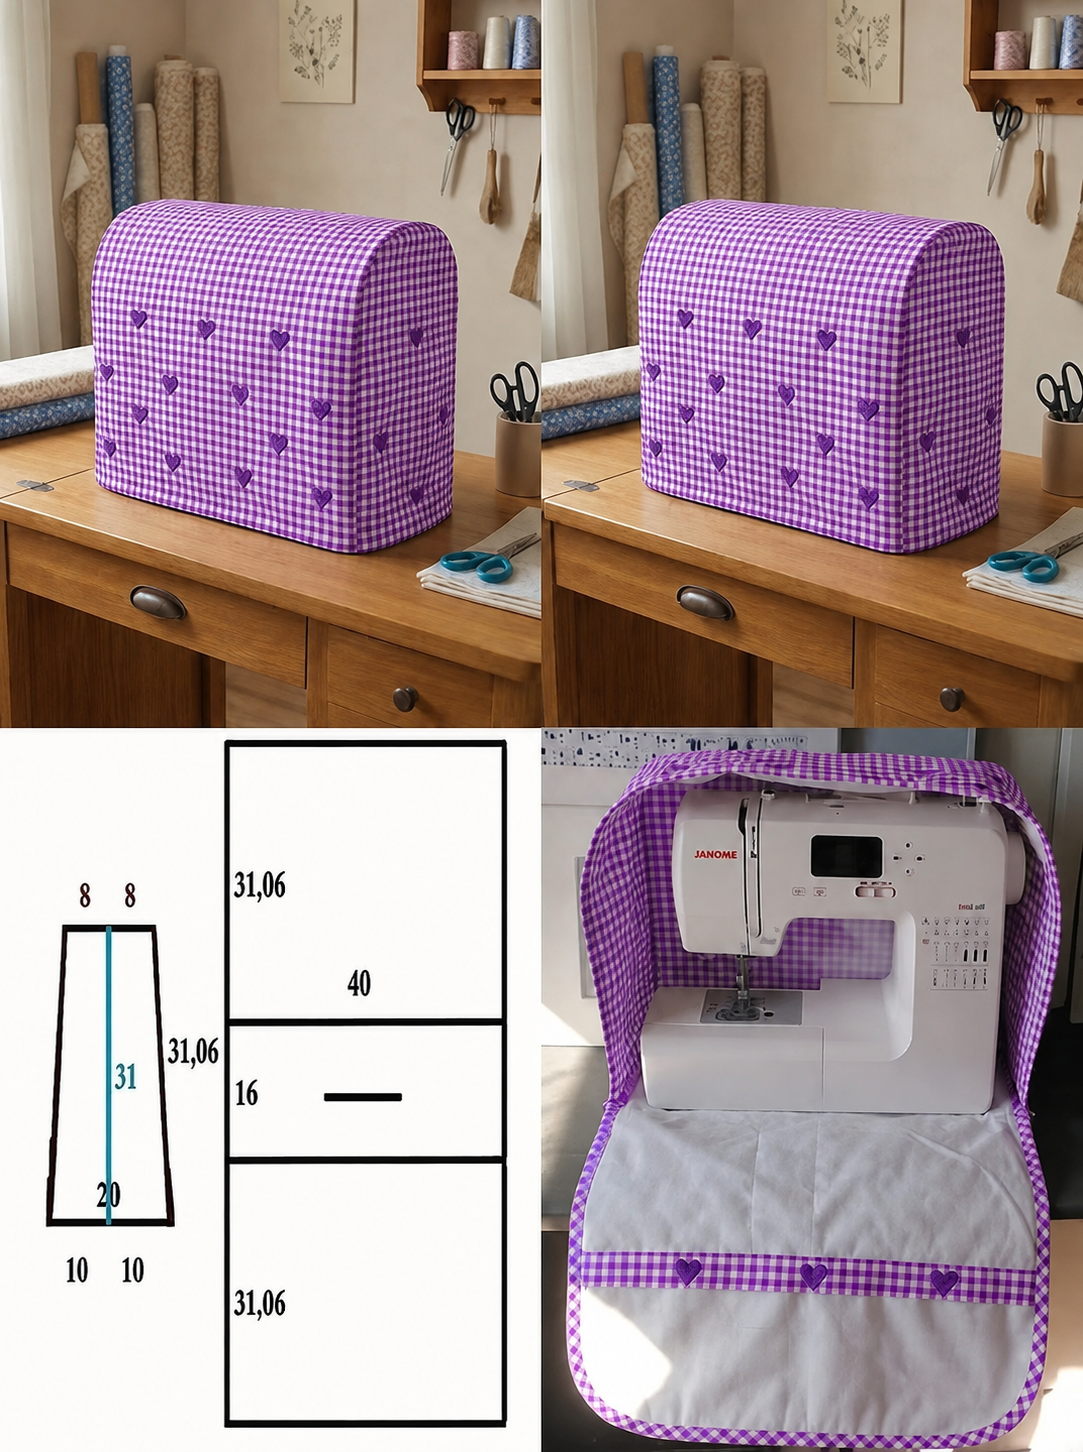
The reference design suggests a main rectangular section approximately 40 cm (15¾ inches) wide, with front and back sections around 31 cm (12¼ inches) high and a central depth section of approximately 16 cm (6¼ inches). These measurements should be treated as starting points rather than universal dimensions.
The side panel shown in the reference is approximately 31 cm (12¼ inches) tall, around 20 cm (7⅞ inches) wide at the bottom, and approximately 16 cm (6¼ inches) across the top. This slight taper helps create the rounded, structured silhouette visible in the finished cover.
Before cutting anything, measure your actual machine. Record its width, height, and depth. Add approximately 1–2 inches (2.5–5 cm) of ease to the appropriate measurements so the cover can slide over the machine without pulling. Remember to include a ⅜-inch (1 cm) seam allowance if it is not already incorporated into your drafted pieces.
Cut matching pieces from the exterior fabric, lining, and interfacing. If adding embroidered or appliquéd hearts, attach them before assembling the cover. Decorative work is considerably easier while the pieces are still flat.
Constructing the Main Body of the Sewing Machine Bag
Start construction by applying the interfacing to the wrong side of every exterior piece according to the manufacturer’s instructions. Press carefully rather than moving the iron back and forth aggressively. Properly fused interfacing gives the fabric sewing machine bag its clean, professional shape.
If using batting instead, temporarily baste it to the exterior fabric. You may quilt the layers together with straight lines, diamonds, or another simple pattern. Quilting is optional, but it can make the finished project more durable while preventing batting from shifting.
Prepare the large main panel next. This section travels from the front of the machine, over the top, and down the back. Mark the points where the fabric transitions from front to top and from top to back. These reference marks will be important when attaching the side panels.
Round the upper corners gently. You can use a plate, bowl, or curved ruler to create identical curves. Avoid extremely tight curves because they are more difficult to sew smoothly and may create puckering.
Pin or clip one side panel to the main body with right sides together. Begin around the lower edge and gradually work toward the curved upper section. Make small alignment marks at the center top and corners before pinning so the pieces remain symmetrical.
Sew slowly around the curve using approximately a ⅜-inch (1 cm) seam allowance. Repeat with the opposite side. Clip the curved seam allowances carefully without cutting through the stitching. Turn the exterior right side out temporarily and inspect the overall shape before continuing.
Making the Lining, Opening, Handle, and Interior Details
Construct the lining using essentially the same method as the exterior shell. Join the side pieces to the large lining panel, carefully matching all corresponding points. Leave an opening of approximately 4–6 inches (10–15 cm) in an inconspicuous seam if you plan to use the traditional bag-turning method.
A useful addition to this Sewing Machine Bag Pattern is an interior pocket. Cut a rectangle approximately 10 × 16 inches (25 × 40 cm), fold it right sides together, sew around the edges while leaving a turning gap, turn, press, and topstitch it onto the lining. Divide it into smaller compartments if desired.
Such pockets are useful for keeping presser feet, bobbins, needles, small scissors, measuring tapes, machine manuals, and other lightweight sewing accessories together. Avoid placing heavy tools inside unsupported pockets because excessive weight can distort the lining.
If you want the cover to function more like a true carrying bag, add reinforced handles. Cut two fabric strips approximately 4 inches (10 cm) wide and 18–22 inches (46–56 cm) long. Fold the raw edges toward the center, fold again, press, and topstitch both sides. Alternatively, use sturdy cotton webbing.
Position handles symmetrically and reinforce each attachment point with a rectangle and an X-shaped line of stitching. Remember that a domestic sewing machine can be heavy. Decorative fabric handles alone should not be assumed to safely support the machine unless the entire bag has been engineered and reinforced specifically for carrying that weight.
For a dust-cover version like the inspiration, handles are optional. You can instead create an opening aligned with the sewing machine’s built-in handle. Measure the handle position carefully and finish the opening with binding or a facing for a clean appearance.
Final Assembly, Binding, and Professional Finishing
Place the exterior shell and lining right sides together. Match the lower edges and all important seams. Pin or clip generously so the layers cannot shift while sewing.
Stitch around the opening using the established seam allowance. Turn the project right side out through the opening left in the lining. Carefully push out the corners and curves without stretching the fabric.
Press the edges thoroughly. Then close the lining opening with a narrow machine stitch or invisible ladder stitch. Topstitching around the lower opening gives the Sewing Machine Bag Pattern a crisp finished edge and helps keep the lining inside.
Another attractive finishing option is bias binding. The reference project uses contrasting trim around the lower edge, which visually frames the gingham fabric. Cut your own bias strips or use ready-made binding approximately ¾–1 inch (2–2.5 cm) wide when finished.
For additional decoration, small fabric or felt hearts can be stitched across the exterior. Keep their placement evenly spaced. Purple-on-purple creates a coordinated look, while contrasting hearts can turn the cover into a colorful scrap-fabric project.
Finally, place the finished cover over the machine and inspect the fit. There should be enough room to move the cover on and off easily without excessive fabric gathering around the base. Steam lightly if appropriate for your chosen materials, and the project is ready to use.
FAQ About the Sewing Machine Bag Pattern
What is a Sewing Machine Bag Pattern?
A Sewing Machine Bag Pattern provides the shapes and construction method needed to create a protective fabric cover or structured bag for a domestic sewing machine.
What fabric is best for this project?
Quilting cotton, cotton canvas, gingham, denim, twill, and lightweight upholstery fabric are all suitable choices.
Can beginners sew this project?
Yes. A confident beginner who can sew curved seams and attach lining should be able to complete it successfully.
How much fabric do I need?
Most domestic machines will require approximately 1½–2 yards (1.4–1.8 m) each of exterior and lining fabric, although machine size can change this amount.
Should I use interfacing?
Yes, especially when working with ordinary quilting cotton. Fusible interfacing helps the cover maintain its shape.
Can I use batting?
Absolutely. Thin batting or fusible fleece creates a padded sewing machine cover and provides additional protection.
What seam allowance should I use?
A ⅜-inch (1 cm) seam allowance works well for this project. Consistency is more important than the exact allowance chosen.
What approximate measurements are shown in the reference design?
The inspiration suggests a main width of about 40 cm (15¾ inches), front/back heights near 31 cm (12¼ inches), and an upper depth section around 16 cm (6¼ inches).
Will those measurements fit every sewing machine?
No. Always measure your own machine before cutting because models vary significantly.
How much ease should I add?
Approximately 1–2 inches (2.5–5 cm) of additional room generally provides a comfortable cover fit.
Can I add pockets?
Yes. Interior or exterior pockets are excellent for storing lightweight sewing accessories.
Can I add a zipper?
Yes. A long zipper can transform the project from a simple cover into a more enclosed bag.
Can I make it from denim?
Yes. Denim is durable and gives the project excellent structure, although bulky seam intersections may require a denim needle.
What needle should I use?
A universal 80/12 or 90/14 needle works for many cotton fabrics. Heavier materials may require a jeans or denim needle.
Can I quilt the exterior?
Yes. Quilting the exterior fabric to batting makes the bag more padded and decorative.
How do I make smooth rounded corners?
Draw identical curves with a template, sew slowly, and clip the seam allowance before turning.
Can I make the purple gingham version shown in the inspiration?
Yes. Choose purple-and-white gingham and add darker purple heart appliqués for a similar aesthetic.
Should the lining be the same fabric?
Not necessarily. A contrasting lining can make the interior brighter and easier to see.
Can this bag safely carry a heavy sewing machine?
A basic fabric cover should not automatically be treated as a load-bearing carrier. If you intend to transport a machine, reinforce the base, handles, seams, and structural layers appropriately for its weight.
Can the pattern be customized?
Yes. You can add pockets, handles, zippers, appliqués, embroidery, quilting, labels, binding, or additional padding.
Conclusion
The Sewing Machine Bag Pattern is a useful sewing-room project that combines protection, organization, and decorative fabric work. Rather than leaving a sewing machine exposed between projects, a handmade cover helps reduce dust while adding a coordinated textile element to the workspace.
The most important part of this project is accurate measuring. Although approximate dimensions can provide a helpful starting point, always measure the width, height, and depth of your own sewing machine before cutting. Allow enough ease for the cover to slide comfortably into place.
Fabric selection can completely transform the finished appearance. Purple gingham with heart appliqués creates a cheerful design similar to the inspiration, while florals can produce a cottage-style cover. Denim offers durability, neutral linen provides a minimalist appearance, and patchwork scraps can turn the project into a colorful scrap-busting opportunity.
Structure is equally important. Combining exterior fabric with interfacing, fusible fleece, or batting prevents the cover from collapsing and creates smoother rounded corners. A properly fitted lining hides raw seams and gives the interior a professional finish.
You can keep the design simple as a dust cover or expand it with pockets, reinforced handles, a zipper, binding, and additional padding. This flexibility makes the Sewing Machine Bag Pattern suitable both as a practical personal project and as a thoughtful handmade gift for someone who loves sewing.
With careful measurements, accurately cut pieces, smooth curved seams, a neat lining, and well-pressed finishing, this Sewing Machine Bag Pattern can become a durable and attractive addition to any sewing room—while providing plenty of opportunities to personalize the project with favorite fabrics, colors, quilting details, and decorative appliqués.