
A quilted sewing machine cover is one of those handmade projects that combines beauty, practicality, and creativity. It protects your sewing machine from dust while adding a charming decorative touch to your sewing room. With soft floral fabrics, delicate stitching, and carefully selected colors, this project transforms an everyday accessory into something truly special.
The Sewing Machine Cover Pattern featured in this tutorial has a lovely vintage-inspired appearance. Its sage-green floral fabric, cream-colored appliqué panel, decorative sewing machine design, and practical side pocket create an elegant combination. The gently rounded top gives the cover a professional finish, while the quilted surface adds texture and structure.
This project is especially appealing to quilters who enjoy making useful accessories for their creative spaces. Whether you are decorating your own sewing room, preparing a thoughtful handmade gift, or practicing quilting and appliqué techniques, this DIY sewing machine cover offers an enjoyable opportunity to combine several sewing skills in one beautiful project.
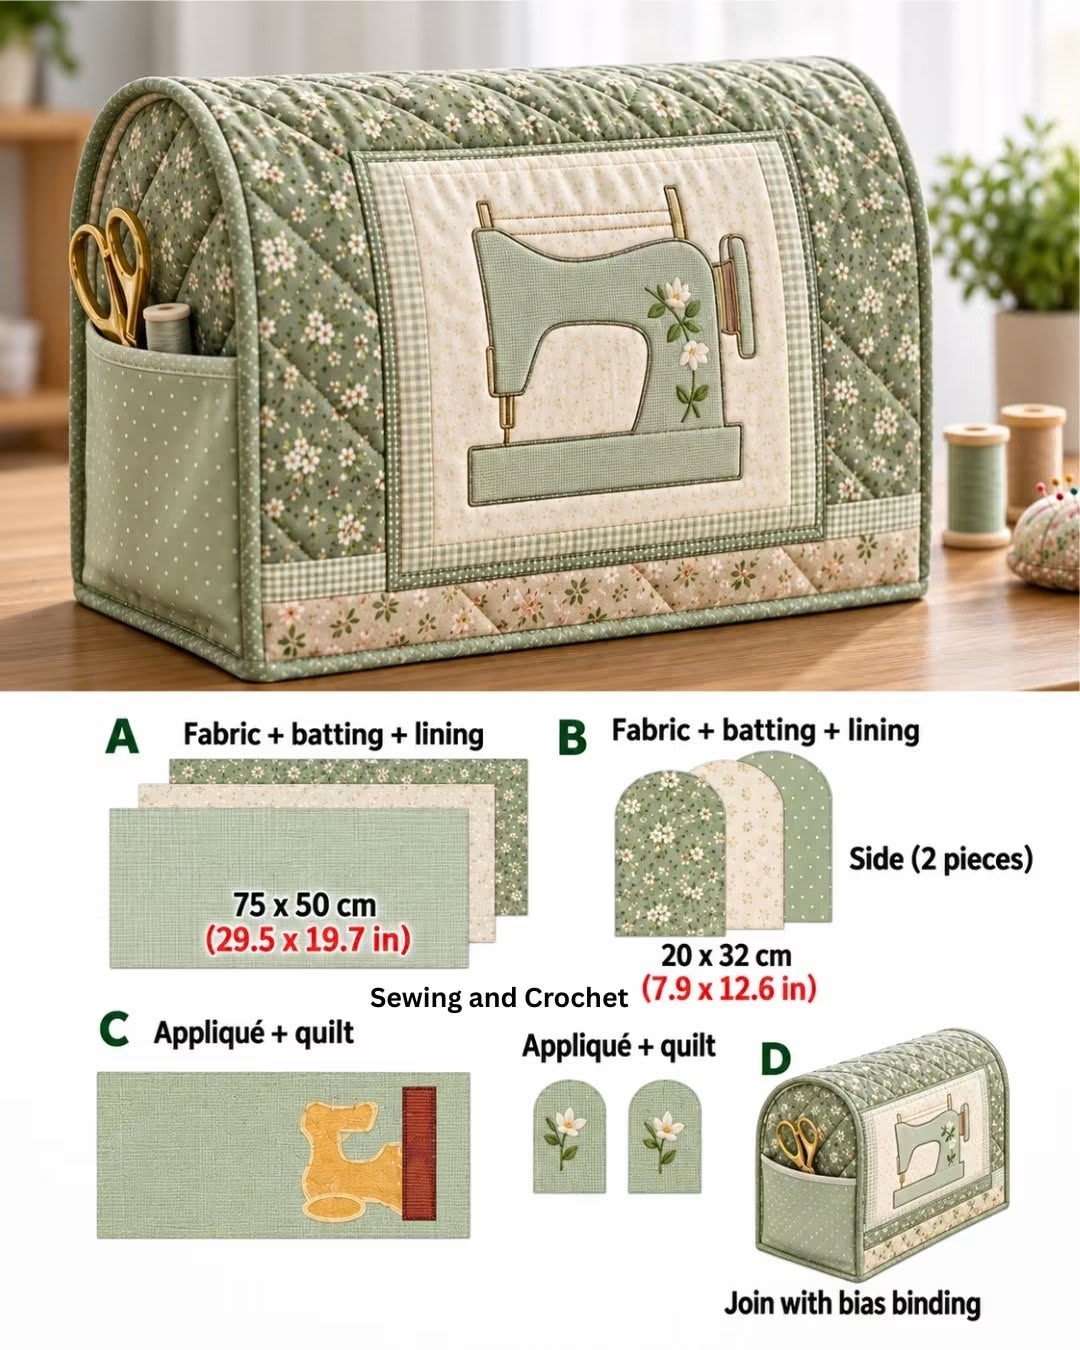
1. Materials and Measurements for the Sewing Machine Cover
Before beginning, gather your materials and prepare a clean cutting surface. Choosing coordinating fabrics will help your finished cover look polished and harmonious.
DISCOVER MORE FREE PATTERNS HERE!
For a vintage-inspired design, consider combining sage green, ivory, soft beige, and delicate floral prints. Small gingham details and matching binding can add an especially attractive finishing touch.
Materials Needed
- 75 × 50 cm (29.5 × 19.7 in) main floral cotton fabric for the central cover panel.
- 75 × 50 cm (29.5 × 19.7 in) cotton lining fabric.
- 75 × 50 cm (29.5 × 19.7 in) quilt batting.
- Two side panels, each approximately 20 × 32 cm (7.9 × 12.6 in), cut from the main fabric.
- Two matching side lining pieces and two batting pieces.
- Coordinating cotton scraps for the sewing machine appliqué.
- Cream or beige fabric for the decorative front panel.
- Green gingham fabric for borders.
- Extra cotton fabric for the side pocket.
- Approximately 3–4 meters (3.3–4.4 yards) of bias binding, depending on the finished dimensions.
- Matching sewing thread.
- Fusible appliqué web.
- Fabric scissors or rotary cutter.
- Quilting ruler and cutting mat.
- Sewing machine.
- Quilting pins or clips.
- Fabric marking pen.
- Iron and ironing board.
Suggested Finished Measurements
The measurements below are a starting point for a medium-size domestic sewing machine.
| Part | Suggested measurement |
|---|---|
| Main cover panel | 75 × 50 cm |
| Side panels | 20 × 32 cm each |
| Decorative front panel | 28 × 24 cm |
| Side pocket | 18 × 16 cm |
| Seam allowance | 1 cm |
| Binding width before folding | 4 cm |
Important: Sewing machines vary in size. The photograph provides suggested cutting dimensions, not a guaranteed fit for every machine.
Measure your machine’s width, height, and front-to-back depth before cutting. Include protruding handles, knobs, and thread guides, then add approximately 2–3 cm of ease so the finished cover can be placed over the machine comfortably.
The main rectangular panel should travel from the bottom of one long side, across the rounded top, to the bottom of the opposite long side. The two shaped end panels determine the final profile.
2. Preparing the Fabric and Creating the Quilted Panels
The first construction stage involves preparing the fabric layers and quilting them together. This gives the quilted sewing machine cover its characteristic padded texture.
For the main panel, place the lining fabric wrong side up on your work surface. Position the batting on top, followed by the floral fabric with its right side facing upward.
Smooth the layers carefully and secure them with quilting pins or temporary basting spray. Avoid stretching the fabric, especially near the edges.
Step 1: Quilt the Main Panel
Using a fabric marking pen, draw diagonal lines approximately 4 cm (1.6 in) apart across the main panel.
Sew along the marked lines with a walking foot if available. Add a second set of diagonal lines in the opposite direction to create a classic diamond quilting pattern.
This quilting technique helps prevent the layers from shifting and produces the soft, textured appearance visible in the inspiration image.
Step 2: Prepare the Rounded Side Panels
Cut two side-panel templates from paper using your machine measurements.
For the illustrated style, create a shape with a flat bottom, straight lower sides, and a smoothly rounded upper section. The overall template should fit within the suggested 20 × 32 cm rectangle if those dimensions suit your machine.
Use the template to cut two outer fabric pieces, two lining pieces, and two batting pieces.
Layer and quilt each side panel in the same manner as the main section.
Step 3: Create the Side Pocket
Cut two pocket fabric pieces approximately 18 × 16 cm (7.1 × 6.3 in).
Place them right sides together and sew around the edges, leaving a small opening for turning.
Trim the corners, turn right side out, press, and topstitch the upper edge.
Position the pocket on one quilted side panel. Sew along the two sides and bottom, leaving the top open.
This sewing machine cover with pocket provides convenient storage for small scissors, thread spools, measuring tape, or other lightweight sewing accessories.
Step 4: Prepare the Decorative Border
Cut narrow strips of coordinating gingham or floral fabric.
These strips can be added to the lower edge of the main panel to create a decorative border.
Press each strip before sewing and maintain a consistent seam allowance for a neat finish.
The combination of quilting, floral fabric, and contrasting borders creates the charming cottage-inspired style that makes this project so attractive.
3. How to Make the Sewing Machine Appliqué and Assemble the Cover
The central decorative panel is one of the most distinctive elements of this Sewing Machine Cover Pattern.
The image features a vintage-style sewing machine appliqué surrounded by coordinating fabric borders and delicate floral details.
You can reproduce this appearance using simple fabric shapes, fusible appliqué web, and decorative machine stitching.
Step 1: Prepare the Appliqué Background
Cut a cream-colored fabric rectangle approximately 28 × 24 cm (11 × 9.4 in).
Add narrow green gingham strips around the rectangle to create a framed decorative panel.
Press the seams toward the darker fabric and square the panel carefully.
If desired, add a thin layer of batting behind the panel before quilting it with diagonal lines.
Step 2: Create the Sewing Machine Shape
Draw a simplified vintage sewing machine silhouette on paper.
The design should include a horizontal machine arm, a curved opening beneath the arm, a lower base, and a small vertical needle section.
Transfer the shapes to fusible appliqué web following the manufacturer’s instructions.
Fuse the web to the wrong side of your chosen fabric, cut out the shapes, remove the paper backing, and arrange the pieces on the decorative background.
Use soft sage-green fabric for the machine body and a darker coordinating fabric for smaller details.
Step 3: Attach the Appliqué
Once you are satisfied with the arrangement, press the appliqué pieces into place.
Secure the edges with a narrow zigzag stitch, blanket stitch, or decorative appliqué stitch.
For a more traditional appearance, use contrasting thread to outline the sewing machine shape.
Add small embroidered flowers, leaves, or decorative stitching to personalize the design.
A few tiny cream-colored flowers can make the appliqué look especially delicate without overwhelming the main composition.
Step 4: Attach the Decorative Panel
Center the completed appliqué panel on the front-facing portion of the main quilted cover.
Check its position by draping the main panel over your machine before sewing.
Topstitch around the panel edges, keeping the stitches straight and evenly spaced.
Make sure the appliqué remains visible when the cover is assembled.
Step 5: Assemble the Cover
Mark the center of the curved edge of each side panel and the corresponding center of the main panel’s top section.
With wrong sides together for an exposed binding finish, align one side panel with the appropriate edge of the main panel.
Clip the curved edges carefully, easing the main panel around the rounded shape without creating folds.
Baste the seam and check that the pieces fit smoothly.
Repeat with the second side panel.
If the main panel is too long, trim the excess evenly at the bottom. If it is too short, adjust the pattern before final stitching rather than stretching the fabric.
Step 6: Finish with Bias Binding
Cover the exposed joining seams with coordinating bias binding.
Bias binding is especially useful for rounded sections because it follows curves more easily than straight-grain strips.
Sew the binding slowly around the curved edges, keeping the fabric layers aligned.
Finish the bottom perimeter with matching binding to give the entire cover a coordinated appearance.
Press gently, avoiding excessive heat if your batting contains synthetic fibers.
The result is a structured quilted sewing machine dust cover with rounded sides, a decorative front, and a practical storage pocket.
4. Finishing Details, Customization, and Helpful Sewing Tips
One of the best things about this handmade sewing machine cover is how easily it can be customized.
Although the inspiration image features a sophisticated sage-green palette, the same construction method works beautifully with many different fabric combinations.
For a romantic sewing room, try dusty rose, ivory, and delicate floral prints.
For a classic country-style appearance, combine navy blue, cream, and small gingham patterns.
A Christmas version could feature forest green, deep red, and gold accents, while a modern design might use charcoal gray, white, and geometric fabrics.
Tips for a Professional Finish
Use quality cotton fabric. Quilting cotton is easy to cut, press, and stitch, making it ideal for this type of project.
Choose suitable batting. A medium-weight batting provides gentle structure without making the cover excessively stiff.
Check your measurements twice. The cover should fit comfortably over the sewing machine without pulling at the corners.
Keep the quilting consistent. Evenly spaced lines create a more balanced and professional appearance.
Use a walking foot when possible. This helps feed the layered fabrics evenly and reduces unwanted puckering.
Press during construction. Careful pressing improves the accuracy of your seams and gives the project a cleaner finish.
Adding More Storage
The side pocket can be divided into smaller compartments by sewing vertical lines through the pocket fabric before attaching it.
For example, one narrow compartment can hold scissors, while a wider section can accommodate a measuring tape or small sewing tools.
You can also add a second pocket to the opposite side of the cover.
Keep pockets shallow enough that stored tools do not pull the cover out of shape.
Creating a Personalized Gift
A DIY quilted sewing machine cover makes a thoughtful gift for someone who enjoys sewing.
Consider embroidering the recipient’s initials on the decorative panel or choosing fabrics that match their sewing room.
You could even create a coordinated set with a matching pincushion, sewing machine mat, thread organizer, or fabric storage basket.
These handmade accessories make a creative workspace feel organized, welcoming, and personal.
Caring for Your Finished Cover
Remove the cover before operating the sewing machine.
For routine care, gently shake off dust or use a soft brush.
If washing is necessary, follow the care instructions for your fabrics, batting, and appliqué materials.
Air-drying is generally a gentle option for preserving the cover’s shape.
Avoid placing heavy objects on top of the finished cover, especially if it has a softly padded rounded top.
Frequently Asked Questions About the Sewing Machine Cover Pattern
Is this sewing machine cover suitable for beginners?
Yes. A beginner with basic sewing experience can complete this project by working carefully through each stage.
The most challenging techniques are quilting multiple fabric layers, applying decorative shapes, and attaching the curved side panels.
Practicing these techniques on scrap fabric first can make assembly easier.
Can I make the cover without a sewing machine appliqué?
Absolutely.
The decorative panel is optional, and you can replace it with patchwork blocks, embroidered flowers, a monogram, or a favorite printed fabric.
A simple quilted cover without appliqué can be equally beautiful.
What type of fabric is best for this project?
100% cotton quilting fabric is an excellent choice because it is easy to sew and comes in a wide variety of patterns.
For a more structured cover, consider combining quilting cotton with suitable batting and a lightweight stabilizer.
How do I adjust the pattern for a larger sewing machine?
Measure the full width, height, and depth of your machine.
Create the two side templates first, allowing room for the machine’s protruding parts.
Then measure the perimeter that the main panel must follow around each side template.
Add seam allowances and a small amount of ease before cutting the final pieces.
Can I add pockets to both sides?
Yes. Adding pockets to both side panels is a practical option for storing sewing accessories.
Make sure the pockets are positioned where they will remain accessible after the cover is assembled.
Do I need to use bias binding?
Bias binding is recommended for this particular design because it produces a neat finish around the curved edges.
However, you can use a different construction method with enclosed seams if you prefer a fully lined cover.
How long does this project take?
The time required depends on your experience and the amount of decorative work.
A simple version may take approximately three to five hours, while a more detailed design with appliqué and extensive quilting may take longer.
Conclusion
The Sewing Machine Cover Pattern is a wonderful project for anyone who enjoys combining quilting, appliqué, and practical sewing accessories.
Its rounded shape, delicate floral fabrics, decorative stitching, and useful side pocket create a beautiful balance between function and style.
By carefully measuring your sewing machine, preparing the quilted panels, adding the decorative appliqué, and finishing the edges with coordinating binding, you can create a handmade cover that protects your equipment and enhances your sewing space.
Whether you choose the elegant sage-green palette shown in the inspiration image or experiment with your own favorite fabrics, this quilted sewing machine cover is a rewarding project that can bring handmade charm to your creative room for years to come.