
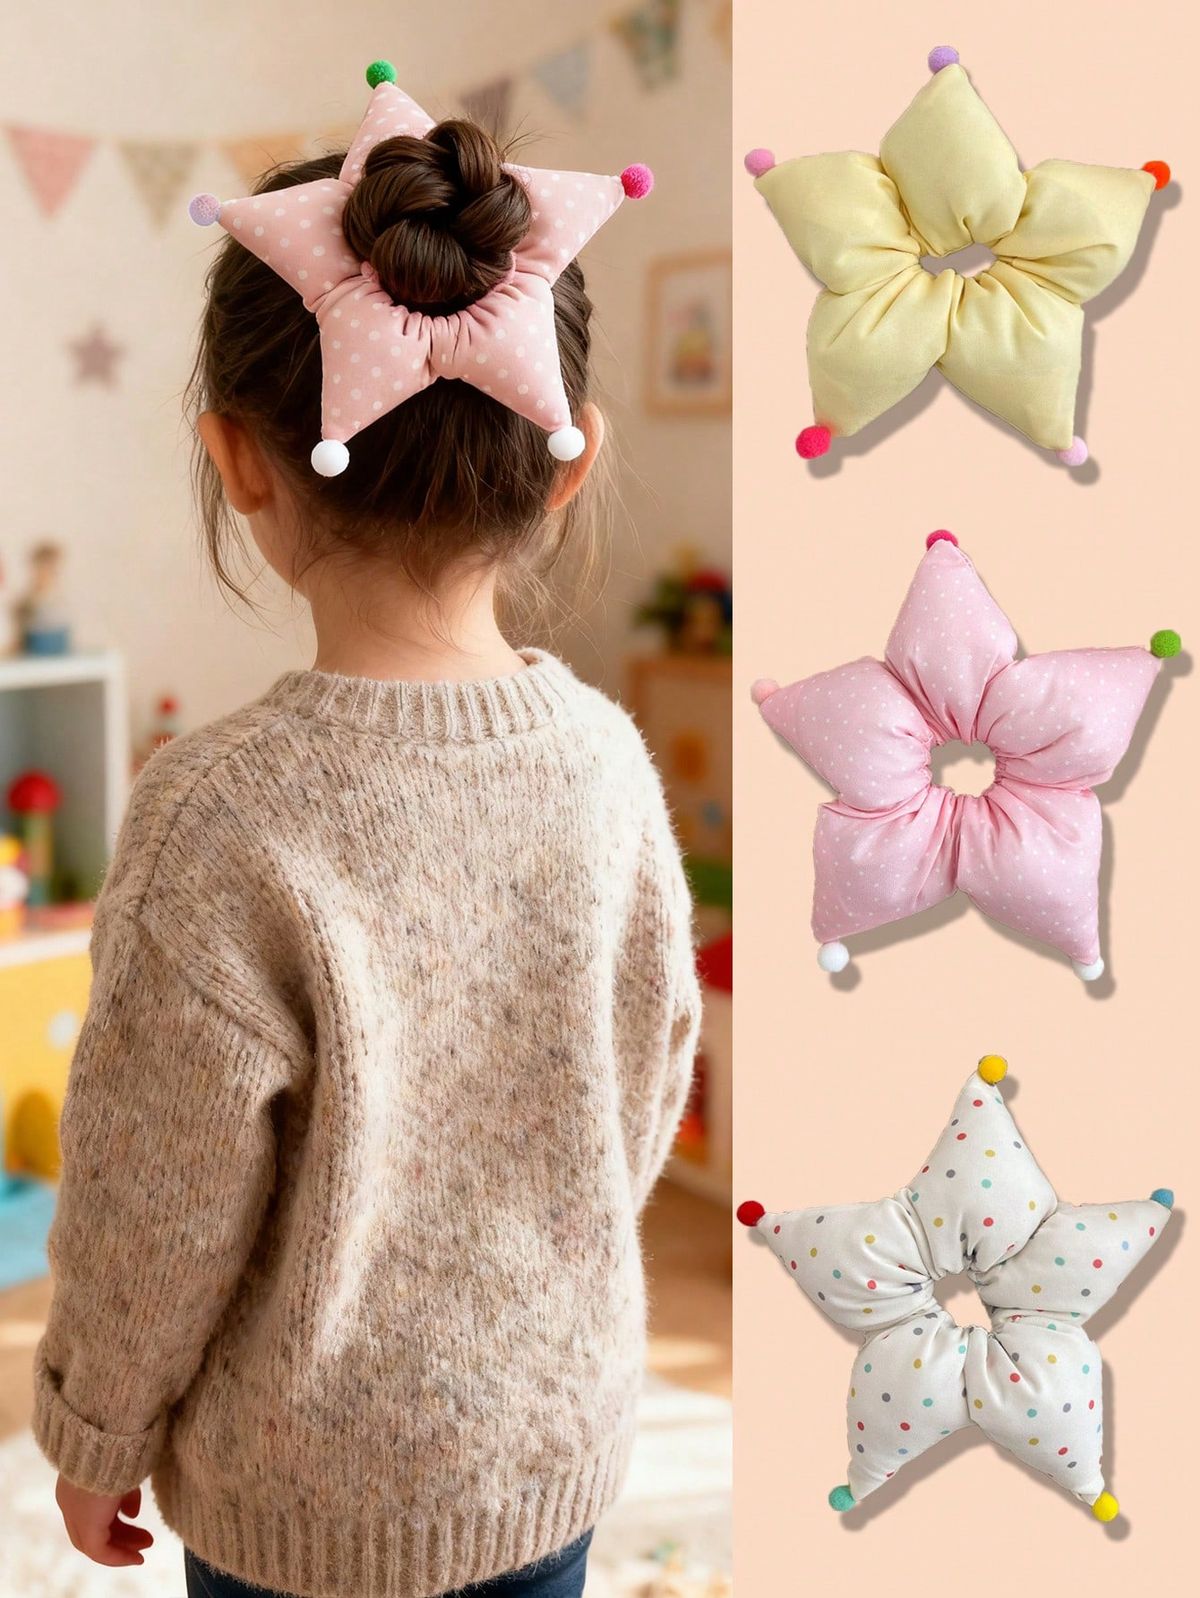
Star Scrunchie Pattern is a fun, creative, and beginner-friendly sewing project that transforms a simple hair accessory into a playful star-shaped decoration. Combining soft fabric, light stuffing, and an elastic hair tie, this charming Star Scrunchie Pattern is perfect for children, teens, and anyone who loves unique handmade accessories. Whether you’re creating gifts, stocking fillers, craft fair items, party favors, or stylish everyday hair accessories, this project is both practical and enjoyable. In this complete tutorial, you’ll learn step by step how to sew a beautiful star scrunchie with soft padded points, a comfortable elastic center, and professional finishing details.
One of the reasons the Star Scrunchie Pattern has become increasingly popular is its versatility. The design can be customized using countless fabric prints, seasonal colors, textured fabrics, decorative pom-poms, embroidery, lace trims, ribbons, or personalized embellishments. Soft pastels create adorable nursery accessories, while vibrant floral prints, polka dots, gingham, holiday fabrics, or playful novelty prints give every scrunchie its own personality. Because the project requires only small fabric pieces, it is also an excellent way to use quilting scraps.
Although the finished accessory looks professionally made, the Star Scrunchie Pattern uses simple sewing techniques that are suitable for beginners. Throughout this tutorial, you’ll learn how to choose fabrics, cut the star pieces accurately, sew and stuff each section, insert the elastic, assemble the center opening, shape the star evenly, and finish the accessory with beautiful decorative details that make it comfortable, durable, and attractive.
Choosing Materials for Your Star Scrunchie Pattern
The first step toward creating a beautiful Star Scrunchie Pattern is selecting soft, lightweight fabrics. Quilting cotton is one of the best choices because it is easy to sew, holds its shape well, and comes in countless colorful prints. Cotton poplin, linen blends, lightweight canvas, muslin, and double gauze also produce excellent results depending on the desired appearance.
DISCOVER MORE FREE PATTERNS HERE!
Choose fabrics that coordinate with your personal style or the season. Soft pinks, cream, mint green, lavender, baby blue, floral prints, gingham, tiny polka dots, stars, hearts, or cheerful novelty prints all create beautiful finished scrunchies. Holiday fabrics can also transform the accessory into festive seasonal decorations.
Gather all necessary sewing supplies before beginning. You’ll need matching thread, soft polyester fiberfill, ¼-inch elastic, safety pin or elastic threader, rotary cutter, quilting ruler, scissors, sewing clips or pins, iron, measuring tape, and a sewing machine. These basic tools make the construction process smooth and enjoyable.
Wash and press all fabrics before cutting. Prewashing removes shrinkage while pressing ensures clean cuts and accurate sewing throughout the project. Smooth fabric also helps maintain symmetrical star points during assembly.
Transfer the pattern carefully onto your fabric. Since the star points define the finished appearance, accurate cutting is essential. Use fabric marking tools that disappear easily or remain hidden inside the seam allowance.
Finally, organize all cut pieces before beginning assembly. Preparing everything in advance allows you to focus entirely on sewing while producing a polished Star Scrunchie Pattern with professional results.
Cutting, Sewing, and Shaping the Star
Begin the Star Scrunchie Pattern by placing two star-shaped fabric pieces right sides together. Pin or clip them carefully, paying particular attention to the narrow points of each star section. Accurate alignment helps create crisp, evenly shaped points after turning.
Sew around the entire outer edge using the recommended seam allowance, leaving a small opening near the center for turning and stuffing. Reduce your stitch length slightly around the corners to improve durability and achieve smoother curves.
Trim excess seam allowance around each point without cutting through the stitches. Small clips along curved sections also help the fabric lie smoothly after turning. These simple preparation steps significantly improve the finished appearance.
Turn the star right side out carefully using a blunt turning tool or chopstick. Gently push each point outward until the star becomes fully defined. Avoid using sharp tools that might damage the fabric.
Fill each star point gradually with small amounts of polyester fiberfill. Even stuffing creates soft, rounded sections while maintaining flexibility. Avoid overstuffing, which can make the scrunchie uncomfortable when worn.
After stuffing, close the opening with either an invisible ladder stitch or a narrow machine seam depending on your preferred finishing technique. Your Star Scrunchie Pattern should now display evenly shaped points and a smooth central opening ready for elastic insertion.
Adding the Elastic and Finishing the Scrunchie
Prepare a length of elastic suitable for the desired hair tie size. Attach a safety pin to one end and carefully thread it through the center casing of the Star Scrunchie Pattern. Move slowly to prevent twisting the elastic inside the channel.
Overlap the elastic ends securely and stitch several times using a reinforced zigzag stitch or multiple straight stitches. Strong reinforcement ensures the scrunchie withstands repeated stretching during everyday use.
Distribute the gathered fabric evenly around the elastic so that the center opening appears balanced. Gentle adjustments help maintain symmetrical star points while allowing the scrunchie to stretch comfortably.
If desired, add decorative pom-poms, tiny tassels, fabric-covered buttons, embroidery, lace edging, or ribbon accents. These small finishing touches personalize every Star Scrunchie Pattern while making each accessory unique.
Inspect the completed scrunchie carefully. Trim loose threads, reshape the stuffing if necessary, and gently press any flat areas with your hands. Avoid direct ironing over stuffed sections to preserve their soft dimensional appearance.
Your finished Star Scrunchie Pattern is now ready to wear, display, or gift. The combination of soft fabric, playful shape, and comfortable elastic creates a charming accessory suitable for both children and adults.
Creative Ideas and Care Tips
One of the greatest strengths of the Star Scrunchie Pattern is its endless customization possibilities. Create themed collections for birthdays, baby showers, holidays, school events, or seasonal celebrations by selecting coordinating fabrics and embellishments.
These scrunchies also make excellent handmade gifts. Pair several together inside a decorative gift box or fabric pouch for birthdays, Christmas stockings, Easter baskets, or party favors. Their small size makes them ideal for craft fairs and handmade markets as well.
Experiment with textured fabrics such as corduroy, velvet, waffle cotton, or soft linen for different visual effects. Mixing fabric textures creates unique accessories while expanding your sewing experience.
Store finished scrunchies in a clean, dry location away from direct sunlight to preserve fabric colors. Because they are lightweight and compact, they can easily be organized in baskets, drawers, or decorative containers.
To clean the finished Star Scrunchie Pattern, gently hand wash with mild detergent and cool water. Press excess moisture out using a towel and allow the accessory to air dry completely before wearing again.
Most importantly, enjoy every step of the creative process. Every completed Star Scrunchie Pattern reflects your sewing skills while producing a fun, practical accessory that brings joy to everyday hairstyles.
Frequently Asked Questions
Is the Star Scrunchie Pattern suitable for beginners?
Yes. This project uses simple sewing techniques and is an excellent introduction to small accessory construction.
What fabric works best?
Quilting cotton is highly recommended because it is easy to sew, durable, and available in countless beautiful prints.
What type of stuffing should I use?
Soft polyester fiberfill provides lightweight, even filling while keeping the star comfortable to wear.
Can I make different sizes?
Absolutely. Simply enlarge or reduce the pattern template to create miniature or oversized versions.
Can I decorate the star points?
Yes. Pom-poms, embroidery, lace, ribbons, beads, and decorative stitching all add unique personality to the finished scrunchie.
How long does this project take?
Most sewists can complete one Star Scrunchie Pattern in approximately one hour, making it an ideal quick sewing project.
Can I use fabric scraps?
Certainly. This is one of the best scrap-busting sewing projects since each scrunchie requires only small fabric pieces.
Is this a good handmade gift?
Yes. Handmade star scrunchies are thoughtful gifts for children, friends, family members, teachers, and anyone who enjoys unique handmade accessories.
Conclusion
The Star Scrunchie Pattern is a delightful sewing project that combines creativity, comfort, and playful design into one charming handmade accessory. Throughout this tutorial, you learned how to choose suitable fabrics, prepare the pattern pieces, sew and stuff the star, insert the elastic, personalize the design with decorative details, and finish the accessory using professional sewing techniques.
Whether you’re creating a fun accessory for everyday wear, making thoughtful handmade gifts, or using leftover quilting fabrics in a creative way, the Star Scrunchie Pattern offers endless opportunities for personalization and enjoyment. Every completed scrunchie becomes a unique accessory that combines practicality with handmade charm.
If you enjoyed this Star Scrunchie Pattern tutorial, we would truly love to hear from you. Please leave your honest opinion, share your sewing experience, and let us know your suggestions for future quilting and sewing patterns. Your sincere feedback inspires new ideas and helps build a creative community of passionate makers around the world.