
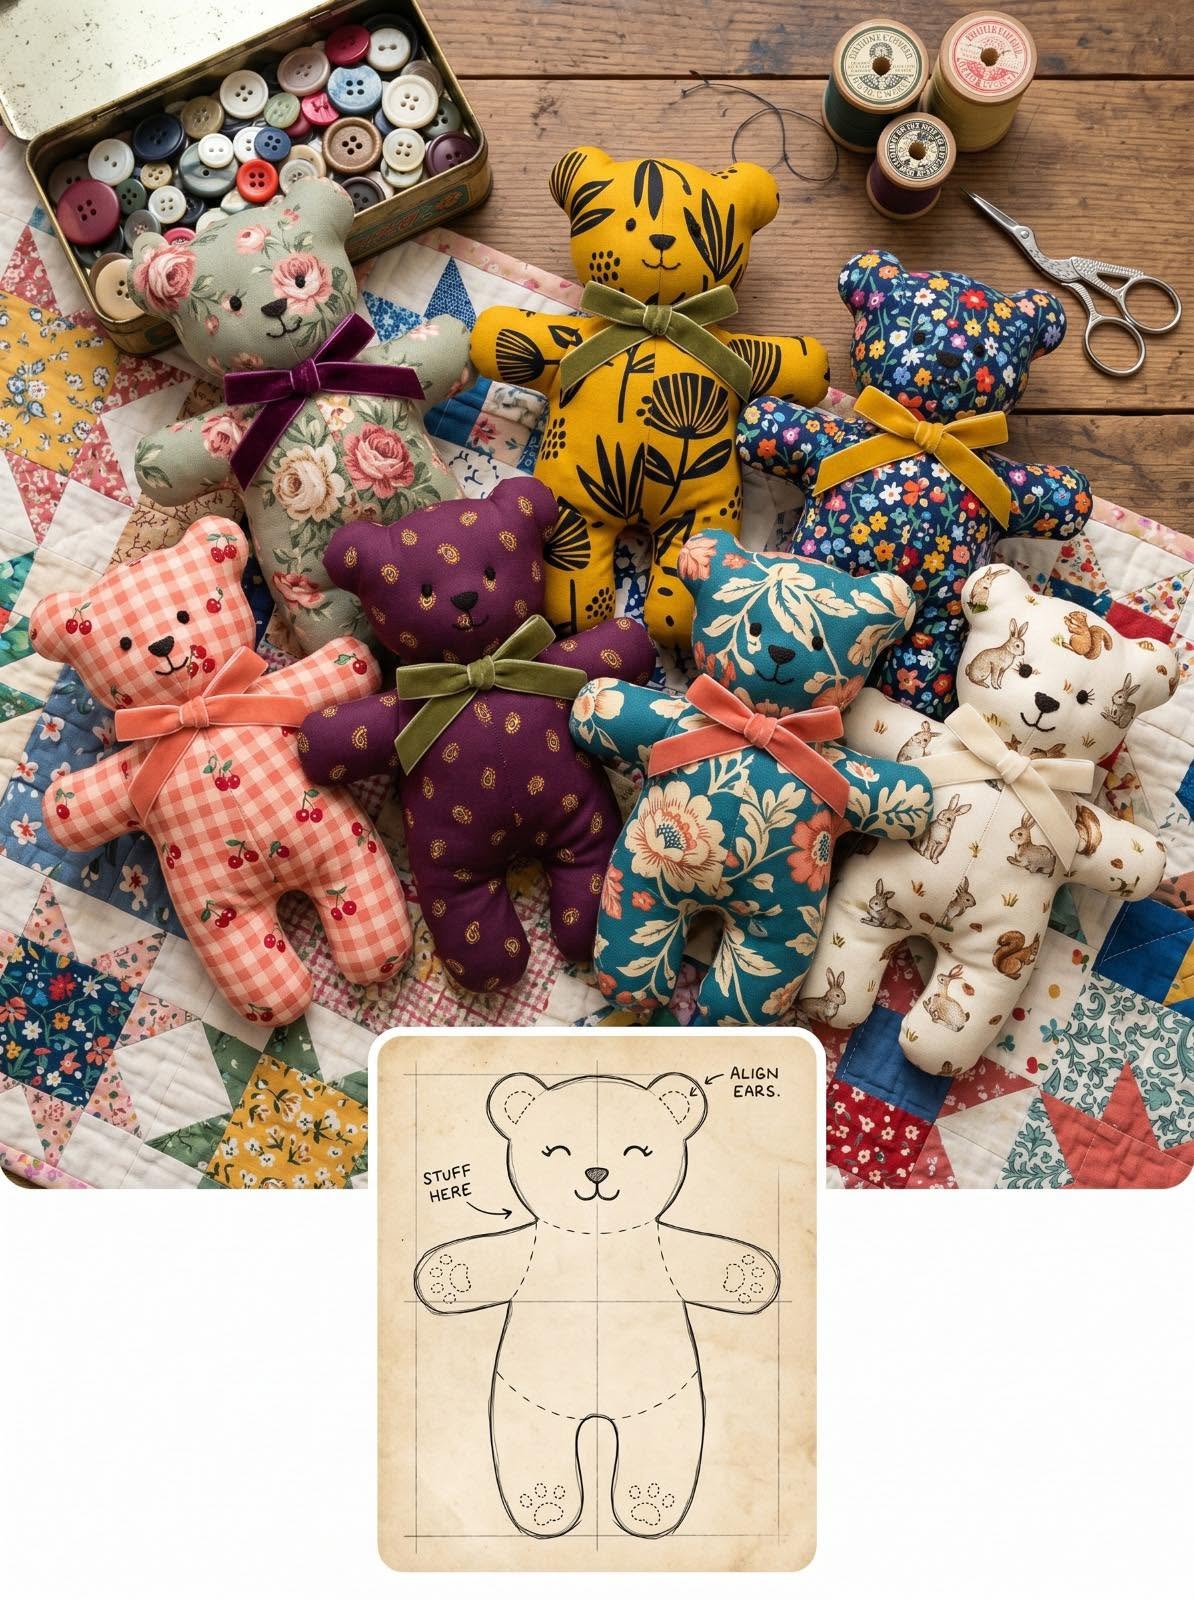
Teddy Bear Pattern is a charming quilting and sewing project that turns beautiful fabric, soft batting, simple embroidery, and basic shaping techniques into an adorable handmade bear. Inspired by the colorful fabric teddy bears shown in the reference image, this project is perfect for anyone who enjoys quilting, sewing, appliqué, scrap fabric projects, and handmade gifts. The rounded ears, soft arms and legs, embroidered face, and decorative bow give the finished bear a timeless appearance that can work beautifully as nursery décor, a keepsake, or a thoughtful handmade present.
One of the greatest advantages of this Teddy Bear Pattern is its versatility. You can create a traditional bear using brown or beige fabrics, make a cheerful floral version, use gingham for a farmhouse look, or combine leftover quilt scraps for a colorful patchwork design. Small-scale prints work particularly well because the finished pieces are compact, while solids can be used for the muzzle, paws, ears, or decorative accents. Every fabric combination creates a completely different personality while following the same basic construction method.
Although the finished teddy bear may appear detailed, the sewing process becomes much easier when divided into manageable steps. The body can be created from a simple front and back silhouette, while the arms, ears, and legs can either be included in that silhouette or sewn separately for additional dimension. In this tutorial, you will learn how to prepare a practical template, choose suitable materials, quilt the fabric if desired, sew and turn the body, create the face, add stuffing, and complete the Teddy Bear Pattern with neat professional finishing. Because the photo is a visual reference rather than a measured commercial template, the dimensions below are suggested starting points that can be adjusted.
Materials, Measurements, and Preparing the Teddy Bear Pattern
For one medium Teddy Bear Pattern, prepare approximately 1/2 yard (46 cm) of quilting cotton for the main body. If you prefer to make the front and back from different fabrics, use approximately 1/4 yard (23 cm) of each coordinating print. Floral cotton, gingham, novelty prints, batiks, linen blends, and small-scale geometric fabrics all work beautifully.
DISCOVER MORE FREE PATTERNS HERE!
You will also need polyester fiberfill for stuffing, coordinating sewing thread, embroidery floss for the face, a hand-sewing needle, fabric scissors or rotary cutter, cutting mat, fabric marker, pins or clips, sewing machine, and iron. Lightweight batting is optional but recommended if you want the distinctive soft quilted teddy bear texture shown in handmade projects.
A practical finished size is approximately 14–16 inches (36–41 cm) tall. This size is large enough to show the fabric pattern clearly while remaining easy to sew and stuff. For a smaller decorative bear, reduce the template proportionally. For a larger sofa or nursery cushion version, enlarge every pattern piece by the same percentage.
Draw the bear silhouette on paper before cutting fabric. Create a rounded head with two semicircular ears, gently curved shoulders, arms extending outward, a slightly tapered waist, and two rounded legs. Keep the inside leg curve wide enough to turn and stuff comfortably.
If your paper template does not already include a seam allowance, add 1/4 inch (6 mm) around all sewing edges. A consistent seam allowance is especially important around the ears, arms, and legs because inconsistent stitching can make the bear look asymmetrical after turning.
Before cutting the final fabric, place the template over your chosen print and consider motif placement. If you are using florals or large decorative elements, center an attractive section over the torso or face area. This small planning step can dramatically improve the appearance of your finished Teddy Bear Pattern.
Cutting, Quilting, and Creating the Teddy Bear Face
Cut one front and one back bear silhouette from your exterior fabric. If you are adding batting, cut matching batting pieces slightly larger than the fabric and quilt them before trimming back to the exact template shape.
Simple quilting works best for a small stuffed project. Straight vertical lines, diagonal diamonds, gentle waves, or free-motion loops add texture without making the teddy bear overly stiff. Keep quilting relatively lightweight so the fabric still turns easily around curves.
Before sewing the front and back together, complete all facial details. This is much easier while the front panel remains flat. Lightly mark the center line of the face with a removable fabric pen to help position the eyes, nose, and mouth evenly.
For the eyes, use embroidery if the teddy will be given to a young child. Small satin-stitched circles or French knots can create a sweet expression. Decorative buttons can produce a vintage appearance on display-only bears, but they should not be used where small detachable components could present a hazard.
Embroider a small triangular or oval nose using dark brown or black thread. From the lower center of the nose, sew one short vertical line downward and then create two gentle curved stitches to form a smiling mouth. A few short eyebrow or eyelash stitches can give each bear a unique expression.
If desired, appliqué contrasting inner-ear shapes or paw pads before assembly. Use small curved pieces of coordinating fabric, securing them with a narrow zigzag, blanket stitch, or straight appliqué stitch. These details are optional, but they add an attractive handmade finish to the Teddy Bear Pattern.
Sewing, Turning, Stuffing, and Shaping the Bear
Place the front and back teddy bear pieces with right sides together. Match the ears, arms, body sides, and legs carefully, and pin or clip around the complete perimeter.
Sew around the bear using the established 1/4-inch (6 mm) seam allowance, leaving approximately 3–4 inches (7.5–10 cm) open along one side of the body for turning and stuffing. Backstitch at both ends of the opening for additional strength.
Clip the seam allowance around tight inward curves, particularly between the arms and body and between the legs. Trim excess fabric from the outer ear curves and other bulky areas, but take care not to cut through the stitching.
Turn the teddy bear right side out through the opening. Use a blunt turning tool or chopstick to gently push out the ears, hands, and feet. Avoid using sharp tools that could puncture the fabric.
Begin stuffing with small amounts of polyester fiberfill. Fill the ears first, followed by the arms and legs. Working on the narrow sections before the torso prevents empty corners that become difficult to reach later.
Continue adding filling to the body and head gradually. Massage the stuffing with your fingers as you work so the finished Teddy Bear Pattern feels smooth and evenly filled. The bear should be comfortably firm but not so tightly stuffed that the seams become strained.
Professional Finishing and Creative Customization Ideas
Once the bear has been stuffed to your liking, fold the raw edges of the turning opening inward and close the gap using a ladder stitch. Small, closely spaced hand stitches produce an almost invisible finish.
Add a fabric ribbon or velvet bow around the neck to recreate the elegant handmade appearance seen in the inspiration. Sage green, burgundy, mustard, coral, cream, or dusty pink can provide attractive contrast against floral and gingham fabrics.
For a more traditional teddy bear appearance, add embroidered paw lines to the hands and feet. Three short stitches are enough to suggest individual toes while keeping the design simple.
A patchwork teddy bear can be created by piecing fabric scraps together before cutting the front silhouette. Sew small squares or strips into a panel, press all seams, optionally quilt the panel, and then place the teddy template over it. This method is perfect for using leftovers from cherished quilts.
You can also personalize the bear with an embroidered initial, name, date, small heart, flower, or appliqué patch. These details make the project especially suitable for birthdays, baby showers, memorial keepsakes, holidays, or family gifts.
Before finishing, inspect every seam and embroidered detail carefully. Reinforce any area that appears weak, trim loose threads, and shape the stuffing one final time. A carefully finished Teddy Bear Pattern can look polished and remain durable for years.
FAQ About the Teddy Bear Pattern
Is the Teddy Bear Pattern suitable for beginners?
Yes. A basic version is suitable for confident beginners because it primarily uses simple curved seams, turning, stuffing, and hand finishing.
What fabric works best for a fabric teddy bear?
Quilting cotton is one of the easiest fabrics to use. Linen blends, flannel, lightweight denim, and soft home décor cotton can also work well.
How large should the finished teddy bear be?
Approximately 14–16 inches (36–41 cm) tall is a convenient medium size, but the template can be enlarged or reduced proportionally.
What seam allowance should I use?
A 1/4-inch (6 mm) seam allowance works well for most fabric teddy bear patterns.
Should I add batting?
Batting is optional. Adding lightweight batting creates a quilted texture and provides a little extra structure, while omitting it creates a softer traditional stuffed bear.
Can I use fabric scraps?
Absolutely. The Teddy Bear Pattern is an excellent scrap-busting project, especially if you piece fabrics together before cutting the final silhouette.
What should I use for the eyes?
Embroidery is the safest and most versatile option. Buttons can be used for decorative bears intended for adults, but they are not appropriate for toys intended for small children.
How much stuffing will I need?
The amount depends on the finished size and desired firmness. A medium 14–16 inch bear generally requires several generous handfuls of polyester fiberfill.
How can I keep both sides symmetrical?
Fold your pattern paper in half while drafting the template or cut mirrored fabric layers simultaneously. Accurate clipping and consistent seam allowances also help preserve symmetry.
Can I make the arms and legs separately?
Yes. Separate limbs create additional dimension and movement, although an all-in-one silhouette is simpler and works especially well for beginners.
Can I add clothes to the teddy bear?
Certainly. Small fabric dresses, vests, scarves, bow ties, aprons, or hats can all be created using leftover fabric.
Can this be turned into a memory bear?
Yes. Meaningful clothing or fabric can be incorporated into the project, provided the material is strong enough for sewing. Delicate fabrics may need lightweight interfacing for support.
Can the bear be machine washed?
That depends on the chosen fabric, embellishments, batting, and stuffing. If all materials are washable, a gentle cycle may work, but hand washing and air drying generally help preserve the shape better.
What is the best way to close the stuffing opening?
An invisible ladder stitch creates one of the cleanest finishes and allows you to control the final amount of stuffing before permanently closing the project.
Conclusion
The Teddy Bear Pattern is a timeless quilting and sewing project that transforms simple fabric pieces into a charming handmade keepsake. Throughout this tutorial, you learned how to select suitable quilting cotton, prepare an approximately 14–16 inch teddy bear template, add optional batting, quilt the fabric, embroider the face, sew the silhouette, clip the curves, turn the project, add stuffing evenly, and close the final opening with professional hand stitching.
One of the most enjoyable parts of making a Teddy Bear Pattern is choosing the personality of each bear. Floral fabric can create a romantic cottage-style teddy, mustard botanical prints can give it a modern vintage look, colorful small flowers can produce a cheerful handmade gift, while gingham and cherry prints can create a nostalgic country-inspired design. The same template can become an entire collection simply by changing fabrics and accessories.
This project is also an excellent opportunity to use treasured scraps from previous quilting projects. Pieces that might otherwise remain unused can become the body, paws, ears, clothing, or decorative details of a handmade teddy bear, giving leftover fabric a meaningful new purpose.
PATTERN VIDEO:
If you create your own Teddy Bear Pattern, please leave your sincere opinion about the project and share your suggestions. Tell us which fabrics and colors you would choose for your teddy bear and what other quilt or sewing patterns you would like to see in future tutorials.