
Teddy Bear Sleeping Bag
Teddy Bear Sleeping Bag is a charming quilted sewing project that combines a cozy sleeping-bag shape with an oversized teddy-bear head, soft ears, a friendly face, and playful dimensional details. The design shown in the reference uses a bright orange main body with fresh green accents, creating a cheerful handmade piece that immediately feels warm and inviting. Although the finished project looks elaborate, it can be approached as a series of manageable sewing steps: preparing the main body, constructing the bear-shaped upper section, adding facial features, assembling the layers, quilting, and completing the padded finish.
A handmade Teddy Bear Sleeping Bag pattern is also a wonderful opportunity to practice several useful quilting and sewing techniques in one project. You can work with exterior cotton, lining fabric, batting, appliqué pieces, curved seams, decorative topstitching, and light stuffing. The large surfaces make the project especially suitable for experimenting with quilting designs, while the smaller bear details allow you to practice accurate cutting and appliqué. The result can be personalized with different fabrics, colors, embroidery, and quilting patterns, making every finished piece unique.
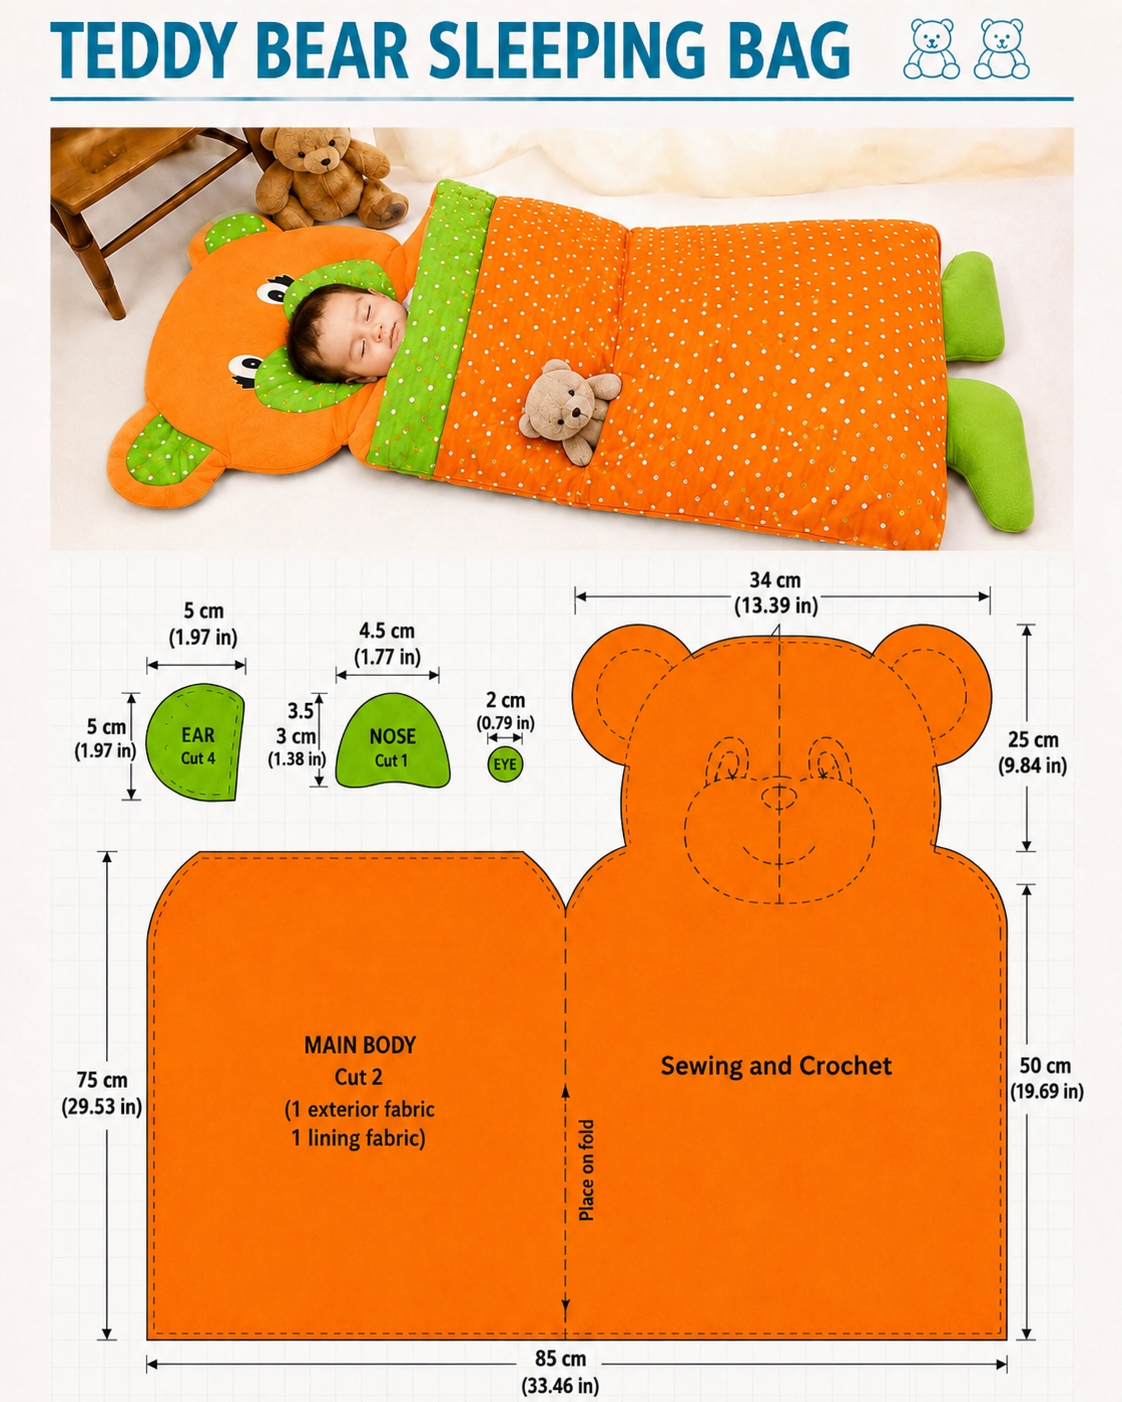
For this tutorial, the measurements visible in the reference image provide a useful starting point, but they should be treated as approximate craft dimensions rather than standardized infant bedding specifications. The illustrated main section is approximately 85 cm (33.46 in) wide, with a body section around 75 cm (29.53 in) long, while the bear-shaped upper area is approximately 34 cm (13.39 in) across the head and about 25 cm (9.84 in) high in the illustrated template. Because anything intended for an infant requires special attention to safe sleep practices, this handmade project is best treated as a decorative, supervised-use quilted item rather than unattended sleep equipment.
Materials, Measurements, and Preparing the Teddy Bear Pattern
Begin your Teddy Bear Sleeping Bag by selecting fabrics that are comfortable to sew and easy to maintain. Quilting cotton is an excellent exterior choice because it is stable, available in countless prints, and works well with batting. A soft cotton fabric can be used for the lining, while lightweight quilt batting provides structure without making the project excessively bulky.
DISCOVER MORE FREE PATTERNS HERE!
For a design inspired by the photograph, choose approximately 1.5–2 yards (1.4–1.8 m) of main exterior fabric and a similar quantity for the lining, allowing extra material for pattern placement and corrections. You will also need batting, coordinating thread, fabric for the ears and muzzle, and small scraps for facial appliqué. Exact yardage varies according to fabric width and your chosen finished dimensions.
Basic tools include a sewing machine, fabric scissors or rotary cutter, cutting mat, quilting ruler, pins or clips, removable fabric marker, iron, ironing surface, hand-sewing needle, and paper for preparing the templates. A walking foot can be helpful when quilting multiple layers because it feeds the quilt sandwich more evenly.
The illustrated main body measures approximately 85 cm (33.46 in) across and approximately 75 cm (29.53 in) along the longer rectangular section. The image also indicates a bear-side body measurement around 50 cm (19.69 in) before the head area. Use these measurements as a visual guide and redraw the shape at full scale on pattern paper before cutting expensive fabric.
The bear head is approximately 34 cm (13.39 in) wide and around 25 cm (9.84 in) high according to the reference. The ear template is approximately 5 × 5 cm (1.97 × 1.97 in), while the muzzle/nose appliqué is shown at roughly 4.5 cm (1.77 in) wide and 3–3.5 cm (1.18–1.38 in) high. Small eye pieces are approximately 2 cm (0.79 in).
Before cutting, add your preferred seam allowance wherever it is not already incorporated into your paper pattern. A 1/2-inch (1.3 cm) seam allowance is comfortable for a padded project. Label every template clearly, mark the center lines, transfer alignment marks, and make a small test assembly from inexpensive fabric if you are uncertain about the proportions.
Cutting, Quilting, and Building the Main Sleeping Bag
Once the paper templates are prepared, press all fabrics before cutting. Fold the fabric carefully along the grain and position the Teddy Bear Sleeping Bag pattern pieces so the printed motifs remain straight. Accurate cutting at this stage greatly improves the final appearance.
Cut the required main exterior pieces and corresponding lining pieces. Cut batting slightly larger than the exterior sections so there is enough coverage during quilting. After quilting is complete, the excess batting can be trimmed flush with the fabric.
Create a quilt sandwich by placing the backing or lining appropriately, batting in the center, and exterior fabric on top. Depending on your preferred construction method, you may quilt individual panels before final assembly. Baste thoroughly with quilting pins, safety pins, or temporary basting methods so the layers cannot shift.
For a beginner-friendly finish, quilt straight parallel lines approximately 1.5–2 inches (4–5 cm) apart. A gentle diamond grid is another attractive choice. More experienced quilters can use free-motion loops, stars, hearts, or meandering patterns. Keep the quilting relatively soft so the project maintains its comfortable character.
The front covering section should overlap the lower body enough to create the recognizable sleeping-bag appearance. In the photograph, the orange dotted fabric creates the primary visual surface while a contrasting green band defines the upper edge. You can reproduce this effect by cutting a contrasting strip, folding the raw edges inward, pressing it carefully, and topstitching it across the upper edge.
After quilting, square the appropriate edges and check that corresponding panels still match. Quilting can cause slight shrinkage, so performing this check before final assembly prevents uneven edges later. Mark the center of the bottom and sides to help maintain symmetry.
Sewing the Teddy Bear Head, Ears, Face, and Dimensional Details
The teddy-bear section gives this Teddy Bear Sleeping Bag its distinctive personality. Begin with the ears. The reference indicates four ear pieces, which allows you to create two dimensional ears by sewing two fabric pieces together for each ear.
Place two ear pieces right sides together and stitch around the curved edge, leaving the straight lower edge open. Clip the seam allowance carefully around the curve without cutting the stitching. Turn the ear right side out, press gently, and optionally add a thin layer of batting for additional softness. Repeat for the second ear.
Position both ears symmetrically along the bear head. Baste them in place before assembling the head layers. The raw edges of the ears should align with the raw edge of the head so that, after sewing and turning, the ears extend outward naturally.
Next prepare the teddy bear face appliqué. The reference shows large friendly eyes, a rounded muzzle area, a small contrasting nose, and a curved smile. You can use fabric appliqué, embroidery, or a combination of both. Fusible web can temporarily stabilize appliqué shapes before they are secured with a satin stitch, blanket stitch, or narrow zigzag.
For decorative pieces, embroidered eyes are an attractive alternative to loose buttons or other detachable embellishments. Use several strands of embroidery floss and keep the stitches compact. Embroider the nose and mouth securely, checking that the expression is centered before completing the final stitches.
The reference also includes two elongated padded shapes extending from the bottom, suggesting teddy-bear legs or feet. Construct these from paired fabric pieces with batting or light stuffing. Sew around each shape, leave a turning opening, turn right side out, add light stuffing if desired, close the opening, and baste the pieces securely into their intended positions before final assembly.
Final Assembly, Binding, Finishing, and Personalization
Before sewing the entire Teddy Bear Sleeping Bag, arrange all completed sections on a large flat surface. Check the head alignment, ear position, front cover, decorative band, and lower dimensional pieces. Taking a few minutes to verify symmetry now can prevent difficult corrections later.
Join the primary layers according to your chosen construction method, keeping the seams smooth and avoiding unnecessary bulk. When stitching through quilted sections, sew slowly and support the weight of the project so it does not pull against the machine needle.
Trim bulky seam allowances carefully, especially around curved sections. Clip inward curves and notch outward curves where necessary. Do not cut through the seam line. Turn appropriate sections right side out and gently shape the curves with a blunt turning tool.
Topstitching approximately 1/8–1/4 inch (3–6 mm) from selected finished edges can give the project a crisp professional appearance. It also helps keep thicker seam allowances from rolling outward. Choose coordinating thread for a subtle finish or contrasting thread for a decorative effect.
Personalization can make the project particularly memorable. Consider embroidering a name on the outer quilted panel, adding small appliqué stars, hearts, clouds, paw prints, or using patchwork for the bear ears. The orange-and-green combination shown in the reference is energetic, but pastel blue, lavender, sage green, dusty pink, cream, or multicolored patchwork can create completely different styles.
Finally, inspect every seam and remove loose threads. Check that appliqué and embroidered details are securely attached. Press only where appropriate for the batting and fabric used. If the item will be around babies or small children, avoid loose cords, buttons, beads, or other detachable decorations, and use it only in ways appropriate for the child’s age and supervision needs.
FAQ About the Teddy Bear Sleeping Bag
Is the Teddy Bear Sleeping Bag suitable for beginners?
A confident beginner can make it, although basic experience with straight seams, curved sewing, quilting, and turning fabric pieces is helpful. The easiest approach is to complete one component at a time rather than trying to assemble everything at once.
What fabric works best for this project?
Quilting cotton is one of the easiest options because it cuts accurately and behaves predictably under the sewing machine. Soft cotton can also work well for the lining.
What batting should I use?
A lightweight, washable quilt batting is usually easier to handle than very thick batting. Excessive thickness can make the curved seams difficult to sew.
What are the approximate dimensions shown in the reference?
The illustrated template shows a main width around 85 cm (33.46 in), a rectangular section approximately 75 cm (29.53 in) long, and a bear-side section approximately 50 cm (19.69 in) before the upper head area.
How wide is the teddy bear head?
The illustrated head is approximately 34 cm (13.39 in) wide.
How high is the head section?
The reference indicates approximately 25 cm (9.84 in).
How large are the ears?
The illustrated ear template is approximately 5 × 5 cm (1.97 × 1.97 in).
How many ear pieces should I cut?
Cut four pieces to create two lined or double-layered ears.
How large is the nose or muzzle detail?
The small illustrated template is approximately 4.5 cm (1.77 in) wide and around 3–3.5 cm (1.18–1.38 in) high.
Can I make the face with embroidery?
Yes. Embroidered facial features are especially useful because they remain flat and eliminate the need for decorative buttons.
Should I quilt the fabric before assembling everything?
For many makers, quilting the major panels first is easier. The quilted sections can then be trimmed and assembled.
What quilting design should beginners use?
Straight-line quilting is the simplest choice. Lines, squares, or diamonds can provide sufficient structure without making the project unnecessarily complicated.
Can I use patchwork instead of a single fabric?
Absolutely. A patchwork front can transform the design into a more traditional teddy bear quilt project. Just complete the patchwork panel before cutting or assembling the final body shape.
Can I add a name to the bear?
Yes. Embroidery or fabric appliqué can be used for personalization. Add the name before final assembly whenever possible because working on a flat panel is easier.
Can I change the colors?
Yes. Orange and green are only one option. Blue and cream, pink and gray, sage and beige, lavender and white, or multicolored scraps can all work beautifully.
Can I enlarge the pattern?
Yes, but enlarge all corresponding pattern pieces proportionally. Avoid enlarging only the body while leaving the head and decorative elements unchanged.
Why should the batting be cut slightly larger initially?
Quilting can shift or shrink the layers slightly. Extra batting provides a safety margin that can be trimmed after quilting.
How can I prevent puckering while quilting?
Baste thoroughly, begin quilting near the center when appropriate, smooth the layers frequently, and avoid pulling the fabric while stitching.
Should decorative buttons be used for the eyes?
For a decorative item intended exclusively for adults, buttons may be an aesthetic option. For anything that may be accessible to a baby or small child, flat embroidered details avoid detachable small components.
Can this be used for routine infant sleep?
A handmade padded sleeping-bag-style craft should not automatically be considered approved infant sleep equipment. Infant sleep products have specific safety considerations, so this project is best approached as a decorative or supervised-use handmade item rather than assumed suitable for unattended sleep.
Conclusion
The Teddy Bear Sleeping Bag combines quilting, appliqué, curved sewing, embroidery, and dimensional construction in one imaginative handmade project. Although the completed design looks detailed, dividing the process into individual components makes construction much easier to understand.
The project begins with careful preparation of the Teddy Bear Sleeping Bag pattern, using the illustrated measurements as a starting reference. Accurate paper templates, clearly marked center points, consistent seam allowances, and carefully cut fabric pieces provide the foundation for a professional-looking result.
From there, the large fabric sections are layered with batting and quilted. Straight-line quilting provides a beginner-friendly approach, while experienced makers can experiment with decorative free-motion designs. The contrasting upper band is another simple feature that can dramatically change the finished appearance.
The teddy-bear details bring the entire design to life. Double-layered ears create dimension, appliqué or embroidery forms the friendly face, and softly padded lower details complete the character. Careful positioning before sewing is especially important because even small changes in eye, ear, or muzzle placement can alter the bear’s expression.
You can also make the design completely personal. Change the orange and green fabrics, introduce patchwork scraps, embroider a name, add quilted stars or hearts, or coordinate the bear with other handmade nursery decorations. The same construction concept can produce many different versions without losing the recognizable teddy-bear character.
After completing your Teddy Bear Sleeping Bag, leave your sincere opinion about the project and share your suggestions. Tell us which fabric combination you would choose, what details you would change, and which quilting technique you think would make this teddy-bear design even more beautiful.