
The Turban Design Pattern is a beautiful and practical sewing project that combines elegance, comfort, and simplicity. Featuring soft gathered fabric, a smooth front section, and graceful pointed tails at the back, this handmade head covering offers a stylish alternative to traditional hats and scarves. Its lightweight construction makes it suitable for everyday wear, casual outings, relaxing at home, and coordinating with favorite outfits.
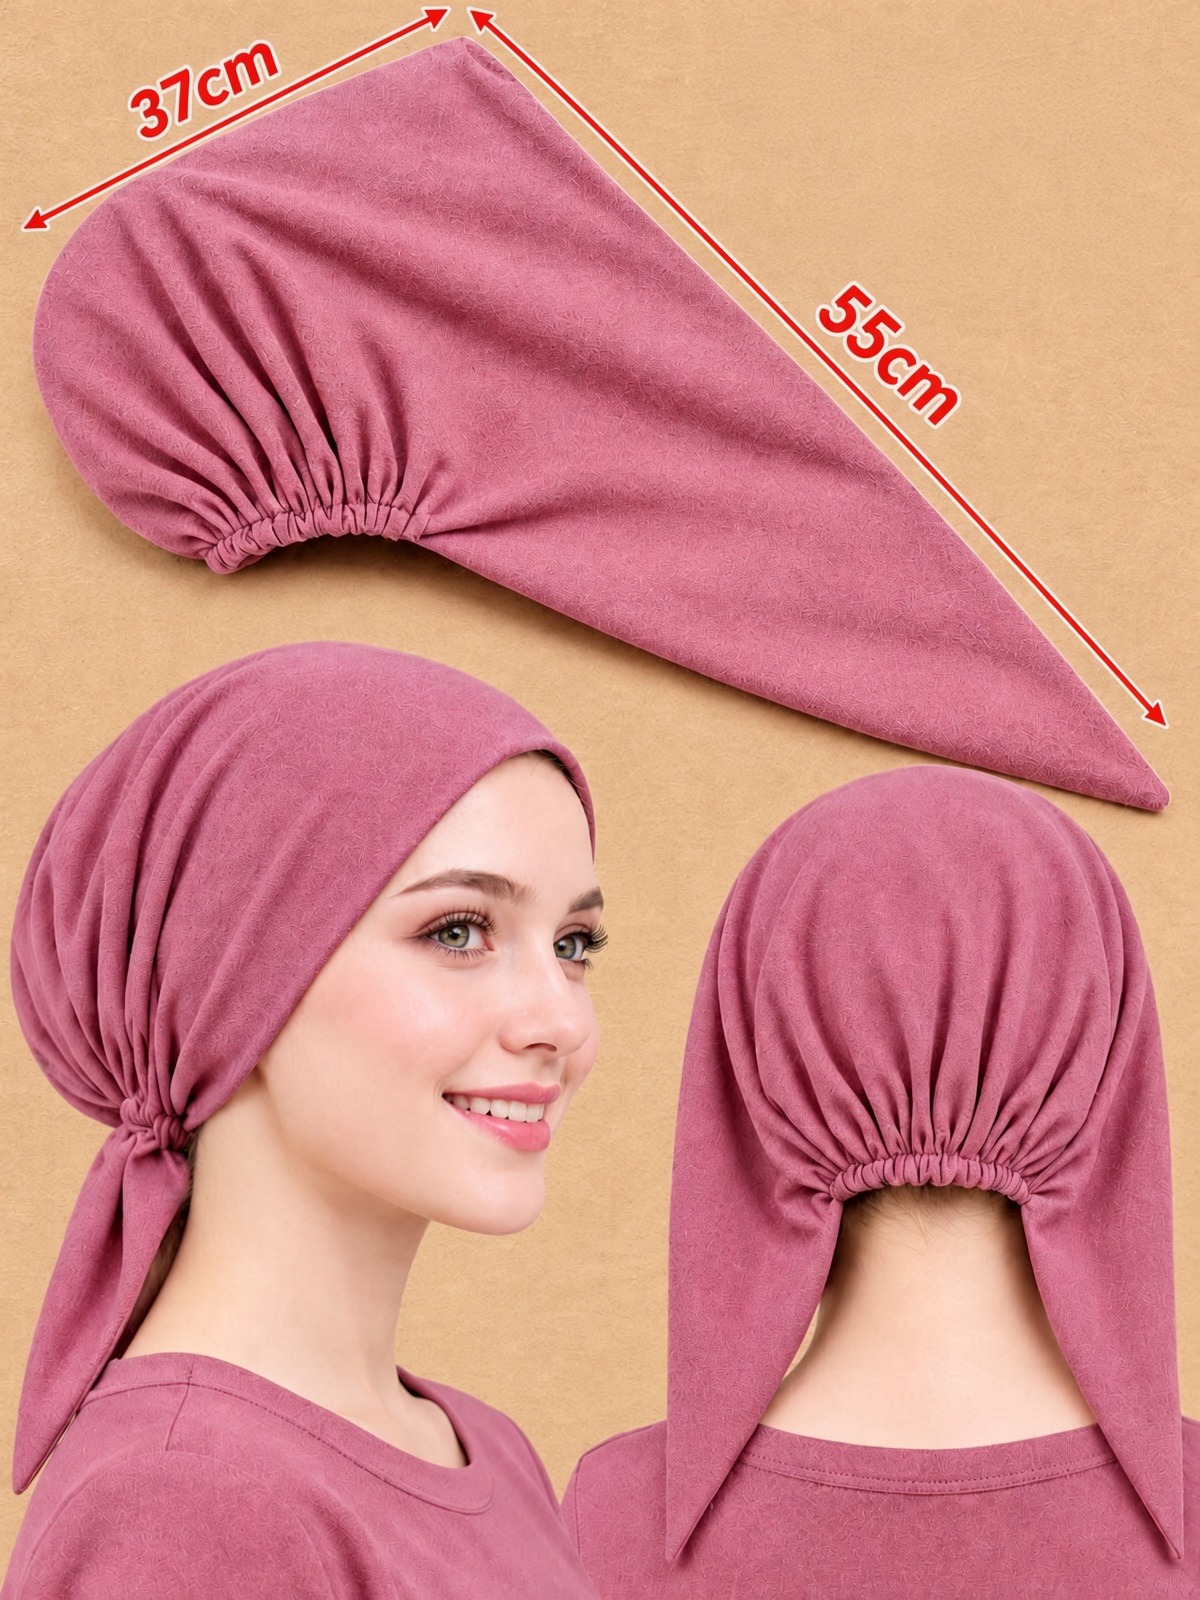
One of the most attractive features of this DIY Fabric Turban Pattern is its clever construction. As shown in the inspiration image, the design begins with a large tapered fabric piece measuring approximately 37 cm (14.6 inches) along its shorter upper edge and 55 cm (21.7 inches) along its longer diagonal edge. The fabric is shaped into a soft head covering, with a gathered section at the back that creates volume around the crown. The two elongated ends fall gracefully toward the shoulders, creating a delicate scarf-like appearance.
This Easy Turban Sewing Tutorial explains how to create a comfortable fabric turban inspired by the photograph using simple cutting, hemming, gathering, and elastic techniques. The project is suitable for beginners who already understand basic sewing machine operations. With clear measurements, detailed construction instructions, fabric recommendations, and professional finishing tips, you can create a beautiful handmade turban in your favorite colors. The original photograph does not show every construction seam, so this tutorial uses an adapted pattern and a practical gathering method to reproduce its overall shape and appearance.
1. Materials, Fabric Selection, and Measurements for the Turban Design Pattern
DISCOVER MORE FREE PATTERNS HERE!
Before beginning your Turban Design Pattern, choose a soft fabric that drapes naturally around the head.
The fabric should feel comfortable against the skin and create gentle folds without excessive stiffness.
Lightweight cotton jersey, bamboo jersey, rayon jersey, and soft stretch fabrics are excellent choices.
For a design similar to the photograph, select a dusty rose or muted pink fabric with a smooth texture.
Materials Needed
- 0.75–1 meter (approximately ¾–1 yard) of soft fabric.
- Matching polyester sewing thread.
- Sewing machine.
- Fabric scissors.
- Measuring tape.
- Fabric marking pencil or washable chalk.
- Sewing pins or clips.
- Iron and ironing board.
- Hand-sewing needle.
- 6–8 mm (¼–5/16 inch) wide soft elastic.
- Safety pin or elastic-threading tool.
- Paper for making the pattern.
- Optional stretch or ballpoint sewing machine needle.
- Optional twin needle for decorative hemming.
Recommended Fabric Types
Cotton Jersey: Soft, breathable, and comfortable for everyday wear.
Bamboo Jersey: Lightweight, smooth, and beautifully draped.
Rayon Jersey: Creates elegant folds and a flowing appearance.
Cotton-Modal Blend: Comfortable and suitable for lightweight head coverings.
Lightweight Stretch Velvet: A beautiful option for special occasions.
Soft Viscose Fabric: Produces graceful draping when suitable for the chosen construction.
For beginners, a stable cotton jersey is one of the easiest options.
Avoid heavy quilting cotton if you want the soft gathered appearance shown in the photograph. Traditional woven cotton can be used for an adapted version, but it will not drape or stretch in the same way.
Suggested Pattern Measurements
The inspiration image shows a tapered piece with two prominent measurements.
| Pattern Component | Measurement |
|---|---|
| Short upper edge | 37 cm (14.6 inches) |
| Long diagonal edge | 55 cm (21.7 inches) |
| Suggested maximum pattern depth | 32–35 cm (12.6–13.8 inches) |
| Back gathering section | Approximately 12–15 cm (4.7–5.9 inches) |
| Elastic length | Approximately 9–12 cm (3.5–4.7 inches) |
| Suggested seam allowance | 1 cm (⅜ inch) |
| Suggested narrow hem | 0.7–1 cm (¼–⅜ inch) |
The 37 cm and 55 cm measurements are visible in the photograph. The remaining measurements are suggested for this tutorial and should be adjusted to your head size and fabric stretch.
Understanding the Turban Shape
The Fabric Turban Headscarf Pattern uses a broad, tapered fabric shape.
The wider portion covers the crown and back of the head.
A curved gathered section creates fullness around the back.
The long pointed ends provide decorative coverage toward the neck and shoulders.
Unlike a tightly fitted cap, this design uses soft folds to create its shape.
Choosing the Right Size
Measure your head circumference with a flexible measuring tape.
Place the tape around the forehead, above the ears, and around the fullest part of the back of the head.
Typical adult head measurements range from approximately 54–60 cm (21.3–23.6 inches).
However, the correct fit depends on the fabric’s stretch and the amount of gathering.
Make a test version before cutting expensive fabric.
Preparing the Fabric
Wash and dry the fabric according to the manufacturer’s instructions.
Press it gently to remove wrinkles.
Lay the fabric flat on a cutting surface.
Make sure the fabric is not stretched while measuring or cutting.
If using jersey, identify the direction with the greatest stretch.
Position the pattern so the stretch runs comfortably around the head.
2. How to Draft and Cut the Fabric Turban Pattern
The cutting stage is one of the most important parts of the Turban Design Pattern.
The photograph shows a distinctive tapered piece with a rounded wide end and a long pointed section.
For this tutorial, you will create a mirrored pair of tapered panels that can be assembled into a comfortable head covering with two decorative tails.
This is an adapted construction method designed to achieve a similar appearance.
Step 1: Prepare the Pattern Paper
Place a large sheet of pattern paper on a flat surface.
Draw a horizontal reference line measuring 37 cm (14.6 inches).
Mark both ends clearly.
This line will help establish the upper section of the turban.
Step 2: Mark the Long Tapered Edge
From one end of the reference line, measure a long diagonal direction approximately 55 cm (21.7 inches).
Mark the endpoint.
This creates the long tapered side of the pattern.
The diagonal edge should slope gently toward the pointed end.
Step 3: Create the Rounded Crown
At the opposite end, draw a smooth curved shape.
The rounded section will form part of the crown and back of the turban.
Avoid sharp corners in this area.
A gentle curve creates softer folds when the fabric is gathered.
Step 4: Shape the Pointed Tail
Connect the curved crown section to the long diagonal endpoint.
Create a narrow pointed tip.
This section will form one of the decorative tails.
The finished tail should taper smoothly rather than ending abruptly.
Step 5: Refine the Pattern
Check that the shape resembles an elongated curved triangle.
The broad portion should provide enough fabric to cover the head.
The narrow portion should extend into a decorative tail.
Smooth any uneven curves.
Step 6: Add Seam Allowances
Add a 1 cm (⅜ inch) seam allowance along edges that will be joined.
For edges that will be hemmed, allow approximately 0.7–1 cm.
Mark the seam allowances clearly.
Step 7: Cut the First Fabric Panel
Place the paper pattern on the fabric.
Secure it with pins or pattern weights.
Cut carefully around the outline.
Avoid stretching the fabric.
Step 8: Cut the Mirrored Panel
Turn the paper pattern over.
Cut a second mirrored piece.
The two pieces should have matching shapes.
When assembled, they will create the main turban covering and two pointed tails.
Step 9: Mark the Gathering Area
On the rounded back section of each panel, mark a gathering area approximately 12–15 cm (4.7–5.9 inches) long.
Use a washable fabric marker.
The gathering marks should be positioned symmetrically.
These marks will guide the elastic or gathering stitches.
Step 10: Check the Cut Pieces
Lay both fabric pieces flat.
Compare their shapes.
Make sure the pointed ends are smooth and the rounded sections match.
Trim any small irregularities.
Your fabric pieces are now ready for sewing.
3. Step-by-Step Instructions for Sewing the Fabric Turban
The assembly process transforms the flat fabric panels into a beautiful Handmade Turban Headscarf.
The most important features are the smooth front opening, gathered back section, and flowing pointed tails.
Work carefully to create even folds and comfortable seams.
Step 1: Prepare the Front Edges
Identify the edges that will frame the face.
Fold the raw edges inward by approximately 0.7 cm (¼ inch).
Press gently.
Fold again if the fabric allows.
Secure with pins or clips.
Step 2: Sew the Front Hems
Using a straight stitch suitable for your fabric or a narrow stretch stitch, sew along the folded edges.
For jersey fabric, use a stretch needle and avoid pulling the fabric while sewing.
Keep the stitching even.
The front edges should lie smoothly against the forehead.
Step 3: Prepare the Back Seam
Place the two fabric panels right sides together.
Align the curved crown sections.
Pin or clip the edges.
Keep the pointed tails free.
Step 4: Sew the Crown Seam
Sew the curved crown edges together using a 1 cm (⅜ inch) seam allowance.
Use a narrow zigzag or stretch stitch for jersey fabric.
Guide the fabric slowly around the curve.
Avoid stretching the seam.
Step 5: Finish the Seam Allowance
Trim bulky seam allowances if necessary.
Use an overlock stitch, serger, or narrow zigzag to finish the raw edges.
Press the seam gently toward one side.
The joined panels should begin to form a soft hood-like shape.
Step 6: Prepare the Back Gathering
Turn the turban right side out.
Locate the marked gathering section at the back.
This area should sit near the lower back of the head.
The gathered section will help shape the crown and create the softly pleated appearance shown in the photograph.
Step 7: Create the Elastic Casing
Cut a narrow strip of matching fabric approximately 3 cm (1.2 inches) wide and slightly longer than the gathering section.
Position the strip on the wrong side of the back gathering area.
Fold the long edges inward.
Stitch along both sides to create a narrow casing.
Leave the ends open.
Step 8: Insert the Elastic
Cut a piece of soft elastic approximately 9–12 cm (3.5–4.7 inches) long.
Attach a safety pin to one end.
Thread the elastic through the casing.
Gently distribute the fabric gathers.
Step 9: Secure the Elastic
Pin both ends of the elastic securely.
Check that the gathering is evenly distributed.
Sew across the ends of the casing several times.
The elastic should create soft, comfortable gathers.
It should not pull tightly against the head.
Step 10: Shape the Crown
Place the turban on a head form or try it on carefully.
Arrange the fabric folds around the crown.
Smooth the front section.
Adjust the gathered back area.
The turban should cover the head comfortably while allowing the pointed tails to hang naturally.
Step 11: Finish the Pointed Tails
Fold the raw edges of each pointed tail inward.
Sew a narrow hem along the edges.
Work carefully near the tips.
For lightweight jersey, a narrow zigzag or stretch stitch can help maintain flexibility.
Step 12: Adjust the Back Opening
Check the opening at the lower back of the turban.
The photograph shows a gathered curved section above the neckline.
Adjust the elastic if necessary.
The opening should feel comfortable without excessive pressure.
Step 13: Secure the Final Seams
Inspect the crown seam, elastic casing, and tail hems.
Reinforce any areas that experience tension.
Trim loose threads.
Press gently using a temperature suitable for the fabric.
Step 14: Final Fitting
Try on the completed turban.
Position the smooth front edge around the forehead.
Arrange the fabric over the crown.
Allow the pointed tails to fall toward the shoulders.
Adjust the folds until the design looks balanced.
Your DIY Fabric Turban is now complete.
4. Creative Turban Styles, Professional Sewing Tips, and Finishing Ideas
The Turban Design Pattern offers many possibilities for customization.
By changing the fabric, color, gathering, or decorative details, you can create completely different looks using the same basic construction method.
The dusty rose turban in the photograph has a soft, elegant appearance that works beautifully with casual clothing.
Elegant Dusty Rose Turban
Use muted pink or dusty rose jersey fabric.
Keep the design simple.
Allow the fabric to form natural folds.
This color creates a soft and feminine appearance.
Classic Black Turban
Choose smooth black cotton jersey.
Use matching black thread.
Keep the seams subtle.
A black turban is versatile and coordinates easily with many outfits.
Vintage Floral Turban
Use lightweight floral jersey fabric.
Choose small flowers in muted colors.
This creates a romantic, vintage-inspired appearance.
Pair the finished turban with simple clothing to highlight the fabric pattern.
Emerald Green Turban
Use rich emerald green fabric.
The vibrant color creates a sophisticated and eye-catching accessory.
Choose a smooth fabric for an elegant finish.
Burgundy Turban
Deep burgundy is a beautiful option for autumn and winter.
Use soft stretch fabric with a gentle drape.
This color works especially well with neutral clothing.
Cream and Beige Turban
For a timeless appearance, choose ivory, cream, or warm beige fabric.
These neutral colors create a delicate and elegant style.
They are also suitable for coordinating with patterned outfits.
Turban with Decorative Front Folds
For additional texture, create two or three small folds near the forehead.
Pin the folds temporarily.
Try on the turban to check the appearance.
Secure them with small hidden stitches.
Avoid creating bulky seams near the face.
Turban with a Decorative Knot
The pointed tails can be tied loosely at the back or side.
This creates a different appearance without changing the main construction.
Make sure the knot does not cause discomfort.
Turban with Shorter Tails
If you prefer a compact design, shorten the pointed sections before hemming.
A shorter version creates a simpler head covering.
This can be especially useful for everyday wear.
Turban with Longer Tails
Extend the tapered ends to create a more scarf-like appearance.
Longer tails can be arranged over the shoulders.
Use lightweight fabric to prevent excessive bulk.
Professional Sewing Tips
Choose soft fabric. Comfortable material is essential for a head covering.
Use stretch stitches. Jersey fabric requires seams that can stretch without breaking.
Avoid excessive tension. Tight elastic can make the turban uncomfortable.
Press gently. High heat may damage delicate stretch fabrics.
Test the fit frequently. Adjustments are easier before finishing all seams.
Use matching thread. Coordinated stitching creates a polished appearance.
Keep the front edge smooth. A neat forehead opening improves the finished look.
Distribute gathers evenly. Balanced gathers create a more attractive silhouette.
Make a test version. A sample allows you to refine the fit before using your favorite fabric.
How to Care for Your Fabric Turban
Check the fabric manufacturer’s washing instructions.
For most washable cotton jersey fabrics, gentle machine washing or hand washing may be suitable.
Use cool water and a mild detergent.
Avoid harsh bleaching products.
Do not twist delicate fabric excessively.
Lay the turban flat or hang it carefully to dry.
Press on low heat if needed.
Store it folded to help preserve its shape.
Frequently Asked Questions About the Turban Design Pattern
Is this turban sewing pattern suitable for beginners?
Yes. The project is suitable for beginners who understand basic cutting, hemming, and sewing machine techniques.
The gathering section may require a little practice.
What are the main measurements shown in the photograph?
The photograph shows a fabric piece with two prominent measurements: 37 cm (14.6 inches) and 55 cm (21.7 inches).
These measurements provide a useful reference for drafting an adapted pattern.
What is the best fabric for a handmade turban?
Soft cotton jersey, bamboo jersey, and rayon jersey are excellent choices.
They create comfortable head coverings with beautiful natural folds.
Can I use quilting cotton?
Yes, but quilting cotton is less stretchy and may produce a more structured appearance.
You may need additional ease or a different closure method.
Do I need elastic?
Elastic is recommended for the gathered back section in this adapted construction.
It helps create the soft pleated appearance and improves the fit.
Can I make the turban without a sewing machine?
Yes.
You can sew the seams by hand using small, secure stitches.
However, a sewing machine makes the project faster.
How much fabric do I need?
Approximately 0.75–1 meter of fabric is sufficient for many adult-size versions.
The exact amount depends on fabric width and pattern adjustments.
Can I make the turban larger?
Yes.
Increase the crown coverage and adjust the gathering section.
Always check the head circumference before cutting.
Can I make the turban smaller?
Yes.
Reduce the pattern dimensions carefully.
Make a test version to ensure a comfortable fit.
Can I use this design for different hairstyles?
Yes.
The soft gathered construction can accommodate different hair volumes.
You may need to increase the crown depth for thicker or longer hair.
Can I add decorative accessories?
Yes.
Small fabric bows, decorative folds, or lightweight embellishments can be added.
Avoid heavy decorations that may pull the fabric out of shape.
How long does it take to sew?
An experienced sewist may complete a simple version in approximately one to two hours.
Beginners may need additional time for cutting, gathering, and fitting.
Can I sell finished turbans made from this tutorial?
You can generally sell handmade items created from this original tutorial, subject to applicable local regulations.
Is this a traditional quilt block?
No.
Although it uses fabric cutting and sewing techniques familiar to quilters, the project is a fabric headwear sewing pattern, not a traditional patchwork quilt block.
Conclusion
The Turban Design Pattern is a beautiful and practical sewing project that transforms a simple piece of fabric into an elegant handmade head covering.
With its soft gathered crown, smooth front edge, and graceful pointed tails, the design offers a comfortable and stylish accessory suitable for many occasions.
The photograph’s distinctive tapered shape and visible 37 cm and 55 cm measurements provide inspiration for creating a similar handmade turban using basic sewing techniques.
By selecting soft fabric, preparing accurate pattern pieces, sewing carefully, and adjusting the gathering section, you can create a finished accessory with a beautiful professional appearance.
Whether you choose dusty rose, classic black, emerald green, burgundy, or a delicate floral print, each Handmade Fabric Turban can reflect your personal style and creativity.
Gather your favorite fabric, prepare your sewing tools, and enjoy making a comfortable and elegant DIY Turban Headscarf that combines simple construction with timeless handmade beauty.