
The U-Shaped Pillow Pattern is a wonderful sewing and quilting project that combines comfort, functionality, and beautiful handmade craftsmanship. With its distinctive curved design, this versatile pillow can provide gentle support while resting, reading, relaxing on the couch, or sitting comfortably in a chair. Unlike ordinary rectangular pillows, its U-shaped construction creates two soft arms connected by a rounded center, making it an attractive and practical addition to any home.
One of the greatest advantages of this DIY U-Shaped Pillow is the opportunity to customize every detail. You can choose delicate floral fabrics for a romantic vintage appearance, colorful patchwork squares for a traditional quilting style, or soft neutral cotton for a modern minimalist design. The pillow can also be made in different sizes, allowing you to create a compact neck pillow, a larger lounging cushion, or a decorative support pillow.
The construction is surprisingly approachable, even for sewists who have limited experience with curved patterns. The project begins with a full-size paper template, followed by fabric cutting, optional patchwork assembly, lightweight quilting, and careful sewing around the curved edges. Once the fabric shell is completed, soft polyester filling creates the rounded shape that makes the pillow comfortable and inviting. A neatly finished opening completes the project with a professional handmade appearance.
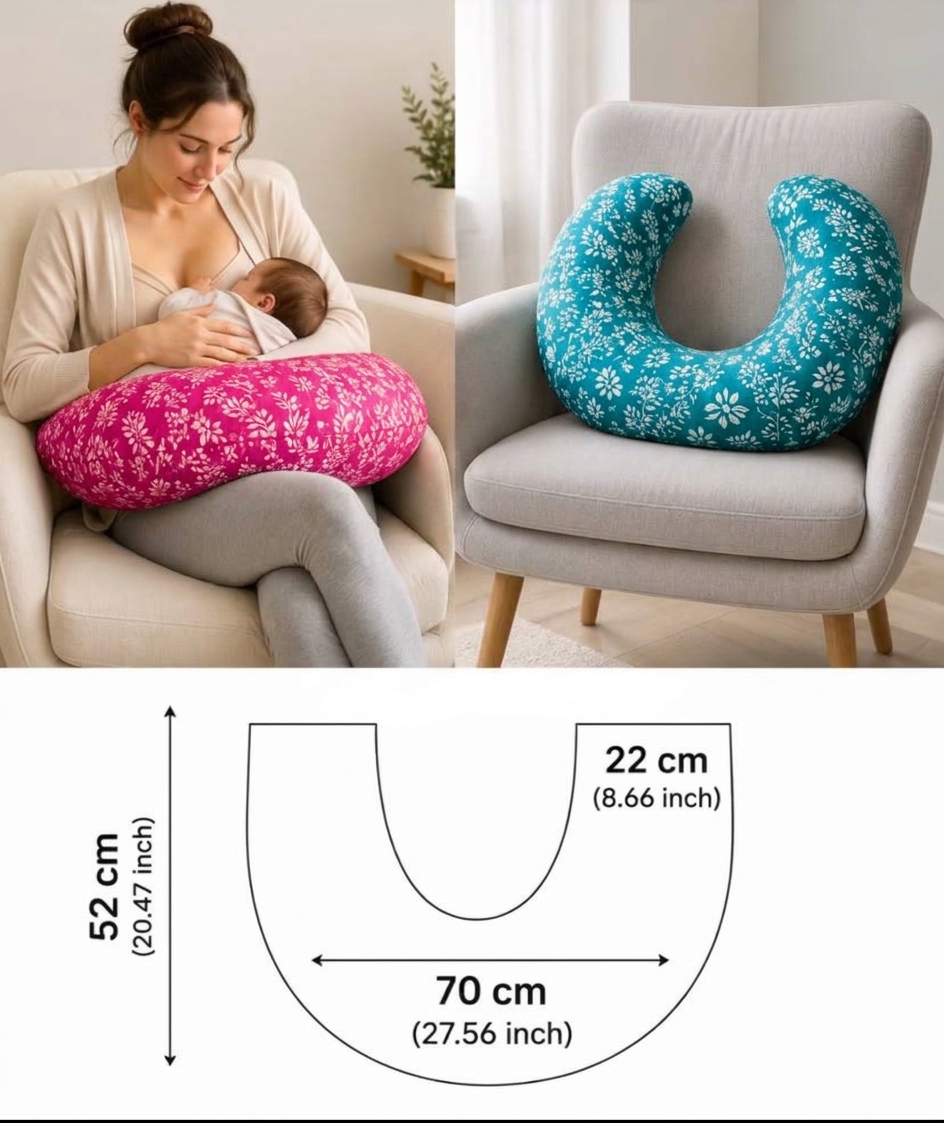
In this complete U-Shaped Pillow Sewing Tutorial, you will learn how to draft an accurate pattern, calculate measurements, select suitable fabrics, create a quilted exterior, sew the curved pillow shape, distribute the filling evenly, and finish the seams securely. The instructions include measurements in both inches and centimeters, helpful sewing techniques, creative design ideas, frequently asked questions, and practical tips for making a beautiful Handmade U-Shaped Pillow.
DISCOVER MORE FREE PATTERNS HERE!
Materials, Measurements, and Fabric Preparation for the U-Shaped Pillow Pattern
Choosing the right materials is the first step toward creating a comfortable and durable Quilted U-Shaped Pillow. Since this project includes curved edges and rounded corners, the fabric should be easy to handle, strong enough to withstand regular use, and soft against the skin.
High-quality quilting cotton is an excellent choice for the outer cover. It is available in countless colors and prints, presses beautifully, and works well with patchwork techniques. For additional softness, you can use cotton flannel or brushed cotton. Lightweight linen blends also create a sophisticated appearance, although they may require additional stabilization.
The filling is equally important. Polyester fiberfill is a popular choice because it is lightweight, washable in many applications, and easy to distribute around the curved sections. For a firmer cushion, use a denser stuffing technique, but avoid overfilling because excessive pressure can distort the U shape.
Materials needed
- ½–¾ yard (45–70 cm) of quilting cotton for the front.
- ½–¾ yard (45–70 cm) of quilting cotton for the back.
- Approximately ½ yard (45 cm) of low-loft quilt batting, optional.
- Lightweight cotton backing fabric for the quilted front and back, if needed.
- Approximately 14–22 oz (400–625 g) of polyester fiberfill, depending on the desired firmness.
- Coordinating sewing thread.
- Sewing machine.
- Size 80/12 universal sewing machine needle.
- Fabric scissors or rotary cutter.
- Cutting mat.
- Quilting ruler.
- Flexible measuring tape.
- Fabric marking pencil.
- Sewing clips or pins.
- Large paper for the template.
- Iron and ironing board.
- Hand-sewing needle.
- Point turner or blunt wooden tool.
Suggested finished measurements
This tutorial uses a medium-sized decorative support pillow.
| Component | Finished Measurement |
|---|---|
| Overall width | 20 in (50.8 cm) |
| Overall height | 18 in (45.7 cm) |
| Pillow arm width | 5 in (12.7 cm) |
| Connecting base thickness | 5 in (12.7 cm) |
| Interior opening width | 10 in (25.4 cm) |
| Interior opening depth | Approximately 13 in (33 cm) |
| Seam allowance | ½ in (1.3 cm) |
The dimensions describe a flat U-shaped pillow before stuffing. The completed pillow may become slightly smaller as the filling rounds the fabric.
For a larger lounging pillow, increase the dimensions proportionally.
For a smaller neck pillow, reduce the pattern while maintaining smooth curves.
Understanding the U-shaped pillow construction
The U-Shaped Pillow Pattern consists of two matching fabric pieces.
The front can be made from a single piece of fabric or assembled from decorative patchwork.
The back can use matching fabric or a contrasting print.
Optional batting adds softness and allows decorative quilting.
The two pieces are sewn together with right sides facing.
A small opening is left for turning and stuffing.
The filling creates the rounded U-shaped form.
Finally, the opening is closed using an invisible hand stitch.
Step-by-Step U-Shaped Pillow Pattern: Drafting and Cutting the Fabric
Accurate pattern drafting is essential for creating a balanced U-Shaped Quilt Pillow. The two arms should be approximately equal in width, and the curved base should connect smoothly without sharp corners.
Using a paper template before cutting the fabric allows you to check the shape and make adjustments without wasting materials.
Step 1: Draw the outer dimensions
Place a large sheet of pattern paper on a flat surface.
Draw a rectangle measuring 20 inches wide and 18 inches tall.
Mark the vertical center line at 10 inches.
This line will help keep both sides of the pillow symmetrical.
The rectangle represents the maximum finished width and height.
Step 2: Create the inner opening
Measure 5 inches inward from each side of the rectangle.
Mark these points along the upper edge.
Draw two vertical guide lines downward from the marks.
The interior opening should be approximately 10 inches wide.
Measure 13 inches downward from the upper edge.
This establishes the approximate depth of the opening.
Step 3: Round the interior base
Connect the two interior guide lines with a smooth curved line.
Use a large round plate, flexible ruler, or freehand drawing.
Avoid sharp corners at the bottom of the opening.
The curve should flow gently into both inner arm edges.
A smooth inner curve makes the pillow easier to sew and stuff.
Step 4: Shape the outer edges
Round the top of each pillow arm.
Create soft curves along the outer corners.
Round the lower outside corners of the U.
Keep the connecting base approximately 5 inches thick at its center.
The overall shape should resemble a wide horseshoe.
Check that both sides are symmetrical.
Step 5: Add the seam allowance
Draw a second line ½ inch outside the finished outline.
This becomes the cutting line.
For the interior opening, extend the cutting line ½ inch into the opening, toward the fabric side of the seam.
Maintain the seam allowance consistently around all curves.
Cut out the completed paper template.
Step 6: Test the pattern shape
Place the paper template on a flat surface.
Fold it along the center line.
Check that both arms align.
Trim any uneven areas.
Open the template again.
The finished pattern should have smooth, balanced curves.
Step 7: Prepare the fabric
Wash and press the cotton fabric if appropriate for the material.
Lay the front fabric right side up.
Position the paper template on top.
Pin securely.
Cut one front piece.
Repeat with the backing fabric.
Cut one matching back piece.
Step 8: Cut the optional batting
Place the template over the batting.
Cut two matching pieces.
One piece will be used behind the front fabric.
The second piece will be used behind the back fabric.
If you prefer a lighter pillow, omit the batting.
The fabric pieces are now ready for quilting and assembly.
How to Quilt, Sew, Turn, and Stuff the U-Shaped Pillow
Once the fabric pieces are prepared, the next step is assembling the Handmade U-Shaped Pillow. Working carefully around the curved edges will help create a smooth, professional finish.
The key is to sew slowly, maintain a consistent seam allowance, and distribute the filling evenly.
Step 1: Prepare the quilt sandwich
Place the front fabric right side up.
Position the batting underneath.
Add a lightweight cotton backing layer if desired.
Smooth the layers.
Secure them with quilting pins.
Repeat for the back piece.
The batting should remain flat without wrinkles.
Step 2: Mark the quilting lines
Use a fabric marking pencil to draw diagonal quilting lines.
Space the lines approximately 2 inches apart.
Draw a second set of diagonal lines in the opposite direction.
This creates a diamond quilting pattern.
For a simpler finish, use straight parallel lines instead.
Choose a quilting design that complements your fabric.
Step 3: Quilt the front and back
Attach a walking foot to the sewing machine.
Sew along the marked lines.
Maintain even stitching.
Avoid stretching the fabric.
Repeat with the back piece.
The quilting helps stabilize the layers and adds beautiful texture.
Step 4: Trim the quilted pieces
Lay both quilted pieces flat.
Trim away any excess batting.
Check the curved edges.
Make sure the front and back match.
If necessary, use the original paper template to correct the shape.
The pieces should align before sewing.
Step 5: Pin the pillow together
Place the front and back pieces right sides together.
Align the outer edges.
Match the inner curves.
Pin or clip around the entire perimeter.
Leave a 5–6 inch opening along one accessible outer edge.
The opening will be used for turning and stuffing.
Avoid placing it at the tightest interior curve.
Step 6: Sew around the pillow
Using a ½-inch seam allowance, sew around the U-shaped outline.
Begin at one side of the marked opening.
Continue slowly around the outer curves.
Pivot gently as needed.
Sew around the inner opening.
Continue until reaching the opposite side of the turning opening.
Backstitch at both ends.
Step 7: Clip the curved seam allowances
Trim excess seam allowance where necessary.
Clip the concave interior curves carefully.
Make small cuts perpendicular to the seam.
Stop before reaching the stitching line.
Notch bulky convex curves if needed.
These adjustments allow the fabric to lie smoothly after turning.
Step 8: Turn the pillow right side out
Reach through the opening.
Gently pull the fabric through.
Use your fingers to shape the two arms.
Smooth the inner curve.
Use a blunt point turner to help shape the rounded corners.
Avoid pushing too hard against the seams.
Step 9: Begin stuffing the pillow
Take small handfuls of polyester fiberfill.
Start by filling the ends of the two arms.
Push the filling gently toward the rounded tips.
Continue filling both arms evenly.
Add more stuffing toward the connecting base.
Work gradually to prevent lumps.
Step 10: Adjust the pillow firmness
Place the pillow on a flat surface.
Check the shape.
Both arms should have similar thickness.
Add more filling where necessary.
Avoid packing the pillow too tightly.
The finished cushion should feel supportive but still compress comfortably.
Step 11: Close the opening
Fold the raw edges of the opening inward by ½ inch.
Pin or clip the edges together.
Thread a hand-sewing needle.
Use a ladder stitch to close the opening.
Pull the thread gently to hide the stitches.
Knot securely.
Weave the thread end into the seam.
Step 12: Shape the finished pillow
Massage the filling through the fabric.
Smooth any uneven areas.
Check the inner curve.
Make sure both arms remain symmetrical.
The DIY U-Shaped Pillow is now complete.
Creative Quilt Designs, Fabric Combinations, Finishing Tips, and Practical Uses
The U-Shaped Pillow Pattern can be customized in many beautiful ways. From classic patchwork to delicate floral prints, the possibilities are nearly endless.
Its curved shape makes it a particularly interesting project for sewists who enjoy combining decorative quilting with functional home accessories.
Step 1: Create a vintage floral pillow
Choose dusty rose fabric with small white flowers.
Use cream-colored cotton for the back.
Add delicate diamond quilting.
Finish with matching thread.
This creates a romantic vintage-inspired cushion.
It looks beautiful in bedrooms and cozy reading corners.
Step 2: Make a colorful patchwork version
Cut small quilting cotton squares measuring 3½ inches.
Arrange them in alternating colors.
Sew the squares into rows using a ¼-inch seam allowance.
Join the rows into a fabric panel large enough for the pillow template.
Press the seams carefully.
Cut the U-shaped front from the completed patchwork panel.
Step 3: Create a modern neutral pillow
Choose beige, ivory, taupe, or light gray cotton fabric.
Use simple straight-line quilting.
Avoid excessive decoration.
Keep the seams smooth and the shape balanced.
This creates a minimalist cushion suitable for contemporary interiors.
Step 4: Make a soft flannel version
Choose high-quality cotton flannel.
Use a soft coordinating lining.
Omit the batting if you prefer a lighter pillow.
Stuff evenly with polyester fiberfill.
This creates a cozy cushion with a gentle texture.
Flannel is especially comfortable during cooler seasons.
Step 5: Add decorative piping
Prepare fabric piping using coordinating cotton.
Position the piping along the outer edge of the front piece.
Baste it in place.
Attach the back piece.
Sew around the pillow using a zipper foot.
The piping creates a decorative outline that emphasizes the U shape.
Step 6: Finish the pillow professionally
Inspect the seams.
Check the hand-stitched opening.
Trim loose threads.
Gently reshape the filling.
Make sure the fabric is smooth.
If the materials are washable, follow the care instructions for the most delicate component.
Allow the pillow to dry completely before using it.
Beautiful Color Combinations for the U-Shaped Pillow Pattern
Dusty Rose and Ivory: A delicate vintage combination for romantic bedrooms.
Sage Green and Cream: A soft botanical palette with timeless appeal.
Navy Blue and White: A classic combination suitable for traditional quilt designs.
Lavender and Pale Pink: A gentle pastel palette with a cheerful handmade appearance.
Terracotta and Beige: A warm rustic combination inspired by autumn colors.
Emerald Green and Gold: A sophisticated palette for decorative cushions.
Baby Blue and White: A fresh, calming combination for cozy spaces.
Practical Uses for a U-Shaped Pillow
A U-shaped pillow can provide gentle support while relaxing in a chair.
It can be used as a decorative cushion on a couch or bed.
A smaller version can function as a travel neck pillow.
A larger version can be useful for comfortable lounging.
The design can also be adapted for reading and resting.
However, a homemade pillow is not a medical positioning device and should not be used as a sleep-positioning aid for infants. Keep pillows out of infant sleep spaces.
Helpful Tips for a Perfect U-Shaped Quilt Pillow
Use a full-size template. Accurate drafting helps maintain symmetry.
Choose soft but durable fabric. Quilting cotton is an excellent option.
Clip curved seams carefully. Proper clipping prevents puckering.
Stuff gradually. Small amounts of filling help prevent lumps.
Avoid overstuffing. Excess filling can distort the curved shape.
Use strong thread. Secure seams improve durability.
Check the final shape. Both arms should remain balanced.
Frequently Asked Questions About the U-Shaped Pillow Pattern
1. Is the U-Shaped Pillow Pattern suitable for beginners?
Yes. The project is suitable for confident beginners who understand basic sewing and curved seams.
2. What fabric is best for a U-shaped pillow?
Quilting cotton, cotton flannel, and soft linen blends are excellent choices.
3. How much fabric do I need?
Approximately ½–¾ yard for the front and the same amount for the back is sufficient for many medium-sized pillows, depending on fabric width and layout.
4. What filling should I use?
Polyester fiberfill is a practical choice because it is lightweight and easy to distribute.
5. Can I make the pillow larger?
Yes. Enlarge the paper template while maintaining the proportions of the arms and connecting base.
6. Can I make a smaller neck pillow?
Yes. Reduce the template dimensions and use a lighter amount of filling.
7. Is batting necessary?
No. Batting is optional and mainly provides additional softness and quilting texture.
8. Can I use fabric scraps?
Absolutely. Fabric scraps are excellent for creating a colorful patchwork exterior.
9. How do I prevent wrinkles around the curves?
Clip the concave seam allowances carefully and avoid stretching the fabric while sewing.
10. How do I prevent the filling from becoming lumpy?
Use small amounts of fiberfill and distribute them gradually.
11. Can I add a removable cover?
Yes. A separate cover with a zipper can be drafted from the finished pillow shape.
12. Can I use fleece fabric?
Yes. Fleece creates a soft cushion, although stretchy fabrics may require additional stabilization.
13. How do I wash the finished pillow?
Follow the fabric and filling manufacturer’s care instructions. A removable washable cover can make cleaning easier.
14. Can I use this pillow for nursing or infant sleep?
This homemade pattern is intended as a general decorative or lounging cushion. It is not tested as a nursing or infant-positioning product and should never be placed in an infant’s sleep area.
15. Can I sell handmade U-shaped pillows?
Handmade pillows created from your own work can generally be sold, subject to applicable pattern rights, labeling rules, and product safety regulations.
Conclusion
The U-Shaped Pillow Pattern is a beautiful sewing and quilting project that combines practical comfort with timeless handmade style. Its gently curved shape, soft fabric layers, decorative quilting, and comfortable filling create a versatile cushion suitable for many home settings.
One of the greatest advantages of this design is its flexibility. You can adjust the dimensions, choose different fabrics, add patchwork details, or experiment with decorative piping to create a pillow that reflects your personal style.
The project also provides an enjoyable opportunity to practice pattern drafting, curved seams, fabric quilting, accurate cutting, stuffing techniques, and invisible hand stitching.
For quilting enthusiasts who enjoy making useful home accessories, this Handmade U-Shaped Pillow offers a rewarding way to transform simple fabric into a beautiful and functional creation.
Whether you choose romantic floral cotton, vintage patchwork, modern neutral fabric, or soft pastel colors, the finished pillow can become a charming addition to your home.
With careful measurements, smooth stitching, thoughtful fabric choices, and attention to the finishing details, your DIY Quilted U-Shaped Pillow can bring comfort, beauty, and the special charm of handmade sewing to your favorite spaces.