
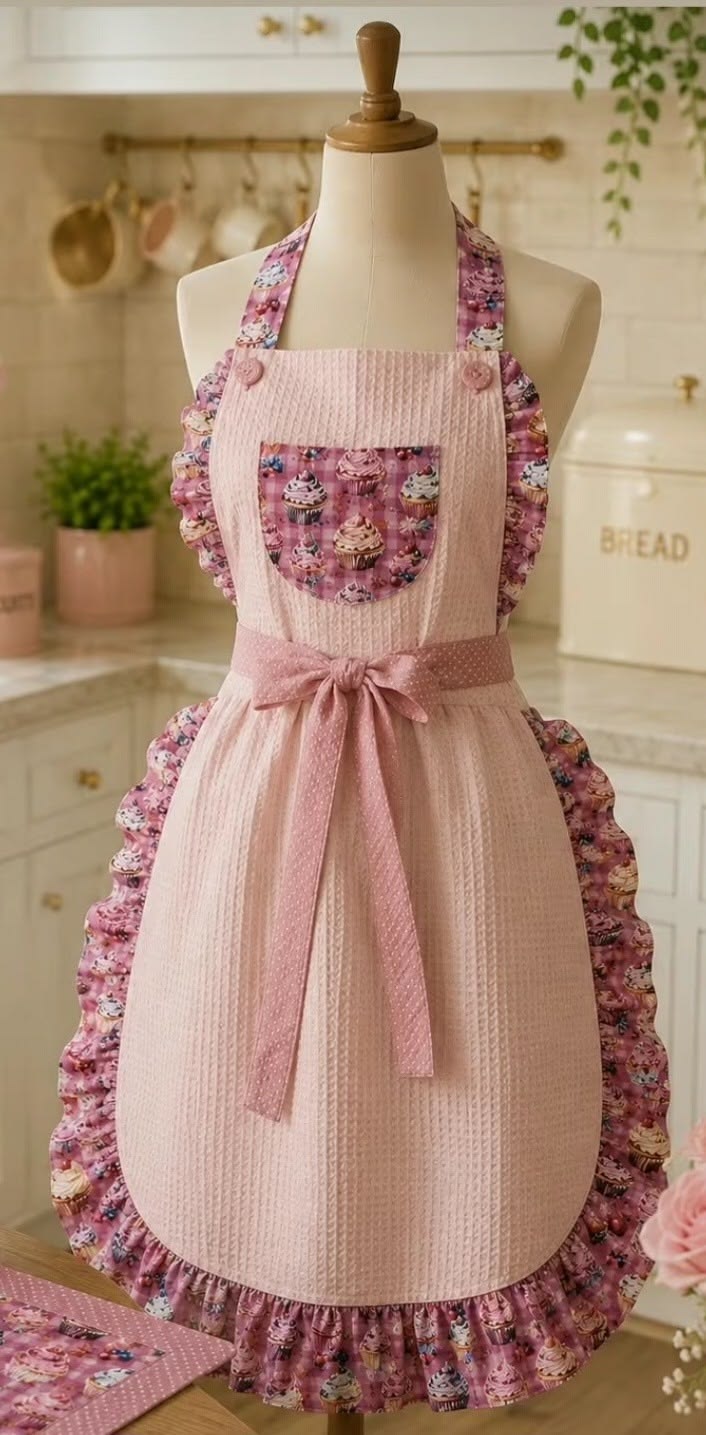
Vintage Style Apron Pattern is the perfect sewing project for anyone who loves elegant handmade kitchen accessories inspired by timeless farmhouse and cottage aesthetics. Featuring a flattering silhouette, delicate ruffled trim, decorative pocket, comfortable neck strap, and adjustable waist ties, this Vintage Style Apron Pattern combines beauty and practicality into one delightful project. Whether you’re baking, cooking, gardening, hosting guests, or simply decorating your kitchen, this apron brings both style and function to every occasion.
One of the greatest advantages of making your own Vintage Style Apron Pattern is the ability to personalize every detail. You can select soft floral prints, gingham fabrics, vintage-inspired cottons, pastel colors, or seasonal collections to perfectly match your kitchen décor. Decorative ruffles, contrasting pockets, bows, lace trims, and embroidered details transform a simple apron into a beautiful heirloom-quality accessory that reflects your personality and sewing skills.
Although the finished apron looks professionally tailored, the construction process is beginner-friendly when completed step by step. Throughout this guide, you’ll learn how to choose suitable fabrics, prepare the pattern pieces, cut every section accurately, sew the apron body, create the ruffled trim, attach the pocket, assemble the neck and waist straps, finish the seams professionally, and complete a Vintage Style Apron Pattern that you’ll proudly wear for years. This tutorial follows traditional quilting and sewing methods suitable for sewists of all experience levels.
Choosing Materials for Your Vintage Style Apron Pattern
The success of a beautiful Vintage Style Apron Pattern starts with selecting quality fabrics that provide comfort, durability, and excellent stitch definition. Quilting cotton is one of the most popular choices because it is lightweight, easy to sew, machine washable, and available in thousands of beautiful prints.
DISCOVER MORE FREE PATTERNS HERE!
For the apron body, choose medium-weight cotton, waffle weave cotton, linen blends, cotton canvas, or textured quilting fabrics. These materials provide enough structure while remaining comfortable during long hours of cooking or baking.
Coordinate your accent fabrics carefully. Floral prints, cupcake motifs, gingham, tiny polka dots, vintage roses, cherries, strawberries, and pastel florals create the classic vintage appearance that makes this apron so charming. Contrasting fabrics work especially well for the pocket, ruffles, straps, and waistband.
Gather all necessary sewing tools before beginning your Vintage Style Apron Pattern. You’ll need fabric scissors, rotary cutter, quilting ruler, cutting mat, measuring tape, pins or sewing clips, matching thread, sewing machine, iron, washable fabric marker, and optional lace or decorative ribbon.
Always prewash and press your fabrics before cutting. This prevents future shrinkage, removes excess sizing, and ensures that every pattern piece maintains its intended dimensions after laundering.
Carefully transfer every pattern piece onto your fabric using accurate markings for darts, pleats, pocket placement, strap positions, and gathering lines. Accurate preparation creates a smoother assembly process and results in a polished finished apron.
Cutting and Sewing the Main Apron Body
Begin the Vintage Style Apron Pattern by cutting the main apron panel according to your selected size. Smooth, accurate cuts help ensure symmetrical edges and simplify later construction steps.
If your pattern includes shaping through curved sides or waist contours, mark these carefully before sewing. Maintaining smooth curves gives the finished apron a flattering fit while preserving the elegant vintage silhouette.
Construct the pocket separately before attaching it to the apron front. Fold and press the upper edge, reinforce the corners with backstitching, and center the pocket carefully before topstitching it securely onto the apron body.
Next, prepare the waistband by folding, pressing, and reinforcing each edge. The waistband not only provides structure but also serves as the attachment point for the waist ties, making it one of the strongest areas of the finished apron.
Assemble the neck strap according to the pattern instructions. Some sewists prefer adjustable button closures, while others enjoy fixed straps or ties. Whichever style you choose, reinforce every stress point for long-lasting durability.
Once the body, pocket, waistband, and neck strap are prepared, join each section together carefully. Press every seam immediately after stitching to create crisp lines and a professional appearance throughout the Vintage Style Apron Pattern.
Creating the Beautiful Vintage Ruffles
The signature feature of this Vintage Style Apron Pattern is its graceful ruffled trim. Cut long fabric strips with consistent width, joining multiple strips together if necessary to achieve the full perimeter length of the apron.
Finish one long edge of each strip using either a narrow rolled hem, serger, decorative stitch, or double-fold hem. A neatly finished edge enhances the overall appearance of the completed ruffle.
Create gathering stitches along the opposite edge using two parallel rows of long machine stitches. Gently pull the bobbin threads until the fabric gathers evenly across the entire length.
Distribute the gathers uniformly before pinning the ruffle around the apron edge. Consistent fullness creates a balanced, elegant appearance while preventing bulky sections.
Sew the ruffle securely to the apron using a standard seam allowance. Once attached, cover the seam with bias binding or facing if your pattern includes an enclosed finish for added comfort and durability.
Give the entire apron a thorough final pressing. Well-pressed ruffles maintain their soft volume while showcasing the delicate vintage styling that defines the Vintage Style Apron Pattern.
Finishing Touches and Customization Ideas
One of the greatest joys of sewing a Vintage Style Apron Pattern is adding personalized finishing touches. Decorative buttons, embroidered initials, lace edging, ric-rac trim, handmade bows, or vintage-inspired labels all add unique character.
Consider making multiple aprons for different seasons using spring florals, patriotic prints, autumn leaves, Christmas fabrics, or cheerful summer themes. The same pattern can produce an entirely different look depending on fabric selection.
Matching kitchen accessories such as oven mitts, pot holders, tea towels, bread basket liners, or table runners create coordinated handmade kitchen collections that make wonderful gifts.
Wash the finished apron according to the fabric manufacturer’s instructions. Machine washing on a gentle cycle followed by light pressing helps preserve the crisp appearance of the ruffles and decorative details.
Store your apron folded neatly or hang it by the neck strap to minimize wrinkles. Proper storage helps maintain the beautiful shape of both the ruffles and waistband between uses.
Most importantly, enjoy wearing your handmade Vintage Style Apron Pattern while cooking, baking, crafting, gardening, or entertaining guests. Every stitch reflects your creativity and transforms an everyday household item into something truly special.
Frequently Asked Questions
Is the Vintage Style Apron Pattern suitable for beginners?
Yes. Beginners with basic sewing skills can successfully complete this project by following the construction steps carefully.
What fabric works best?
Quilting cotton, waffle cotton, linen blends, cotton canvas, and lightweight home décor fabrics all work beautifully.
Can I make the apron adjustable?
Absolutely. Adjustable neck straps with buttons, sliders, or ties provide a customizable fit for different body sizes.
Can I add more pockets?
Yes. Additional pockets can easily be added for utensils, recipe cards, towels, or kitchen tools.
Do I have to include the ruffles?
No. The apron looks equally beautiful with clean edges if you prefer a simpler farmhouse style.
Can I customize the size?
Yes. The pattern can be lengthened, widened, or shortened to create children’s aprons, petite sizes, or larger adult versions.
Is this a good handmade gift?
Definitely. Handmade aprons are thoughtful gifts for bakers, cooks, gardeners, bridal showers, birthdays, Mother’s Day, and holiday celebrations.
How should I care for the finished apron?
Machine wash using a gentle cycle, reshape while damp if needed, and press with a warm iron to maintain its crisp, polished appearance.
Conclusion
The Vintage Style Apron Pattern is a delightful quilting and sewing project that combines timeless elegance with everyday practicality. Throughout this tutorial, you’ve learned how to select suitable fabrics, prepare accurate pattern pieces, sew the apron body, construct decorative pockets, create beautiful gathered ruffles, assemble the straps, finish every seam professionally, and customize the design to match your own personal style.
Whether you’re sewing your first handmade apron, creating thoughtful gifts for family and friends, or adding another beautiful piece to your handmade kitchen collection, the Vintage Style Apron Pattern offers endless opportunities for creativity while producing a functional accessory you’ll enjoy wearing every day.
If you enjoyed this Vintage Style Apron Pattern tutorial, we would love to hear your honest opinion. Please share your sewing experience, tell us how your apron turned out, and leave your suggestions for future quilting and sewing tutorials. Your feedback helps inspire new ideas and supports our growing community of passionate handmade creators.