Creating an Elephant Quilt Block is a fantastic way to add a fun and unique touch to your quilting projects. Whether you’re a seasoned quilter or a beginner, this tutorial will guide you step by step in making your very own elephant quilt block. The charm of an elephant quilt block lies in its simplicity, combined with the fun and whimsical design of an elephant, which makes it perfect for nursery quilts, children’s blankets, or even home decor. In this article, you will learn everything you need to know about creating a stunning elephant quilt block, from fabric choices to sewing tips.
Quilting is an art that combines both creativity and precision. An Elephant Quilt Block can be a playful and meaningful addition to your collection. The beauty of an elephant quilt block is in its ability to showcase your skills while also expressing personality and creativity. By following this tutorial, you’ll not only learn how to piece together fabric but also gain confidence in creating intricate quilt blocks. Let’s dive into the detailed steps and tips that will help you complete your elephant quilt block.
Before starting, it’s important to note that quilting requires patience and attention to detail. The Elephant Quilt Block may look complex at first glance, but with careful planning and the right techniques, you’ll find it’s a rewarding and enjoyable project. In this article, we will break down the entire process into manageable steps, making it easy for anyone to follow along.
1. Choosing the Right Fabrics for Your Elephant Quilt Block
Choosing the right fabric is one of the most crucial steps in creating a beautiful elephant quilt block. Fabric choice not only influences the final look of your quilt but also impacts how easy the block is to sew together. Here are some tips to help you pick the best fabrics for your project:
SEE OTHER FACE PATTERNS HERE!
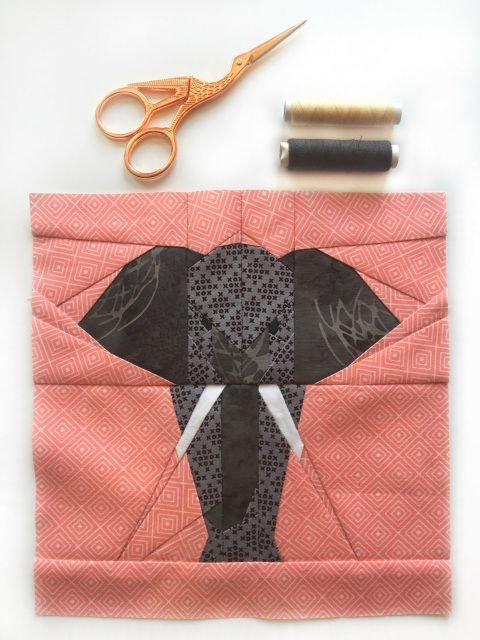
First, consider the color scheme you want for your quilt. Neutral colors such as grays, whites, and beiges work great for the elephant’s body, while brighter colors can be used for accents like the ears or background. Play around with shades that complement each other, creating a balanced and harmonious design.
Next, think about the texture of the fabrics. Quilting cottons are a popular choice for quilt blocks due to their durability and ease of use. However, you could also experiment with other fabric types like flannel or linen for a unique texture. Soft, easy-to-sew fabrics will make the piecing process smoother.
It’s also important to select fabrics of similar weight and thickness to ensure a consistent outcome. If you mix different types of fabric weights, it could result in uneven stitching and a less professional look.
The pattern of the fabric also plays a role in the aesthetic of your quilt block. Solid fabrics will create a clean and minimalist look, while patterned fabrics can add more visual interest. Be mindful of how the patterns will work together and whether they will distract from the overall design of the elephant.
Don’t forget to account for fabric shrinkage. Pre-washing your fabric before you start cutting your pieces is highly recommended. This helps prevent the quilt block from changing shape after it’s finished.
Lastly, you’ll need a fabric for the backing. Choose a fabric that complements your design and ensures your quilt block’s durability. Quilt backing fabric can be a larger print or a solid color, depending on the look you’re aiming for.
2. Cutting the Pieces for Your Elephant Quilt Block
Now that you’ve chosen your fabrics, the next step is to cut out the necessary pieces for your elephant quilt block. This step is where precision becomes important to ensure all pieces fit together seamlessly. Here’s how to approach cutting the fabric:
Start by measuring and marking your fabric using a fabric ruler and a fabric pencil. Accurate measurements are essential for a neat and tidy quilt block. You will need a range of fabric pieces: the body, ears, trunk, tail, and background.
For the elephant’s body, you will likely need a large square or rectangular piece. Measure the size of your desired quilt block (typically 12” x 12”) and cut the body piece slightly larger than your block size. You’ll trim the excess fabric once you begin piecing the quilt block together.
The ears are typically made from two fabric pieces: one for the larger outer ear and one for the smaller inner ear. You can create a two-tone effect by using contrasting fabrics for the inner and outer parts of the ear. Cut these pieces carefully to ensure the elephant’s ears have a balanced shape.
The trunk is an essential feature of the elephant quilt block, and it requires attention to detail when cutting. You can create a curved trunk by cutting out a long, slightly tapered piece of fabric. Keep the fabric light and flexible for easy stitching.
You’ll need to cut several smaller pieces for the background and any additional details like the tail, eyes, and tusks. These pieces should be cut with precision, as they will form the background and smaller features of the block.
Once all the fabric pieces are cut, keep them organized in separate piles or containers. This will make it easier for you to grab the right piece at the right time during the piecing process.
3. Assembling the Elephant Quilt Block
With all the fabric pieces cut, it’s time to start assembling your elephant quilt block. This is where the design starts to come to life. Here are the steps to successfully assemble your block:
Start by sewing together the elephant’s body. Use a quarter-inch seam allowance to ensure the pieces fit together correctly. As you sew the body together, take care to align the edges of the fabric pieces to avoid any puckering or misalignment.
Next, sew the elephant’s ears. Attach the inner ear fabric to the outer ear fabric, then sew the completed ears onto the body. Be sure to leave enough seam allowance around the ears to avoid fraying when you turn the fabric inside out.
Now, sew the trunk to the elephant’s face. The trunk is a crucial part of the design, so make sure it curves gracefully and aligns with the body. You may need to adjust the trunk slightly to achieve a perfect fit, depending on the size and shape of your elephant’s face.
Once the main parts are pieced together, attach the tail and any additional smaller details. This is also a good time to add any decorative stitching or quilting that will give your block texture and dimension.
When all the main pieces are sewn together, carefully trim the edges of the fabric to ensure a neat, square shape. This will help your block fit well with other blocks if you plan to join multiple quilt blocks together.
Finally, iron the quilt block to remove any wrinkles and set the seams. Pressing helps to ensure that the block maintains its shape and lays flat, making it easier to join with other blocks.
4. Adding the Finishing Touches to Your Elephant Quilt Block
After assembling your elephant quilt block, it’s time to add the finishing touches that will complete your design and make it stand out. Here are some final steps to help you add the perfect touches:
First, consider adding decorative embellishments like embroidery or appliqué. For example, you could add eyelashes to the elephant’s eyes or use a contrasting fabric to create small details like wrinkles on the ears or trunk. These little touches will add character and personality to your elephant.
You may also want to quilt your block for extra texture. Quilting can be done by hand or with a sewing machine. You can stitch in the ditch (along the seams) or create free-motion quilting designs to enhance the texture of your block. Choose a quilting pattern that complements the style of your elephant.
If you’re planning to join several quilt blocks together, use sashing or a border around the edges of the block. This helps to separate each block and create a clean, finished look when the blocks are joined together.
Adding a border to the quilt block can also make it stand out, giving it more structure and framing the design. Choose a color that complements your main fabrics to create a cohesive design.
Once your quilt block is complete, take a step back and admire your work. It’s amazing how much detail can be packed into a small, charming quilt block. You can now use this elephant quilt block as a standalone piece or incorporate it into a larger quilt project.
Finally, consider washing your quilt block before it’s joined with others. Pre-washing will help ensure that the fabric shrinks evenly and maintains its vibrant colors over time.
FAQ (Frequently Asked Questions)
1. How do I make an elephant quilt block with a simple design?
To make a simpler elephant quilt block, reduce the number of details. Use basic shapes like rectangles for the body and simple curves for the ears and trunk. Keep the fabric choices minimal, and focus on basic piecing techniques.
🌟Join our exclusive Quilt broadcast list on Messenger! Receive the best patterns, tips, and updates directly in your inbox. Our team is ready to send you delightful content that will inspire your projects. Don’t miss this opportunity to stay updated and create amazing pieces. Join now and be part of this passionate quilt community!✨📩
2. What fabric should I use for the elephant quilt block?
Cotton fabrics are the most popular choice for elephant quilt blocks due to their softness and ease of handling. You can experiment with flannel for a cozy feel or even linen for a more textured look.
3. Can I add different colors to the elephant quilt block design?
Yes! You can customize your elephant quilt block by choosing any colors that suit your project. Use shades that complement each other or choose bold, contrasting colors for a playful effect.
4. How do I make sure my elephant quilt block fits into a larger quilt?
To ensure your elephant quilt block fits perfectly with other blocks, make sure all the blocks are cut to the same size and sewn together with consistent seam allowances.
5. How do I care for my finished quilt block?
Once your elephant quilt block is completed, it’s recommended to wash it before assembling it into a quilt. Follow the fabric care instructions for the fabrics you used to maintain their appearance and texture.
In this Elephant Quilt Block – Tutorial, you learned how to create a beautiful and playful quilt block from start to finish. We covered essential steps such as choosing the right fabrics, cutting the pieces, assembling the block, and adding finishing touches. Whether you’re creating a small project or incorporating the block into a larger quilt, this design is sure to bring joy and creativity to your quilting endeavors.
We hope you found this tutorial helpful! Please leave a sincere opinion or any suggestions you might have for future quilting tutorials. Happy quilting!


