The Crazy Quilt – TUTORIAL is a celebration of freedom, creativity, and artistic expression in quilting. Unlike traditional quilt blocks that follow symmetry and precision, the crazy quilt invites improvisation, asymmetry, and bold combinations. This makes it the perfect project for quilters who love to experiment with texture, color, and embellishment.
Originating in the Victorian era, the Crazy Quilt – TUTORIAL has evolved into a timeless technique that reflects the personality of its maker. It’s ideal for using up fabric scraps, trying unconventional stitches, and exploring mixed media in textile form. With no strict rules, this quilting style gives you permission to let your imagination run wild.
Whether you’re a seasoned quilter or a curious beginner, this guide will walk you through every stage of creating your own crazy quilt block—from fabric selection to stitching techniques and finishing ideas. Let’s dive into the playful world of quilting with this inspiring and approachable Crazy Quilt – TUTORIAL.
1. Gathering Materials and Fabric Selection
Creating a successful Crazy Quilt – TUTORIAL starts with the right mix of materials. Unlike uniform quilt blocks, crazy quilting thrives on diversity and texture, so your fabric selection can include anything from silks to cottons and velvets.
SEE OTHER FACE PATTERNS HERE!
Start by gathering fabric scraps in various textures, weights, and colors. Vintage fabrics, lace, denim, and even old clothing can add a unique charm. This is the perfect time to use treasured scraps you’ve been saving for a special project.
Choose a neutral or light-colored foundation fabric like muslin. This will serve as your base layer for piecing. You’ll be stitching your fabric pieces directly onto this foundation, so make sure it’s sturdy and easy to sew through.
You’ll also need:
-
Fabric scissors or rotary cutter
-
Pins or fabric glue stick
-
Sewing machine (or hand stitching needle)
-
Thread in multiple colors
-
Optional: embroidery floss, ribbons, beads, or lace for embellishing
Lay out your fabrics and start grouping them by color family or contrast. Even though crazy quilts are, well, “crazy,” planning a general color palette helps unify the final design.
Don’t forget to pre-wash your fabrics if they’re new or have different fiber contents. This prevents shrinkage or bleeding later, especially important if your quilt will be used or washed frequently.
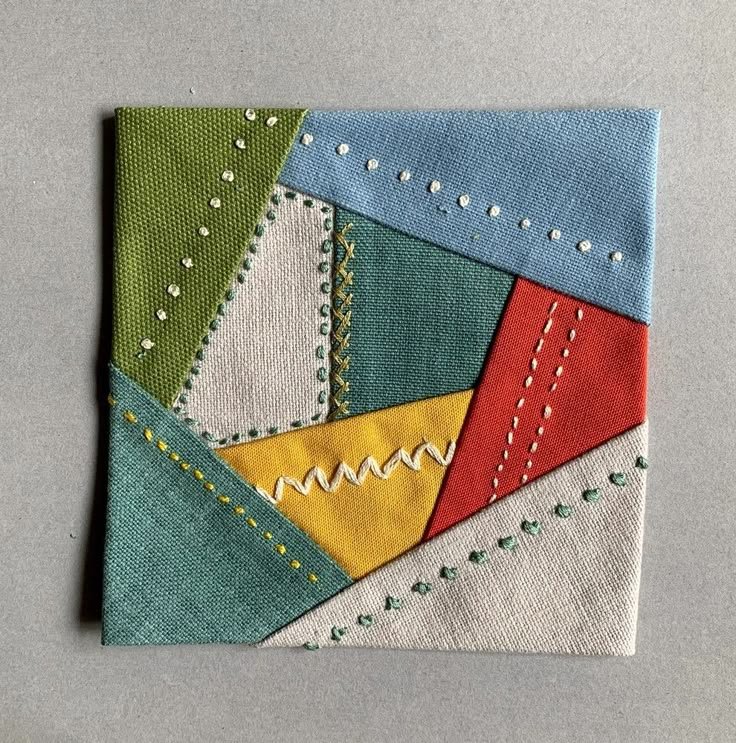
2. Piecing the Crazy Quilt Block
The most fun part of the Crazy Quilt – TUTORIAL is piecing. Unlike other quilting styles, crazy quilting doesn’t follow strict geometry. You’ll work intuitively, starting from the center and building out.
Begin by placing a five-sided or irregular-shaped piece of fabric in the center of your foundation. Then choose another scrap to place along one edge. Right sides together, stitch it down with a 1/4 inch seam, then press it open.
Continue working outward, covering the foundation fabric with overlapping, oddly shaped pieces. Always press after stitching to keep your block flat and neat. This “stitch and flip” method allows for freedom without templates.
Trim any excess fabric that extends beyond your foundation edges. The goal is to fill the entire foundation with fabric pieces, creating an abstract mosaic.
You can either complete one block at a time or work on several in assembly-line fashion. For beginners, finishing one full block before starting another can help you stay focused and experiment safely.
Each finished block can vary in size, but common dimensions are 8×8 inches or 10×10 inches. Once trimmed, they’re ready to be embellished or assembled into a larger quilt.
3. Embellishing and Decorative Stitching
One of the defining features of the Crazy Quilt – TUTORIAL is the use of rich embellishments and decorative stitches. This is where your creativity can really shine and your block transforms from patchwork to art.
Start with embroidery. Basic stitches like chain stitch, feather stitch, herringbone, and French knots are common in crazy quilts. You can outline each seam with a different embroidery stitch to add movement and visual interest.
Use embroidery floss in contrasting or complementary colors to make your stitching pop. Metallic threads or variegated flosses can also add texture and richness.
Add embellishments like lace trim, buttons, beads, or small appliqués. Just make sure these are sewn securely, especially if the quilt will be handled or washed.
For a more modern look, consider using fabric paint or iron-on patches. These can add pops of color or even meaningful text to your piece.
You can also embellish with hand lettering, vintage charms, or even use a sewing machine’s decorative stitches to save time and add precision.
Always consider balance when embellishing—leave some areas plain so the eye can rest, and let the details shine in focal points throughout the block.
4. Finishing and Project Ideas
Once your blocks are pieced and embellished, it’s time to think about how you want to finish your Crazy Quilt – TUTORIAL project. You can sew blocks together into a large quilt, or use them in smaller, functional items.
If you’re making a full quilt, join your blocks using a sashing or quilt-as-you-go method. This helps keep the thick embellished seams flat and manageable. Use a backing fabric that complements your front, and finish with quilting stitches or tying.
Crazy quilt blocks also make amazing wall hangings. Add a border and mount your piece on canvas or use quilt hangers to showcase your work.
Use smaller blocks to create one-of-a-kind bags, journal covers, cushions, or fabric postcards. These make great gifts or art pieces with personal meaning.
When binding your finished piece, consider a fabric that complements the eclectic style of your quilt. Binding in velvet, satin, or bold patterns can enhance the overall look.
Remember to label your piece with your name, date, and a short description. Crazy quilts often become keepsakes, and future generations will appreciate your story.
No matter what you turn your quilt blocks into, the process of making them is therapeutic and deeply personal—just as the Crazy Quilt – TUTORIAL experience should be.
🌟Join our exclusive Quilt broadcast list on Messenger! Receive the best patterns, tips, and updates directly in your inbox. Our team is ready to send you delightful content that will inspire your projects. Don’t miss this opportunity to stay updated and create amazing pieces. Join now and be part of this passionate quilt community!✨📩
FAQ
Is the Crazy Quilt – TUTORIAL beginner-friendly?
Yes! This is a great style for beginners because it doesn’t require perfect measuring or cutting. It’s a forgiving and creative way to learn patchwork and stitching.
What’s the best fabric to use?
A mix! Cotton, silk, velvet, denim, lace—all add texture and visual interest. Just ensure each piece is stable enough for sewing and not too fragile.
Do I need a sewing machine?
No. While a machine makes piecing faster, you can absolutely complete a crazy quilt block using only hand stitching and embroidery techniques.
How do I plan the color scheme?
Even though the style is eclectic, having a dominant color or theme can help your quilt feel more cohesive. You can also group colors by season or emotion.
Can I wash a crazy quilt?
Yes, but wash with care. Hand wash or use a delicate machine cycle. Avoid dryers, especially if your quilt includes vintage fabrics or embellishments.
Is there a specific block size I should follow?
No standard size is required, but 8” to 10” squares are common. You can adjust the size depending on your project goals.
Conclusion
The Crazy Quilt – TUTORIAL is more than just a pattern—it’s a creative journey that encourages self-expression, artistic experimentation, and mindful making. With its free-form style and endless possibilities for embellishment, it’s the perfect project for quilters who love freedom and storytelling through fabric.
In this tutorial, you learned how to gather the right materials, piece your block without templates, add personal touches with embroidery and embellishments, and turn your creation into something truly special.
Now it’s your turn—grab those fabric scraps, pick up a needle, and let your imagination guide your hands. We’d love to hear what you think! Please leave your honest opinion, show us your finished work, and feel free to suggest future tutorials. Happy quilting!


