The Felt Gnome – PATTERN is a charming and heart-warming craft project perfect for anyone who loves sewing, quilting, or creating decorative handmade pieces for seasonal décor. In the first line of this article, we highlight the keyword Felt Gnome – PATTERN so it appears naturally throughout the text, supporting SEO and helping readers find reliable and well-structured content. This adorable felt gnome can be used as a holiday ornament, a gift topper, a cozy home decoration, or even a soft toy depending on how you choose to craft it.
What makes this project so appealing is its simplicity. You don’t need advanced sewing or quilting skills to create your own felt gnome. With basic stitches, simple shapes, and a few small materials, you can craft a unique and personalized decoration that looks beautiful in any space. This tutorial is designed to guide beginners gently while also offering options for customization that experienced crafters will enjoy.
Before we move into the step-by-step instructions, it’s important to understand why the Felt Gnome – PATTERN has become so popular among makers around the world. Gnomes are symbolic figures in many cultures, representing protection, warmth, and good fortune. Their magical appearance makes them perfect for holidays, winter décor, and children’s rooms. Creating them from felt gives the craft a soft, cozy texture that suits all decorative styles.
1. Understanding the Felt Gnome – PATTERN
The Felt Gnome – PATTERN is based on simple geometric shapes that are easy to cut, sew, and assemble. The body usually consists of a cone shape, while the beard, hat, and nose are made from small felt pieces. This simplicity is what makes the project ideal for beginners and quick crafting sessions.
SEE OTHER FACE PATTERNS HERE!
Working with felt is one of the easiest ways to start sewing or quilting because felt doesn’t fray, which means the edges stay clean without requiring complicated stitches. The gnome pattern uses only a few basic hand-sewing techniques like running stitch or blanket stitch, both of which are easy to learn and perfect for creating soft decorative items.
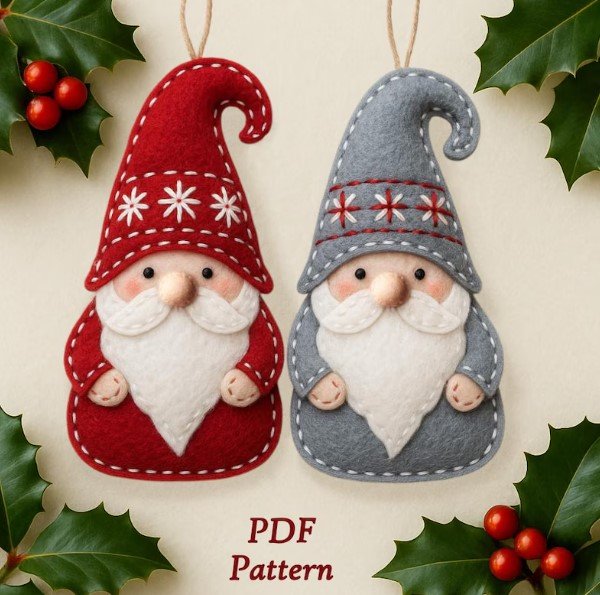
Another reason the Felt Gnome – PATTERN is so beloved is its versatility. You can create gnomes in any color theme—traditional red and gray for Christmas, pastel tones for spring, or earthy colors for rustic home décor. The freedom to customize your gnome gives your final project personality and charm.
Stuffing is optional when crafting a felt gnome. You can choose to make a soft, fully stuffed standing gnome or create a flat ornament-style gnome without stuffing. Each variation offers a unique finished look and works well for different decorative purposes.
The gnome’s hat is one of the most customizable areas of the project. Makers often decorate it with pom-poms, buttons, embroidery, fabric paint, or ribbon to give each gnome an expressive character. Small details like these add charm and uniqueness to the design.
Understanding these creative possibilities helps you appreciate the beauty of the Felt Gnome – PATTERN. Whether you are crafting for seasonal displays, holiday markets, or homemade gifts, this project delivers excellent results every time.
2. Materials Needed for the Felt Gnome – PATTERN
To begin crafting your Felt Gnome – PATTERN, gather basic materials that are easy to find at any craft store. Felt sheets are the main fabric used, available in a wide variety of colors and thicknesses. Using high-quality felt ensures your gnome keeps its shape and remains durable over time.
You will need scissors sharp enough to cut felt cleanly. Precision scissors or embroidery scissors are especially helpful for cutting small shapes like the beard and nose. These tools allow you to create smooth curves and defined edges.
Thread is another essential material. Choose thread color that matches your felt so the stitches blend seamlessly, or pick contrasting thread to create visible, decorative stitching. Either choice works well, depending on your desired style.
You will also need a small amount of stuffing if you want to create a 3D standing gnome. Polyester fiberfill works great and keeps the project lightweight and easy to assemble. If you prefer a flat gnome, simply skip the stuffing step.
A hot glue gun or fabric glue can also be used in place of hand-sewing for certain pieces. Many crafters prefer combining sewing and gluing to speed up the process. Glue is helpful for attaching the beard, nose, and hat decorations.
Finally, consider adding embellishments to your project. Mini pom-poms, wooden beads, buttons, glitter felt, ribbons, and tiny bells make your Felt Gnome – PATTERN more festive and visually appealing. These small extras turn a simple pattern into a magical handmade creation.
3. Step-by-Step Tutorial for the Felt Gnome – PATTERN
Begin the Felt Gnome – PATTERN by cutting out the main shapes: the cone for the body, the long triangle for the hat, a rounded shape for the beard, and a small circle or oval for the nose. Use templates if needed, or draw your shapes freehand for a more rustic look.
Next, form the body by folding the cone shape into a 3D cone and sewing or gluing along the edge. If you want a soft stuffed gnome, add fiberfill before closing the bottom. If making an ornament, keep the body flatter with minimal or no stuffing.
Prepare the beard by gently shaping the felt or using faux fur for a more realistic effect. If using faux fur, cut it from the back side with a craft knife to avoid losing the fluff around the edges. Attach the beard to the front of the body.
Add the nose at the top center of the beard. A felt circle or a small wooden bead works well for this piece. Glue or sew the nose securely so it remains stable and centered.
Create the gnome’s hat by shaping the triangle and closing it along the long edge. Fit the hat over the top of the body, slightly overlapping the nose and beard. Tilt the hat to one side for a cute, whimsical effect.
Finally, decorate your hat and beard with embellishments of your choice. Add small stars, snowflakes, buttons, or embroidery to personalize the design. Each detail enhances the charm of your Felt Gnome – PATTERN and makes it a delightful addition to your handmade décor.
4. Customization Ideas for the Felt Gnome – PATTERN
One of the best features of the Felt Gnome – PATTERN is the endless ways you can personalize the project. A festive holiday version could include red, white, and green felt with glittery details, while a rustic farmhouse gnome can be created using shades of beige, brown, and gray.
You can customize the beard by switching materials. Classic felt gives a clean, simple look, while faux fur adds depth and texture. A yarn fringe beard is another creative option that gives your gnome a cozy handmade appearance.
The hat is an excellent area for experimentation. Embroider stars, snowflakes, hearts, or initials to give your gnome a handcrafted story. You can even sew small fabric patches onto the hat for a quilt-inspired design.
Another fun customization option is giving your gnome accessories. Tiny felt scarves, miniature bags, heart-shaped appliqués, or tiny flowers add personality and charm. Each detail creates a unique character.
If you enjoy patchwork, create the body of the gnome using quilted scraps. This variation is an excellent way to recycle leftover fabric pieces and give your gnome a more artistic and textured appearance.
Whether you’re crafting for holidays, gifts, or home displays, customization elevates your Felt Gnome – PATTERN into a memorable handmade item that brings joy and creativity to your space.
FAQ – Felt Gnome – PATTERN
1. Is the Felt Gnome – PATTERN beginner-friendly?
Yes, it is perfect for beginners because felt is easy to cut and sew, and the pattern uses simple shapes.
2. Do I need a sewing machine for this project?
No. This pattern can be completed entirely with hand-sewing or glue.
3. What type of felt is best?
High-quality wool or wool-blend felt works best, but acrylic felt is affordable and great for beginners.
4. Can I make the gnome without stuffing?
Yes, you can create a flat version suitable for ornaments or appliqués.
5. How long does it take to make a felt gnome?
Most crafters finish one gnome in 20–40 minutes.
6. Can I use fabric instead of felt?
Yes, but fabric edges fray, so you may need interfacing or lining.
7. Are gnomes safe for children?
They are safe if made securely, but avoid small detachable parts for very young children.
8. Can I sell gnomes made from this pattern?
Yes, handmade gnomes are popular in craft fairs and online marketplaces.
Conclusion
The Felt Gnome – PATTERN is a fun, creative, and heart-warming project that brings joy to makers of all skill levels. With simple materials, easy steps, and endless customization options, you can create adorable gnomes perfect for any season or celebration. This tutorial gave you everything needed to craft your own unique gnome with confidence and creativity.
I hope you enjoyed this guide! Please leave your honest opinion, suggestions, or share your experience creating your felt gnome. Your feedback helps inspire more handmade tutorials like this one!

