Creating a quilt can be a rewarding and creative experience, especially when you work with beautiful quilt patterns like the Pinwheel Star Quilt Block.
This tutorial will guide you through the process step-by-step, ensuring you understand every detail along the way.
From fabric selection to cutting dimensions and assembly, you’ll be ready to create your own stunning quilt block.
Understanding the Pinwheel Star Quilt Block
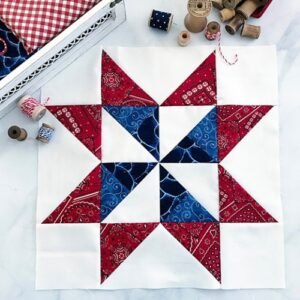
The Pinwheel Star Quilt Block is a charming combination of pinwheel and star shapes that adds a playful yet elegant touch to any quilt. Its design features a central star surrounded by spinning pinwheels, which can be created using various fabric colors and patterns. This block not only looks beautiful but also offers the opportunity for quilters to experiment with color placement and design elements.
The versatility of the Pinwheel Star pattern means it can fit into many quilting styles, from traditional to modern. By mixing and matching different fabrics, you can create a unique look that reflects your personal style. Understanding the fundamentals of this block will enhance your quilting repertoire and allow you to tackle more complex designs in the future.
As we move through this tutorial, you’ll learn about the necessary materials, precise measurements, and tips for a successful quilting experience. Whether you are a seasoned quilter or a beginner, the Pinwheel Star is a fantastic project to dive into.
Materials Needed
Before diving into the sewing process, it’s essential to gather all necessary materials. Here’s a list of what you’ll need:
- Fabric: Choose two contrasting fabrics for the star and pinwheel sections. For this tutorial, we’ll use a light fabric for the star points and a darker fabric for the pinwheels.
- Rotary Cutter and Mat: These tools will help you make accurate cuts, which are crucial for achieving the best results in your quilt blocks.
- Ruler: A quilting ruler will assist in measuring and cutting your fabric with precision.
- Sewing Machine: A reliable sewing machine is key for piecing your quilt blocks together.
Be sure to wash, dry, and iron your fabric before starting. This pre-washing step will help prevent any shrinking after your quilt is complete. Choosing high-quality cotton fabric will ensure that your quilt holds up well over time and has a lovely texture.
Cutting Your Fabric
Accurate cutting is one of the most important steps in creating the Pinwheel Star Quilt Block. You’ll need to cut your fabric into the following pieces:
- For the Star Points:
- Cut 4 squares measuring 4.5 inches from your light fabric.
- Cut 4 squares measuring 4.5 inches from your dark fabric.
- For the Pinwheel Units:
- Cut 4 squares measuring 5 inches from your dark fabric.
- Cut 4 squares measuring 5 inches from your light fabric.
- Background Fabric:
- Cut 1 square measuring 6.5 inches from a solid background fabric of your choice (this will act as the foundation for your quilt block).
Accurate measurements are crucial, as even a slight deviation can affect the overall appearance and fit of your quilt block. Take your time during this step, ensuring that all cuts are straight and clean to create a polished finish.
Creating the Star Points
Now that you have your fabric pieces cut, it’s time to create the star points. Follow these steps carefully:
- Draw a Diagonal Line: Take the light fabric squares and draw a diagonal line from one corner to the opposite corner on the wrong side of each square. This line will serve as a sewing guide.
- Sewing: Place a dark fabric square on top of a light square, right sides together. Sew along the drawn line. Repeat this step for all four pairs of squares.
- Trimming and Pressing: After sewing, trim the excess fabric, leaving a quarter-inch seam allowance. Press the seam open or to one side, depending on your preference. This will create the star points that will be attached to the center of your quilt block.
Making the star points requires precision to ensure they fit together seamlessly. Take your time with the pressing stage, as well-pressed seams will make a significant difference in the overall flatness and alignment of your block.
Assembling the Pinwheel Units
Next, you’ll create the pinwheel units that surround the star. Here’s how to do it:
- Prepare the Squares: Take your 5-inch squares (four from the dark fabric and four from the light fabric). Again, draw a diagonal line on the wrong side of each light square.
- Sewing the Pinwheel: Place a light square on top of a dark square, right sides together. Sew along the drawn line. Trim the excess fabric and press open. Repeat this step for all pairs of squares.
- Combine Units: Now, take two of the sewn squares (one dark, one light) and place them right sides together. Sew along the center seam. Repeat for the remaining pairs. This will create four pinwheel units.
Assembling the pinwheel units requires careful alignment to ensure that the design comes together beautifully. Pay attention to how the colors interact in the pinwheels, as this can dramatically change the look of your quilt block.
Final Assembly of the Quilt Block
With the star points and pinwheel units complete, it’s time for the final assembly of the Pinwheel Star Quilt Block. Follow these steps:
- Arrange Your Pieces: Start by laying out your components on a flat surface. Position the star points around the central background square, creating the star shape. Place the pinwheel units in the corners.
- Sewing the Rows: Sew the star points to the background square first. Next, sew the pinwheel units to the corners of the star. Make sure to press your seams open or to the side as you go to maintain a flat block.
- Final Assembly: Once you have all the rows sewn together, join them to complete the quilt block. Take your time to ensure everything lines up correctly, and press your final seams for a polished look.
Final assembly is where all your hard work comes together. Take pride in your craftsmanship, and remember that practice makes perfect. Each block you create will help you improve your skills.
Tips for Success
To ensure your Pinwheel Star Quilt Block turns out beautifully, consider these helpful tips:
- Use a Quality Thread: Investing in good quality quilting thread can make a significant difference in the final look of your quilt block. It will provide strength and durability to your seams.
- Maintain Consistent Seam Allowances: Consistent seam allowances are key to achieving a perfect fit. Use a quarter-inch foot on your sewing machine to help maintain this measurement.
- Take Your Time: Don’t rush through the cutting and sewing process. Taking your time will lead to more accurate pieces and a more polished final product.
By following these tips, you can elevate your quilting skills and ensure that each quilt block you create is as beautiful as you envisioned. Remember that quilting is a journey, and every block is an opportunity to learn and grow.
🌟 Join our exclusive Quilt broadcast list on Messenger! Receive the best patterns, tips, and updates directly in your inbox. Our team is ready to send you delightful content that will inspire your projects. Don’t miss this opportunity to stay updated and create amazing pieces. Join now and be part of this passionate quilt community! ✨📩
Conclusion
The Pinwheel Star Quilt Block is a delightful project that combines the beauty of pinwheels with the elegance of star patterns. Whether you’re making a single block or incorporating it into a larger quilt, this tutorial provides you with the knowledge and steps needed to succeed.
As you experiment with colors and fabrics, don’t hesitate to make this pattern your own. The versatility of the Pinwheel Star allows for endless possibilities, so let your creativity shine. Happy quilting!


