
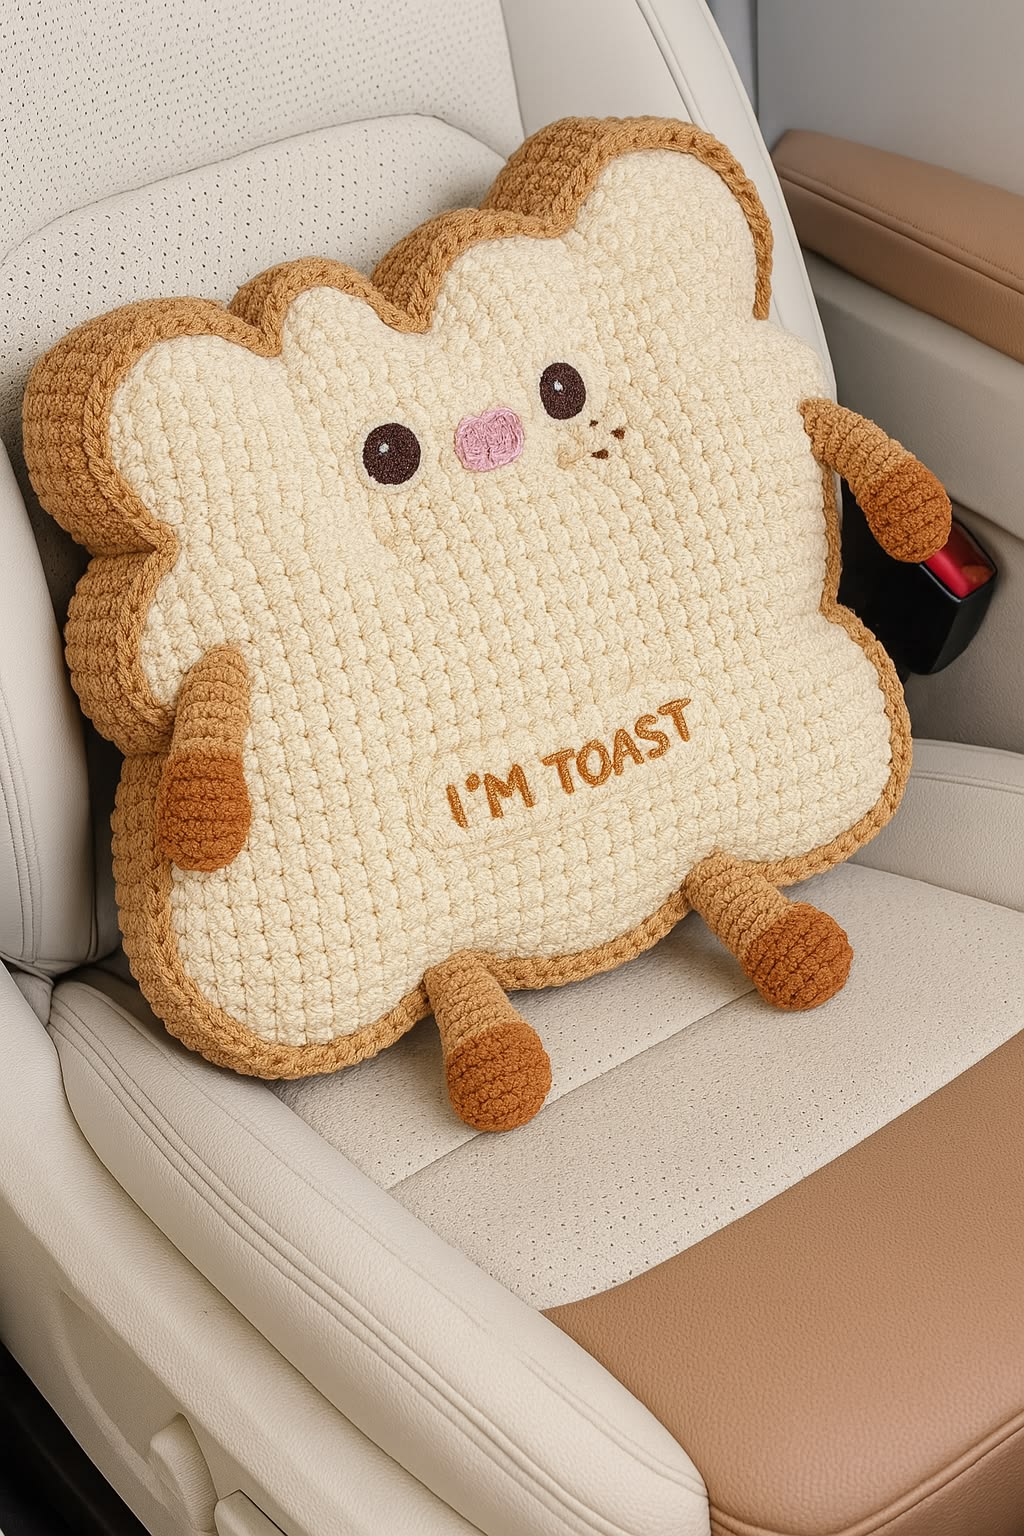
A Crochet Toast Pillow Pattern brings a playful touch to handmade home décor. With its creamy center, golden crust, tiny arms, and dangling feet, this bread-shaped cushion turns a familiar breakfast favorite into a lovable character. The pillow in the photograph combines soft texture with simple facial details, creating a cheerful project for anyone who enjoys crocheting decorative cushions.
The charm comes from the contrast between the pale bread panels and the warm brown edging. Rounded upper corners suggest a slice of toast, while embroidered eyes and a pink nose give the cushion personality. You can personalize your crochet bread pillow with a small smile, rosy cheeks, or a short embroidered message across the front.
The following instructions describe an original, simplified interpretation inspired by the photograph, rather than the exact pattern used to make the pictured piece. It uses two shaped panels, a separate crust strip, and small stuffed limbs. All stitch terminology follows US crochet terms, and the suggested measurements are approximate because yarn, hook size, and individual tension affect the finished result.
1. Materials, Measurements, and Basic Crochet Techniques
For the main body, choose a soft bulky yarn in ivory or cream, plus a compatible yarn in caramel for the crust. You will also need small amounts of dark brown and pink yarn for the face. As a starting estimate, allow approximately 350–500 g of cream yarn and 150–250 g of caramel yarn. Actual requirements depend on the yarn’s yardage and how firmly you crochet.
DISCOVER MORE FREE PATTERNS HERE!
Gather a 5 mm or 6 mm crochet hook, polyester fiberfill, stitch markers, scissors, a measuring tape, and a blunt yarn needle. Use the hook that produces a dense but flexible fabric with your chosen yarn. For embroidered details, a smooth cotton or acrylic yarn is often easier to control than chenille, especially when shaping small eyes or lettering.
Aim for a gauge of approximately 10 single crochet stitches and 10 rows per 10 cm. At this gauge, the cream panel measures roughly 40 cm across and 40 cm tall before edging. The finished cushion will be slightly larger, with a depth of approximately 6 cm. Make a swatch first; a different row gauge will change the proportions of the toast.
The abbreviations are ch for chain, sc for single crochet, sl st for slip stitch, and st for stitch. An increase, abbreviated inc, means working two single crochet stitches into one stitch. A decrease, written sc2tog, combines two stitches into one. Numbers in parentheses show the stitch count at the end of a row or round.
Work the body panels in turned rows. Chain one before turning each row; this turning chain does not count as a stitch. Work the first single crochet into the first actual stitch, and count carefully at the edges. Small differences between the front and back panels can make the finished pillow twist or develop an uneven outline.
This version uses single crochet to create a straightforward, dense fabric. The photograph has a pronounced plush texture that will vary with the yarn selected. A fuzzy or chenille yarn can create a similarly soft appearance, although it may hide stitch openings. Place markers in the first and last stitches if you find the edges difficult to identify.
2. Crochet the Front and Back Toast Panels
Begin the lower edge: With cream yarn, chain 35. For Row 1, single crochet into the second chain from the hook and into every remaining chain for 34 sc. Chain one and turn. Keep the foundation chain relaxed enough to match the width of the fabric above it; a tight foundation can pull the lower edge inward.
Shape the lower corners: Row 2: increase in the first stitch, work 32 sc, and increase in the last stitch for 36 sc. Row 3: increase, work 34 sc, increase for 38 sc. Row 4: increase, work 36 sc, increase for 40 sc. These gradual increases soften the bottom corners without creating a sharply angular base.
Build the main section: Work 40 sc in each row from Rows 5–32. Check your stitch count regularly and measure the panel on a flat surface. Avoid stretching the fabric while measuring. At the suggested gauge, the panel should now be approximately 40 cm wide and 32 cm tall, with a broad, nearly rectangular body.
Shape the first upper lobe: Divide the 40 stitches into two groups of 20 and mark the division. Row 33: work 20 sc and turn, leaving the other 20 stitches unworked. Rows 34–35: work 20 sc. Row 36: sc2tog, 16 sc, sc2tog for 18 sc. Row 37: sc2tog, 14 sc, sc2tog for 16 sc. Row 38: sc2tog, 12 sc, sc2tog for 14 sc. Fasten off.
Complete the second upper lobe: With the same side facing you as when beginning Row 33 of the first lobe, join cream yarn to the first unworked stitch. Repeat Rows 33–38 across the remaining 20 stitches. The division creates a central notch between the two upper sections. This simplified shape becomes softer and more bread-like after edging, joining, and light stuffing.
Finish and duplicate the panel: Work one round of cream single crochet around the entire outline, placing approximately one stitch per row end along the sides. Add an extra stitch where necessary around convex corners, and decrease across the deepest point of the notch to prevent bunching. Record your placement and repeat it on the second panel. Both panels should have matching perimeter counts.
3. Add the Face, Crust, Arms, and Feet
Embroider the face before assembly: Lay one cream panel flat and position two dark brown eyes across the upper third. Make each eye approximately 2–3 cm wide, leaving about 8–10 cm between their centers. Use short, closely spaced stitches rather than long loose strands. Add a tiny cream highlight to each eye, keeping both highlights on the same side.
Add the nose and optional message: Embroider a small pink oval between and slightly below the eyes. A few brown stitches underneath can suggest a smile or tiny crumbs. If you want the lettering shown in the photograph, lightly baste the words “I’M TOAST” onto the lower front, then follow the guide with backstitch. Keep the lettering relaxed so it does not pucker the panel.
Crochet the crust strip: With caramel yarn, chain 7. Row 1: sc in the second chain from the hook and across for 6 sc. Continue working rows of 6 sc, chaining one and turning after every row. This creates a strip approximately 6 cm wide at the suggested gauge. Its length should match the full perimeter of one panel without stretching either piece.
Make two arms: Using caramel yarn, work in continuous rounds and mark the first stitch. Round 1: 6 sc in a magic ring. Round 2: increase in each stitch for 12 sc. Rounds 3–6: 12 sc. Round 7: repeat “sc2tog, 2 sc” three times for 9 sc. Rounds 8–11: 9 sc. Stuff the rounded end lightly, leave the upper end soft, and fasten off with a sewing tail.
Make two feet: With caramel yarn, begin with 6 sc in a magic ring. Round 2: increase around for 12 sc. Round 3: repeat “1 sc, inc” six times for 18 sc. Rounds 4–6: 18 sc. Round 7: repeat “1 sc, sc2tog” six times for 12 sc. Rounds 8–11: 12 sc. Lightly stuff each foot, flatten its opening, and sew it closed.
Position the limbs: Pin the arms to opposite sides of the front panel, slightly below its midpoint. Place the feet along the lower edge, evenly spaced from the center. Check the arrangement with the cushion upright before sewing. Attach the limbs securely through several stitches along each flattened opening, keeping their rounded ends pointing outward from the body.
4. Assemble, Stuff, and Finish Your Toast Pillow
Join the crust to the front: Starting near the lower edge, sew one long edge of the caramel strip to the perimeter of the front panel. Use small whipstitches through corresponding fabric edges. Guide the strip gently around the corners and into the top notch. Keep checking that the panel lies smoothly and that the strip does not pull it into a bowl.
Close the crust strip into a loop: Once the strip reaches the starting point, add or remove rows until its ends meet comfortably. Sew the short ends together without twisting the strip. This seam sits discreetly near the bottom of the pillow. The caramel strip now forms a continuous sidewall around the cream front, giving the cushion its slice-of-bread thickness.
Attach the back panel: Match the back panel to the remaining long edge of the strip. Mark the bottom center, upper notch, and side midpoints on both pieces to distribute the seam evenly. Sew around the outline, leaving a 12–15 cm opening along the lower edge. Keep the arms and feet clear of the sewing path so they remain free to move.
Stuff gradually: Insert small handfuls of fiberfill into the upper lobes, lower corners, and central body. Spread the filling with your fingers instead of pushing one large clump inside. Use enough stuffing to support the shape while preserving a soft surface. Overfilling can stretch the stitches, flatten the central notch, and make the cushion look more rounded than toast-shaped.
Close and refine the shape: Sew the remaining opening closed using the same seam tension as before. Weave yarn ends through several stitches and conceal them inside the cushion. Gently massage the filling until the front and back look even. Check the limb attachments, embroidered details, and crust seams, reinforcing any area that feels loose before using the pillow.
Care for the finished cushion: Follow the care instructions for both the yarn and the stuffing. Spot cleaning is a practical first option for small marks. If washing is suitable, reshape the pillow and allow the filling to dry completely. For a cushion intended for young children, use embroidered features and omit loose decorations, buttons, or other detachable embellishments.
Frequently Asked Questions
Is this Toast Pillow Pattern suitable for beginners?
A confident beginner can make this version after practicing single crochet, increases, decreases, and sewing crochet pieces together. The trickiest parts are matching the two panels and attaching the crust evenly around the upper notch.
Can I use thinner yarn?
Yes, but the same stitch counts will produce a smaller pillow. To retain the suggested size, you would need to recalculate both the stitch and row counts from your gauge, including the upper lobes and crust width.
How can I prevent stuffing from showing?
Use a smaller hook if your stitches have visible gaps, and avoid overfilling. A hook change also changes the finished dimensions, so check a new swatch before beginning the panels.
Does the back need a face?
No. A plain cream back keeps the design simple and reduces finishing time. You can add a second expression if you want a reversible character pillow.
Can I leave out the arms and feet?
Yes. The main panels and crust strip form a complete toast-shaped cushion on their own. Omitting the limbs gives the project a simpler silhouette while preserving its recognizable bread shape.
Will this reproduce the photograph exactly?
No. This is an untested, original interpretation with simplified shaping and stitch texture. The photograph provides visual inspiration; the precise construction and stitch counts of the pictured pillow cannot be determined from the image alone.
Conclusion
This Crochet Toast Pillow Pattern combines simple stitches, gentle shaping, and expressive embroidery in a cheerful decorative project. Cream yarn creates the soft bread center, while a caramel side strip provides the recognizable crust. Take time to match the panels, distribute the stuffing evenly, and position the face carefully—the small finishing choices are what give your handmade toast its personality.