
The Dusty Rose Crochet Vest Pattern is a beautiful handmade garment that combines timeless elegance, comfort, and the delicate charm of traditional crochet. With its soft pink color, flattering silhouette, and textured stitches, this vest is a wonderful addition to any wardrobe. Whether worn over a blouse, a lightweight sweater, or a simple dress, it adds a sophisticated touch to everyday outfits.
One of the most appealing features of this Crochet Vest Pattern is its versatility. A dusty rose color creates a romantic, vintage-inspired appearance that pairs beautifully with cream, beige, white, denim, and other neutral shades. The sleeveless construction makes the vest suitable for layering throughout different seasons, while the handmade texture provides warmth without the bulk of a traditional sweater.
This Easy Crochet Vest Tutorial is designed for advanced beginners and intermediate crocheters who want to create a wearable garment using accessible crochet techniques. The construction features two front panels, one back panel, a gently shaped V-neckline, comfortable armholes, and a neat decorative border. The result is a practical, elegant vest that can be customized according to personal measurements and style preferences.
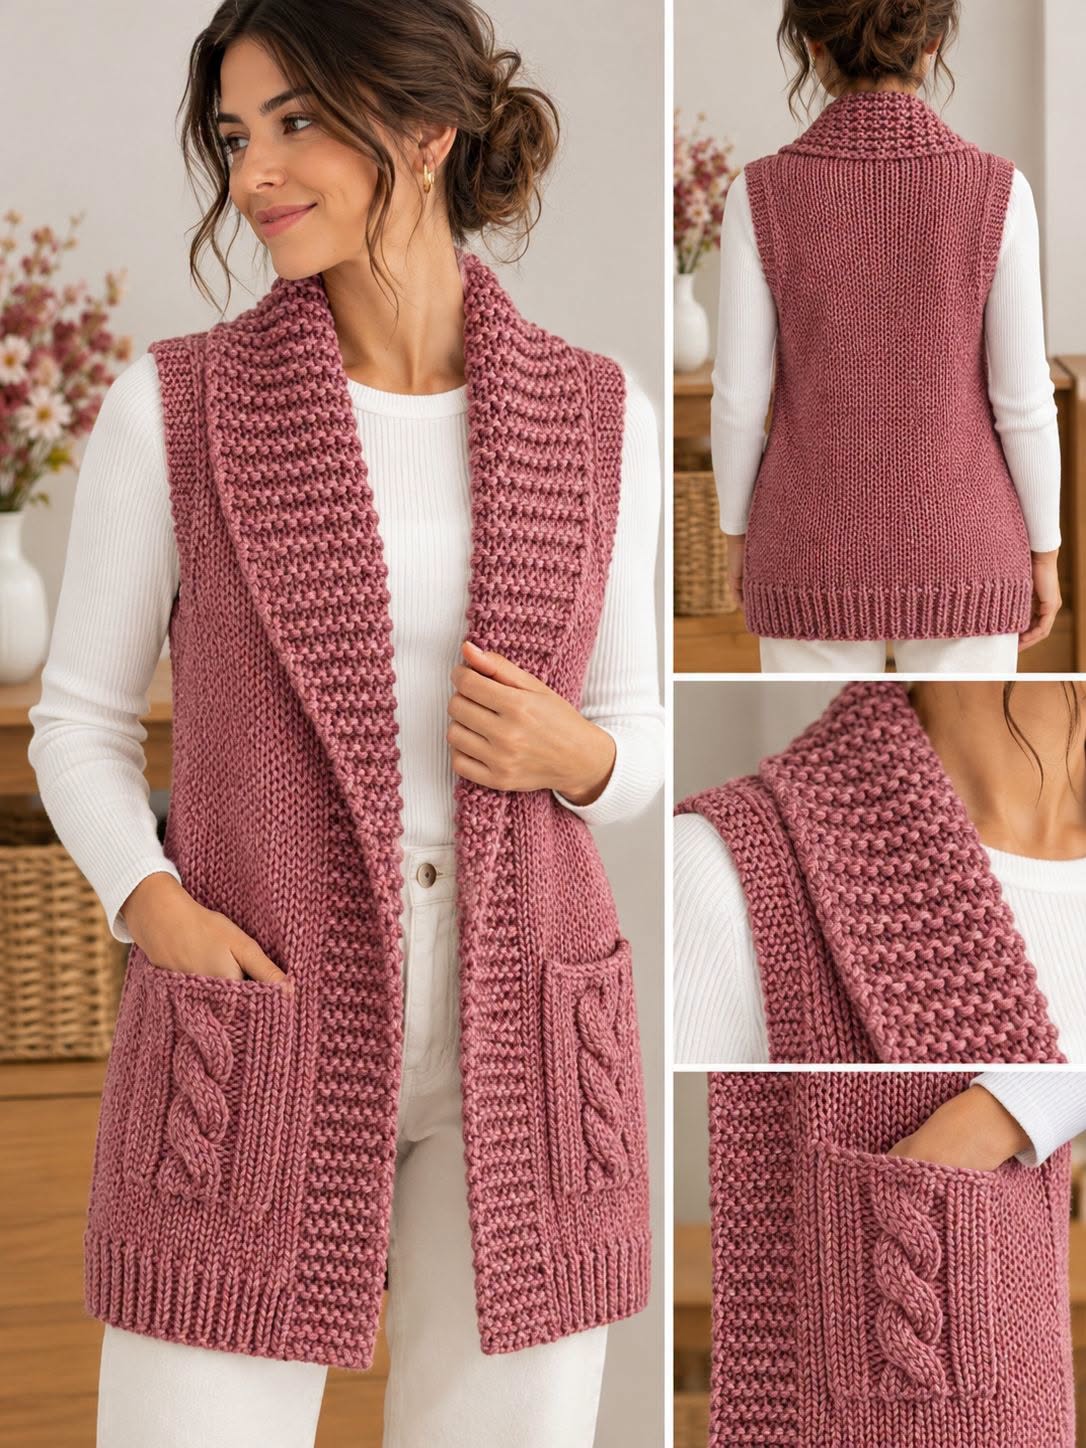
Throughout this complete Dusty Rose Crochet Vest Pattern, you will learn how to select the best yarn, determine the correct measurements, crochet the individual panels, shape the neckline, assemble the garment, and add professional finishing details. The tutorial uses U.S. crochet terminology and includes measurements in both inches and centimeters.
DISCOVER MORE FREE PATTERNS HERE!
Materials, Crochet Stitches, and Measurements for the Dusty Rose Crochet Vest Pattern
Choosing the right materials is essential for creating a comfortable and attractive Dusty Rose Crochet Vest. The yarn should feel pleasant against the skin, maintain its shape, and provide enough stitch definition to highlight the handmade texture.
For this design, DK-weight yarn is an excellent choice. It creates a relatively lightweight garment that can be layered over other clothing without becoming excessively heavy.
Cotton blends are particularly suitable for spring and autumn, while soft acrylic or wool blends can provide additional warmth during colder months.
The sample vest uses a classic dusty rose shade, but the same pattern can be adapted to many other colors.
Materials needed
- 900–1,500 yards (825–1,370 m) of DK-weight yarn, depending on size and length.
- 4.5 mm (7) crochet hook, or size needed to achieve gauge.
- 4.0 mm crochet hook for the borders, if desired.
- Stitch markers.
- Measuring tape.
- Yarn needle.
- Scissors.
- Blocking mat.
- Rustproof blocking pins.
- Optional decorative buttons.
Suggested finished measurements
| Size | Finished Bust | Approximate Length |
|---|---|---|
| XS | 34 in (86 cm) | 21 in (53 cm) |
| S | 38 in (96.5 cm) | 22 in (56 cm) |
| M | 42 in (107 cm) | 23 in (58.5 cm) |
| L | 46 in (117 cm) | 24 in (61 cm) |
| XL | 50 in (127 cm) | 25 in (63.5 cm) |
| 2XL | 54 in (137 cm) | 26 in (66 cm) |
These are finished garment measurements rather than body measurements.
For a comfortable fit, choose a finished bust circumference approximately 2–4 inches (5–10 cm) larger than your actual bust measurement.
U.S. crochet abbreviations
| Abbreviation | Meaning |
|---|---|
| ch | Chain |
| sc | Single Crochet |
| hdc | Half Double Crochet |
| dc | Double Crochet |
| sl st | Slip Stitch |
| st | Stitch |
| sts | Stitches |
| BLO | Back Loop Only |
| rep | Repeat |
| RS | Right Side |
| WS | Wrong Side |
| dec | Decrease |
Special stitch – hdc2tog: Yarn over, insert hook into the next stitch, yarn over and pull up a loop. Yarn over, insert hook into the following stitch, yarn over and pull up a loop. Yarn over and pull through all five loops on the hook.
This decrease creates a gentle slope for the V-neckline.
Gauge
For this tutorial, the target gauge is:
16 hdc stitches × 12 rows = 4 × 4 inches (10 × 10 cm).
Make a gauge swatch before beginning.
If your stitches are too large, use a smaller hook.
If your stitches are too small, use a larger hook.
Correct gauge is especially important when making fitted crochet garments.
Construction overview
The vest is assembled from three main pieces:
- One rectangular back panel.
- Two front panels with V-neck shaping.
- Crocheted borders around the neckline, front opening, armholes, and hem.
The panels are joined at the shoulders and sides.
The front remains open, making the vest easy to layer over other garments.
Step-by-Step Dusty Rose Crochet Vest Pattern: Crocheting the Back Panel
The back panel forms the foundation of the Dusty Rose Crochet Vest Pattern.
It is worked from the bottom upward in rows of half double crochet.
The simple stitch pattern produces a smooth, softly textured fabric that complements the vest’s elegant design.
Step 1: Choose your size
Use the following stitch counts for the back panel.
| Size | Foundation Chain | HDC per Row |
|---|---|---|
| XS | 69 | 68 |
| S | 77 | 76 |
| M | 85 | 84 |
| L | 93 | 92 |
| XL | 101 | 100 |
| 2XL | 109 | 108 |
At the stated gauge, the back panel widths are approximately 17, 19, 21, 23, 25, and 27 inches.
The two front panels will together provide the same total width.
Step 2: Make the foundation chain
Using dusty rose yarn and the 4.5 mm crochet hook, make the foundation chain corresponding to your size.
Row 1: Work 1 hdc into the second chain from the hook.
Continue working 1 hdc into every remaining chain.
Chain 1 and turn.
The turning chain does not count as a stitch.
Step 3: Crochet the textured body
Row 2: Work 1 hdc into each stitch across.
Chain 1 and turn.
Repeat Row 2 until the back panel reaches the required length.
The number of rows will vary according to your size.
Step 4: Determine the panel length
Use the following approximate row counts as a starting point.
| Size | Approximate Rows |
|---|---|
| XS | 63 |
| S | 66 |
| M | 69 |
| L | 72 |
| XL | 75 |
| 2XL | 78 |
At 12 rows per 4 inches, these row counts correspond to approximately 21–26 inches in length.
Measure the actual fabric rather than relying only on row counts.
Step 5: Check the back panel
Lay the completed panel on a flat surface.
Measure the width and length.
Make sure the sides are straight and the fabric is not pulling inward.
If the panel is narrower than expected, review your gauge before continuing.
Step 6: Finish the back panel
Fasten off, leaving a long yarn tail for sewing.
Do not add the border yet.
Place the back panel aside while you prepare the two front sections.
How to Crochet the Front Panels and Shape the V-Neckline
The front panels give the Dusty Rose Crochet Vest Pattern its flattering open-front appearance.
Each panel begins as a rectangle and gradually narrows near the upper neckline.
The shaping is worked along the inner front edges.
For this version, the shoulder width is maintained while the neckline decreases gently toward the top.
Step 1: Make the front panel foundation
Use the following stitch counts.
| Size | Foundation Chain | HDC per Row |
|---|---|---|
| XS | 35 | 34 |
| S | 39 | 38 |
| M | 43 | 42 |
| L | 47 | 46 |
| XL | 51 | 50 |
| 2XL | 55 | 54 |
Each front panel is approximately half the width of the back panel.
Make two front panels.
Step 2: Crochet the lower front section
Work the foundation row in hdc.
Continue working 1 hdc into each stitch across every row.
Keep the stitch count consistent.
Work until the panel measures approximately 13 inches (33 cm) for XS, increasing by about ½ inch (1.3 cm) for each successive size.
This creates the lower body before the V-neck shaping begins.
Step 3: Begin the V-neck shaping
The neckline shaping is worked along the inner edge of each front panel.
For the right front panel, decrease at the beginning of the appropriate shaping rows.
For the left front panel, decrease at the opposite edge.
To decrease, work hdc2tog over the first two stitches or last two stitches, depending on the panel.
Continue working hdc across the remaining stitches.
Step 4: Shape the neckline gradually
Decrease one stitch at the neckline edge on every second row.
Continue until the neckline has narrowed by approximately 12 stitches for XS and S, 14 stitches for M and L, or 16 stitches for XL and 2XL.
After completing the decreases, work even rows as needed to reach the same total length as the back panel.
The resulting upper edges should provide sufficient width for the shoulder seams.
Step 5: Mirror the second panel
Make the second front panel using the same foundation stitch count.
Work the neckline decreases on the opposite edge.
Place the two panels side by side.
The sloping edges should face each other.
This creates the symmetrical V-shaped opening.
Step 6: Check the front panels
Lay the front panels over the back panel.
Align the bottom edges.
Make sure both front panels are the same length.
Check that the neckline slopes are symmetrical.
Adjust the final rows before fastening off if necessary.
Assembling the Crochet Vest, Adding Borders, and Professional Finishing
Once all three panels are complete, the Dusty Rose Crochet Vest Pattern begins to take its final shape.
The assembly process includes shoulder seams, side seams, armholes, and decorative edging.
Careful joining is essential for a polished appearance.
Step 1: Join the shoulder seams
Place the front panels over the back panel with right sides facing.
Align the outer shoulder edges.
Join each shoulder using a mattress seam or slip-stitch seam.
For this design, join approximately 4–5 inches (10–12.5 cm) at each shoulder, adjusting the seam width to suit the chosen size.
Leave the remaining center back edge free for the neckline.
Step 2: Sew the side seams
Align the front and back panels at the sides.
Beginning at the hem, sew upward using a mattress stitch.
Stop before reaching the shoulders to create the armholes.
Suggested armhole depths are:
| Size | Armhole Depth |
|---|---|
| XS | 7½ in (19 cm) |
| S | 8 in (20.3 cm) |
| M | 8½ in (21.6 cm) |
| L | 9 in (22.9 cm) |
| XL | 9½ in (24.1 cm) |
| 2XL | 10 in (25.4 cm) |
Try the vest on before permanently securing the side seams.
Step 3: Crochet the armhole borders
Join the yarn at the underarm seam.
Work one round of sc evenly around the armhole.
Avoid placing too many stitches along the vertical edges.
Join with a slip stitch.
For a slightly more decorative finish, work a second round of sc BLO.
Repeat on the opposite armhole.
Step 4: Finish the neckline and front opening
Join the yarn at one lower front corner.
Work sc evenly up the front opening, around the V-neckline, across the back neckline, and down the opposite front.
Place approximately two stitches for every three hdc row ends along vertical sections, adjusting as needed so the edging lies flat.
Work one additional round or row of sc for a clean finish.
For a subtle decorative texture, finish with reverse single crochet if desired.
Step 5: Add the bottom border
Join the yarn at the lower hem.
Work one round of sc evenly around the bottom edge.
For a more structured finish, work two additional rounds of sc BLO.
Keep the tension relaxed so the hem does not pull inward.
Fasten off and weave in the ends.
Step 6: Block the finished vest
Lay the vest flat on a blocking mat.
Lightly dampen the fabric according to the yarn manufacturer’s instructions.
Shape the neckline, armholes, and hem.
Pin the garment to the intended measurements.
Allow it to dry completely.
Blocking helps the stitches relax and improves the overall drape.
Beautiful Color Combinations for the Dusty Rose Crochet Vest Pattern
Dusty Rose and Cream: A soft dusty rose vest paired with a cream blouse creates a romantic, vintage-inspired outfit.
Dusty Rose and White: This combination feels fresh, delicate, and perfect for spring.
Dusty Rose and Denim Blue: Wearing the vest with blue jeans creates a comfortable casual look.
Dusty Rose and Chocolate Brown: Warm brown accessories complement the muted pink tone beautifully.
Dusty Rose and Sage Green: These two soft colors create a sophisticated palette inspired by nature.
Dusty Rose and Burgundy: A deeper burgundy accent can add richness to the neckline or decorative borders.
Helpful Tips for Crocheting a Beautiful Vest
Always make a gauge swatch. Small differences in tension can significantly change the finished garment measurements.
Measure as you crochet. Compare each panel with the intended dimensions before beginning the next section.
Use stitch markers. Marking neckline decreases helps maintain symmetry between the front panels.
Choose soft yarn. A vest should feel comfortable over clothing and should not become excessively stiff.
Keep seams flexible. Tight seams can restrict movement and affect the fit around the shoulders.
Block before wearing. Proper blocking improves drape, stitch definition, and overall appearance.
Frequently Asked Questions About the Dusty Rose Crochet Vest Pattern
1. What is the Dusty Rose Crochet Vest Pattern?
It is a crochet garment pattern designed to create an elegant sleeveless vest in a soft dusty rose color.
2. Is this crochet vest suitable for beginners?
Advanced beginners can complete the pattern, especially if they are familiar with basic crochet stitches and simple garment assembly.
3. What yarn is best for this crochet vest?
DK-weight cotton blends, acrylic yarns, and soft wool blends are suitable choices.
4. What crochet hook should I use?
A 4.5 mm crochet hook is recommended, although the correct hook size depends on your gauge.
5. How much yarn will I need?
Approximately 900–1,500 yards (825–1,370 m), depending on the garment size and desired length.
6. Can I make the vest longer?
Yes. Add more rows to the back and front panels before completing the garment.
7. Can I make the vest shorter?
Yes. Reduce the number of rows while maintaining consistent measurements across all panels.
8. Can I use a different color?
Absolutely. The pattern works beautifully in cream, sage green, burgundy, lavender, beige, and many other shades.
9. Does this vest have sleeves?
No. It is designed as a sleeveless layering garment.
10. Can I add buttons?
Yes. Buttons can be added along the front opening, but you will need to create matching buttonholes and ensure the fronts overlap sufficiently.
11. What stitches are used in this pattern?
The main stitch is half double crochet, with single crochet used for the borders.
12. How do I make the V-neckline?
The V-neckline is created by decreasing stitches gradually along the inner edges of the two front panels.
13. Can I wear the vest over a sweater?
Yes. Choose a size with enough positive ease to accommodate the sweater underneath.
14. Should I block the finished vest?
Blocking is recommended because it improves the garment’s shape, drape, and stitch definition.
15. Is this crochet vest a good handmade gift?
Yes. A handmade vest can be a thoughtful gift, especially when customized to the recipient’s measurements and favorite colors.
Conclusion
The Dusty Rose Crochet Vest Pattern is a beautiful project for anyone who enjoys creating elegant handmade clothing. Its soft color, comfortable construction, and timeless design make it a versatile accessory for different seasons and occasions.
By following this step-by-step crochet vest tutorial, you can create a garment featuring a textured body, gently shaped V-neckline, comfortable armholes, and neatly finished borders.
One of the greatest advantages of this pattern is its adaptability. You can customize the vest’s length, size, yarn, and decorative details to create a garment that reflects your personal style.
The dusty rose color adds a romantic vintage touch, while the simple crochet stitches make the design accessible to crocheters who want to develop their garment-making skills.
Accurate measurements, consistent tension, careful seaming, and proper blocking are essential for achieving a professional-looking result.
Whether you are making this vest for yourself or as a special handmade gift, the Dusty Rose Crochet Vest Pattern offers a rewarding opportunity to transform beautiful yarn into a stylish, comfortable, and timeless piece of crochet fashion.