
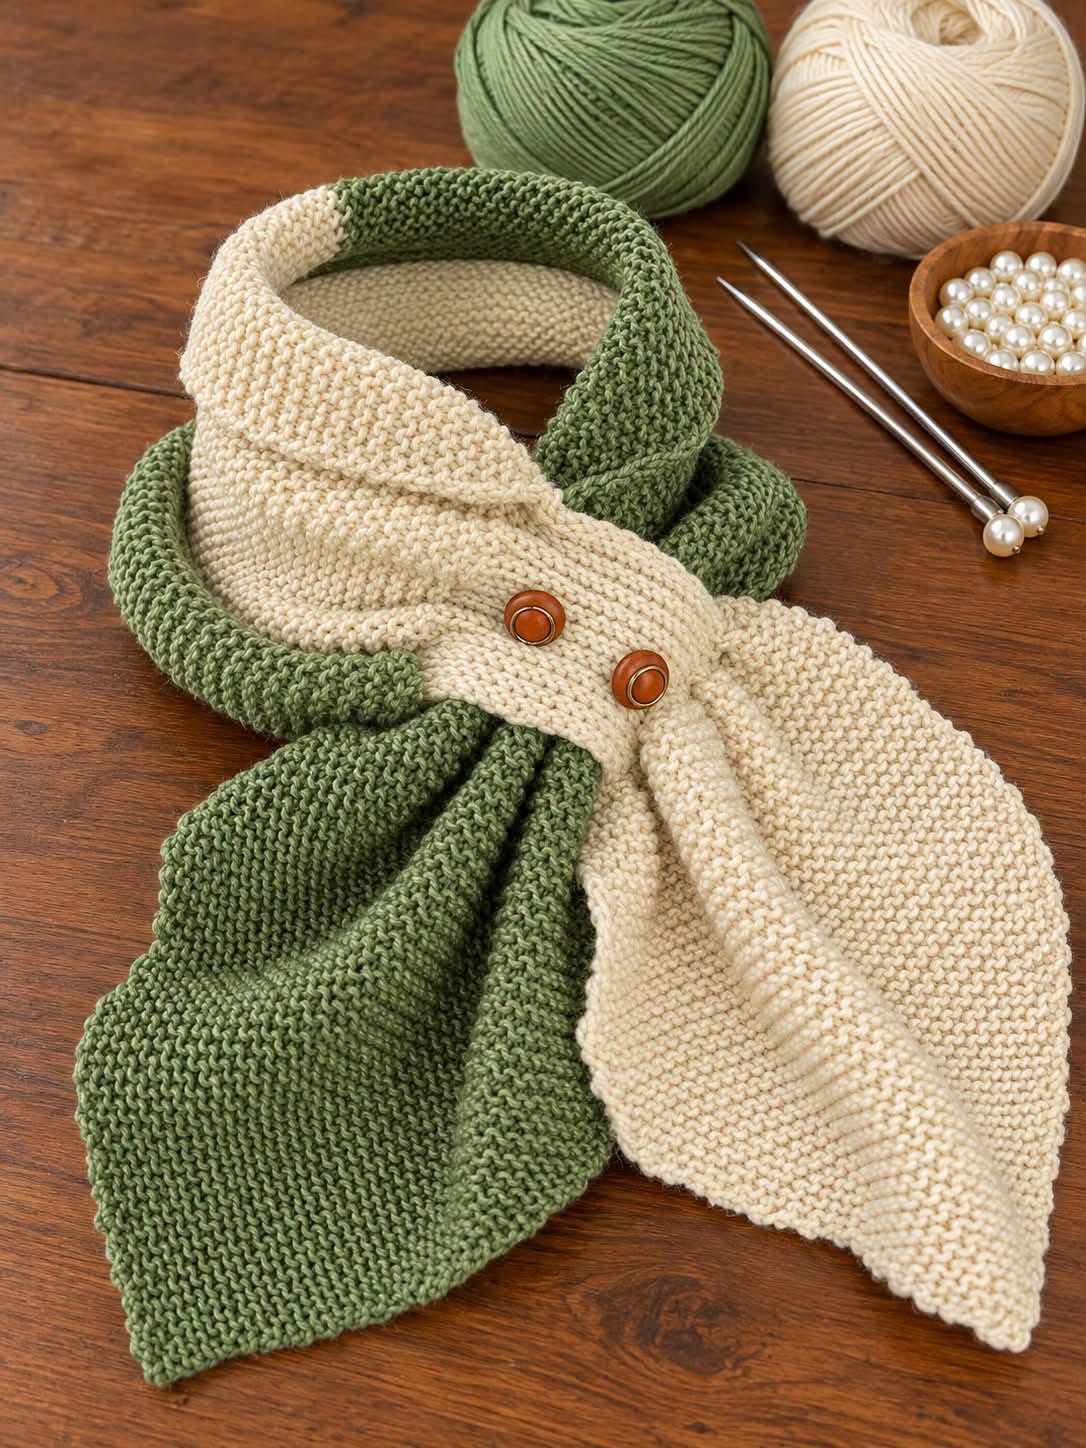
One of the most appealing features of this Leaf Scarf Pattern is its unique construction. The scarf combines a comfortable neck section with two broad, tapered ends that resemble natural leaves. The textured crochet stitches give the fabric a soft, cozy appearance, while the contrasting colors create visual interest without overwhelming the design. The buttons near the center help hold the scarf in position, allowing the leaf-shaped ends to drape gracefully over the chest. This makes the scarf especially suitable for autumn and winter outfits, although lighter yarn can transform it into a lovely accessory for spring. Whether worn with a coat, sweater, cardigan, or simple blouse, this handmade scarf can become a distinctive addition to any wardrobe.
Another wonderful advantage of this handmade leaf scarf is the opportunity to explore different crochet techniques while creating something functional. The project introduces gradual increases and decreases, textured stitches, color changes, shaped edges, and decorative finishing methods. Although the scarf looks intricate, its construction can be simplified into manageable stages, making it approachable for confident beginners and intermediate crocheters. In this tutorial, you will learn how to create an original leaf-inspired scarf based on the appearance of the reference image, including recommended materials, measurements, detailed crochet instructions, assembly techniques, and helpful finishing tips. With patience and attention to detail, you can create a beautiful two-tone crochet scarf that combines comfort, elegance, and handmade craftsmanship.
Materials, Measurements, and Crochet Techniques for the Leaf Scarf Pattern
1. Choosing the Best Yarn for Your Leaf Scarf
DISCOVER MORE FREE PATTERNS HERE!
Selecting the right yarn is one of the most important steps when making a Leaf Scarf Pattern. The scarf should feel soft against the neck while maintaining enough structure to display its leaf-shaped ends. A medium-weight yarn, commonly classified as worsted weight (Category 4), is an excellent choice for this project. Acrylic, cotton blends, or wool blends can all work well, depending on the season and the texture you prefer. A soft wool-acrylic blend provides warmth and flexibility, while a cotton blend creates a slightly more structured scarf suitable for milder weather. For a design inspired by the photograph, consider combining sage green with warm ivory or cream.
2. Materials and Supplies Needed
Before beginning your crochet leaf scarf, gather the following materials:
-
Approximately 180–220 yards (165–200 meters) of sage green worsted-weight yarn.
-
Approximately 180–220 yards (165–200 meters) of cream or ivory worsted-weight yarn.
-
A 5 mm (H/8) crochet hook.
-
Two decorative buttons, approximately 0.75–1 inch (19–25 mm) in diameter.
-
A tapestry needle for weaving in yarn ends.
-
Sharp scissors.
-
Stitch markers.
-
Measuring tape.
-
Matching sewing thread or yarn for attaching buttons.
-
Optional blocking mat and rust-resistant pins.
Choose buttons that complement the yarn colors. Wooden buttons, vintage-style buttons, and decorative resin buttons are especially attractive for nature-inspired accessories.
3. Recommended Scarf Measurements
The dimensions below are suggested for an adult-sized scarf. You can adjust them according to your preferred fit.
| Component | Approximate measurement |
|---|---|
| Total scarf length | 110–125 cm (43–49 in) |
| Narrow neck section width | 10–13 cm (4–5 in) |
| Widest leaf section | 20–24 cm (8–9.5 in) |
| Length of each leaf-shaped end | 35–42 cm (14–16.5 in) |
| Button diameter | 2–2.5 cm (0.75–1 in) |
| Suggested hook size | 5 mm (H/8) |
These measurements are approximate. The final size depends on yarn thickness, crochet tension, and the number of rows worked.
4. Understanding Crochet Gauge
Gauge helps ensure that your Leaf Scarf Pattern reaches the desired measurements. For worsted-weight yarn and a 5 mm hook, begin by making a small swatch using single crochet stitches. A useful starting gauge is approximately 14 stitches and 16 rows per 4 inches (10 cm), although your results may differ. If the fabric feels too stiff, try a larger hook. If it becomes too loose or stretches excessively, use a smaller hook. The ideal fabric should be flexible enough to drape comfortably while maintaining the curved shape of the leaves.
5. Essential Crochet Abbreviations
This tutorial uses U.S. crochet terminology.
| Abbreviation | Meaning |
|---|---|
| CH | Chain |
| SC | Single crochet |
| HDC | Half double crochet |
| DC | Double crochet |
| SL ST | Slip stitch |
| INC | Increase: 2 SC in the same stitch |
| DEC | Single crochet decrease |
| ST(S) | Stitch(es) |
| BLO | Back loop only |
| FLO | Front loop only |
| RS | Right side |
| WS | Wrong side |
| FO | Fasten off |
The instructions use a simple textured stitch pattern that produces a surface similar to the soft, raised texture visible in the reference image.
6. Understanding the Construction of the Leaf Scarf
This two-tone leaf scarf is worked as one continuous piece, beginning with the first leaf-shaped end, continuing through the narrow neck section, and finishing with the second leaf-shaped end. The leaves are formed through gradual increases and decreases that create pointed tips and wider rounded sections. The central neck section maintains a consistent width for comfortable wrapping. Decorative buttons are added after the main scarf is completed, allowing the overlapping leaves to stay in place. This construction minimizes complicated seams and makes the project easier to customize.
Step-by-Step Crochet Instructions for the Leaf Scarf Pattern
Step 1: Begin the First Leaf-Shaped End
Start with sage green yarn and your 5 mm crochet hook.
Row 1: CH 4. SC in the second chain from the hook and in each remaining chain. (3 SC)
Row 2: CH 1, turn. INC in the first stitch, SC in the next stitch, INC in the last stitch. (5 SC)
Row 3: CH 1, turn. SC in each stitch across. (5 SC)
Row 4: CH 1, turn. INC in the first stitch, SC across until one stitch remains, INC in the last stitch. (7 SC)
Continue repeating the increase row followed by one plain SC row. Each increase row adds two stitches, gradually widening the leaf. Continue until you reach approximately 29 stitches or your desired leaf width. The pointed beginning forms the tip of the leaf, while the expanding rows create its rounded body.
Step 2: Create the Textured Leaf Surface
Once the leaf reaches its widest point, begin working a textured stitch pattern. A simple variation of the moss stitch creates an attractive handmade appearance.
Texture Row 1: CH 1, turn. SC in the first stitch, CH 1, skip the next stitch, SC in the following stitch. Repeat across.
Texture Row 2: CH 1, turn. SC in the first stitch, then work CH 1, SC in the next chain-1 space across, ending with SC in the final stitch.
Repeat the second texture row for approximately 10–14 rows. The fabric will develop a slightly raised, flexible texture. Keep your tension consistent so the leaf remains smooth and symmetrical.
Step 3: Shape the Upper Section of the First Leaf
After completing the textured section, begin narrowing the leaf toward the neck portion.
Return to regular single crochet stitches for easier shaping.
Decrease Row: CH 1, turn. DEC over the first two stitches, SC across until two stitches remain, DEC over the final two stitches.
Next Row: CH 1, turn. SC in each stitch across.
Repeat these two rows until the scarf reaches approximately 17 stitches across.
This gradual decrease creates a smooth transition from the wide leaf to the narrower neck section. If you prefer a broader scarf, stop decreasing at 19 or 21 stitches.
Step 4: Crochet the Narrow Neck Section
Continue using sage green yarn to create the section that wraps comfortably around the neck.
Row 1: CH 1, turn. SC in each stitch across. (17 SC)
Rows 2–55: Repeat Row 1.
For additional texture, you may work every other row in BLO. This creates subtle horizontal ridges that resemble the fabric texture shown in the reference image.
Measure the neck section as you work. The goal is to create enough length for the scarf to wrap comfortably without feeling tight. Adjust the number of rows according to your preferred fit.
Step 5: Change Colors for the Second Leaf
When the neck section reaches the desired length, change from sage green to cream yarn.
On the final stitch of the previous row, insert your hook, yarn over, and pull up a loop. Complete the stitch using the new cream yarn.
Continue working with the cream yarn.
Row 1: CH 1, turn. SC in each stitch across. (17 SC)
Row 2: CH 1, turn. INC in the first stitch, SC across until one stitch remains, INC in the final stitch. (19 SC)
Row 3: CH 1, turn. SC in each stitch across. (19 SC)
Repeat the increase row followed by one plain row until the second leaf reaches the same maximum width as the first leaf.
Step 6: Finish the Second Leaf Shape
After reaching the desired width, work approximately 10–14 textured rows using the moss stitch technique described earlier.
Then begin narrowing the leaf toward its pointed tip.
Decrease Row: CH 1, turn. DEC over the first two stitches, SC across until two stitches remain, DEC over the final two stitches.
Next Row: CH 1, turn. SC in each stitch across.
Repeat until only three stitches remain.
Work one final row of three SC, then fasten off.
The second leaf should resemble the first in size and shape, with the main difference being its contrasting cream color. Lay both ends flat and compare them before proceeding to the finishing stage.
Adding Decorative Buttons, Leaf Details, and Professional Finishing
1. Creating a Beautiful Crochet Border
A neat border helps give the Leaf Scarf Pattern a polished appearance. Attach matching yarn at the edge of the first leaf and work SC stitches evenly around its perimeter. Place additional stitches along curved areas to prevent pulling, but avoid adding too many stitches because this may cause the edges to ripple. At the pointed tip, work three SC into the same stitch to create a smooth point. Repeat the process around the second leaf. You may also add a subtle contrasting border using the opposite yarn color for a more decorative finish.
2. Adding a Decorative Leaf Vein
To emphasize the nature-inspired design, create a raised leaf vein using surface crochet. With the leaf lying flat, attach yarn near the pointed tip and work slip stitches along the center toward the wider section. Follow a gentle curved line to resemble the natural vein of a leaf. For additional detail, add two or three shorter diagonal lines extending from the central vein toward the edges. These decorative stitches are optional, but they can make the crochet leaf scarf look more realistic and visually interesting.
3. Positioning the Decorative Buttons
The reference image features two beautiful buttons near the overlapping center of the scarf. To achieve a similar appearance, wrap the finished scarf around your neck and position the two leaf-shaped ends so they overlap comfortably. Mark the preferred button positions with stitch markers. Remove the scarf and sew the buttons securely to the lower overlapping layer. The upper layer can be fastened through carefully created crochet buttonholes or small spaces reinforced with matching yarn. Make sure the buttons are securely attached and that the fastening does not pull excessively on the crochet fabric.
4. Creating Optional Buttonholes
If you want functional buttonholes, they can be incorporated into the overlapping leaf section. Choose the row where the buttonhole should appear and replace two or three SC stitches with an equivalent chain space.
For example:
Buttonhole Row: SC across until reaching the marked position, CH 2, skip 2 stitches, then continue working SC across.
On the following row, work two SC into the chain space.
Test the opening with your chosen button before continuing. If the buttonhole is too loose, reduce the chain space or reinforce its edges with slip stitches. If it is too tight, increase the opening slightly.
5. Blocking the Finished Scarf
Blocking can improve the shape and drape of your handmade leaf scarf. If your yarn is suitable for wet blocking, gently dampen the scarf and remove excess water without twisting. Lay it flat on a clean towel or blocking mat. Shape the leaf ends carefully, making sure both tips are symmetrical. Use rust-resistant pins to hold the edges in place while drying. For acrylic yarn, follow the manufacturer’s care instructions and avoid excessive heat. Proper blocking can help the leaves lie smoothly and give the finished accessory a more professional appearance.
6. Customizing the Scarf with Different Colors and Textures
The Leaf Scarf Pattern offers many opportunities for customization. Sage green and cream create a soft, sophisticated look, but other combinations can be equally attractive. Burgundy and beige provide a warm autumn-inspired appearance, while navy blue and gray create a classic winter accessory. For a delicate feminine style, consider dusty rose and ivory. You can also experiment with different textured stitches, such as seed stitch-inspired crochet, half double crochet in the back loop, or alternating rows of SC and HDC. Each variation changes the scarf’s appearance while preserving its distinctive leaf-shaped construction.
Tips for Making, Wearing, and Caring for Your Crochet Leaf Scarf
1. Choosing the Right Size for Different Wearers
The Leaf Scarf Pattern can be adapted for different ages and body sizes. For a smaller scarf, reduce the number of increase rows and shorten the neck section. For a larger adult scarf, increase the maximum leaf width and add additional rows to the central section. Always measure the intended wearer when possible. A comfortable scarf should rest gently around the neck without excessive pressure. Because the leaf ends overlap, the final length may differ from that of a traditional rectangular scarf.
2. Selecting Yarn for Different Seasons
Yarn choice can transform this design into an accessory suitable for different weather conditions. For winter, choose a soft wool blend or warm acrylic yarn. For autumn, cotton-acrylic blends provide comfort without excessive bulk. Lightweight cotton yarn can create a breathable version for spring. When changing yarn weight, remember to adjust the hook size and stitch counts accordingly. A thinner yarn will produce smaller leaves unless additional increases and rows are added.
3. Avoiding Common Crochet Mistakes
One of the most common mistakes when making a crochet leaf scarf is inconsistent stitch tension. Uneven tension can cause the leaf edges to curl or become asymmetrical. Another issue is forgetting to count stitches during the increase and decrease sections. Use stitch markers and check your stitch count regularly. When changing colors, secure the yarn ends carefully to prevent unraveling. Finally, avoid attaching buttons before testing the scarf’s fit, because incorrect button placement can affect how the leaves overlap.
4. Styling Your Handmade Leaf Scarf
This scarf can be styled in several attractive ways. For a classic look, wear it over a neutral sweater with the leaf ends overlapping at the front. For a more decorative appearance, position one leaf slightly higher than the other to create an asymmetrical effect. The scarf also pairs beautifully with wool coats, cardigans, and knitted dresses. Its nature-inspired design makes it especially suitable for autumn outfits, while lighter colors can complement spring wardrobes.
5. Caring for Your Finished Crochet Scarf
Proper care helps preserve the texture and shape of your Leaf Scarf Pattern. Always follow the yarn manufacturer’s washing recommendations. For delicate handmade scarves, gentle hand washing in cool water with mild detergent is often a suitable option. Avoid wringing or twisting the fabric. Instead, press out excess water with a clean towel and lay the scarf flat to dry. Store it folded rather than hanging for long periods, as hanging may stretch the neck section or distort the leaf-shaped ends.
6. Turning the Leaf Scarf into a Thoughtful Handmade Gift
A handmade crochet leaf scarf makes a wonderful gift for birthdays, holidays, Mother’s Day, or special occasions. Its unusual design adds a personal touch that distinguishes it from ordinary store-bought accessories. Choose colors that reflect the recipient’s preferences and consider adding decorative buttons that match their style. You can also create matching accessories, such as a crochet leaf brooch, headband, or small handbag charm. A carefully finished scarf presented in simple gift packaging can become a meaningful handmade keepsake.
Frequently Asked Questions About the Leaf Scarf Pattern
Is the Leaf Scarf Pattern suitable for beginners?
Yes. Confident beginners who understand basic crochet stitches, increases, and decreases can complete this project. The leaf shaping requires attention to stitch counts, but the overall construction is straightforward.
What is the best yarn for a crochet leaf scarf?
Soft worsted-weight yarn is an excellent choice. Wool blends, acrylic yarn, and cotton blends can all work well depending on the desired warmth and drape.
How much yarn do I need for the Leaf Scarf Pattern?
Approximately 360–440 yards (330–400 meters) of yarn in total is a useful estimate for an adult-sized scarf. Actual yarn consumption depends on stitch tension, dimensions, and yarn thickness.
What crochet hook size should I use?
A 5 mm crochet hook is recommended for worsted-weight yarn, although you may need to adjust the size to achieve the desired texture.
Can I make the scarf without buttons?
Yes. The scarf can be worn with the leaf ends loosely overlapping, or you can use a decorative brooch or removable scarf pin to hold them together.
How do I make the leaf ends more pointed?
Use gradual increases at the beginning and gradual decreases at the end. Working one plain row between shaping rows creates a smoother, more elongated leaf shape.
Can I crochet this scarf in one color?
Absolutely. A single-color scarf can look elegant and allows the leaf texture to become the main decorative feature.
How long does it take to crochet a leaf scarf?
Depending on your experience, the yarn, and the scarf’s dimensions, the project may take approximately 6–10 hours.
Can I use chunky yarn for this pattern?
Yes, but chunky yarn will create a thicker, larger scarf. Reduce the stitch counts or use a smaller number of shaping rows if necessary.
Why are the edges of my leaf scarf curling?
Curling may result from tight tension, uneven increases, or an insufficient number of stitches along the border. Blocking can help improve the shape.
How can I make the scarf softer?
Choose a soft yarn suitable for garments, avoid overly tight stitches, and use a hook size that produces a flexible fabric.
Can I add decorative embroidery to the leaves?
Yes. Surface crochet, simple embroidery, and decorative leaf veins can enhance the nature-inspired appearance.
How do I adjust the scarf for a larger neck size?
Add more rows to the narrow neck section before beginning the second leaf. Test the fit before completing the scarf.
Is the Leaf Scarf Pattern a good handmade gift?
Yes. Its unusual design, comfortable fit, and customizable colors make it an attractive handmade gift for many occasions.
Can I sell scarves made using this tutorial?
You can generally sell handmade scarves made from these instructions, subject to applicable laws and any relevant third-party intellectual property rights.
Conclusion
The Leaf Scarf Pattern is a charming crochet project that combines creativity, comfort, and nature-inspired elegance. Its distinctive leaf-shaped ends, soft textured stitches, and beautiful color combinations make it an appealing alternative to traditional scarves. Whether you choose sage green and cream like the reference image or experiment with your own favorite colors, the finished accessory can become a stylish addition to your handmade wardrobe.
By following this step-by-step crochet leaf scarf tutorial, you can practice important crochet techniques such as increasing, decreasing, shaping, color changing, and decorative finishing. Each stage contributes to the final appearance, from the pointed leaf tips to the comfortable neck section and carefully positioned buttons.
The beauty of this project lies in its versatility. You can adjust the measurements, experiment with different yarn weights, add decorative leaf veins, or personalize the design with unique buttons. These simple changes allow you to create a scarf that reflects your individual style while maintaining the recognizable leaf-inspired shape.
With careful stitching, thoughtful finishing, and a little creativity, your handmade crochet leaf scarf can become a beautiful accessory, a meaningful gift, or a treasured addition to your collection of crochet projects. The finished scarf is a reminder that even simple crochet techniques can produce elegant, imaginative designs inspired by the natural world.