
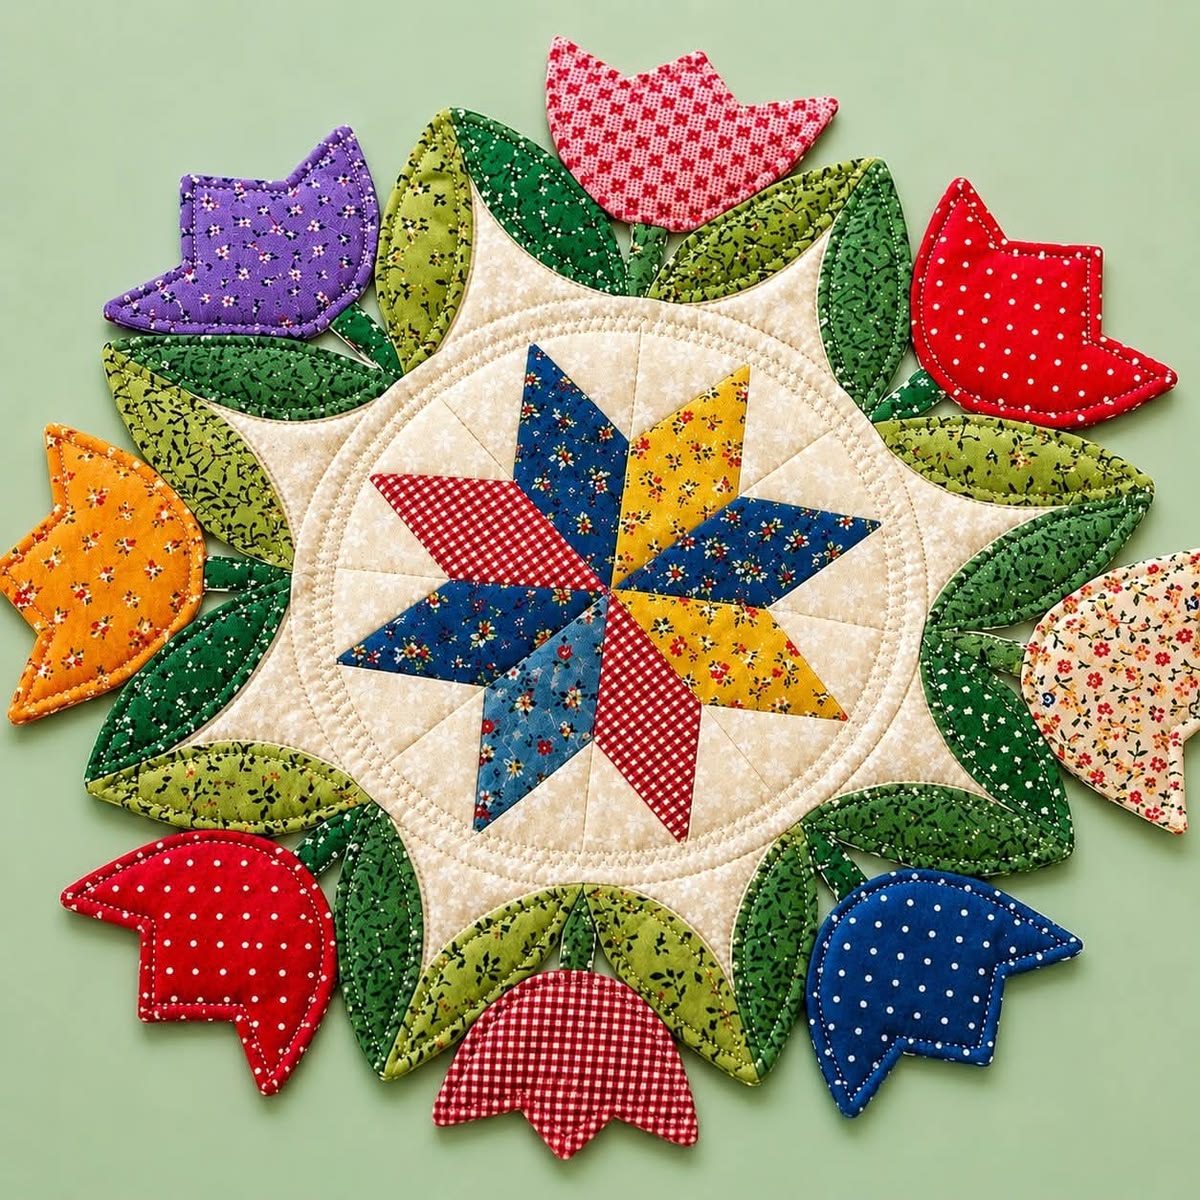
Tulip Star Quilted Table Mat is a delightful quilting project that combines the timeless beauty of a classic star block with colorful tulip appliqués to create a stunning centerpiece for your dining or coffee table. Whether you’re decorating for spring, celebrating Easter, or simply adding cheerful handmade accents to your home, this Tulip Star Quilted Table Mat offers the perfect balance of traditional piecing and decorative appliqué. The finished design showcases vibrant flowers surrounding a striking geometric star, making it an eye-catching project for quilters of all skill levels.
One of the greatest advantages of sewing a Tulip Star Quilted Table Mat is the opportunity to experiment with color. Bright tulips, fresh green leaves, soft cream backgrounds, and colorful star points allow endless combinations that can match every season or home décor style. You can create a bold modern version using vibrant fabrics or choose soft floral prints for a charming cottage-inspired appearance. Every fabric selection transforms the finished table mat into a completely unique handmade creation.
Although the completed project looks highly detailed, the construction process is straightforward when approached step by step. Throughout this tutorial, you’ll learn how to choose fabrics, prepare the star block, cut the tulip appliqués, assemble the background wedges, attach the decorative flowers and leaves, quilt the layers together, bind the edges, and complete a beautiful Tulip Star Quilted Table Mat using traditional quilting techniques suitable for beginners and experienced quilters alike.
Choosing Fabrics and Preparing Your Tulip Star Quilted Table Mat
The beauty of the Tulip Star Quilted Table Mat begins with thoughtful fabric selection. Quilting cotton is the preferred choice because it presses beautifully, maintains crisp shapes, and provides excellent durability for everyday home décor.
DISCOVER MORE FREE PATTERNS HERE!
Select several coordinating fabrics for the star points. Rich blues, warm reds, golden yellows, soft oranges, or floral prints create beautiful contrast while maintaining the traditional quilt appearance. Scrappy combinations also work wonderfully if you enjoy using leftover fabric pieces from previous quilting projects.
Choose fresh green fabrics for the leaves. Mixing multiple shades of green creates natural variation and gives the finished tulips greater depth and realism. Small floral prints, tone-on-tone fabrics, and textured greens all blend beautifully.
The background fabric should provide enough contrast for the star and flowers to stand out clearly. Cream, ivory, soft beige, or pale neutral prints help highlight every colorful element without overwhelming the design.
Gather all necessary quilting supplies before beginning. You’ll need rotary cutter, cutting mat, quilting ruler, fabric scissors, sewing clips, pins, coordinating thread, sewing machine, iron, pressing board, quilting batting, backing fabric, and temporary fabric glue if desired for appliqué placement.
Before cutting any fabric, wash, dry, and press each piece thoroughly. Prewashing removes shrinkage while careful pressing ensures accurate cutting and precise seam alignment throughout the Tulip Star Quilted Table Mat.
Piecing the Center Star and Background
Begin the Tulip Star Quilted Table Mat by cutting all diamond-shaped pieces for the central star according to your pattern measurements. Organize the fabrics before sewing to maintain a balanced color distribution around the finished block.
Pair the diamond units carefully, sewing with a consistent quarter-inch seam allowance. Accurate seam allowances are essential because even slight variations become noticeable when assembling multiple points into a circular star.
Press each seam immediately after stitching. Many quilters prefer pressing seams open for flatter construction, while others press toward the darker fabric depending on their preferred quilting method.
Once each star unit has been assembled, join the sections gradually until the complete star is formed. Check alignment frequently to ensure every point meets neatly in the center without distortion.
Next, prepare the surrounding background wedges. These sections create the circular layout that frames the central star while providing space for the decorative tulips around the outer edge.
Join the background wedges to the completed star, pressing each seam carefully to preserve the circular shape. The completed center now forms the foundation of your Tulip Star Quilted Table Mat.
Adding Tulip Appliqués and Quilting the Layers
The cheerful tulips are the signature feature of the Tulip Star Quilted Table Mat. Begin by cutting all tulip flower shapes and matching leaf pieces from your selected fabrics using the pattern templates.
Prepare the appliqué pieces using your preferred method. Fusible web appliqué offers excellent precision, while needle-turn appliqué provides a traditional handmade appearance. Both techniques produce beautiful results when sewn carefully.
Arrange the leaves first around the outer edge of the mat, spacing them evenly to create visual balance. Once satisfied with the layout, position each tulip flower above its pair of leaves before securing everything temporarily.
Attach the appliqués using a narrow zigzag stitch, blanket stitch, invisible machine appliqué stitch, or hand stitching depending on your preferred finishing style. Consistent stitching enhances both durability and appearance.
Layer the quilt top with batting and backing fabric. Smooth every layer carefully, removing wrinkles before basting with pins, temporary adhesive, or hand basting stitches.
Quilt the Tulip Star Quilted Table Mat using echo quilting around the star, gentle curves surrounding the tulips, or simple straight-line quilting that complements the geometric design without overpowering the appliqué work.
Binding, Finishing, and Decorating Your Home
After quilting is complete, trim the edges evenly while maintaining the circular shape of the table mat. Accurate trimming makes attaching the binding much easier.
Prepare continuous bias binding for the curved edges. Bias binding naturally follows rounded shapes more smoothly than straight-grain binding, resulting in a polished professional finish.
Attach the binding slowly around the perimeter, easing the fabric gently around each curve. Careful stitching prevents puckers while maintaining smooth, even edges throughout the project.
Once the binding has been completed, inspect the entire mat for loose threads or missed stitching. A final pressing enhances the quilted texture and gives the Tulip Star Quilted Table Mat its finished appearance.
This versatile project can decorate dining tables, kitchen islands, coffee tables, side tables, or entryway consoles. It also makes a thoughtful handmade gift for birthdays, Mother’s Day, Easter, housewarmings, bridal showers, or spring celebrations.
Store the finished table mat flat whenever possible to preserve its shape. Proper storage helps maintain crisp appliqué edges and keeps the quilting smooth for many years of seasonal decorating.
Frequently Asked Questions
Is the Tulip Star Quilted Table Mat suitable for beginners?
Yes. Beginners with basic quilting experience can successfully complete this project by following the construction process step by step.
What fabrics work best?
High-quality quilting cotton is the most recommended fabric because it provides excellent stitch definition and durability.
Can I change the flower colors?
Absolutely. Tulips can be sewn in red, yellow, purple, pink, orange, white, or any seasonal color combination you prefer.
Should I use fusible appliqué or hand appliqué?
Both methods work beautifully. Fusible appliqué is faster, while hand appliqué offers a classic heirloom finish.
What batting should I use?
Lightweight cotton or cotton-polyester blend batting provides enough structure while allowing the table mat to lie flat.
Can I enlarge the pattern?
Yes. Simply scale each template proportionally to create a larger centerpiece or table topper.
Is this project suitable as a gift?
Definitely. Handmade table mats are thoughtful gifts for quilters, gardeners, spring celebrations, weddings, birthdays, and housewarming occasions.
How should I wash the finished table mat?
Machine wash gently using mild detergent, reshape while damp if necessary, and press with a warm iron to maintain its beautiful appearance.
Conclusion
The Tulip Star Quilted Table Mat is a charming quilting project that beautifully combines traditional star piecing with cheerful tulip appliqué to create a timeless handmade decoration. Throughout this tutorial, you’ve learned how to choose coordinating fabrics, piece the central star, prepare the background wedges, attach decorative tulips and leaves, quilt the layered project, bind the curved edges, and complete a stunning table mat that celebrates both classic quilting and seasonal beauty.
Whether you’re decorating your own home, creating thoughtful handmade gifts, or expanding your quilting skills with decorative appliqué techniques, the Tulip Star Quilted Table Mat offers endless opportunities for creativity while producing a beautiful project that can be enjoyed year after year.
If you enjoyed this Tulip Star Quilted Table Mat tutorial, we would truly love to hear your honest opinion. Please share your quilting experience, tell us how your project turned out, and leave your suggestions for future quilting tutorials. Your feedback inspires new ideas and helps our handmade quilting community continue to grow.